
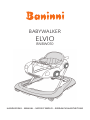
HANDLEIDING - MANUAL - MODE D’EMPLOI - GEBRAUCHSHANTLEITUNG
BABYWALKER
ELVIO
BNBW010

NL Nederlands
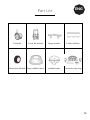
Onderdelenlijst 3
Waarschuwingen 4
Montage procedure 6
Hoe de hoogte van de 9
wandelaar instellen
Hoe vouw je de wandelaar op 10
Gebruik van elektronisch 10
speelstukjesbakje
Onderhoud en reiniging 11
BELANGRIJK: VOOR HET GEBRUIK LEEST U DEZE HANDLEIDING
AANDACHTIG DOOR OM DE VEILIGHEID VAN UW KIND NIET OP HET
SPEL TE ZETTEN. BEWAAR ZE OM ZE OOK IN DE TOEKOMST TE KUNNEN
RAADPLEGEN. HET KIND KAN ZICH BEZEREN ALS U ZICH NIET AAN DEZE
INSTRUCTIES HOUDT.
LET OP: VERWIJDER VOOR HET GEBRUIK EVENTUELE PLASTIC ZAKKEN EN
ALLE ANDERE VERPAKKINGSONDERDELEN EN GOOI ZE WEG OF HOUD ZE
IN IEDER GEVAL BUITEN HET BEREIK VAN KINDEREN.
Blokkeer trappen, open
haarden, oneven oppervlaktes
veilig voordat u het
loopstoeltje gebruikt.
WAARSCHUWING
2

NL
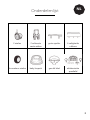
Onderdelenlijst
2 achterste
vaste wielen
6 veiligheids
rubbers
grote spoiler
3
2 wielen
decoratieve wielen baby looprek gevuld blad elektronische
speeltafel

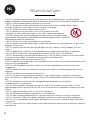
NL Waarschuwingen
4

NL
Waarschuwingen
Elektronisch speelblad:
٠
Het speelblad reinigen en onderhouden:
Batterijen:
5

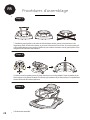
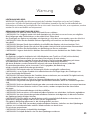
NL Montage procedure
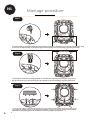
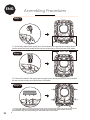
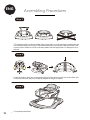
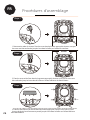
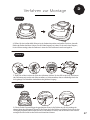
3. Fix the safe rubbers in the appropriate housings. Ensure that the safe rubbers are firmly pushed all the
way into the housing on the down base of the walker.
Assembling Procedures
1. Turn the baby walker frame upside down. Fix the wheels in the appropriate housings. Ensure that the
wheels are firmly pushed all the way into the housing on the down base of the walker.
2. Fix the rear fix wheels in the appropriate housings. Ensure that the wheels are firmly pushed all the way
into the housing on the down base of the walker.
Front Side
Back Side
Step 2
Step 3
Step 1
1. Draai het baby looprekje ondersteboven. Bevestig de wielen in de daarvoor bestemde behuizingen. Zorg
ervoor dat de wielen stevig in de behuizing aan de onderkant van de loopwagen worden geschoven.
2. Bevestig de achterste bevestigingswielen in de daarvoor bestemde behuizingen. Zorg ervoor
dat de wielen stevig in de behuizing aan de onderkant van de loopwagen worden geschoven.
3. Bevestig de veilige rubbers in de juiste behuizingen. Zorg ervoor dat de veilige rubbers stevig
helemaal in de behuizing aan de onderkant van de loopwagen zijn geduwd.
Achterzijde
Voorzijde
Stap 1
Stap 2
Stap 3
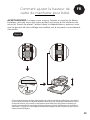
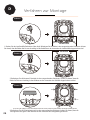
6

NL
Montage procedure
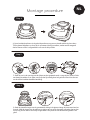
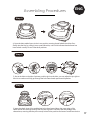
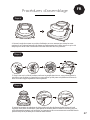
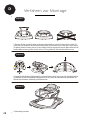
4. Open the baby walker frame in the in-use posion, ensuring that all wheels touch the floor. Slowly raise
the tray by polling it in an upward direcon, unl a click indicates that the frame has been locked
correctly in one of the three posions.
Step 5
Step 4
Step 6
6. Insert the plasc rings of the padded seat in the slots located along the upper edge of the walker frame.
Pass the rings through the slots and tug them unl they clear the passage, then release them, ensuring
that they are correctly locked in the posion and cannot recede into the slot.
5.
Aim at the hole on the side of upbase, push the pin into the hole, you may adjust the pin right or le a bit
to make sure it fully get through the hole. Rest wheels repeat same operaon.
4. Open het babyloopframe in de gebruikspositie en zorg ervoor dat alle wielen de vloer raken.
Til het plateau langzaam op door het in opwaartse richting te trekken, totdat een klik aangeeft
dat het frame correct is vergrendeld in een van de drie posities.
6. Steek de plastieke ringen van de gewatteerde zitting in de gleuven langs de bovenrand van het
looprek. Haal de ringen door de gleuven en trek er aan tot ze de doorgang vrijmaken, laat ze dan
los en zorg ervoor dat ze correct zijn vergrendeld in de positie en niet kunnen terugvallen in de
gleuf.
5. Steek de pen in de opening aan de zijkant van de opstaande rand, u mag de pen rechts of links
een beetje verstellen om er zeker van te zijn dat hij volledig door het gat heen komt.Voor de rest
van de wielen herhalen dezelfde handeling.
Stap 6
Stap 5
Stap 4

NL
8
Assembling Procedures
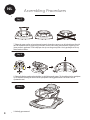
7. Fit the large spoiler on the rear walker frame; simply place it on the housings, located at the rear of the
backrest, and push it firmly in a downward direcon, ensuring that it has been fied in the correct
posion. Please do not li up baby walker with large spoiler. It is dangerous do in this way.
Step 7
Step 8
Step 9
8. Insert all small toy parts into corresponding holes. Put the electronic play tray on the dinner tray.
Confirm the electronic play tray completely clasped the edges of upbase.
9. Completely assembled.
7. Plaats de grote spoiler op het achterste looprek, plaats hem gewoon op de behuizingen, die zich
aan de achterkant van de rugleuning bevinden, en duw hem stevig naar beneden, zodat hij in de
juiste positie is geplaatst. Til de babyloper niet op met de grote spoiler. Het is gevaarlijk om dit op
deze manier te doen.
8. Plaats alle kleine speelgoedonderdelen in de bijbehorende gaten. Zet de elektronische speelplaat
op de eettafel. Bevestig de elektronische speelplaat volledig geklemd aan de randen van de
opstaande rand.
9. Volledig gemonteerd.
Stap 7
Stap 8
Stap 9

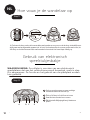
NL
Hoe de hoogte van de
wandelaar instellen
WAARSCHUWING: Zorg er bij het openen, sluiten of afstellen van de
rollator voor dat uw kind zich op een veilige afstand bevindt. Voordat
u het kind in het looprek plaatst, moet u zich ervan vergewissen dat de
secundaire vergrendelknop weer correct is vergrendeld.
Step 10
10. To adjust the seat’s height, remove the child from the baby walking frame, pull up the safe buon
located under the small tray table and rotate it to 90 degrees. keep the safe buon pressed, then
raise or lower the small table unl the desired posion is reached, then pull up the safe buon and
rotate it to 90 degrees again to lock the small table.(If it is a automac secondary lock, please make
sure the lock rotated to 90 degrees.)
9. Om het zitje in hoogte te verstellen, haalt u het kind uit het looprek, trekt u de kluisknop onder
het tafeltje omhoog en draait u het tot 90 graden. Houd de veilige knop ingedrukt, til dan de kleine
tafel op of laat hem zakken tot de gewenste positie is bereikt, trek dan de veilige knop omhoog en
draai hem weer tot 90 graden om de kleine tafel te vergrendelen. (Als het een automatische secun-
daire vergrendeling is, zorg er dan voor dat de vergrendeling tot 90 graden is gedraaid).
Stap 9
9

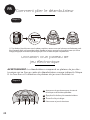
NL
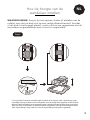
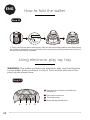
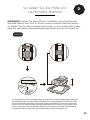
The front
press
Step 11
Step 12
11. Firstly, pull down the buon under top tray, make sure the buon finally parallel to the
adjusted-device(see 1st picture). Meanwhile, press up the front poson(see 2nd picture), and
press down the top base ll the end. The frame folds up completely.
The walker includes one electronic play tray that aaches to the walker frame as
shown in step 8. The funcon and use of the play tray are shown here.
A B C D
A
B
C
D
Press big buons to listen to splendid
music and lights up
Press buon to hear horn
Turn wheel to steer
Rotate and play rearview mirrors
Hoe vouw je de wandelaar op
Gebruik van elektronisch
speelstukjesbakje
The front
press
Step 11
Step 12
11. Firstly, pull down the buon under top tray, make sure the buon finally parallel to the
adjusted-device(see 1st picture). Meanwhile, press up the front poson(see 2nd picture), and
press down the top base ll the end. The frame folds up completely.
The walker includes one electronic play tray that aaches to the walker frame as
shown in step 8. The funcon and use of the play tray are shown here.
A B C D
A
B
C
D
Press big buons to listen to splendid
music and lights up
Press buon to hear horn
Turn wheel to steer
Rotate and play rearview mirrors
WAARSCHUWING: De rollator is voorzien van een elektronisch
speelplateau dat aan het rollatorframe wordt bevestigd, zoals in stap
8 is aangegeven. De functie en het gebruik van de speelplaat worden
hier getoond.
10. Trek eerst de knop onder de bovenste lade naar beneden en zorg ervoor dat de knop uiteindelijk even-
wijdig staat aan het afgestelde apparaat (zie 1e foto). Druk ondertussen de voorste positie naar boven (zie
2de foto), en druk de bovenste basis naar beneden tot het einde. Het frame klapt volledig op.
Stap 11
Stap 12
10
Druk op grote knoppen om naar prachtige
muziek te luisteren en het licht op.
Druk op de knop om de hoorn te horen
Draai aan het stuurwiel om te sturen
Met de achteruitkijkspiegel kan je draaien en
spelen

NL
Onderhoud & reiniging
• Dit artikel heeft geregeld onderhoud nodig. Reinigings- en
onderhoudswerkzaamheden mogen alleen door een volwassene worden
verricht.
• Reinig de stof, de kunststof delen, inclusief de stoppers, met een vochtige
doek.
• Gebruik voor de reiniging geen schuur- of oplosmiddelen.
• Droog de metalen delen af, om roestvorming te voorkomen.
11
Garantie
• Wij geven 2 jaar garantie op dit product vanaf de datum van aankoop.
Binnen de garantieperiode zullen wij eventuele gebreken aan het apparaat
als gevolg van materiaal- of fabricagefouten elimineren, hetzij door het
complete product te repareren of te vervangen.
• Deze garantie dekt niet: schade als gevolg van onjuist gebruik, normale
slijtage of gebruik, alsmede gebreken die een verwaarloosbaar eect
hebben op de waarde of werking van het product. Schade als gevolg van
overbelasting of verkeerd gebruik wordt niet vergoed.
• Om service te verkrijgen binnen de garantieperiode, dient u het volledige
product in te leveren met uw kassabon naar de winkel waar het product is
gekocht geweest.
• De garantie geldt alleen voor de eerste eigenaar en is niet overdraagbaar.

ENG ENGLISH
IMPORTANT: READ THE INSTRUCTIONS CAREFULLY BEFORE USE AND
KEEP THEM FOR FUTURE REFERENCE .
THE CHILD MAY BE HURT IF YOU DO NOT FOLLOW THESE
INSTRUCTIONS
WARNING: BEFORE FIRST USE, REMOVE AND DISPOSE
OF ALL PLASTIC BAGS AND PACKAGING MATERIALS
AND KEEP THEM OUT OF REACH OF CHILDREN.
Block stairs, fireplaces,
uneven surfaces safely before
using the baby walker.
Part list 13
Warning 14
Assembling procedures 16
How to adjust the height 19
of baby walker frame
How to fold the walker 20
Using electronic play toy tray 20
Care and maintenance 21
WARNING
12

ENG
Part List
2 wheels
decorative wheels
2 rear x wheels
baby walker frame
large spoiler 6 safe rubbers
padded seat electronic play-tray
13

ENG Warning
14

ENG
ELECTRONIC TOY
WARNING: Check the product regularly for signs of wear and damage and to ensure that it is
assembled correctly. If you notice any damage or malfunctions, keep the product
out of reach of children, do not use it, do not attempt to repair it and contact qualified service
centres only.
CARE AND MAINTENANCE OF THE TOY:
B AT T ER I ES
Warning
15

ENG Assembling Procedures
3. Fix the safe rubbers in the appropriate housings. Ensure that the safe rubbers are firmly pushed all the
way into the housing on the down base of the walker.
Assembling Procedures
1. Turn the baby walker frame upside down. Fix the wheels in the appropriate housings. Ensure that the
wheels are firmly pushed all the way into the housing on the down base of the walker.
2. Fix the rear fix wheels in the appropriate housings. Ensure that the wheels are firmly pushed all the way
into the housing on the down base of the walker.
Front Side
Back Side
Step 2
Step 3
Step 1
1. Turn the baby walker frame upside down. Fix the wheels in the appropriate housings. Ensure
that the wheels are rmly pushed all the way into the housing on the down base of the walker
2. Fix the rear x wheels in the appropriate housings. Ensure that the wheels are rmly pushed all
the way into the housing on the down base of the walker.
3. Fix the safe rubbers in the appropriate housings. Ensure that the safe rubbers are rmly
pushed all the way into the housing on the down base of the walker.
Back Side
16

ENG
Assembling Procedures
4. Open the baby walker frame in the in-use posion, ensuring that all wheels touch the floor. Slowly raise
the tray by polling it in an upward direcon, unl a click indicates that the frame has been locked
correctly in one of the three posions.
Step 5
Step 4
Step 6
6. Insert the plasc rings of the padded seat in the slots located along the upper edge of the walker frame.
Pass the rings through the slots and tug them unl they clear the passage, then release them, ensuring
that they are correctly locked in the posion and cannot recede into the slot.
5.
Aim at the hole on the side of upbase, push the pin into the hole, you may adjust the pin right or le a bit
to make sure it fully get through the hole. Rest wheels repeat same operaon.
4. Open the baby walker frame in the in-use position, ensuring that all wheels touch the oor.
Slowly raise the tray by polling it in an upward direction, until a click indicates that the frame has
been locked correctly in one of the three positions.
6. Insert the plastic rings of the padded seat in the slots located along the upper edge of the
walker frame. Pass the rings through the slots and tug them until they clear the passage, then
release them, ensuring that they are correctly locked in the position and cannot recede into the slot.
5. Aim at the hole on the side of upbase, push the pin into the hole, you may adjust the pin right or
left a bit to make sure it fully get through the hole. Rest wheels repeat same operation.
17

ENG Assembling Procedures
7. Fit the large spoiler on the rear walker frame; simply place it on the housings, located at the rear of the
backrest, and push it firmly in a downward direcon, ensuring that it has been fied in the correct
posion. Please do not li up baby walker with large spoiler. It is dangerous do in this way.
Step 7
Step 8
Step 9
8. Insert all small toy parts into corresponding holes. Put the electronic play tray on the dinner tray.
Confirm the electronic play tray completely clasped the edges of upbase.
9. Completely assembled.
7. Fit the large spoiler on the rear walker frame, simply place it on the housings, located at the rear
of the backrest, and push it rmly in a downward direction, ensuring that it has been tted in the
correct position. Please do not lift up the baby walker with the large spoiler. It is dangerous do in
this way.
8. Inset all small toy parts into corresponding holes. Put the electronic play tray on the dinner tray.
Conrm the electronic play tray completely clasped the edges of upbase.
9. Completely assembled.
18

ENG
How to adjust the height of
baby walker frame
WARNING: When opening, closing or adjusting the walker, ensure that
your child is at a safe distance. Before placing the child in the walker
ensure that the secondary lock button is correctly locked again.
Step 10
10. To adjust the seat’s height, remove the child from the baby walking frame, pull up the safe buon
located under the small tray table and rotate it to 90 degrees. keep the safe buon pressed, then
raise or lower the small table unl the desired posion is reached, then pull up the safe buon and
rotate it to 90 degrees again to lock the small table.(If it is a automac secondary lock, please make
sure the lock rotated to 90 degrees.)
10. To adjust the seat’s height, remove the child from the baby walking frame, pull up the safe
button located under the small tray table and rotate it to 90 degrees. Keep the safe button pressed,
then raise or lower the small table until the desired position is reached, then pull up the safe button
and rotate it to 90 degrees again to lock the small table. (If it is a automatic secondary lock, please
make sure the lock rotated to 90 degrees.)
19

ENG How to fold the walker
Using electronic play toy tray
The front
press
Step 11
Step 12
11. Firstly, pull down the buon under top tray, make sure the buon finally parallel to the
adjusted-device(see 1st picture). Meanwhile, press up the front poson(see 2nd picture), and
press down the top base ll the end. The frame folds up completely.
The walker includes one electronic play tray that aaches to the walker frame as
shown in step 8. The funcon and use of the play tray are shown here.
A B C D
A
B
C
D
Press big buons to listen to splendid
music and lights up
Press buon to hear horn
Turn wheel to steer
Rotate and play rearview mirrors
WARNING: The walker includes one electronic play tray that attaches
to the walker frame as shown in step 8. The function and use of the
play tray are shown here.
11. Firstly, pull down the button under top tray, make sure the button nally parallel to the adjusted-device
(see 1st picture). Meanwhile, press up the front position (see 2nd picture), and press down the top base till
the end. The frame folds up completely.
Press big buttons to listen to splendid music
and lights up
Press button to hear horn
Turn wheel to steer
Rotate and play rearview mirror
20
La page charge ...
La page charge ...
La page charge ...
La page charge ...
La page charge ...
La page charge ...
La page charge ...
La page charge ...
La page charge ...
La page charge ...
La page charge ...
La page charge ...
La page charge ...
La page charge ...
La page charge ...
La page charge ...
La page charge ...
La page charge ...
La page charge ...
La page charge ...
La page charge ...
La page charge ...
-
 1
1
-
 2
2
-
 3
3
-
 4
4
-
 5
5
-
 6
6
-
 7
7
-
 8
8
-
 9
9
-
 10
10
-
 11
11
-
 12
12
-
 13
13
-
 14
14
-
 15
15
-
 16
16
-
 17
17
-
 18
18
-
 19
19
-
 20
20
-
 21
21
-
 22
22
-
 23
23
-
 24
24
-
 25
25
-
 26
26
-
 27
27
-
 28
28
-
 29
29
-
 30
30
-
 31
31
-
 32
32
-
 33
33
-
 34
34
-
 35
35
-
 36
36
-
 37
37
-
 38
38
-
 39
39
-
 40
40
-
 41
41
-
 42
42


dans d''autres langues
- English: Baninni Elvio Owner's manual
- Deutsch: Baninni Elvio Bedienungsanleitung
- Nederlands: Baninni Elvio de handleiding
Documents connexes
Autres documents
-
BABYMOOV A040008 Manuel utilisateur
-
Costway BC10021 Mode d'emploi
-
Hauck ROLL A ROUND II Le manuel du propriétaire
-
Chicco 05079540780000 Baby Walker Walky Talkie Manuel utilisateur
-
-
mothercare Chicco_walker WALKY TALKY Mode d'emploi
-
-
-
Brevi Giocagiro 3 in 1 Le manuel du propriétaire
-