GE current LRXEMBBKIT10B Guide d'installation
- Taper
- Guide d'installation

Page 1 of 6
Rev July 14, 2022
IND669-Lumination-LRXB EMBB KIT-installation guide
gecurrent.com/lumination
© 2022 Current Lighting Solutions, LLC. All rights reserved. GE and the GE monogram are trademarks of the
General Electric Company and are used under license. Information and specifications subject to change without
notice. All values are design or typical values when measured under laboratory conditions.
Installation Guide
669 | DOC-2003424
Lumination® LED Luminaire
LRXB EMBB KIT
(LRXEMBBKIT10B/FRAMEXREL10B/FRAMEXSEL10B)
BEFORE YOU BEGIN / AVANT DE COMMENCER
Read these instructions and IOTA ILB-CP instruction manual completely and carefully.
Wear work gloves to prevent dirt and oil from being transferred to the luminaire.
IMPORTANT SAFEGUARDS / MESURES DE SÉCURITÉ IMPORTANTES
•
• Install this kit only in the lumiaires that has the construction
features and dimensions shown in the photographs
and/or drawings.
•
with the construction and operation of the luminaire’s
•
to edges of sheet metal or other sharp objects.
• Do not make or alter any open holes in an enclosure of wiring
or electrical components during kit installation.
•
installation is complete and A.C. power is supplied to the unit.
• This kit provides more than one power supply output source.
and by disconnecting the unit connector.
• Battery is a sealed unit. Components are not replaceable.
Replace the entire unit when necessary.
•
personnel only. De-energize before opening.
• The kit is for use with grounded LED luminaires listed
to UL standards. Not for use in heated air outlets or
hazardous locations.
•
• Do not mount near gas or electric heaters.
•
manufacturer may cause unsafe condition.
• The kit should be mounted in locations and at heights
where it will not readily be subjected to tampering by
unauthorized personnel.
• The kit and frame will supply output listed as bellowing for
90 minutes.
•
temperatures.
•
• Install in accordance with the National Electrical Code and
local regulations.
•
need to ensure product system compatibility before
•
de la maintenance.
• Installer cette trousse seulement avec des luminaires possédant les
et/ou dessins.
•
t un
•
•
l’installation de la trousse.
•
• Cette trousse fournie plus d’une source de sortie d’alimentation. Pour réduire
débranchant le C.A. de la dérivation et aussi en déconnectant
le connecteur de l’unité de la batterie.
• La batterie est une unité scellée dont les composantes ne sont pas remplaçables.
•
seulement. Couper la tension avant de procéder.
• Cette trousse a été conçue pour être utilisé avec des luminaires DEL possédant
utiliser pour un usage dans un conduit d’air chaud ou dans des emplacements
•
•
causer des conditions dangereuses.
• Cette trousse et se châssis fourniront la source lemineuse répertoriée
pour 90 minutes.
• Peut-être utilisé â une température ambiante entre 0°C minimum
•
•
réglementation locale.
•

Page 2 of 6
July 14, 2022
IND669-Lumination-LRXB EMBB KIT-installation guide
gecurrent.com/lumination
© 2022 Current Lighting Solutions, LLC. All rights reserved. GE and the GE monogram are trademarks of the
General Electric Company and are used under license. Information and specifications subject to change without
notice. All values are design or typical values when measured under laboratory conditions.
Lumination® LED Luminaire LRXB EMBB KIT Installation Guide
CAUTION / ATTENTION
•
installation instructions.
• Wear safety glasses and proper aid during installation
and maintenance.
•
•
instructions d’installation.
•
et la maintenance.
•
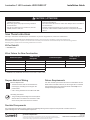
Prepare Electrical Wiring
Provided Components
physical damage. Do not install damaged components.
Fixture Requirements
Step 1 for an
Electrical Requirements
• The LED luminaire must be connected to the
mains supply according to its ratings on the
product label.
• Class 1 wiring should be in accordance with NEC.
Grounding Instructions
• The grounding and bonding of the overall system
shall be done in accordance to local electric code
of the country where the luminire is installed.
Save These Instructions
Use only in the manner intended by the manufacturer. If you
Note:
Wear work gloves to prevent dirt and oil from being transferred to the luminaire.
Kit for Retrot
• LRXEMBBKIT10B
Kit vs Fixture for New Construction
Fixture Description EMBB Frame Kit
Description Fixture Description EMBB Frame Kit
Description
LRXBR4XXXXXXX FRAME4REL10B
LRXBR6XXXXXXX FRAME6REL10B
LRXBR8XXXXXXX FRAME8REL10B
LRXBR10XXXXXXX FRAME10REL10B
LRXBR12XXXXXXX FRAME12REL10B
•

Page 3 of 6
July 14, 2022
IND669-Lumination-LRXB EMBB KIT-installation guide
gecurrent.com/lumination
© 2022 Current Lighting Solutions, LLC. All rights reserved. GE and the GE monogram are trademarks of the
General Electric Company and are used under license. Information and specifications subject to change without
notice. All values are design or typical values when measured under laboratory conditions.
Lumination® (LRXB - Series) Installation Guide
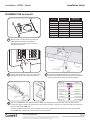
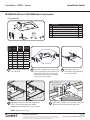
LRXEMBBKIT10B for Retrot
Fixture size Fixture Type Existing Bracket
Hole Size (inch)
4 Round
6 Round
8 Round
10 Round
12 Round
4
6
8
2 3
4
1
Use proper lockout and tagout procedures.
with a ground wire connected to the luminaire.
the other half from EMBB side.
are metal and are constructed similarly to
the illustration above.

Page 4 of 6
July 14, 2022
IND669-Lumination-LRXB EMBB KIT-installation guide
gecurrent.com/lumination
© 2022 Current Lighting Solutions, LLC. All rights reserved. GE and the GE monogram are trademarks of the
General Electric Company and are used under license. Information and specifications subject to change without
notice. All values are design or typical values when measured under laboratory conditions.
Lumination® (LRXB - Series) Installation Guide
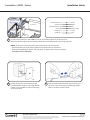
AC line
Connect AC and
dimming conduit
Junction
box
LRXEMBBKIT10B
Black
White
Red
Yellow-Green
Violet
Pink
Switched Power (L1)
Common (N)
Grounding
Dimming (+)
Dimming (−)
Unswitched Power (L2)
NOTE: For phase cut dimming product, dimming leads can be disconnected.
• If dimming leads will not be utilized, please do not remove the wire connectors.
• Dimming compatibility for both 0 –10V and phase cut, please refer to Current’s website:
www.gecurrent.com/dimming.
of the test switch.
Connect male and female ends of the battery unit
refer to the picture shown above.
5
6 7

Page 5 of 6
July 14, 2022
IND669-Lumination-LRXB EMBB KIT-installation guide
gecurrent.com/lumination
© 2022 Current Lighting Solutions, LLC. All rights reserved. GE and the GE monogram are trademarks of the
General Electric Company and are used under license. Information and specifications subject to change without
notice. All values are design or typical values when measured under laboratory conditions.
Lumination® (LRXB - Series) Installation Guide
Provided Item Qty.
1 1
2 Mounting Brackets 2
3 L-Bracket 2
4 1
Wing Nut 3
5
4
3
2
1
L-brackets
Mounting brackets
Bars Conduit
A B
Adjust height and
tighten wing nut
FRAMEXXEL10B for LRXB EMBB New Construction
Components
12 3
4 5
Cut the appropriate size hole
into ceiling tile.
screws and tighten with screwdriver on
both sides of the frame. Then attach
mounting brackets to both L-brackets
mounting brackets.
Option A:
Option B:
NOTE: Supplied by 3rd party.
tighten both mounting bracket wing nuts.
Fixture
Size
(inch) Type Suitable
Frame Suggested
Ceiling Hole
4Round FRAME4R
6Round FRAME6R
8Round FRAME8R
10 Round FRAME10R
12 Round FRAME12R
4
6
8

gecurrent.com/lumination
© 2022 Current Lighting Solutions, LLC. All rights reserved. GE and the GE monogram are trademarks of the
General Electric Company and are used under license. Information and specifications subject to change without
notice. All values are design or typical values when measured under laboratory conditions.
Page 6 of 6
Rev July 14, 2022
IND669-Lumination-LRXB EMBB KIT-installation guide
NOTE:
6
Springs up
remote mounting of the test switch.
NOTE: For phase dut dimming product, dimming leads
(violet and pink wires) are disconnected.
Load springs into upright position by
twisting the springs upward and
• All kit and frame will be completely
addressed on ceiling.
78
Lumination® (LRXB - Series) Installation Guide
-
 1
1
-
 2
2
-
 3
3
-
 4
4
-
 5
5
-
 6
6


GE current LRXEMBBKIT10B Guide d'installation
- Taper
- Guide d'installation
dans d''autres langues
Documents connexes
Autres documents
-
Lumination LRX Series LED Luminaire EMBB Retrofit Guide d'installation
-
-
-
-
Current IND668 Guide d'installation
-
-
 GE Appliances 93056860 Guide d'installation
-
-
-
