Kichler Lighting 43185AUB Manuel utilisateur
- Taper
- Manuel utilisateur

3
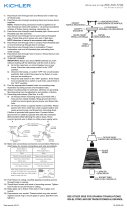
1) Passwirefromxturethroughstemandscrewstemtotopofcoupling.
NOTE: Threadlockingcompoundmustbeappliedtoallstemthreads
asnotedwithsymbol(3)topreventaccidentalrotationofxtureduring
cleaning,relamping,etc.
2) Passxturewirethroughremainingstemsandscrewstemstogether.
3) If using swivel for sloped ceilings,passxturewirethroughswivel
andthreadswivelontotopoflaststem.
4) Threadsmallthreadedpipeintoendofswivel.
5) Passthreadedpipeonendofswivelupthroughholeincanopy.
6) Sliplockwasheroverendofthreadedpipeprotrudingfrominsidecanopy.
7) Slipendofsafetycablethenremaininglockwasheroverendofthreaded
pipe.Screwhexnutontothreadedpipe.
NOTE DIRECTION OF SWIVEL IN ACCORDANCE WITH CEILING.
8) If not using swivel,threadsmallthreadedpipeintoendoflaststem.
9) Passthreadedpipeonendofstemupthroughholeincanopy.
10)Sliplockwasheroverendofthreadedpipeprotrudingfrominsidecanopy.
11) Slipendofsafetycablethenremaininglockwasheroverendofthreaded
pipe.Screwhexnutontothreadedpipe.
12) TURN OFF POWER.
IMPORTANT:Beforeyoustart,NEVERattemptanyworkwithout
shuttingofftheelectricityuntiltheworkisdone.
a) Gotothemainfuse,orcircuitbreaker,boxinyourhome.Place
themainpowerswitchinthe“OFF”position.
b) Unscrewthefuse(s),orswitch“OFF”thecircuitbreakerswitch(s),
thatcontrolthepowertothextureorroomthatyouareworking
on.
c) Placethewallswitchinthe“OFF”position.Ifthexturetobe
replacedhasaswitchorpullchain,placethoseinthe“OFF”position.
13)Findtheappropriatethreadedholesonmountingstrap.Assemble
mountingscrewsintothreadedholes.
14)Attachmountingstraptooutletbox.(Screwsnotprovided).Mounting
strapcanbeadjustedtosuitpositionofxture.
15)Attachsafetycabletoslotinmountingstrap.
16)Makewireconnections(connectorsnotprovided.)Referencechart
belowforcorrectconnectionsandwireaccordingly.
17)Pushxturetoceiling,carefullypassingmountingscrewsthroughholes
incanopy.
18)Securexturetoceilingwithknurlknobs.
19)Setglassdownoversocket.
1) Acheminerlelduluminaireparlatigeetvisserlatigeenhautduluminaire.
REMARQUE : appliquerlefreinletsurtouslesletsdelatige
indiquésparlesymbole(3)pourempêcherlarotationaccidentelle
duluminairependantlenettoyage,remplacementdelampe,etc.
2) Acheminerlelduluminaireparlestigesrestantesetvisserlestiges
ensemble.
3) Pour les plafonds inclinés-avecuntourillon:acheminerleldu
luminaireparlepivotetvisserlepivotenhautdeladernièretige.
4) Visserunpetittubeletédansl’extrémitédelarotule.
5) Fairepasserletubeletésurl’extrémitédel’jusqu’àrotuledansletrou
ducache.
6) Passerunerondelledeblocagesurextrémitédutubeletésortantde
l’intérieurducache.
7) Passerl’extrémitéducâbledesécuritépuislarondelledeblocage
restantesurl’extrémitédutubeleté.Visserl’écrouhexagonalsurle
tubeleté.
PRENEZ NOTE de la direction de la rotule conformément au plafond.
8) Sans tourillon :Enlerletubepetiteletéedansl’extrémitédelatige
dernière.
9) Fairepasserletubeletésurl’extrémitédelatigedansletroudansle
cache.
10)Passerunerondelledeblocagesurextrémitédutubeletésortantde
l’intérieurducache.
11) Passerl’extrémitéducâbledesécuritépuislarondelledeblocage
restantesurl’extrémitédutubeleté.Visserl’écrouhexagonalsurle
tubeleté.
12) COUPERLECOURANT.
IMPORTANT:TOUJOURScouperl’électricitéavantdecommencerle
travail.
a) Localiserlecoffretàfusiblesouledisjoncteurdudomicile.Mettre
l’interrupteurprincipalenpositiond’Arrêt.
b) Dévisserleoulesfusibles(oumettreledisjoncteursurArrêt)qui
contrôlentl’alimentationversleluminaireoulapiècedans
laquelleletravailesteffectué.
c) Mettrel’interrupteurmuralenpositiond’Arrêt.Sileluminaireà
remplacerestdotéd’uninterrupteuroud’unechaîneconnectéeà
l‘interrupteur,placercesélémentsenpositiond’Arrêt.
13)Trouverlestrousletésappropriéssurlabarrettedemontage.Vissez
lesvisdemontagedanslestrousletés.
14)Visserlabarrettedemontageàlaboitedejonction.(Visnonfournies).
Labarrettedemontagepeutetreajustéepourconveniràlapositionde
l’applique.
Connect Black or
Red Supply Wire to:
Connect
White Supply Wire to:
Black White
*Parallel cord (round & smooth) *Parallel cord (square & ridged)
Clear, Brown, Gold or Black
without tracer
Clear, Brown, Gold or Black
with tracer
Insulated wire (other than green)
with copper conductor
Insulated wire (other than green)
with silver conductor
*Note: When parallel wires (SPT I & SPT II)
are used. The neutral wire is square shaped
or ridged and the other wire will be round in
shape or smooth (see illus.)
Neutral Wire
DateIssued:6/29/12 IS-43185-CB
INSTRUCTIONS
For Assembling and Installing Fixtures in Canada
Pour L’assemblage et L’installation Au Canada
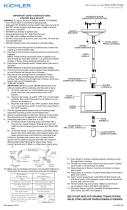
MOUNTINGSTRAP
PATTEDEFIXATION
CANOPY
CACHE
KNURL KNOB
BOUTONMOLETÉ
STEM
TIGE
SWIVEL
ROTULE
SAFETYCABLE
CÂBLEDESÉCURITÉ
3
15)Connecterlecâbledesécuritéassembléàl’intérieurducachesurle
supportdemontage.(Cecipermettradesoutenirleluminairelorsdu
branchementdesls.)
16)Connecterlesls(connecteursnonfournis).Sereporterautableauci-
dessouspourfairelesconnexions.
17)Pousserleluminaireversleplafondenpassantsoigneusementlesvis
demontageparlestrousdanslecache.
18)Fixerleluminaireauplafondàl’aidedesboutonsmoletés.
19)Placerleverresurladouille.
Connecter le fil noir ou
rouge de la boite
Connecter le fil blanc de la boîte
A Noir A Blanc
*Au cordon parallèle (rond et lisse)
*Au cordon parallele (à angles droits el strié)
Au bransparent, doré, marron, ou
noir sans fil distinctif
Au transparent, doré, marron, ou
noir avec un til distinctif
Fil isolé (sauf fil vert) avec
conducteur en cuivre
Fil isolé (sauf fil vert) avec
conducteur en argent
*Remarque: Avec emploi d’un fil paralléle
(SPT I et SPT II). Le fil neutre est á angles
droits ou strié et l’autre fil doit étre rond ou
lisse (Voir le schéma).
Fil Neutre
3
4
3
GLASS
VERRE
-
 1
1


