Baxtran STE Manuel utilisateur
- Catégorie
- Balances personnelles
- Taper
- Manuel utilisateur

EN|ES|FR|PT|IT|DE
CRANE SCALE
GANCHO PESADOR
CROCHET PESEUR
GANCHO DE PESAGEM
GANCIO DI PESO
KRANWAAGE
STE
USER’S MANUAL | MANUAL DE USUARIO | MANUEL D’UTILISATION
MANUALE DI ISTRUZIONI | BEDIENUNGSANLEITUNG
trade mark propiety of | marca propiedad de | est une marque de
marca de propriedade de | marchio di proprietà di | Warenzeichen Proprietät von:
Pol. Empordà Internacional C/ Molló, 3
17469 VILAMALLA - (Girona) SPAIN
T. (34) 972 527 212
The manufacturer reserves the right to modify the specifications of its products in order to make technical improvements or comply with new regulations./El fabricante se reserva el derecho de modificar sin previo aviso las
características de sus productos para introducir mejoras técnicas o cumplir con nuevas regulaciones oficiales./Le constructeur se réserve le droit de modifier les caractéristiques de ses produits en vue d’y apporter des améliorations
techniques ou de respecter de nouvelles réglamentations./ O fabricante reserva-se o direito de modificar sem aviso prévio as características dos seus produtos para introduzir melhorias técnicas ou para cumprir as novas regulações
oficiais./Il produttore si riserva il diritto di modificare le caratteristiche dei suoi prodotti senza preavviso per introdurre miglioramenti tecnici o per conformarsi a nuove norme ufficiali./ Der Hersteller behält sich das Recht vor, ohne
Vorankündigung die Eigenschaften seiner Produkte zu ändern, um weitere Verbesserungen zu erzielen oder offizielle Richtlinien einzuhalten.
V.2.2
06/03/2023

STE
2
INDEX
EN 8
1. PRODUCT DESCRIPTION 8
2. PANEL DESCRIPTION 8
3. SAFETY RECOMMENDATIONS 9
4. FUNCTION KEYS ON REMOTE CONTROL 9
5. USE OF CRANE SCALE 10
5.1 TURN ON 10
5.2 TURN OFF 10
5.3 TARE/ZERO 10
5.4 WEIGHING ACCUMULATION FUNCTION 10
5.5 HOLD FUNCTION 10
5.6 ON / OFF SAVE POWER 10
5.7 REMOTE CHANNEL SELECTION 10
6. CALIBRATION 11
7. DIVISION SETTING 11

STE
3
ÍNDICE
ES 12
1. DESCRIPCIÓN DEL PRODUCTO 12
2. DESCRIPCIÓN DEL PANEL 12
3. REQUISITOS PARA UNA ÓPTIMA INSTALACIÓN 13
4. FUNCIÓN DE LAS TECLAS DEL CONTROL REMOTO 13
5. UTILIZACIÓN DE LA BÁSCULA 14
5.1 ENCENDER LA BÁSCULA 14
5.2 APAGAR LA BÁSCULA 14
5.3 TARA Y PUESTA A CERO 14
5.4 FUNCIÓN DE ACUMULACIÓN DE PESADAS 14
5.5 FUNCIÓN HOLD 14
5.6 AHORRO DE ENERGÍA 14
5.7 SELECCIÓN DEL CANAL REMOTO 15
6. CALIBRACIÓN 15
7. CONFIGURACIÓN DE LA DIVISIÓN 15

STE
4
SOMMAIRE
FR 16
1. DESCRIPTION DU PRODUIT 16
2. DESCRIPTION DU PANNEAU 16
3. CONDITIONS REQUISES POUR UNE INSTALLATION OPTIMALE 17
4. FONCTION DES TOUCHES DE LA COMMANDE A DISTANCE 17
5. UTILISATION DU CROCHET 18
5.1 ALLUMER LE CROCHET 18
5.2 ETEINDRE LE CROCHET PESEUR 18
5.3 TARA Y PUESTA A CERO 18
5.4 FONCTION D’ACCUMULATION DE PESÉES 18
5.5 FONCTION HOLD 18
5.6 ON / OFF SAVE POWER 18
5.7 SÉLECTION DE CANAL À DISTANCE 18
6. CALIBRATION 19
7. CONFIGURATION DE LA DIVISION 19

STE
5
ÍNDICE
PT 20
1. DESCRIÇÃO DO PRODUTO 20
2. DESCRIÇÃO DO PAINEL 20
3. REQUISITOS PARA UMA INSTALAÇÃO ÓTIMA 21
4. FUNÇÕES DAS TECLAS DO CONTROLO REMOTO 21
5. UTILIZAÇÃO DA BALANÇA 22
5.1 LIGAR A BALANÇA 22
5.2 APAGAR A BALANÇA 22
5.3 TARA E COLOCAÇÃO A ZERO 22
5.4 FUNÇÃO DE ACUMULAÇÃO DE PESAGENS 22
5.5 FUNÇÃO HOLD 22
5.6 POUPANÇA DE ENERGIA 22
5.7 SELEÇÃO DE CANAIS REMOTOS 22
6. CALIBRAÇÃO 23
7. CONFIGURAÇÃO DA DIVISÃO 23

STE
6
INDICE
IT 24
1. DESCRIZIONE DEL PRODOTTO 24
2. DESCRIZIONE DEL PANNELLO 24
3. REQUISITI PER UN’INSTALLAZIONE OTTIMALE 25
4. FUNZIONE DEI TASTI DEL TELECOMANDO 25
5. USO DELLA BILANCIA 26
5.1 ACCENSIONE DELLA BILANCIA 26
5.2 SPEGNIMENTO DELLA BILANCIA 26
5.3 TARA E AZZERAMENTO 26
5.4 FUNZIONE DI ACCUMULO PESATURE 26
5.5 FUNZIONE HOLD 26
5.6 RISPARMIO ENERGETICO 26
5.7 SELEZIONE DEL CANALE REMOTO 26
6. CALIBRAZIONE 27
7. CONFIGURAZIONE DELLA DIVISIONE 27

STE
7
INDEX
DE 28
1. PRODUKTBESCHREIBUNG 28
2. BESCHREIBUNG DES BEDIENELEMENTS 28
3. VORAUSSETZUNGEN FÜR EINE OPTIMALE INSTALLATION 29
4. FUNKTION DER FERNBEDIENUNGSTASTEN 29
5. ANWENDUNG DER WAAGE 30
5.1 DIE WAAGE EINSCHALTEN 30
5.2 DIE WAAGE AUSSCHALTEN 30
5.3 TARA UND NULLSTELLUNG 30
5.4 FUNKTION DER WÄGEKUMULATION 30
5.5 HOLD-FUNKTION 30
5.6. ENERGIE SPAREN 30
5.7 AUSWAHL DES FUNKKANALS 30
6. KALIBRIERUNG 31
7 . KONFIGURATION DER UNTERTEILUNG 31

ENENUSER’S MANUAL STE
8
EN
1. PRODUCT DESCRIPTION
STE is the new weighing device that, combined with the weight, load cell and power, can be connected directly to the lifting hook to obtain the
weight of the assembly and not assembled at the same time. The display has led with brightness, the number of displays can be clearly seen from
25 meters. Portable structure and easy operation describe the STE scale, with high quality and competitive prices, this model has been widely used
in the textile, pharmaceutical, warehouses, etc. It is an ideal weighing device for the management of a modern company.
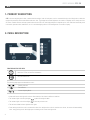
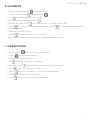
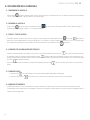
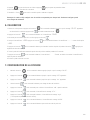
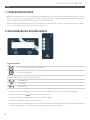
2. PANEL DESCRIPTION
FUNCTION OF THE STE KEYS
Switch the STE on /off and Zero initialization.
Tare / Remove the tare
The following digits appear underneath the screen:
Stability indicator.
Tare indicator.
Current Weighing Mode.
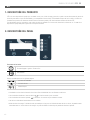
• Viewer with intense Led light of 8 sections. Great visibility of the viewer in different conditions.
• The indicator light on the far right lights up when the weight is stable.
• The indicator light on the left end lights up when we perform a tare.
• The two intermediate indicator lights are unit lights.
• Power saving mode: If the scale is connected but there is no weight on the scale for more than one minute, the screen will automatically
enter “energy saving mode” with bright spots circulating on the screen from right to left.

9
ENENUSER’S MANUAL STE
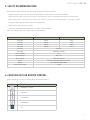
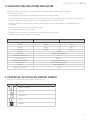
3. SAFETY RECOMMENDATIONS
Before using the crane scale, please, read this manual carefully and follow the instructions:
• DON’T overload the crane scale, this could seriously damage the loadcell (repair not covered by the warranty).
• DON’T leave any weight on the hook for a long time, this reduces the accuracy of the equipment and short the life of the load cell.
• Before using the scale, check rings, hooks and other parts, cotter pin, if the screw is loose and deformation loose every 3 months.
• Charge the battery when the display shows the low power indicator.
• DON’T use the crane scale in rain or storms.
• After used, hook should vertical suspended or the loadcell could be damaged.
DON’T try to repair the crane scale. Please contact with your Distributor.
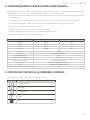
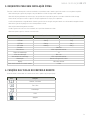
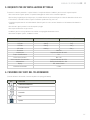
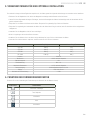
Model Capacity Division (E)
STE 100 100 kg 20 g
STE 300 300 kg 50 g
STE 500 500 kg 100 g
STE 1000 1000 kg 200 g
Accuracy Class III
Tare range 100% Max. capacity
Time of stability 10´s
Overload alarm Max +9e
Max. overload 125% Max. capacity
Power Full seal rechargeable battery 6V/1.4AH
Display Super light LED height 20mm
Remote control range ≤ 20m
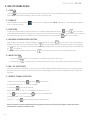
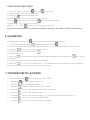
4. FUNCTION KEYS ON REMOTE CONTROL
(Before using the remote control, remove the plastic that protects the battery)
KEY FUNCTION
Totalisation / Confirm
Tare / zero
Accumulation
Hold function
Off

ENENUSER’S MANUAL STE
10
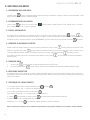
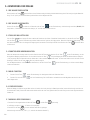
5. USE OF CRANE SCALE
5.1 TURN ON
Press the key on the crane, the scale begin the self test, at the same time, auto-zero initialization, then the display will show battery
charge “PA 85” (85% power) and finally the crane scale enters to weighing mode.
5.2 TURN OFF
Press the ON/OFF key for 2 seconds or on remote control, the display will show “PA 80” (80% charge), 1.5 seconds later, the display will
show “off” and scale power off.
5.3 TARE/ZERO
To make a tare, place the weight to be tared on the hook, once you have the stable weight press the key or the key on the remote
control and the weight will be tared in the crane scale memory. If in the crane scale we do not have anything the weight should be zero, if it shows us
some weight being empty we will use the ZERO option, in this way it will return to zero by pressing the button of the crane scale.
5.4 WEIGHING ACCUMULATION FUNCTION
When the reading of the display is stable and weighing more than 20 divisions, press the key on the remote control to accumulate the
weighing carried out and so on consecutively pressing the key on each weighing scale we will visualize the number of accumulations
(“n32” example) , after 2 seconds the crane scale returns to the normal weighing mode. To display the last weigh as well as the last total press
the key at any time.
To cancel the weight accumulation function, press the key on the remote control to return to the normal weighing mode.
5.5 HOLD FUNCTION
1. Press the key on remote control, the display´s reading will remain locked for 30 seconds.
2. Press again the key on remote control, the Hold function will be turn off, the crane scale will return to normal weighing mode.
5.6 ON / OFF SAVE POWER
If the scale remains at zero and inactive for one minute, the screen will go blank depending on battery saving (only one circulating point will
appear at the bottom of the screen). As soon as the crane scale is activated again or a key is pressed, the display will show the current load
value again.
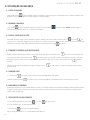
5.7 REMOTE CHANNEL SELECTION
1. With the hook off, press the keys and the key at the same time.
2. The display will show “Dsp 1”. (Function not available)
3. Press the key to go to the next parameter.
Now the display will show “CHX ” (“X ” representing the current channel “0-7 “)
4. Press to select a channel and press to go to the next and last setting.
The display will show “Ft0 ”. Command Settings.
5. Keep at "0 ". Press to return to weighing mode and restart the device.
Note: The channel is already configured with the corresponding control for each hook. Only configure couando the control is
controlled when a charge of commad is made.

11
ENENUSER’S MANUAL STE
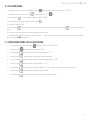
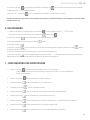
6. CALIBRATION
1. Power on the crane scale and press the until visualized “CAL SP”.
* on version 8.3 and newers press from remote instead of .
2. Press key on remote control once to display “CAL00”.
3. Do not hang on the hook any goods at this time, press key.
4. Display will show “LOAD”, press the key on remote control view “ “ and then later on display “LOAD”.
5. Press the key on remote control to input the calibration weight value (long press key on remote control to increase the number of
digit, click to the left shift).
6. Lifting weights, until steady 4 to 5 seconds.
7. Press the key on remote control to show “ “,2 seconds after the
display of the hanging weight values, calibration is finished, put weight down, turn it off and turn it on again.
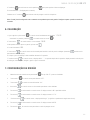
7. DIVISION SETTING
1. Post holding down the key on remote control and so display “CAL SP”.
2. Press the key on remote control to display “SET”.
3. Press the A key on remote control to display “d2”.
4. With key on remote control to change the division value.
5. When finished, press the key on remote control. the display will show “100” maximum capacity.
6. Press the key on remote control to show “fLT 00”.
7. Press the key on remote control to show “rng 1” (1 indicates zero tracking parameters).
8. Press the key on remote control to show “AUPf0”.
9. Press the key on remote control to back to normal weighing mode.

ESESMANUAL DE USUARIO STE
12
ES
1. DESCRIPCIÓN DEL PRODUCTO
STE es el nuevo dispositivo de pesaje que, combinado con el peso, célula de carga y potencia, se puede conectar directamente al gancho de
elevación para obtener el peso del ensamblado y no ensamblado al mismo tiempo. El visualizador dispone de led con brillo, el número de
visualizaciones puede verse claramente desde 25 metros. Estructura portátil y fácil funcionamiento describen la báscula STE.
Con alta calidad y precios competitivos, este modelo ha sido muy utilizado en el sector textil, farmacéutico, almacenes, etc. Se trata de un
dispositivo de pesaje ideal para la gestión de una empresa moderna
2. DESCRIPCIÓN DEL PANEL
Funciones de las teclas
Encender/Apagar el gancho i Puesta a Cero
Tarar/Destarar
Debajo la pantalla aparecen los siguientes dígitos:
Indicador de establidad.
Indicador de tara.
Unidad de peso
• Visualizador con iluminación intensa de 8 secciones. Gran visibilidad del visor en diferentes condiciones.
• La luz indicadora situada en el extremo derecho se ilumina cuando el peso es estable.
• La luz indicadora del extremo izquierdo se ilumina en el momento en que realizamos una tara.
• Las dos luces indicadoras intermedias son luces unitarias.
• Modo de ahorro de energía: Si la báscula está conectada pero no hay peso en la báscula durante más de un minuto, la pantalla entrara
automáticamente en “modo de ahorro de energía” con puntos brillantes circulando por la pantalla de derecha a izquierda.

13
ESESMANUAL DE USUARIO STE
3. REQUISITOS PARA UNA ÓPTIMA INSTALACIÓN
Para obtener el máximo rendimiento y los mejores resultados, recomendamos utilizar e instalar el gancho de acuerdo
con los siguientes requisitos:
• No sobrecargar el gancho pesador, esto podría dañar la célula de carga y anular la garantía.
• No deje objetos colgados durante mucho tiempo, esto podría disminuir la precisión del gancho y reducir la duración de la célula de carga.
• Antes de su utilización revisar la cadena y el gancho. Revisar regularmente los clips, pins y tornillos.
• Revisar con frecuencia la carga de la batería. Cuando el gancho se queda sin energía, cargar la batería con el alimentador/cargador
suministrado.
• No utilizar el gancho pesador en el caso de tormentas o lluvia.
• No someterlo a atmósferas con gases corrosivos.
• Instalar el gancho en un lugar seco y bien ventilado, no situarlo directamente sobre el suelo.
• No intentar reparar el gancho, contactar con su proveedor.
Modelo Capacidad División (E)
STE 100 100 kg 20 g
STE 300 300 kg 50 g
STE 500 500 kg 100 g
STE 1000 1000 kg 200 g
Precisión Class III
Rango de tara 100% capacidad máxima
Tiempo de estabilización 10´s
Aviso de sobrecarga Max +9e
Máximo valor de sobrecarga 125% capacidad máxima
Alimentación Batería recargable 6V/1.4AH
Display LED, altura 20 mm
Rango de control remoto ≤ 20m
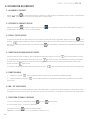
4. FUNCIÓN DE LAS TECLAS DEL CONTROL REMOTO
(Antes de usar el control remoto extraer el plastico que protege la pila)
KEY FUNCTION
Totalizar / Confirmar
Tara / Cero
Acumulación
Hold
Apagado

ESESMANUAL DE USUARIO STE
14
5. UTILIZACIÓN DE LA BÁSCULA
5.1 ENCENDER LA BÁSCULA
Pulsar la tecla el gancho realizará un auto chequeo, al mismo tiempo la inicialización del cero, el display mostrará la carga de la batería
“PA 85” (85%) y finalmente el gancho entrará en el modo de pesaje.
5.2 APAGAR LA BÁSCULA
Pulsar la tecla del gancho durante 2 segundos o la tecla del control remoto. El display mostrará “PA 80” (80% de carga), 1,5
segundos después, el display mostrará “off” y el gancho se apagará.
5.3 TARA Y PUESTA A CERO
Para realizar una tara coloque el peso a tarar en el gancho, una vez tenga el peso estable pulse la tecla o la tecla del mando a
distancia y el peso quedara tarado en la memoria del gancho. Si en el gancho no tenemos nada el peso debería ser cero, si nos muestra algún
peso estando vacía utilizaremos la opción ZERO, de esta manera volverá a cero pulsando el botón del gancho.
5.4 FUNCIÓN DE ACUMULACIÓN DE PESADAS
Cuando la lectura del display esté estable y con un peso por encima de 20 divisiones pulsar la tecla del control remoto para acumular
la pesada efectuada y así consecutivamente pulsando la tecla a cada pesada iremos visualizando el número de acumulaciones (“n32”
ejemplo) transcurridos 2 segundos el gancho vuelve al modo normal de pesaje. Para visualizar la última pesada así como el ultimo total presio-
ne la tecla en cualquier momento.
Para cancelar la función de acumulación y borrado de las pesadas, pulsar la tecla del control remoto para volver al modo normal de
pesaje.
5.5 FUNCIÓN HOLD
1. Pulsar la tecla del control remoto, la lectura del display quedará fijada durante 30 segundos.
2. Pulsar de nuevo la tecla del control remoto, la función Hold se desactiva y entra al modo normal de pesaje.
5.6 AHORRO DE ENERGÍA
Si la báscula permanece a cero e inactiva durante un minuto, la pantalla se pondrá en blanco en función de ahorro de batería (solo un punto
circulante aparecerá en la parte inferior de la pantalla). Tan pronto como el gancho se vuelva a activar o se presione una tecla, la pantalla volverá a
mostrar el valor de carga actual.

5.7 SELECCIÓN DEL CANAL REMOTO
1. Con el gancho apagado, pulsar las teclas y la tecla al mismo tiempo
2. La pantalla mostrará: “Dsp 1”. (Función no disponible)
3. Pulsar la tecla para pasar al siguiente parámetro.
Ahora la pantalla mostrara “CHX ” (“X ” que representa el canal actual 0-7)
4. Presione para seleccionar un canal i presione para ir al siguiente y último ajuste.
La pantalla mostrarà “Ft0 ”. (Configuración del comando).
5.Mantener en "0 ". Presionar para volver el modo de pesaje y reiniciar el aparato.
Nota: El canal ya viene configurado con el mando correspondiente a cada gancho. Solo configurar cuando se cambie de mando
6. CALIBRACIÓN
1. Encender el gancho y pulsar la tecla el control remoto inmediatamente hasta visualizar “CAL SP”.
* en la versión 8.3 y posteriores, presione desde el control remoto en lugar de .
En la versión 8.3 y posteriores, encienda la báscula de grúa y presione la tecla “D” en el control remoto hasta que se visualice CAL SP.
2. Pulsar la tecla del control remoto, la pantalla mostrará “CAL00”.
3. No colgar ningún objeto en el gancho, pulsar la tecla .
4. La pantalla mostrará “LOAD”.
5. Pulsar la tecla del control remoto para introducir el valor de la pesa de calibración (mantener pulsada la tecla para incrementar
el valor del dígito).
6. Colocar la pesa de calibración y dejar que se estabilice de 4 a 5 segundos.
7. Pulsar la tecla del control remoto, el display mostrará “ “, 2 seconds after the transcurridos 2 segundos el display mostrará el valor
de la pesa de calibración, retire la pesa y apague el gancho y vuélvala a encender.
7. CONFIGURACIÓN DE LA DIVISIÓN
1. Mantener pulsada la tecla del control remoto hasta visualizar “CAL SP”.
2. Pulsar la tecla del control remoto para visualizar “SET”.
3. Pulsar la tecla del control remoto hasta visualizar “d 2.
4. Utilizar la tecla del control remoto para cambiar el valor de la división.
5. Pulsar la tecla del control remoto. El display mostrará “100” capacidad máxima.
6. Pulsar la tecla del control remoto, el display mostrará “fLT 2”.
7. Pulsar la tecla del control remoto, el display mostrará “rng 2” (1 significa los parámetros del seguimiento del cero).
8. Pulsar la tecla del control remoto, el display visualizará “AUPf0”.
9. Pulsar la tecla del control remoto para volver al modo normal de pesaje.

FRFRMANUEL D’UTILISATION STE
1616
FR
1. DESCRIPTION DU PRODUIT
STE est le nouvel appareil de pesage qui, associé au poids, à la cellule de charge et à la puissance, peut être connecté directement au crochet
de levage pour obtenir le poids de l’ensemble et non assemblé en même temps. L’affichage a conduit avec luminosité, le nombre d’affichages
peut être clairement vu à partir de 25 mètres. Portable et la facilité d’utilisation décrivent l’échelle STE.
Avec une qualité élevée et des prix compétitifs, ce modèle a été largement utilisé dans le textile, la pharmacie, les entrepôts, etc. C’est un
appareil de pesage idéal pour la gestion d’une entreprise moderne.
2. DESCRIPTION DU PANNEAU
Fonction des touches de crochet
Activer / Désactiver le chrochet
Tarer / Enterer la tare
Les chiffres suivants apparaissent sous l’écran :
Indicateur de stabilité.
Indicateur de tare.
Unité de poids.
Visionneuse avec éclairage intense de 8 sections. Grande visibilité du spectateur dans différentes conditions.
Le voyant situé à l’extrême droite . S’allume quand Le poids est stable
Le voyant situé à l’extrémité gauche s’allume lorsque nous effectuons une tare.
Les deux voyants intermédiaires sont des voyants d’unité.
Mode économie d’énergie: si l est connectée mais que le crochet n’a pas de poids pendant plus d’une minute, l’écran passe automatiquement
en “mode économie d’énergie” avec des points lumineux qui circulent à l’écran de droite à gauche.

FRFRMANUEL D’UTILISATION STE
1717
3. CONDITIONS REQUISES POUR UNE INSTALLATION OPTIMALE
Pour une utilisation optimale et de meilleurs résultats, nous recommandons d’utiliser et installer le crochet en suivant les instructions suivantes
Ne pas surcharger le crochet peseur, cela pourrait endommager le capteur de pesée et annuler la garantie..
• Ne pas laisser d’objets pendre pendant une trop longue durée. Cela pourrait diminuer la précision du crochet peseur et réduire la durée du
capteur de pesée.
• Avant chaque utilisation, il est important de vérifier l’état de la chaine et du crochet. Vérifier régulièrement les clips, boulons et vis..
• Vérifier fréquemment la batterie. Lorsque le crochet est sans batterie, recharger la batterie en utilisant le chargeur fourni.
• Ne pas utiliser le crochet peseur en cas d’orage ou de pluie.
• Ne pas exposer le crochet peseur à des atmosphères avec des gaz corrosifs.
• Installer le crochet dans un endroit sec et bien aéré, ne pas placer directement sur le sol.
• Ne pas tenter de réparer le crochet, contacter votre fournisseur.
Model Capacite Division (E)
STE 100 100 kg 20 g
STE 300 300 kg 50 g
STE 500 500 kg 100 g
STE 1000 1000 kg 200 g
Precision Class III
Rang de Tare 100% Capacité maximale
Temps de stabilisation 10´s
Indication de surcharge Max +9e
Valeur Max de surcharge 125% Capacité maximale
Alimentation Batterie rechargeable 6V/1.4AH
Display Super lumière LED hauteur 20mm
Distance pour contrôle de la commande ≤ 20m
4. FONCTION DES TOUCHES DE LA COMMANDE A DISTANCE
(Avant d’utiliser la commande, retirez le plastique qui protège la batterie)
KEY FUNCTION
Totalisé / Confirm
Tare / zéro
Accumulation
Hold
Off

FRFRMANUEL D’UTILISATION STE
1818
5. UTILISATION DU CROCHET
5.1 ALLUMER LE CROCHET
Appuyer sur la touche le crochet réalisera une auto- vérification, en même temps que l’initialisation du zéro. Ensuite, l’écran affichera le
charge “PA85” (85%) et en fin le crochet peseur entrera dans le mode de pesage.
5.2 ETEINDRE LE CROCHET PESEUR
Appuyer sur la touche dpendant 2 secondes ou sur le touche de la commande, l’écran affichera “PA 80” (80% de charge), 1.5
secondes après, l’écran affichera “off” et le crochet s’éteindra.
5.3 TARA Y PUESTA A CERO
Pour effectuer une tare, placez le poids à tarer sur le crochet. Une fois que vous avez obtenu le poids stable, appuyez sur la touche ou sur
la touche de la télécommande pour peser le poids dans la mémoire de le crochet. Si dans le crochet nous n’avons rien, le poids doit être
égal à zéro, s’il indique qu’un poids est vide, nous utiliserons l’option De cette manière, il reviendra à zéro en appuyant sur le bouton ZERO
de le crochet.
5.4 FONCTION D’ACCUMULATION DE PESÉES
Lorsque la lecture de l’écran est stable et que le poids dépasse 20 divisions, appuyez sur la touche de la télécommande pour accumu-
ler le pesage effectué. En appuyant successivement sur la touche de chaque le crochet, vous visualiserez le nombre d’accumulations
(exemple “n32”), après 2 secondes, le crochet revient au mode de pesée normal. our afficher la dernière pesée ainsi que le dernier total,
appuyer sur la touche à tout moment.
Pour annuler la fonction d’accumulation de poids, appuyez sur la touche de la télécommande pour revenir au mode de pesage normal
5.5 FONCTION HOLD
1. Appuyer sur la touche de la commande à distance, la lecture de l’écran restera fixe pendant 30 secondes.
2. Appuyer à nouveau sur la touche de la commande à distance, la fonction Hold de désactivera et permettra l’accès au mode de
pesée normal.
5.6 ON / OFF SAVE POWER
Si le crochet reste à zéro et inactive pendant une minute, l’écran devient blanc en fonction de l’économie de batterie (un seul point de circula-
tion apparaît en bas de l’écran). Dès que le est réactivée ou qu’une touche est enfoncée, l’écran affiche à nouveau la valeur de charge actuelle.
5.7 SÉLECTION DE CANAL À DISTANCE
1. Avec le crochet décroché, appuyez sur les touches et la clé en même temps
2. L’écran montrera: “Dsp 1”. (Fonction non disponible)
3. Appuyez sur la touche pour aller au paramètre suivant.
Maintenant, l’écran montrera“CHX ” (“X ” qui représente le canal actue “0-7”)

FRFRMANUEL D’UTILISATION STE
1919
4. Appuyez sur pour sélectionner une chaîne et appuyez sur pour passer au paramètre suivant.
L’écran montrera“Ft0 ”. Paramètres de commande
5. Gardez à"0 ". Presse pour revenir en mode de pesée et redémarrer l’appareil..
Remarque: Le canal est déjà configuré avec le contrôle correspondant pour chaque hook. Seulement configurer quand
vous changez de commande
6. CALIBRATION
1. Allumer le crochet peseur et appuyer sur la touche de la commande à distance jusqu’à ce que le message “CAL SP”. apparaisse.
* sur la version 8.3 et ultérieure, appuyez sur D sur la télécommande au lieu de .
2. Appuyer sur la touche de la commande à distance. et l’écran affichera “CAL00”.
3. Ne surtout pas accrocher d’objet sur le crochet, appuyer sur la touch .
4. Lorsque l’écran affichera “LOAD”. Appuyer sur la touche de la commande à distance. L’écran affichera “-------“ et tout de suite après
“ LOAD”.
5. Appuyer sur la touche de la commande à distance pour introduire la valeur du poids de (maintenir la touche appuyée pour
augmenter la valeur du numéro).
6. Placer le poids de la calibration et attendre que la valeur du poids se stabilise pendant 4 à 5 secondes
7. Appuyer sur la touche de la commande à distance, l’écran affichera “ “. Ensuite, au-delà de 2 secondes l’écran affichera la
valeur du poids de calibration.
8. Enlever le poids et éteindre le crochet.
7. CONFIGURATION DE LA DIVISION
1. Maintenir la touche de la commande à distance appuyée jusqu’à ce que le message “CAL SP”.
2. Appuyer sur la touche de la commande à distance jusqu’à ce que le message “SET” apparaisse.
3. Appuyer sur la touche de la commande à distance jusqu’à ce que le message “d 2” apparaisse.
4. Utiliser la touche de la commande à distance pour changer la valeur de la división.
5. Appuyer sur la touche de la commande pour confirmer. L’écran affichere “100 “ capacité maximale.
6. Appuyer sur la touche de la commande, l’écran affichera le message “fLT 2” .
7. Appuyer sur la touche de la commande à distance, l’écran affichera le message “rng 2”
(1 correspond aux paramètres du suivi du Zéro).
8. Appuyer sur la touche de la commande à distance, l’écran affichera le message “AUPf0”.
9. Appuyer sur la touche de la commande à distance pour revenir au mode de pesée nor.

PTPTMANUAL DE UTILIZAÇÃO STE
20
PT
1. DESCRIÇÃO DO PRODUTO
STE é o novo dispositivo de pesagem que, combinado com peso, célula de carga e potência, pode ser conectado diretamente ao gancho de
elevação para obter o peso do conjunto e sem conjunto ao mesmo tempo. O ecrã tem LEDs brilhantes, o número de ecrãs pode ser visto clara-
mente a partir de 25 metros. Estrutura portátil e de fácil funcionamento descrevem a balança STE.
Com alta qualidade e preços competitivos, este modelo tem sido amplamente utilizado no setor têxtil, farmacêutico, armazéns, etc. É um dispo-
sitivo de pesagem ideal para a gestão de uma empresa moderna.
2. DESCRIÇÃO DO PAINEL
Funções das teclas
Ligar/desligar o gancho i Colocação a zero
Tarar/Destarar
Os seguintes dígitos aparecem na parte inferior do ecrã:
Indicador de estabilidade.
Indicador de tara.
Unidade de peso
• Visualizador com iluminação intensa de 8 secções. Grande visibilidade do visor em diferentes condições.
• A luz indicadora na extremidade direita acende quando o peso está estável.
• A luz indicadora da extremidade esquerda acende quando executamos uma tara.
• As duas luzes indicadoras intermédias são luzes unitárias.
• Modo de poupança de energia: Se a balança estiver ligada mas não houver peso na balança durante mais de um minuto, o ecrã entra auto-
maticamente no “modo de poupança de energia” com pontos brilhantes a circularem no ecrã da direita para a esquerda.
La page est en cours de chargement...
La page est en cours de chargement...
La page est en cours de chargement...
La page est en cours de chargement...
La page est en cours de chargement...
La page est en cours de chargement...
La page est en cours de chargement...
La page est en cours de chargement...
La page est en cours de chargement...
La page est en cours de chargement...
La page est en cours de chargement...
La page est en cours de chargement...
La page est en cours de chargement...
La page est en cours de chargement...
-
 1
1
-
 2
2
-
 3
3
-
 4
4
-
 5
5
-
 6
6
-
 7
7
-
 8
8
-
 9
9
-
 10
10
-
 11
11
-
 12
12
-
 13
13
-
 14
14
-
 15
15
-
 16
16
-
 17
17
-
 18
18
-
 19
19
-
 20
20
-
 21
21
-
 22
22
-
 23
23
-
 24
24
-
 25
25
-
 26
26
-
 27
27
-
 28
28
-
 29
29
-
 30
30
-
 31
31
-
 32
32
-
 33
33
-
 34
34


Baxtran STE Manuel utilisateur
- Catégorie
- Balances personnelles
- Taper
- Manuel utilisateur
dans d''autres langues
- italiano: Baxtran STE Manuale utente
- English: Baxtran STE User manual
- español: Baxtran STE Manual de usuario
- Deutsch: Baxtran STE Benutzerhandbuch
- português: Baxtran STE Manual do usuário