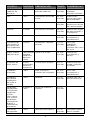
BLACK+DECKER RCD514 Le manuel du propriétaire
- Catégorie
- Petits appareils de cuisine
- Taper
- Le manuel du propriétaire
Ce manuel convient également à

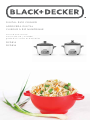
DIGITAL RICE COOKER
ARROCERA DIGITAL
CUISEUR À RIZ NUMÉRIQUE
use and care manual
manual de uso y cuidado
guide d’utilisation et d’entretien
RCD514
RCD516

Should you have any questions or concerns with your new product,
please call our Customer Service Line at 1-800-231-9786 (US and
Canada). Please do not return to the store.
Si usted tiene alguna inquietud o pregunta con su producto, por
favor llame a nuestra línea de servicio al cliente una atención
inmediata 1-800-231-9786 (EE.UU/Canadá) 01-800-714-2503
(México). No devuela a la tienda.
Si vous avez des questions ou des préoccupations à propos de
votre nouveau produit, veuillez communiquer avec notre Service à
la clientèle au 1 800 231-9786 (États-Unis et Canada). Veuillez ne
pas rapporter le produit au magasin.
Thank you for your purchase!
Gracias por su compra!
Merci de votre achat!

3
CONTENTS
Important Safeguards ............................................... 4
Getting to Know Your Rice Cooker..................................... 6
Getting Started .................................................... 7
Important Information About Your Rice Cooker ......................... 7
Operating Your Rice Cooker .......................................... 8
Cleaning and Care ..................................................11
Helpful Hints and Tips...............................................11
Troubleshooting....................................................16
Warranty .........................................................17
WELCOME!
Congratulations on your purchase of the BLACK+DECKER™ Digital Rice Cooker.
We have developed this use and care guide to ensure optimal performance and
your satisfaction. Save this use and care book and register your appliance online
at www.prodprotect.com/applica.

4
Please Read and Save this Use and Care Book.
IMPORTANT SAFEGUARDS.
When using electrical appliances, basic safety precautions should always be fol-
lowed to reduce the risk of fire, electric shock, and/or injury, including the following:
• Read all instructions.
• Do not touch hot surfaces. Use
handles or knobs.
• To protect against electrical shock, do
not immerse cord, plug or base unit in
water or other liquid.
• Close supervision is necessary when
any appliance is used by or near
children.
• Unplug from outlet when not in use
and before cleaning. Allow to cool
before putting on or taking off parts.
• Do not operate appliance with a
damaged cord or plug, or after the
appliance malfunctions or has been
damaged in any manner. Contact
Consumer Support at the toll-free
number listed in the warranty section.
• The use of accessory attachments
not recommended by this appliance
manufacturer may cause injuries.
• Do not use outdoors.
• Do not let cord hang over edge of
table or counter, or touch hot surfaces.
• Do not place on or near a hot gas or
electric burner, or in a heated oven.
• Extreme caution must be used when
moving an appliance containing hot oil
or other hot liquids.
• To disconnect, press the Start/Stop
button and then remove the plug
from the outlet.
• Do not use appliance for other than
intended use.
• This appliance is not intended for use
by persons (including children) with
reduced physical, sensory or mental
capabilities, or lack of experience
and knowledge, unless they have
been given supervision or instruction
concerning use of the appliance by a
person responsible for their safety.
• The appliance is not intended to be
operated by means of an external timer
or separate remote control system.
• Do not use this appliance on an unstable
surface.
• Do not attempt to heat or cook non-
food items in this appliance.
• Children should be supervised to
ensure that they do not play with the
appliance.
• Intended for countertop use only.
• WARNING: Spilled food can cause
serious burns. Keep appliance and cord
away from children. Never drape cord
over edge of counter, never use outlet
below counter, and never use with an
extension cord.
Additional Safeguards:
• To prevent damage or shock hazard,
do not cook directly in cooking base.
Cook only in cooking bowl provided.
• This appliance generates heat and
escaping steam during use. Lift off glass
lid carefully to avoid scalding, and allow
water to drip into cooking bowl.
• Never use the cooking bowl on a gas or
electric cooktop or on an open flame.
• Do not cut foods directly in the
cooking bowl to avoid scratching.
SAVE THESE INSTRUCTIONS.
This product is for household use only.

5
POLARIZED PLUG
This appliance has a polarized plug (one blade is wider than the other). To reduce
the risk of electric shock, this plug is intended to fit into a polarized outlet only one
way. If the plug does not fit fully into the outlet, reverse the plug. If it still does not fit,
contact a qualified electrician. Do not attempt to modify the plug in any way.
TAMPER-RESISTANT SCREW
Warning: This appliance is equipped with a tamper-resistant screw to prevent
removal of the outer cover. To reduce the risk of fire or electric shock, do not attempt
to remove the outer cover. There are no user-serviceable parts inside. Repair should
be done only by authorized service personnel. For service, repair or any questions
regarding your appliance, please call our Customer Service Line at 1-800-231-9786
(U.S. and Canada).
ELECTRICAL CORD
A short power-supply cord is provided to reduce the risks resulting from children
grabbing the cord or someone becoming entangled in or tripping over a longer cord.
Note: If the power cord is damaged, please contact the warranty department listed
in these instructions.

6
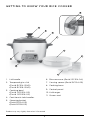
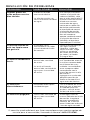
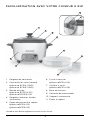
Product may vary slightly from what is illustrated.
1. Lid handle
2. Tempered glass lid
(Part# RC514-01ND)
(Part# RC516-01ND)
3. Cooking bowl
(Part# RCD514-02)
(Part# RCD516-02)
4. Cool-touch side handles
5. Steaming basket
(Part# RC514-03)
(Part# RC516-03)
6. Rice measure (Part# RC514-04)
7. Serving spoon (Part# RC514-05)
8. Cooking base
9. Control panel
10. Lid hanger
11. Steam vent
GETTING TO KNOW YOUR RICE COOKER
1
2
8
9
7
3
4
5
6
11
10

7
GETTING STARTED
This appliance is intended for household use only.
• Remove all packing material, any stickers, and the plastic band around the
power plug.
• Go to www.prodprotect.com/applica to register your product.
• Wash all removable parts as instructed in CARE AND CLEANING.
Place the clean, dry cooking pot in the cooking base.
• Select a location where this unit is to be used. Place the unit on a stable, heat
resistant surface, free from cloth, liquids and any other flammable materials.
Ensure that the unit has enough space all the way around and above it to
allow heat to flow without damage to cabinets or walls.
IMPORTANT INFORMATION ABOUT YOUR
RICE COOKER
• It is not necessary to preheat the rice cooker before use.
• The cooking bowl gets hot. When in use, always use oven mitts or
potholders when touching any outer or inner surface of the appliance.
• During the first few minutes of use you may notice smoke and a slight
odor. This is caused by oil that may have been used during manufacturing
of the unit and will not impact the performance.
• As rice cooks, steam will escape through vent in lid. Place glass lid on the
rice cooker so the steam vent is facing away from cabinets and walls. Do not
place hand over steam vent while rice is cooking; the hot steam may burn.
• Use the plastic serving spoon (or a wooden spoon) to stir and remove
rice. Do not use metal utensils that can scratch the nonstick cooking bowl.
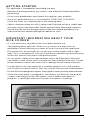
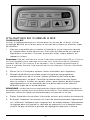
• Do not fill the cooking bowl higher than highest water marking measurement.
• When the rice cooker is plugged in, two dashes will blink on the display
screen, indicating that the rice cooker is on standby and ready to
program. A solid light indicates that the rice cooker is cooking.

8
• If using a Rice function to cook soups or stews, always use a kitchen
timer. Do not rely on the appliance in this function to switch to keep warm
since it is not intended to be an indicator of cooking time for soups and
stews.
OPERATING YOUR RICE COOKER
COOKING RICE
Use the brown rice setting to cook brown rice. Use the white rice setting to
cook white rice and other types of grains.
1. Measure desired amount of rice with the provided measuring cup and
add to the cooking bowl. See cooking chart in the Helpful Hints section
for rice and water ratios.
NOTE: When measuring uncooked rice; do not use a standard 1 cup (8 fluid
oz.) measuring cup. A standard rice cup is ¾ cup (6 fluid oz.); the same size
as the provided rice measuring cup. One rice cup measure of dry rice will
yield 2 standard cups of cooked rice.
2. Rinse the rice with water to remove any excess starch and then drain.
3. Fill the cooking bowl with water to the line that matches the number of
rice cups being cooked. Add butter, oil, or seasonings as desired. See the
cooking chart in the Helpful Hints section for additional details on water
and rice measures for different types of rice and grains.
NOTE: There are separate water marking lines for white and brown rice. For best
results, use the water marking lines that correspond to the rice being cooked.
4. Place the cooking pot into the cooking base and then place the lid on
the pot.
5. Plug in the appliance; the function lights and dashes on the display will
blink, indicating that the unit is in standby mode. Select the desired
rice setting by pressing the Menu button until the light to the left of the
setting illuminates.
6. Press the Start/Stop button and the White or Brown Rice light will turn
solid and the display screen dashes will begin rotating. This means
the appliance is cooking. When the rice is about 5 minutes from being
finished, the display will show the minute countdown.
7. When the rice is ready, the rice cooker will switch to Keep Warm and the
display will start counting up the hours for up to 4 hours.
8. For best results, allow the rice to rest on warm for 15 minutes with the lid
in place. This will help further steam the rice. Always stir the rice with the
serving spoon before serving.
9. To turn the rice cooker off, press the Start/Stop button. Unplug
the appliance when not in use and always allow the rice cooker to
completely cool before cleaning.
NOTE: If using Rice function for soups or stews always use a kitchen timer.
Do not rely on the appliance in this function to switch to keep warm since it
is not intended to be an indicator of cooking time for soups and stews.

9
SLOW COOKING
This setting allows you to slow cook, like in a traditional slow cooker set to
low. If you’re using a recipe, follow the instructions for the low setting. Most
recipes take 6–8 hours.
1. Add ingredients into the cooking bowl. Place cooking bowl into the
cooking base, then place the lid on top.
2. Plug in the appliance; the function lights and dashes on the display will
blink, indicating that the unit is in standby mode.
3. Select the Slow Cook setting by pressing the Menu/Select button until the
light to the left of Slow Cook illuminates.
4. To set the time, press the arrow keys up or down until the desired number
of hours is showing on the display.
5. Press the Start/Stop button to begin; the Slow Cook light will turn solid
and the display screen will begin to countdown the hours. This means the
appliance is cooking on Slow Cook.
6. Once the cook time is complete, the rice cooker will switch to Keep Warm
for up to 4 hour. This will be indicated by a blinking light above the Keep
Warm function on the display and also the timer counting up the hours.
7. To turn the rice cooker off, press the Start/Stop button. Unplug the
appliance when not in use and always allow the rice cooker to completely
cool before cleaning.
STEAMING
This setting allows you to steam vegetables, proteins, dumplings and more.
Please see the cooking chart in the Helpful Hints section for recommended
cooking times and quantities.
1. Add about 1 cup of water into the cooking bowl, and then place the
cooking bowl into the cooking base.
2. Add ingredients to the steaming basket, and then place the basket into
the cooking bowl. Place the lid on top.
3. Plug in the appliance; the function lights and dashes on the display will
blink, indicating that the unit is in standby mode.
4. Select the Steam function by pressing the Menu/Select button until the
light above Steam illuminates.
5. To set the time, press the arrow keys up or down until the desired number
of minutes is showing on the display.
6. Press the Start/Stop button to begin; the Steam light will turn solid and
the display screen will begin to countdown the minutes. This means the
appliance is heating.
7. Once the cook time is complete, the rice cooker will switch to Keep Warm
for up to 4 hours. This will be indicated by a blinking light above the
Keep Warm function on the display. Also, the timer will count down the
remaining time, indicated in hours.
8. To turn the rice cooker off, press the Start/Stop button. Unplug the
appliance when not in use and always allow the rice cooker to completely
cool before cleaning.

10
KEEPING FOOD WARM
This setting allows you to keep foods warm for an extended period of time. It
is not recommended to keep food on warm for more than 4 hours.
1. Add ingredients to the cooking bowl. Place the cooking bowl into the
cooking base, and then place the lid on top.
2. Plug in the appliance; the function lights and dashes on the display will
blink, indicating that the unit is in standby mode.
3. Select the Keep Warm function by pressing the Menu/Select button until
the light to the left of Keep Warm illuminates.
4. To set the time, press the arrow keys up or down until the desired number
of hours is showing on the display.
5. Press the Start/Stop button to begin; the warm light will turn solid and
the display screen will begin to countdown the hours. This means the
appliance is heating.
6. Once the cook time is complete, the rice cooker will switch off.
7. Unplug the appliance when not in use and always allow the rice cooker to
completely cool before cleaning.
DELAY START
The delay start function is ideal for planning out meals on your schedule,
allowing you to delay cooking for a set amount of time. This feature works
for white rice, brown rice, and steam. Always be sure to follow food safety
recommendations while cooking. See www.foodsafety.gov for additional
information.
1. Add ingredients to the cooking bowl. Place the cooking bowl into the
cooking base, and then place the lid on top.
2. Plug in the appliance; the function lights and dashes on the display will
blink, indicating that the unit is in standby mode.
3. Select the function that you want to delay by pressing the Menu button
until the light to the left of the function illuminates.
4. Set the cooking time as desired (if applicable for the desired setting) by
pressing the arrows up or down until the desired time is shown.
5. Press the Delay Start button and select the number of hours you want to
delay cooking by pressing the arrows up or down until the desired time is
shown.
6. Press the Start/Stop button; the light to the left of the selected function
will turn solid and the delay timer will start counting down. Once the delay
start time is completed, the cook time will start. See the specific function
directions for more information.

11
CLEANING AND CARE
This product contains no user serviceable parts. Refer service to qualified
service personnel.
CLEANING
Important: Never immerse cooking base in water or other liquids.
1. Always unplug the rice cooker and allow to cool completely before cleaning.
2. Wash cooking bowl and glass lid in warm, soapy water. If food sticks to
the cooking bowl, fill with warm, soapy water and allow it to soak before
cleaning with plastic scouring pad
Note: Both the cooking bowl and glass lid are dishwasher safe.
3. Rinse and dry thoroughly.
4. Wipe interior and exterior of the cooking base with a soft, slightly damp
cloth or sponge.
Important: Never use abrasive cleansers or scouring pads to clean the
cooking base, as they may damage the surfaces.
5. If water accidentally gets near the control panel or onto the heating
plate, allow the rice cooker to dry completely before using. Any other
servicing should be performed by an authorized service representative.
Note: Both the cooking bowl and glass lid are dishwasher safe.
STORING
Make sure that the appliance is thoroughly cool and dry. Never wrap the cord
tightly around the appliance; keep it loosely coiled. Placing the lid on upside-
down for storage can help save space.
HELPFUL HINTS AND TIPS
RICE TIPS
• If rice or other foods start to boil over, remove the lid and stir for a couple
minutes. Leaving the lid off for a short period of time will allow some of the
liquids to boil off and for the mixture to slightly cool. Place the lid back on the
rice cooker and repeat if needed. Adding a small amount (1 Tbs.) of butter or
oil to water before cooking will help prevent this issue from occurring.
• Kosher salt has no impurities and dissolves faster than table salt. If using
kosher salt, you may find you want to add a little more than if using table
salt. About ¾ tsp. of kosher salt is recommended for each rice cup (5 fluid
oz.) of uncooked rice.
• Uncooked white rice can be stored in an airtight container in a cool dark
place for up to one year.
• Uncooked brown rice can be stored in an airtight container in a cool dark
place for up to six months. Refrigeration or freezing extends its shelf life.
• Try using broth, stock, or reconstituted bouillon in place of water for
additional flavor. If you do, no additional salt may be necessary.
• Do not keep small amounts of rice in the warm cycle for extended periods
of time because it can dry out the rice.

12
• During cooking, a thin crust may develop on the rice at the bottom of
the bowl. If you do not like rice with a crust, you can easily peel it off and
discard it.
• Taste/hardness will vary depending on the quality/type of rice and length
of time it is cooked. For softer, fluffier rice, add a little more water. For
firmer, crunchier rice, use less water.
• If steaming foods and cooking rice at the same time, do not cook more
than 2 standard rice cups.
• For other types of grains not listed in the cooking chart, follow package
directions.
• Do not fill bowl above the highest water marking cup level on the cooking
bowl.
• If using one of the rice settings for foods other than rice and grains (for
example soups and stews), always use a kitchen timer. The automatic
keep warm function only works with rice, grains, oatmeal, and the like.
• If using one of the rice settings for foods other than rice and grains, for
best results choose recipes that will cook in 1 hour or less.
• To make pasta, add 6–7 cups of water to the cooking bowl and bring it to
a boil on the white rice setting. Add up to 1/2 lb. of pasta, stir, and cover.
Stir occasionally as needed. Cook until noodles have reached the desired
consistency and drain.
• When cooking oatmeal, steel cut oats work best. Never fill more than half
way with liquids as the oatmeal will expand. Stir as needed throughout
the cooking process to ensure even results. If using the white rice setting,
the rice cooker will switch to keep warm when the oatmeal is well-done.
If you prefer a different consistency, simply monitor the cooking process
and stop cooking when desired consistency is reached.
ADDITIONAL USES FOR YOUR RICE COOKER
Packaged foods: condensed and ready to serve soups, pastas, and stews
• Do not fill bowl above the largest water marking cup level on the
cooking bowl.
• For even heating, stir occasionally.
• If using Rice function for soups, stews, or the like, always use a kitchen timer.
Do not rely on the appliance in this function to switch to keep warm since it is
not intended to be an indicator of cooking time for soups and stews.
• If using rice settings to cook food with meats, use only boneless meats and
poultry that are cut into cubes no larger than 1½ inches. It is not necessary to
brown the meats before cooking.
• If using rice settings to cook, choose recipes that will cook in 1 hour or less.
• When cooking rice or pasta in the soup, add additional liquid in the recipe.
• Since most frozen vegetables cook very quickly, it is best to add them at the
end of the cooking time. Stir them into the soup or stew and allow the mixture
to cook an additional 5 to 10 minutes.
• To make pasta, add 6–7 cups of water to the cooking bowl and bring it to a
boil on the Rice Function. Add up to ½ lb. of pasta, stir and cover. Cook until
noodles have reached desired consistency and drain.

13
OATMEAL OR HOT CEREALS
• Steel cut oats work best.
• Do not fill bowl more than half way with liquids, as the oatmeal will
expand during the cooking process.
• For even heating, stir occasionally.
• When the oatmeal is done, the rice cooker will switch to warm.
Please note that this is for well-done oatmeal. If you prefer a different
consistency, monitor the cooking process to manually switch to warm for
desired results.
• Choose recipes that will cook in 1 hour or less.
If desired, add seasonings and oil or butter with rice before adding water.
Allow rice to rest on warm at least 15 minutes before serving.
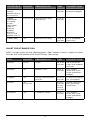
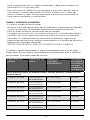
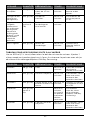
AMOUNT OF
RICE
AMOUNT OF
WATER
APPROX.
COOKING TIME
YIELD
(standard
8 oz. cups)
FOR WHITE LONG GRAIN, JASMINE, BASMATI, YELLOW, OR MEDIUM GRAIN RICE
2 rice measures to white rice mark 2 21 to 26 minutes 3.5 cups
3 rice measures to white rice mark 3 23 to 28 minutes 5.3 cups
4 rice measures to white rice mark 4 25 to 30 minutes 7 cups
5 rice measures to white rice mark 5 27 to 32 minutes 8.8 cups
6 rice measures to white rice mark 6 29 to 34 minutes 10.5 cups
7 rice measures* to white rice mark 7 31 to 36 minutes 12.3 cups
8 rice measures** to white rice mark 8 33 to 38 minutes 14 cups
FOR BROWN RICE
2 rice measures to brown rice mark 2 28 to 33 minutes 4.5 cups
3 rice measures to brown rice mark 3 30 to 35 minutes 6.8 cups
4 rice measures to brown rice mark 4 32 to 37 minutes 9 cups
5 rice measures to brown rice mark 5 34 to 39 minutes 11.3 cups
6 rice measures* to brown rice mark 6 36 to 41 minutes 13.5 cups
7 rice measures** to brown rice mark 7 38 to 43 minutes 15.8 cups
For other types of grains not listed in the cooking chart, follow package
directions.
*For the 14 cup rice cooker: RCD514, this is the maximum.
**For the 16 cup rice cooker: RCD516, this is the maximum.

14
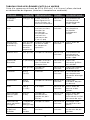
CHART FOR STEAMED VEGETABLES
Steam using 1 ½ to 2 cups of water, stock, or vegetable broth (cold or room
temperature).
VEGETABLE AMOUNT PREPARATION TIME SUGGESTIONS
Fresh
Asparagus
½ lb. Wash; break off
woody base where
spears snap easily.
15 to 18
minutes
Season with
salt, pepper, and
grated lemon peel.
Fresh Green
Beans
½ lb. Leave whole, trim
end or cut into 2-inch
pieces.
15 to 18
minutes
Season with salt,
pepper, and freshly
snipped dill.
Fresh Beets
(quartered)
1 lb. (about
5 medium)
Remove stem and
root ends. Peel and
cut into wedges.
26 to 28
minutes
Serve with butter.
Fresh Broccoli 1 lb. Cut into florets. 15 to 18
minutes
Season with
salt, pepper, and
grated lemon peel.
Brussels
Sprouts
4 cups Cut a cross in the
base of each sprout.
24 to 26
minutes
Garnish with
chopped, toasted
hazelnuts.
Cabbage 1 lb. Cut in wedges. 24 to 26
minutes
Garnish with
crumbled, cooked
bacon.
Carrots 12 oz. Slice. 18 to 20
minutes
Season with salt,
pepper, and grated
orange peel.
Cauliflower 12 oz. Cut into florets. 22 to 25
minutes
Garnish with
buttered, toasted
bread crumbs.
Corn 1 ½ lb. 2-4 ears. 20 to 22
minutes
Serve with butter
and spices.
Snow peas or
Sugar Snap
Peas
8 oz. Trim and leave whole. 12 to 14
minutes
Serve with minced
green onions and
drizzled with soy
sauce.
New potatoes
(red)
6 medium
(about 1 lb.)
Cut in half. 24 to 26
minutes
Toss with butter
and parsley.
Fresh leaf
spinach
4 cups
firmly
packed
Use whole leaves. 10 to 15
minutes
Garnish with
roasted garlic and
toasted pine nuts
Butternut
squash
1 lb. Peel and cut into
1-inch cubes.
24 to 26
minutes
Serve with butter
and spices.

15
VEGETABLE AMOUNT PREPARATION TIME SUGGESTIONS
Summer
Squash
(yellow squash
or zucchini)
1 lb. Slice. 16 to 18
minutes
Season with salt
and garlic pepper
Frozen
Vegetables,
including
mixed
vegetables
such as
broccoli
medley,
broccoli
stir fry, and
pepper stir fry
10 oz. to 1 lb. Remove from bag
and season.
16 to 18
minutes
Frozen peas 1 lb. Remove from bag. 14 to 16
minutes
Stir in chopped,
fresh mint.
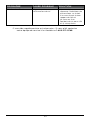
CHART FOR STEAMED FISH
Add 1 ½ cups water to rice cooking bowl. Add 1 lemon, thickly sliced, to water.
Season fish with lemon juice and Old Bay Seasoning.
FISH AMOUNT PREPARATION TIME SUGGESTIONS
Salmon 1 ½ lbs. Fillets 24 to 26
minutes
Top with lemon
slices and snipped,
fresh dill.
Scallops 1 lb. Medium size 14 to 16
minutes
Very tender;
serve with tartar
sauce and lemon
wedges.
Snapper 1 lb. Whole, remove head
and tail
20 to 22
minutes
Drizzle with garlic,
soy vinaigrette
Shrimp 1 lb.
(20 to 24)
15 to 18
minutes
or until
shrimp
turn pink
Season with Old
Bay Seasoning
and lemon.
Swordfish 1 lb. 2 medium steaks 15 to 17
minutes
Very tender;
serve with tartar
sauce and lemon
wedges.

16
TROUBLESHOOTING
PROBLEM POSSIBLE CAUSE SOLUTION
Some kernels of rice do
not seem fully cooked
• The rice was not allowed
to finish cooking
• There was not enough
water in the cooking
bowl.
• Once the switch on the
rice cooker automatically
switches to keep warm,
allow rice to rest for 15
minutes before serving.
• Add a few more
tablespoons of water
and cook a little longer
by pushing the control
switch back to cook.
Check the rice again
when the appliance
automatically switches
back to warm and has
rested for 15 minutes.
Rice cooking bowl is
not as clean as I would
like.
• Starch built up on sides
and bottom of the bowl.
• Fill the bowl with
hot soapy water and
let stand for several
minutes; then use a
nylon scrubber along
sides and bottom.
Rinse well.
Rice boils over. • Too much rice is being
cooked.
• There is too much water
for the amount of rice.
• Make sure to cook no
more than maximum
amount suggested in the
Use and Care Manual.
The amount of rice to
be cooked should match
the water markings on
the bowl.
• Add a small amount
(1 Tbs.) of butter or oil to
water before cooking.
Rice is too dry. • There is too much rice or
not enough water.
• Use the rice measuring
cup that comes with
the appliance. The rice
measure provided holds
¾ cup (6 fluid oz.) of
uncooked rice.
Rice is gummy. • There is too much water
or not enough rice.
• Add water to match
water markings on the
rice bowl. Make sure you
have the correct ratio of
¾ cup (6 fluid oz) rice to
1 cup water marking.
If additional assistance is needed, please contact our consumer service team at
1-800-231-9786.

17
For service, repair or any questions regarding your appliance, call the
appropriate 800 number listed within this section. Please DO NOT return
the product to the place of purchase. Also, please DO NOT mail product
back to manufacturer, nor bring it to a service center. You may also want to
consult the website listed on the cover of this manual.
Two-Year Limited Warranty
(Applies only in the United States and Canada)
What does it cover?
• Any defect in material or workmanship provided; however, Spectrum Brands,
Inc.’s liability will not exceed the purchase price of product.
For how long?
• Two years from the date of original purchase with proof of purchase.
What will we do to help you?
• Provide you with a reasonably similar replacement product that is either new or
factory refurbished.
How do you get service?
• Save your receipt as proof of date of sale.
• Visit the online service website at www.prodprotect.com/applica, or call toll-free
1-800-231-9786, for general warranty service.
• If you need parts or accessories, please call 1-800-738-0245.
What does your warranty not cover?
• Damage from commercial use
• Damage from misuse, abuse or neglect
• Products that have been modified in any way
• Products used or serviced outside the country of purchase
• Glass parts and other accessory items that are packed with the unit
• Shipping and handling costs associated with the replacement of the unit
• Consequential or incidental damages (Please note, however, that some states do
not allow the exclusion or limitation of consequential or incidental damages, so
this limitation may not apply to you.)
How does state law relate to this warranty?
• This warranty gives you specific legal rights. You may also have other rights that
vary from state to state or province to province.
WARRANTY INFORMATION

18
ÍNDICE
Instrucciones Importantes de Seguridad................................19
Conozca Su Arrocera................................................21
Primeros Pasos ................................................... 22
Información Importante Acerca de su Arrocera ......................... 22
Uso de su Arrocera ................................................ 23
Limpieza y Cuidado................................................ 26
Consejos y Pistas Útiles ............................................ 27
Resolución de Problemas ........................................... 33
Información de Garantía ............................................ 34
¡BIENVENIDO!
Felicitaciones por su compra de la Arrocera de BLACK+DECKER. Hemos
diseñado esta guía para asegurar un rendimiento óptimo del producto y
garantizar su satisfacción completa. Conserve este manual de uso y cuidado y
asegúrese de registrar su producto en línea, visitando www.prodprotect.com/
applica.

19
• LEA TODAS LAS INSTRUCCIONES
ANTES DE UTILIZAR EL APARATO.
• Para protegerse contra descargas
eléctricas, no sumerja el cable, enchufe
o aparato en agua u otro líquido.
• No toque las superficies calientes.
Utilice las asas o las perillas.
• Todo aparato eléctrico utilizado en la
presencia de los niños o por ellos mismos
requiere la supervisión de un adulto.
• Desenchufe el aparato del
tomacorriente cuando no esté en uso
y antes de limpiarlo. Permita que el
aparato se enfríe antes de instalarle o
retirarle las piezas.
• No utilice ningún aparato que
tenga el cable o el enchufe dañado,
que presente un problema de
funcionamiento o que esté dañado.
Cliente, llamando gratis al número que
aparece en la sección de Garantía.
• El uso de accesorios no recomendados
por el fabricante del aparato puede
causar lesiones personales.
• No utilice el aparato a la intemperie.
• No permita que el cable cuelgue del
borde de la mesa o del mostrador ni
que entre en contacto con superficies
calientes.
• No lo coloque sobre o cerca de una
hornilla de gas o eléctrica, ni en un
horno caliente.
• Se debe proceder con extrema
precacución cuando se mueve un
aparato que contenga aceite caliente
u otros líquidos calientes.
• Para desconectar, presione el
interruptor de control hacia arriba (la
luz indicadora de calentar (WARM) se
iluminará) y luego remueva el enchufe
del tomacorriente.
• No utilice el aparato para otro fin que
no sea para el que fué diseñado.
• Este aparato no está diseñado para
ser utilizado por personas (incluyendo
los niños) con su capacidad física,
sensorial o mental reducida, o con falta
de experiencia o sabiduria, a menos
que sean supervisadas o instruidas
acerca del uso del aparato por una
persona responsable de su seguridad.
• El aparato no está diseñado para
funcionar a través de un reloj
automático externo o con un sistema
de control remoto separado.
• No utilice este aparato sobre una
superficie inestable.
• No trate de calentar o cocinar nada
que no sea alimento en este aparato.
• Los ninos deben ser supervisados
para asegurar que no jueguen con el
aparato.
• Diseñado solamente para uso en el
mostrador.
• ADVERTENCIA: Los alimentos
derramados pueden ocasionar
quemaduras graves. Mantenga el
aparato y el cable alejados de los
niños. Nunca acomode el cable de
manera que cuelgue sobre el borde
del mostrador, nunca utilice el
tomacorriente debajo del mostrador y
nunca utilice con un cable de extensión.
Medidas de Seguridad Adicionales:
• Para prevenir daños o riesgos de
descarga eléctrica, no cocine sobre la
base de cocción. Solo cocine en la olla
de cocción incluída.
• Este aparato genera calor y escape de
vapor durante su uso. Levante la tapa
de vidrio cuidadosamente para evitar
quemaduras y permitir que el agua
caiga dentro de la olla de cocción.
• Nunca utilice la olla de cocción sobre
una estufa de gas o eléctrica ni sobre
una llama al descubierto.
• A fin de evitar rayones, no corte
los aliments directamente en la olla
de cocción.
Por favor lea este instructivo antes de usar el producto.
INSTRUCCIONES IMPORTANTES
DE SEGURIDAD
Cuando se utilizan aparatos eléctricos, siempre se debe respetar ciertas medidas de
seguridad a fin de reducir el riesgo de un incendio, un choque eléctrico y (o) lesiones a
las personas, incluyendo las siguientes:
CONSERVE ESTAS INSTRUCCIONES.
Este aparato eléctrico es para uso doméstico solamente.

20
ENCHUFE POLARIZADO
Este aparato cuenta con un enchufe polarizado (un contacto es más ancho que
el otro). A fin de reducir el riesgo de un choque eléctrico, este enchufe encaja
en un tomacorriente polarizada en un solo sentido. Si el enchufe no entra en le
tomacorriente, inviértalo y si aun así no encaja, consulte con un electricista. Por favor
no trate de alterar esta medida de seguridad.
TORNILLO DE SEGURIDAD
Advertencia: Este aparato cuenta con un tornillo de seguridad para evitar la remoción
de la cubierta exterior del mismo. A fin de reducir el riesgo de incendio o de choque
eléctrico, por favor no trate de remover la cubierta exterior. Este producto no
contiene piezas reparables por el consumidor. Toda reparación se debe llevar a cabo
únicamente por personal de servicio autorizado
CABLE ELÉCTRICO
Un cable de alimentación corto es provisto para reducir los riesgos de que los niños
agarren el cable o que alguien se enrede o tropiece con un cable más largo.
Nota: Si el cable de alimentación está dañado, por favor llame al número del
departamento de garantía que aparece en estar instrucciones.
La page est en cours de chargement...
La page est en cours de chargement...
La page est en cours de chargement...
La page est en cours de chargement...
La page est en cours de chargement...
La page est en cours de chargement...
La page est en cours de chargement...
La page est en cours de chargement...
La page est en cours de chargement...
La page est en cours de chargement...
La page est en cours de chargement...
La page est en cours de chargement...
La page est en cours de chargement...
La page est en cours de chargement...
La page est en cours de chargement...
La page est en cours de chargement...
La page est en cours de chargement...
La page est en cours de chargement...
La page est en cours de chargement...
La page est en cours de chargement...
La page est en cours de chargement...
La page est en cours de chargement...
La page est en cours de chargement...
La page est en cours de chargement...
La page est en cours de chargement...
La page est en cours de chargement...
La page est en cours de chargement...
La page est en cours de chargement...
La page est en cours de chargement...
La page est en cours de chargement...
La page est en cours de chargement...
La page est en cours de chargement...
La page est en cours de chargement...
La page est en cours de chargement...
La page est en cours de chargement...
La page est en cours de chargement...
-
 1
1
-
 2
2
-
 3
3
-
 4
4
-
 5
5
-
 6
6
-
 7
7
-
 8
8
-
 9
9
-
 10
10
-
 11
11
-
 12
12
-
 13
13
-
 14
14
-
 15
15
-
 16
16
-
 17
17
-
 18
18
-
 19
19
-
 20
20
-
 21
21
-
 22
22
-
 23
23
-
 24
24
-
 25
25
-
 26
26
-
 27
27
-
 28
28
-
 29
29
-
 30
30
-
 31
31
-
 32
32
-
 33
33
-
 34
34
-
 35
35
-
 36
36
-
 37
37
-
 38
38
-
 39
39
-
 40
40
-
 41
41
-
 42
42
-
 43
43
-
 44
44
-
 45
45
-
 46
46
-
 47
47
-
 48
48
-
 49
49
-
 50
50
-
 51
51
-
 52
52
-
 53
53
-
 54
54
-
 55
55
-
 56
56


BLACK+DECKER RCD514 Le manuel du propriétaire
- Catégorie
- Petits appareils de cuisine
- Taper
- Le manuel du propriétaire
- Ce manuel convient également à