
ENGLISH FRANÇAIS ESPAÑOL
www.signaturekitchensuite.com (USA)
www.signaturekitchensuite.ca (CANADA)
Copyright © 2019 Signature Kitchen Suite. All Rights Reserved.
MFL70339814_Rev.00
ENGLISH FRANÇAIS ESPAÑOL
OWNER’S MANUAL
BUILT-IN FREEZER
Read this owner's manual thoroughly before operating the appliance
and keep it handy for reference at all times.
SKSCF1801P
SKSCF2401P
SKSCF3001P

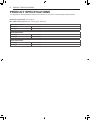
2 TABLE OF CONTENTS
TABLE OF CONTENTS
3 PRODUCT FEATURES
4 SAFETY INSTRUCTIONS
4 IMPORTANT SAFETY INSTRUCTIONS
8 PRODUCT SPECIFICATIONS
9 PRODUCT OVERVIEW
9 Interior
10 OPERATION
10 Before Use
11 Control Panel
13 Ice Compartment
13 Automatic Icemaker
13 Storing Food
16 Door Bins
17 Adjusting the Shelves
18 SMART FUNCTIONS
18 SIGNATURE KITCHEN SUITE Application
21 Smart Grid Function
22 Smart Diagnosis™ Function
23 MAINTENANCE
23 Cleaning
24 Replacing the Water Filter
25 Recycling the Air Filter
29 TROUBLESHOOTING
29 FAQs: Frequently Asked Questions
30 Before Calling for Service
38 LIMITED WARRANTY
38 FOR USA
40 FOR CANADA

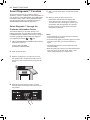
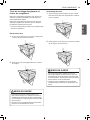
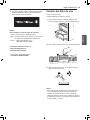
3PRODUCT FEATURES
ENGLISH
PRODUCT FEATURES
Depending on the model, some of the following functions may not be available.
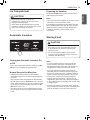
DOOR ALARM
The Door Alarm function is designed to prevent freezer malfunctioning that could occur if a door remains open.
If a door is left open for more than 60 seconds, a warning alarm sounds at 30-second intervals.
ICE PLUS
Ice production is increased when the freezer section is maintained at the coldest temperature for a 24-hour
period.

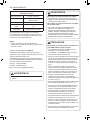
4SAFETY INSTRUCTIONS
SAFETY INSTRUCTIONS
READ ALL INSTRUCTIONS BEFORE USE
Your safety and the safety of others are very important.
We have provided many important safety messages in this manual and on your appliance. Always read and
follow all safety messages.
This is the safety alert symbol.
This symbol alerts you to potential hazards that can kill or injure you and others.
All safety messages will follow the safety alert symbol and either the word WARNING or CAUTION.
These words mean:
WARNING
You may be killed or seriously injured if you do not follow instructions.
CAUTION
You may be injured or cause damage to the product if you do not follow instructions.
All safety messages will tell you what the potential hazard is, tell you how to reduce the chance of injury, and
tell you what may happen if the instructions are not followed.
IMPORTANT SAFETY INSTRUCTIONS
WARNING
To reduce the risk of explosion, re, death, electric shock, scalding or injury
to persons when using this product, follow basic precautions, including the
following:

5SAFETY INSTRUCTIONS
ENGLISH
OPERATION
•This product is not to be used for special purposes such as the storage of medicine or test materials or for
use on ships, etc.
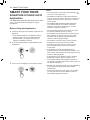
•DO NOT allow children to climb, stand, or hang on the freezer doors or on the shelves in the freezer.
They could damage the freezer and seriously injure themselves.
•Do not allow children to climb into the freezer. They could be trapped and suffocated.
•Children should be supervised to ensure that they do not play with the freezer.
•Keep ngers out of pinch point areas when opening or closing doors. Be careful closing doors when
children are nearby.
•Do not touch frozen food or the metal parts in the freezer compartment with wet or damp hands. Doing so
may cause frostbite.
•Do not refreeze frozen food that has thawed completely. Doing so may result in a serious health hazard.
•An individual properly grounded branch circuit or circuit breaker must be used in case of requiring
disconnect after installation.
•Do not use an adapter plug or plug the power plug into a multi-outlet extension cord.
•Do not use a cord that shows cracks or abrasion damage along its length or at either the plug or connector
end. Immediately have all power cords that have become frayed or otherwise damaged repaired or replaced
by qualied service personnel.
•Do not operate the freezer or touch the power cord with wet hands.
•Do not modify or extend the power cord.
•Do not use an uncertied power outlet. Do not plug appliance into a damaged wall outlet.
•Do not put hands, feet or other objects into the air vents or bottom of the freezer. Doing so could result in
personal injury or electric shock.
•In the event of a gas leak (propane/LPG), ensure the area is adequately ventilated and contact an
authorized service center before resuming use. Do not touch the freezer or power button of the freezer.
•Turn off power to the appliance immediately and contact an authorized service center if there is a strange
noise, odor, or smoke coming from the appliance.
•Do not use any fuse (such as copper, steel wire, etc.) other than a standard fuse.
•Do not place or use an electrical appliance inside the freezer, unless it is of a type recommended by the
manufacturer.
•Do not put animals inside the appliance.
•Avoid contact with any moving parts of the ejector mechanism or with the heater that releases the ice
cubes. DO NOT place ngers in the automatic icemaker when the freezer is plugged in.
•This appliance is not intended for use by persons (including children) with reduced physical, sensory or
mental capabilities, or lack of experience and knowledge, unless they have been given supervision or
instruction concerning the use of the appliance by a person responsible for their safety.
•If connected to a circuit protected by fuses, use time delay fuse.

6SAFETY INSTRUCTIONS
MAINTENANCE
•Do not use a hair dryer to dry the inside of the freezer.
•Do not light a candle to remove odors in the freezer.
•In the event of a refrigerant leak, move ammable objects away from the freezer. Ensure the area is
adequately ventilated and contact an authorized service center.
•Keep ammable materials and vapors, such as gasoline, away from the freezer.
•This appliance is intended to be used in household and similar applications such as staff kitchen areas
in shops, ofces and other working environments; farm houses and by clients in hotels, motels and other
residential type environments; bed and breakfast type environments; catering and similar non-retail
applications.
•Turn off power before cleaning or repairing the freezer.
•The freezer compartment lights are interior LED lighting, and service should be performed by a qualied
technician.
•Turn off power immediately in the event of a blackout or thunderstorm.
•Turn the power off if water or dust penetrates into the freezer. Call a service agent.
•Do not store glass containers or soda in the freezer compartment. Contents may expand when frozen,
break the container and cause injury.
•Do not store, disassemble or repair the appliance yourself or allow unqualied personnel to do so.
•If the electrical supply cord is damaged, it must only be replaced by the manufacturer or its service agent or
a similar qualied person in order to avoid a hazard.
•Do not store explosive substances such as aerosol cans with a ammable propellant in this appliance.
DISPOSAL
•Junked or abandoned freezer are dangerous, even if they are sitting for only a few days. When disposing of
the freezer, remove the packing materials from the door or take off the doors but leave the shelves in place
so that children may not easily climb inside.
•If disposing of a freezer, make sure the refrigerant is removed for proper disposal by a qualied servicer. If
you release the refrigerant, you may be ned or imprisoned in accordance with the relevant environmental
law.
GROUNDING INSTRUCTIONS
•Improper connection of the equipment-grounding conductor can result in a risk of electric shock. Check with
a qualied electrician or service personnel if you are in doubt whether the appliance is properly grounded.
Do not modify the plug provided with the appliance; if it will not t the outlet, have a proper outlet installed by
a qualied electrician.
•Have a certied electrician check the wall outlet and wiring for proper grounding.

7SAFETY INSTRUCTIONS
ENGLISH
This appliance contains a small amount of isobutane refrigerant (R600a), but it is also combustible. When
transporting and installing the appliance, care should be taken to ensure that no parts of the refrigerating
circuit are damaged. Refrigerant squirting out of the pipes could ignite or cause an eye injury. If a leak is
detected, avoid any naked ames or potential sources of ignition and air the room in which the appliance is
standing for several minutes.
In order to avoid the creation of a ammable gas air mixture if a leak in the refrigerating circuit occurs, the
size of the room in which the appliance may be sited depends on the amount of refrigerant used. The room
must be 1m
2
in size for every 8g of R600a refrigerant inside the appliance. The amount of refrigerant in your
particular appliance is shown on the identication plate inside the appliance. Never start up an appliance
showing any signs of damage. If in doubt, consult your dealer.
WARNING
•Keep ventilation openings, in the appliance enclosure or in the built-in structure, clear of obstruction.
•Do not use mechanical devices or other means to accelerate the defrosting process, other than those
recommended by the manufacturer.
•Do not damage the refrigerant circuit.
•Do not use electrical appliances inside the food storage compartments of the appliance, unless they are of the
type recommended by the manufacturer.
•The refrigerant and insulation blowing gas used in the appliance require special disposal procedures. When
disposing, please consult with service agent or a similarly qualified person.
CAUTION
To reduce the risk of minor or moderate injury to persons, malfunction, or damage
to the product or property when using this product, follow basic precautions,
including the following:
INSTALLATION
•Do not install the freezer where there may be a danger of the unit falling.
•The freezer must be properly installed in accordance with the Installation Instructions.
OPERATION
•Do not use aerosols near the freezer.
•This appliance is intended to be used only in domestic and similar applications.
•Do not strike or apply excessive force to any glass surface. Do not touch glass surfaces if they are cracked
or broken.
•Do not overll or pack items too tightly into door bins. Doing so may cause damage to the bin or personal
injury if items are removed with excessive force.
•Do not overll the appliance with food. Doing so may cause personal injury or property damage.
MAINTENANCE
•Do not use strong detergents like wax or thinners for cleaning. Clean with a soft cloth.
•Remove foreign objects (such as dust and water) off the prongs of the power plug and contact areas. Do
not use a wet or damp cloth when cleaning the plug.
•Do not spray water directly on the inside or outside of the freezer.
•Do not clean glass shelves or covers with warm water when they are cold. They may break if exposed to
sudden temperature changes.
SAVE THESE INSTRUCTIONS

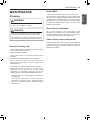
8PRODUCT SPECIFICATIONS
PRODUCT SPECIFICATIONS
The appearance and specications listed in this manual may vary due to constant product improvements.
Electrical requirements: 115 V, 60 Hz
Min. / Max. water pressure: 20 - 120 psi (138 - 827 kPa)
Model SKSCF1801P
Description Built-in, Freezer
Net weight 304 lb (138 kg)
Model SKSCF2401P
Description Built-in, Freezer
Net weight 346 lb (157 kg)
Model SKSCF3001P
Description Built-in, Freezer
Net weight 403 lb (183 kg)

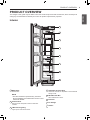
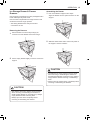
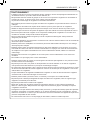
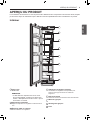
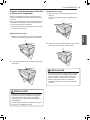
9PRODUCT OVERVIEW
ENGLISH
Interior
1
2
3
4
5
6
7
8
Water lter
Purifies water.
NOTE
•The lter should be replaced every 6 months.
See the Replacing the Water Filter section in this
manual for details.
Control Panel
Sets the freezer temperature and the water lter
condition.
LED interior lighting
Lights up the inside of the freezer.
Adjustable Freezer Shelf
The freezer shelves are adjustable to meet individual
storage needs.
Movable Door Bin
Store chilled food or drinks.
Icemaker
Ice Storage
Drawer
PRODUCT OVERVIEW
The images in this guide may be different from the actual components and accessories, which are subject to
change by the manufacturer without prior notice for product improvement purposes.

10 OPERATION
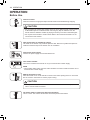
OPERATION
Before Use
Clean the freezer.
Clean the freezer thoroughly and wipe off all dust that accumulated during shipping.
CAUTION
•Do not scratch the freezer with a sharp object or use a detergent that contains alcohol,
a ammable liquid or an abrasive when removing any tape or adhesive from the
freezer. Remove adhesive residue by wiping it off with your thumb or dish detergent.
•Do not peel off the model or serial number label or the technical information on the
rear surface of the freezer.
Open freezer door to ventilate the interior.
The inside of the freezer may smell like plastic at rst. Remove any adhesive tape from
inside the freezer and open the freezer door for ventilation.
Connect the power supply.
Check if the power supply is connected before use.
Turn off the icemaker
Turn off the icemaker if the freezer is not yet connected to the water supply.
NOTE
• The icemaker water valve may buzz if the icemaker is turned on while the freezer is not
connected to the water supply.
Wait for the freezer to cool.
Allow the freezer to run for at least two to three hours before putting food in it. Check the
ow of cold air in the freezer to ensure proper cooling.
CAUTION
•Putting food in the freezer before it has cooled could cause the food to spoil, or a bad
odor to remain inside the freezer.
The freezer makes a loud noise after initial operation.
This is normal. The volume will decrease as the temperature decreases.

11OPERATION
ENGLISH
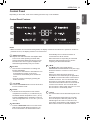
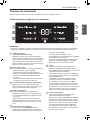
Control Panel
Depending on the model, some of the following functions may not be available.
Control Panel Features
1
2
3
5
6
7
4
NOTE
•When the freezer is in the Power Saving Mode, the display remains off until the door is opened or a button is
pressed. Once on, the display remains on for 20 seconds.
* Water Filter Reset
Replace the water lter when the Replace Filter
icon turns on. After replacing the water lter,
press and hold the Water Filter button for three
seconds to turn the icon light off. Replace the
water lter approximately every six months.
Ice Plus
This function increases both ice making and
freezing capabilities.
• Press the Ice Plus button to illuminate the icon
and activate the function for 24 hours.
The function automatically shuts off after 24
hours.
• Stop the function manually by pressing the
button once more.
* Ice On/Off
Press the Ice On/Off button for three seconds to
turn the icemaker on/off.
Freezer
Indicates the set temperature of the freezer
compartment in Celsius (°C) or Fahrenheit (°F).
The default freezer temperature is 0°F (-18 °C).
Press the Freezer button repeatedly to select a
new set temperature from -6 °F to 8 °F (-21 °C to
-13 °C).
Smart Grid
Press the Smart Grid button to turn the Smart
Grid function On/Off. When the function is on,
the icon illuminates. The Smart Grid function
automatically turns on when the freezer is
connected to the Wi-Fi network.
When the freezer is responding to a Demand
Response (DR) message from the electric
company, the Grid text illuminates.
* Wi-Fi
The Wi-Fi button, when used with the
SIGNATURE KITCHEN SUITE smart phone app,
allows the freezer to connect to a home Wi-Fi
network.
Refer to the Smart Functions section for
information on the initial setup of the application.
The Wi-Fi icon shows the status of the freezer’s
network connection. The icon illuminates when
the freezer is connected to the Wi-Fi network.
Press and hold the Wi-Fi button for 3 seconds to
connect to the network. The icon blinks while
the connection is being made, then turns on once
the connection is successfully made.
* Power
The Power button turns off all electrical power to the
unit.
Press and hold the Power button for 3 seconds
to turn off the power. When the power is off, the
indicator light is off. There is no need to turn off
power at the circuit breaker or wall receptacle. Use
this function for service or extended vacations.

12 OPERATION
CAUTION
Display Mode (For Store Use Only)
•The Display Mode disables all cooling in the
freezer sections to conserve energy while on
display in a retail store. When activated, OF is
displayed on the control panel and the display
remains on for 20 seconds.
To deactivate / activate:
•With the door open, press and hold the Freezer
and Water Filter reset buttons at the same time
for ve seconds. The control panel beeps and
the temperature settings display to conrm that
Display Mode is deactivated. Use the same
procedure to activate Display Mode.
and SABBATH
Sabbath mode is used on the Jewish Sabbath
and holidays.
• To turn Sabbath mode on, touch the display to
activate it, then press and hold the Freezer and
Power buttons for 3 seconds until Sb appears in
the display.
• Sabbath mode automatically turns off after 96
hours.
• To turn Sabbath mode off manually, press
and hold the Freezer and Power buttons for 3
seconds.
• Once turned on, Sabbath mode is maintained
even after a power outage.
• Selecting Sabbath mode automatically turns off
the Light and Alarm functions. The icemaker is
also disabled.
• The interior display stays on during Sabbath
mode, but only “Sb” and the Freezer and Power
buttons are displayed.
• The freezer temperature is set to 0°F (-18°C)
and cannot be changed until Sabbath mode is
turned off.
NOTE
• The Smart Grid function is automatically turned off
in Sabbath mode.
When Sabbath mode ends, the Smart Grid function
must be activated again manually.

13OPERATION
ENGLISH
Ice Compartment
CAUTION
•Keep hands and tools out of the ice
compartment. Failure to do so may result in
damage or personal injury.
•Throw away the rst few batches of ice after
installation. This is also necessary if the freezer
has not been used for a long time.
Automatic Icemaker
Turning the Automatic Icemaker On
or Off
To turn off the automatic icemaker, press the ice On/
Off button on the display for three seconds.
Normal Sounds You May Hear
•Keeping the power turned on to the icemaker
before the water line is connected can damage the
icemaker.
•The icemaker water valve buzzes as the icemaker
lls with water. If the Ice On/Off button is in the ON
mode, it will buzz even if it has not yet been hooked
up to water. To stop the buzzing, press the Ice On/
Off button to turn it off.
•You will hear the sound of cubes dropping into the
bin and water running in the pipes as the icemaker
rells.
Preparing for Vacation
Set the Ice On/Off button to OFF and shut off the
water supply to the freezer.
NOTE
•The ice bin should be emptied any time the Ice On/
Off button is turned to the OFF mode.
If the ambient temperature will drop below freezing,
have a qualied technician drain the water supply
system to prevent serious property damage due
to ooding caused by ruptured water lines or
connections.
Storing Food
CAUTION
•Do not overll or pack items too tightly into door
bins. Doing so may cause damage to the bin
or personal injury if items are removed with
excessive force.
•Do not store glass containers in the freezer.
Contents may expand when frozen, break the
container and cause injury.
NOTE
•If you are leaving home for a short period, like
a short vacation, the freezer should be left on.
Refrigerated foods that are able to be frozen will
stay preserved longer if stored in the freezer.
•If you are leaving the freezer turned off for an
extended period, remove all food and unplug the
power cord. Clean the interior, and leave the door
open to prevent fungi from growing in the freezer.
•If the freezer is kept in a hot and humid place,
frequent opening of the door or storing a lot of
vegetables in the freezer may cause condensation
to form. Wipe off the condensation with a clean cloth
or a paper towel.
•If the door is opened or closed too often, warm air
may penetrate the freezer and raise its temperature.
This can increase the running costs of the unit.

14 OPERATION
Food Storage Tips
Wrap or store food in the freezer in airtight and
moisture-proof material unless otherwise noted. This
prevents food odor and taste transfer throughout
the freezer. For dated products, check date code to
ensure freshness.
Food How to
Butter or
Margarine
Keep opened butter in covered dish
or closed compartment in refrigerator.
When storing an extra supply, wrap in
freezer packaging and freeze.
Fish
Freeze fresh sh and shellsh if they
are not being eaten the same day
purchased. Eating fresh sh and
shellsh the same day purchased is
recommended.
Storing Frozen Food
Check a freezer guide or a reliable cookbook for
further information about preparing food for freezing
or food storage times.
Freezing
Your freezer will not quick-freeze a large quantity of
food. Do not put more unfrozen food into the freezer
than will freeze within 24 hours (no more than 2 to 3
pounds of food per cubic foot of freezer space).
Leave enough space in the freezer for air to circulate
around packages. Be careful to leave enough room
at the front so the door can close tightly.
Storage times will vary according to the quality and
type of food, the type of packaging or wrap used
(how airtight and moisture-proof) and the storage
temperature. Ice crystals inside a sealed package are
normal. This simply means that moisture in the food
and air inside the package have condensed, creating
ice crystals.
NOTE
•Allow hot foods to cool at room temperature for 30
minutes, and then package and freeze. Cooling hot
foods before freezing saves energy.
Packaging
Successful freezing depends on correct packaging.
When you close and seal the package, it must not
allow air or moisture in or out. If it does, you could
have food odor and taste transfer throughout the
freezer and could also dry out frozen food.
Packaging recommendations
•Rigid plastic containers with tight-tting lids
•Straight-sided canning/freezing jars
•Heavy-duty aluminum foil
•Plastic-coated paper
•Non-permeable plastic wraps
•Specied freezer-grade self-sealing plastic bags
Follow package or container instructions for proper
freezing methods.
Do not use
•Bread wrappers
•Non-polyethylene plastic containers
•Containers without tight lids
•Wax paper or wax-coated freezer wrap
•Thin, semi-permeable wrap

15OPERATION
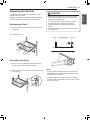
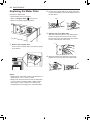
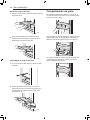
ENGLISH
2 Lift the empty drawer slightly to remove it from the
support.
Ice Storage Drawer & Freezer
Drawers
Use the upper compartment to store packaged frozen
foods and frequently-used foods.
Use the lower compartments for larger frozen foods
and items stored for longer periods.
• The sliding drawers allow easy access and
convenience of use.
Removing the Drawers
1 Pull the drawer out until it stops. Empty all
contents out of the drawer before removing it.
Assembling the Drawer
1 Pull out the drawer support until it stops.
Angle the drawer into the space and set it on the
support.
2 Slide the drawer back until it lowers into place on
the support. Close the drawer.
CAUTION
•The drawers are heavy. Always use two hands
when removing or assembling the drawers to
avoid product damage or personal injury. Always
empty drawers before removing them.
•Always open the doors completely before
removing or assembling the drawers.
CAUTION
•The drawers are heavy. Always use two hands
when removing or assembling the drawers to
avoid product damage or personal injury. Always
empty drawers before removing or assembling
them.
•Always open the freezer doors completely before
removing or assembling the drawers.

16 OPERATION
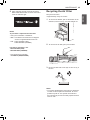
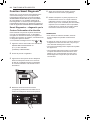
Removing the Drawer Support
1 Press the levers on either side of the drawer
support.
2 Keeping both levers pressed, lift the drawer
support slightly and remove it from the rail system.
Assembling the Drawer Support
1 Pull both drawer rails out until they stop.
2 Line up the bottom edges on the sides of the
drawer support with the groove in each rail and
then lower the support until it clicks into place.
Door Bins
To remove the door bins, hold the guide so that the
bin can not move and tap the bottom of the bin 2 or 3
times.
To assemble the door bin, align both sides of the bin
with the guides and push the bin down until it snaps
into place.
To adjust the location of the bin, tilt the front of the
bin up and slide the bin up or down to the desired
location.

17OPERATION
ENGLISH
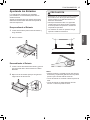
Adjusting the Shelves
The shelves in the freezer are adjustable to meet
individual storage needs.
Adjusting the shelves to t items of different heights
will make nding the exact item you want easier.
Detaching the Shelf
1 Tilt up the front of the shelf and then lift the shelf
straight up.
2 Pull the shelf out.
Assembling the Shelf
1 Tilt the front of the shelf up and guide the shelf
hooks into the slots at a desired height.
2 Lower the front of the shelf so that the hooks drop
into the slots.
CAUTION
•Make sure that shelves are level from one side
to the other. Failure to do so may result in the
shelf falling or spilled food.
•Do not clean glass shelves with warm water
while they are cold. Shelves may break if
exposed to sudden temperature changes or
impact.
•Glass shelves are heavy. Use special care when
removing them.
Transmitter
Receiver
NOTE
•Foreign objects and dirt between the right side of
shelf and the inner cabinet wall could prevent the
shelf light from turning on.
•The shelf light turns on when the door is opened.
•The shelf light turns off after seven minutes or when
the door is closed.

18 SMART FUNCTIONS
SMART FUNCTIONS
SIGNATURE KITCHEN SUITE
Application
The SIGNATURE KITCHEN SUITE application allows
you to communicate with the appliance using a
smartphone.
Before Using the Application
1 Check the strength of the wireless signal near the
appliance.
•If the distance between the appliance and the
wireless router is too far, the signal strength
becomes weak. It may take a long time to
register or installation may fail.
2 Turn off the Mobile data or Cellular Data on your
smartphone.
3 Connect your smartphone to the wireless router.
NOTE
•To verify the Wi-Fi connection, check that Wi-Fi
icon on the control panel is lit.
•The appliance supports 2.4 GHz Wi-Fi networks
only. To check your network frequency, contact your
Internet service provider or refer to your wireless
router manual.
•The SIGNATURE KITCHEN SUITE application
is not responsible for any network connection
problems or any faults, malfunctions, or errors
caused by network connection.
•The surrounding wireless environment can make
the wireless network service run slowly.
•If the appliance is having trouble connecting to the
Wi-Fi network, it may be too far from the router.
Purchase a Wi-Fi repeater (range extender) to
improve the Wi-Fi signal strength.
•The network connection may not work properly
depending on the Internet service provider.
•The Wi-Fi connection may not connect or may
be interrupted because of the home network
environment.
•If the appliance cannot be registered due to
problems with the wireless signal transmission, turn
off the router and wait about a minute before turning
it back on and trying again.
•If the rewall on your wireless router is enabled,
disable the rewall or add an exception to it.
•The wireless network name (SSID) should be a
combination of English letters and numbers. (Do not
use special characters.)
•Smartphone user interface (UI) may vary depending
on the mobile operating system (OS) and the
manufacturer.
•If the security protocol of the router is set to WEP,
you may need to change it to WPA2 in order to
successfully register the product.

19SMART FUNCTIONS
ENGLISH
Installing SIGNATURE KITCHEN
SUITE Application
Search for the SIGNATURE KITCHEN SUITE
application from the Google Play Store or Apple
App Store on a smart phone. Follow instructions to
download and install the application.
SIGNATURE KITCHEN SUITE
Application Features
Energy Monitoring
This feature keeps track of the freezer’s power
consumption and the number of door openings.
Push Messages
If the door remains open for more than ten minutes,
you will receive a push message. When Ice Plus is
nished, you will receive a push message.
Smart Diagnosis™
This function provides useful information for
diagnosing and solving issues with the appliance
based on the pattern of use.
Settings
Allows you to set various options on the freezer and
in the application.
NOTE
•If you change your wireless router, Internet service
provider, or password, delete the registered
appliance from the SIGNATURE KITCHEN SUITE
application and register it again.
•This information is current at the time of publication.
The application is subject to change for product
improvement purposes without notice to users.
Wireless LAN Module Specications
Model LCW-003
Frequency Range 2412 to 2462 MHz
Output
Power(Max) IEEE 802.11b: 17.56 dBm
IEEE 802.11g: 25.53 dBm
IEEE 802.11n: 25.29 dBm
Wireless Power Transfer Specications
Frequency 330 kHz ~ 370 kHz
Rated voltage DC 12V
Delivered power Less than and equal to 3W
per shelf
Transmission
mode
Electromagnetic induction
FCC Notice
•For transmitter module contained in this product
This equipment has been tested and found to comply
with the limits for a Class B digital device, pursuant
to Part 15 of the FCC Rules. These limits are
designed to provide reasonable protection against
harmful interference in a residential installation. This
equipment generates, uses, and can radiate radio
frequency energy and, if not installed and used in
accordance with the instructions, may cause harmful
interference to radio communications. However, there
is no guarantee that interference will not occur in a
particular installation. If this equipment does cause
harmful interference to radio or television reception,
which can be determined by turning the equipment
off and on, the user is encouraged to try to correct
the interference by one or more of the following
measures:
•Reorient or relocate the receiving antenna.
•Increase the separation between the equipment and
the receiver.
•Connect the equipment to an outlet on a circuit
different from that to which the receiver is
connected.
•Consult the dealer or an experienced radio/TV
technician for help.
This device complies with part 15 of the FCC Rules.
Operation is subject to the following two conditions:
1) This device may not cause harmful interference
and
2) This device must accept any interference received,
including interference that may cause undesired
operation of the device.
Any changes or modications in construction of this
device which are not expressly approved by the party
responsible for compliance could void the user’s
authority to operate the equipment.

20 SMART FUNCTIONS
FCC RF Radiation Exposure Statement
This equipment complies with FCC radiation
exposure limits set forth for an uncontrolled
environment. This transmitter must not be co-located
or operating in conjunction with any other antenna or
transmitter.
This equipment should be installed and operated with
a minimum distance of 20 cm (7.8 inches) between
the antenna and your body. Users must follow the
specic operating instructions for satisfying RF
exposure compliance.
Industry Canada Statement (For transmitter
module contained in this product)
This device contains licence-exempt transmitter(s)/
receiver(s) that comply with Innovation, Science and
Economic Development Canada’s licence-exempt
RSS(s). Operation is subject to the following two
conditions:
(1) This device may not cause interference.
(2) This device must accept any interference,
including interference that may casuse undesired
operation of the device.
IC Radiation Exposure Statement
This equipment complies with IC radiation exposure
limits set forth for an uncontrolled environment.
This equipment should be installed and operated with
a minimum distance of 20 cm (7.8 inches) between
the antenna and your body.
NOTE
•THE MANUFACTURER IS NOT RESPONSIBLE
FOR ANY RADIO OR TV INTERFERENCE
CAUSED BY UNAUTHORIZED MODIFICATIONS
TO THIS EQUIPMENT. SUCH MODIFICATIONS
COULD VOID THE USER’S AUTHORITY TO
OPERATE THE EQUIPMENT.
Open Source Software Notice Information
To obtain the source code under GPL, LGPL, MPL,
and other open source licenses, that is contained
in this product, please visit http://opensource.
signaturekitchensuite.com.
In addition to the source code, all referred license
terms, warranty disclaimers and copyright notices are
available for download.
SIGNATURE KITCHEN SUITE will also provide
open source code to you on CD-ROM for a
charge covering the cost of performing such
distribution (such as the cost of media, shipping,
and handling) upon email request to opensource@
signaturekitchensuite.com.
This offer is valid for a period of three years after our
last shipment of this product. This offer is valid to
anyone in receipt of this information.
La page est en cours de chargement...
La page est en cours de chargement...
La page est en cours de chargement...
La page est en cours de chargement...
La page est en cours de chargement...
La page est en cours de chargement...
La page est en cours de chargement...
La page est en cours de chargement...
La page est en cours de chargement...
La page est en cours de chargement...
La page est en cours de chargement...
La page est en cours de chargement...
La page est en cours de chargement...
La page est en cours de chargement...
La page est en cours de chargement...
La page est en cours de chargement...
La page est en cours de chargement...
La page est en cours de chargement...
La page est en cours de chargement...
La page est en cours de chargement...
La page est en cours de chargement...
La page est en cours de chargement...
La page est en cours de chargement...
La page est en cours de chargement...
La page est en cours de chargement...
La page est en cours de chargement...
La page est en cours de chargement...
La page est en cours de chargement...
La page est en cours de chargement...
La page est en cours de chargement...
La page est en cours de chargement...
La page est en cours de chargement...
La page est en cours de chargement...
La page est en cours de chargement...
La page est en cours de chargement...
La page est en cours de chargement...
La page est en cours de chargement...
La page est en cours de chargement...
La page est en cours de chargement...
La page est en cours de chargement...
La page est en cours de chargement...
La page est en cours de chargement...
La page est en cours de chargement...
La page est en cours de chargement...
La page est en cours de chargement...
La page est en cours de chargement...
La page est en cours de chargement...
La page est en cours de chargement...
La page est en cours de chargement...
La page est en cours de chargement...
La page est en cours de chargement...
La page est en cours de chargement...
La page est en cours de chargement...
La page est en cours de chargement...
La page est en cours de chargement...
La page est en cours de chargement...
La page est en cours de chargement...
La page est en cours de chargement...
La page est en cours de chargement...
La page est en cours de chargement...
La page est en cours de chargement...
La page est en cours de chargement...
La page est en cours de chargement...
La page est en cours de chargement...
La page est en cours de chargement...
La page est en cours de chargement...
La page est en cours de chargement...
La page est en cours de chargement...
La page est en cours de chargement...
La page est en cours de chargement...
La page est en cours de chargement...
La page est en cours de chargement...
La page est en cours de chargement...
La page est en cours de chargement...
La page est en cours de chargement...
La page est en cours de chargement...
La page est en cours de chargement...
La page est en cours de chargement...
La page est en cours de chargement...
La page est en cours de chargement...
La page est en cours de chargement...
La page est en cours de chargement...
La page est en cours de chargement...
La page est en cours de chargement...
La page est en cours de chargement...
La page est en cours de chargement...
La page est en cours de chargement...
La page est en cours de chargement...
La page est en cours de chargement...
La page est en cours de chargement...
La page est en cours de chargement...
La page est en cours de chargement...
La page est en cours de chargement...
La page est en cours de chargement...
La page est en cours de chargement...
La page est en cours de chargement...
La page est en cours de chargement...
La page est en cours de chargement...
La page est en cours de chargement...
La page est en cours de chargement...
La page est en cours de chargement...
La page est en cours de chargement...
La page est en cours de chargement...
La page est en cours de chargement...
La page est en cours de chargement...
La page est en cours de chargement...
La page est en cours de chargement...
La page est en cours de chargement...
-
 1
1
-
 2
2
-
 3
3
-
 4
4
-
 5
5
-
 6
6
-
 7
7
-
 8
8
-
 9
9
-
 10
10
-
 11
11
-
 12
12
-
 13
13
-
 14
14
-
 15
15
-
 16
16
-
 17
17
-
 18
18
-
 19
19
-
 20
20
-
 21
21
-
 22
22
-
 23
23
-
 24
24
-
 25
25
-
 26
26
-
 27
27
-
 28
28
-
 29
29
-
 30
30
-
 31
31
-
 32
32
-
 33
33
-
 34
34
-
 35
35
-
 36
36
-
 37
37
-
 38
38
-
 39
39
-
 40
40
-
 41
41
-
 42
42
-
 43
43
-
 44
44
-
 45
45
-
 46
46
-
 47
47
-
 48
48
-
 49
49
-
 50
50
-
 51
51
-
 52
52
-
 53
53
-
 54
54
-
 55
55
-
 56
56
-
 57
57
-
 58
58
-
 59
59
-
 60
60
-
 61
61
-
 62
62
-
 63
63
-
 64
64
-
 65
65
-
 66
66
-
 67
67
-
 68
68
-
 69
69
-
 70
70
-
 71
71
-
 72
72
-
 73
73
-
 74
74
-
 75
75
-
 76
76
-
 77
77
-
 78
78
-
 79
79
-
 80
80
-
 81
81
-
 82
82
-
 83
83
-
 84
84
-
 85
85
-
 86
86
-
 87
87
-
 88
88
-
 89
89
-
 90
90
-
 91
91
-
 92
92
-
 93
93
-
 94
94
-
 95
95
-
 96
96
-
 97
97
-
 98
98
-
 99
99
-
 100
100
-
 101
101
-
 102
102
-
 103
103
-
 104
104
-
 105
105
-
 106
106
-
 107
107
-
 108
108
-
 109
109
-
 110
110
-
 111
111
-
 112
112
-
 113
113
-
 114
114
-
 115
115
-
 116
116
-
 117
117
-
 118
118
-
 119
119
-
 120
120
-
 121
121
-
 122
122
-
 123
123
-
 124
124
-
 125
125
-
 126
126
-
 127
127
-
 128
128


