
Drawn Approved
Signature
Jungim.Ha Jongok.Kim
MMM/DD/YYYY
Sep/12/2014 Sep/12/2014
LS75A,73B LG MBM64777007
US,WM LG Digital Signage (1511-REV05)
:LGEAK :LGEKR :LGERS
:LGEAZ :LGEMA :LGESY
:LGEEG :LGEMX :LGETH
:LGEIL :LGEND :LGEVN
:LGEIN :LGERA :LGEWR
:LGEAS
Rev. Number
MMM/DD/YYYY
Signature
ECO Number
Change Contents
Feb/13/2015
Jungim.Ha
EKMF200237
FTC green guide is applied in US suffix manual
Dec/01/2014
Jungim.Ha
EKMEB00209
LS73B models are added in manual
Aug/12/2015
Jungim.Ha
EKMF700062
Backcover label is changed (DVI --> DVI-D)
Apr/13/2015
Jungim.Ha
EKMF400215
AV label design and position of Backcover are changed
Nov/18/2015
Jungim.Ha
EKMFB00239
To modify the manual for NOM certification.
4. Changes
Printed in Indonesia
Printed in Russia
Printed in Poland
Printed in Algeria
Printed in Egypt
Printed in Mexico
Printed in Thailand
Printed in India
Printed in China
Printed in Vietnam
3. Origin Notification
Printed in Kazakhstan
Printed in Korea
Printed in Mexico
Printed in Brazil
Printed in Poland
Printed in China
Off set
N
O
T
E
“This part contains Eco-hazardous substances (Pb, Cd, Hg, Cr6+, PBB, PBDE, etc.) within LG standard level,
Details should be followed Eco-SCM management standard[LG(56)-A-2524].
Especially, Part should be followed and controlled the following specification.
(1) Eco-hazardous substances test report should be submitted when Part certification test and First Mass Production.
(2) Especially, Don’t use or contain lead(Pb) and cadmium(Cd) in ink.
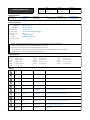
1. Model Description
:Model name
:Brand name
:Part number
:2nd, 3rd Suffix
:Product name
(Revision number)
Printing specification
Checked
Seounggeun.Kim
Sep/12/2014
2. Printing Specification
1. Trim size (Format)
: • Unfolded size
420 mm x 297 mm
: • Folded size
210 mm x 148.5 mm
:5. Bindery
One sheet (2 Folded)
:6. Language
ENG/FRE_CA/SPA_LA (3)
:7. Number of pages
2
:2. Printing colors
1 Color (Black)
:3. Stock (Paper)
Uncoated, wood-free paper 80 g/㎡
:4. Printing method
1
10
9
8
7
6
5
4
3
2

Front Back
P/no.
297 mm
420 mm
Folded
148.5 mm
210 mm
Front Front Front
Fold Step
Pagination sheet
Easy Setup Guide
Easy Setup Guide
Easy Setup Guide
Easy Setup Guide
Easy Setup Guide

HDMI
Network
ฒખ
Connecting external devices / Raccordement d'appareils externes /
Conexión de dispositivos externos
ENG
FRA
FRANÇAISENGLISH
ESP
ESPAÑOL
P
A
G
E
INPUT
ENERGY
SAVING
MARK
ARC
ON
OFF
. , !
ABC
DEF
GHI
JKL
MNO
PQRS
TUV
1/a/A
- * #
WXYZ
CLEAR
MONITOR
PSM
AUTO
MUTE
BRIGHT
NESS
MENU
POWER
OK
S.MENU
ID
BACK
TILE
ON
OFF
EXIT
IR & Light Sensor
Détecteur IR et lumière
Sensor de infrarrojos y luz
CD (Owner's Manual) / Card
CD (Manuel d'utilisation) / Carte
CD (manual de usuario) / Tarjeta
HDMI Cable
Câble HDMI
Cable HDMI
FRA
Sélectionnez un signal d’entrée.
ENG
Select an input signal.
Note / Remarque / Nota
HDMI1 HDMI2/OPS DisplayPort
DVI-D
ESP
Seleccione una señal de entrada.
Connect the signal input cable and
tighten it by turning the screws clock-
wise.
ENG
Raccordez le câble d'entrée de sig-
nal et serrez-le en tournant les vis
dans le sens des aiguilles d'une
montre.
Conecte el cable de entrada de señal y
asegúrelo girando en el sentido de las
agujas del reloj.
FRA
ESP
Note / Remarque / Nota
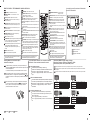
Connecting to a PC/ Connexion à un PC / Conexión a un PC
Pixel sensor kit
Kit pour détecteur de pixels
Kit del sensor de píxeles
Remote Control / Batteries
Télécommande et piles
Mando a distancia, Pila
Power Cord
Cordon d'alimentation
Cable de alimentación
Easy Setup Guide
Guide de conguration rapide
Guía Rápida
Please read this Easy Setup Guide carefully before operating your product. Keep it for future
reference and record the model number and serial number of the product. See the label
attached on the product and quote this information to your dealer if you require service.
ENG
Por favor lea esta Guía Rápida cuidadosamente antes de operar su producto.
Consérvela para futura referencia y registre el nombre del modelo y el número de serie del
producto. Vea la etiqueta que está pegada en el producto y cite esta información a su centro
de venta en caso de requerir servicio.
ESP
FRA
Veuillez lire ce guide de configuration rapide attentivement avant d'utiliser votre produit et le
conserver pour pouvoir vous y référer plus tard. Veuillez également noter le modèle et le
numéro de série du produit. indiqués sur l'étiquette afin de fournir cette information à votre
détaillant si votre produit doit être réparé.
Un Manual del Propietario extendido que contiene información sobre las características
avanzadas está ubicado en el CD-ROM proporcionado en versión electrónica. Para
leer estos archivos, usted necesitará usaruna Computadora Personal (PC) equipada
con una unidad CD-ROM.
ESP
Note / Remarque / Nota
FRA
Une copie électronique d'une version étendue du guide du propriétaire contenant des
renseignements sur les fonctions avancées se trouve sur le CD-ROM. Pour lire ces
fichiers, vous devez utiliser un ordinateur équipé d'un lecteur de CD-ROM.
An electronic version of an extended owner's manual that contains information about
the advanced features can be found in the CD-ROM.To read these files, you will need
to use a (PC) equipped with a CD-ROM drive.
ENG
ENG
FRA
Assurez-vous que les accessoires suivants sont inclus avec votre moniteur. Les accessoires fournis peuvent
avoir un aspect légèrement différent de ceux représentés ci-dessous.
Make sure the following items are included with your product. The included accessories may look slightly
different from the gures shown below.
Accessories / Accessoires fournis / Accesorios
ESP
Asegúrese de que con el producto se suministran los siguientes accesorios. Los accesorios incluidos pu-
eden parecer distintos a los que se muestran a continuación.
ENG
Without prior notice, optional accessories are subject to change to improve the performance of the product, and new
accessories may be added. Optional accessories are not included for all models.
Optional Accessories / Accessoires en option / Accesorios opcionales
FRA
Les accessoires en option peuvent être modiés et de nouveaux accessoires peuvent être ajoutés sans
préavis, dans le but d'améliorer les performances du produit. Les accessoires en option ne sont pas inclus avec tous
les modèles.
Se podrán cambiar los accesorios opcionales para mejorar el funcionamiento del producto, así como incorpo-
rar nuevos accesorios sin previo aviso. Los accesorios opcionales no se incluyen en todos los modelos.
ESP
Stand kit
Kit de support
Kit de soporte
USB
OR / OU / O
Receptor/DVD/vídeo HD/
Cámara de vídeo / Cámara /
Consola de videojuegos
ESP
HD Receiver/DVD/VCR
Camcorder/Camera/Gaming Device
ENG
Direct Connection/
Using the Router/
Using the Internet
ENG
Conexión directa /
A través de un router /
A través de Internet
ESP
Connexion directe /
Utilisation du routeur /
Utilisation d'Internet
FRA
Récepteur HD / Lecteur DVD /
Magnétoscope Caméscope /
Appareil photo / Console de jeu
FRA
P/NO : MBM64777007 (1511-REV05)
Printed in Korea
www.lg.com
42LS75A/ 49LS75A/ 55LS75A
42LS73B/ 49LS73B/ 55LS73B
*MBM64777007*
Mounting Cable Tie
Serre-câble de fixation
Soporte del sujetacables
Cable holders/ Cable Ties
Support de câble/ Serre-câbles
Organizador de cables/ sujetacable
KT-SP0
Screws
Vis
Tornillos
Card (Easy Setup Guide)
Carte (Guide de
configuration rapide)
Tarjeta (Guía Rápida)
KT-OPSA
Connecting Cable
Connexion du câble
Cable de conexión
Power Cord
Cordon d'alimentation
Cable de alimentación
P
A
G
E
INPUT
ENERGY
SAVING
MARK
ARC
ON
OFF
. , !
ABC
DEF
GHI
JKL
MNO
PQRS
TUV
1/a/A
- * #
WXYZ
CLEAR
MONITOR
PSM
AUTO
MUTE
BRIGHT
NESS
MENU
POWER
OK
S.MENU
ID
BACK
TILE
ON
OFF
EXIT
AN-WF500
Wi-Fi Dongle kit
Kit dongle Wi-Fi
Kit de dispositivo de seguridad
Wi-Fi
Screws
Vis
Tornillos
Speaker kit
Kit haut-parleur
Kit de altavoces
Screws
Vis
Tornillos
OPS kit
Kit OPS
Kit de OPS
DP OUT
DVI OUT
HDMI
DVI OUT
Stand
ST-200T
Support
Soporte
Speaker
SP-2100Haut-parleur
Altavoces
ID
BACK
TILE
ON
OFF
EXIT

REMOTE CONTROL / TÉLÉCOMMANDE / MANDO A DISTANCIA
Installing Batteries / Insertion des piles /
Instalación de las pilas
Pour remplacer les piles, ouvrez le couvercle du compartiment des piles,
insérez deux piles de 1,5 V de type AAA en respectant la polarité et ,
et refermez le couvercle. Pour retirer les piles, procédez à l'inverse de leur
insertion.
To replace batteries, open the battery cover, replace batteries (1.5 V
AAA) matching
and ends to the label inside the compartment, and
close the battery cover.
To remove the batteries, perform the installation actions in reverse.
ENG
FRA
Para cambiar las pilas, abra la tapa del compartimento, sustitúyalas
(1,5 Vcc AAA) haciendo coincidir los polos y con la etiqueta del
interior y vuelva a colocar la tapa. Para retirar las pilas, realice el
proceso de instalación en orden inverso.
ESP
ENG
FRA
FRANÇAISENGLISH
ESP
ESPAÑOL
※ The specifications shown above may be changed without prior notice for quality improvement.
ENG
※ Les spécifications indiquées ci-dessus peuvent être modifiées sans préavis à des fins d'amélioration de
la qualité.
FRA
※ Las especificaciones mostradas anteriormente pueden cambiar sin previo aviso para mejorar la calidad.
ESP
FRA
ENG
Insert CD-ROM in Computer.
CD-ROM will open automatically.(for Window only)
If it does not run automatically, it is available to see the below sequence.
My computer ➙ Digital_LG(CD-ROM) ➙ Index.htm Open
My computer ➙ Digital_LG(CD-ROM) ➙ Manual ➙ Owner's manual
Open
Insérez le CD ROM dans l'ordinateur.
Le CD-ROM s'exécutera automatiquement (sous Windows uniquement).
S'il ne s'exécute pas automatiquement, suivez les étapes ci-dessous.
Mon ordinateur ➙ Digital_LG(CD-ROM) ➙ Ouvrez le fichier Index.htm
Mon ordinateur ➙ Digital_LG(CD-ROM) ➙ Manuel ➙ Ouvrez le
fichier Manuel
ESP
Introduzca el CD-ROM en el PC.
El CD-ROM se abrirá automáticamente (solo para Windows).
Si no se ejecuta de forma automática, siga la secuencia que se
indica a continuación.
Mi PC ➙ Digital_LG(CD-ROM) ➙ Abrir Index.htm
Mi PC ➙ Digital_LG(CD-ROM) ➙ Manual ➙ Abrir manual de usu-
ario
Dimensions (Width x Height x Depth) / Weight
Dimensions (Largeur x Hauteur x Profondeur) / Poids
Dimensiones (ancho x alto x profundidad) / Peso
To view the Owner's manual / Pour consulter le manuel
d'utilisation / Para consultar el manual de usuario
* For more details on how to operate the remote control,
please refer to the CD manual.
* Pour plus d’informations sur le fonctionnement de la
télécommande, reportez-vous au manuel du CD.
FRAENG
(POWER) : Turns the Monitor set on or off.
MONITOR ON/OFF : Turn on the monitor. / Turn off
the monitor.
ENERGY SAVING : Reduces power consumption by
adjusting peak screen brightness.
Volume Up / Down : Adjusts the volume level.
USB Menu Control Buttons : Controls media playback.
BACK : Allows the user to move back one step in user
interaction function.
INPUT : Selects the input mode.
BRIGHTNESS : Adjusts the brightness of the display. PAGE
Function is not supported in the this model.(Depending on
the model, this feature may not be supported.)
AUTO : Automatically adjusts picture position and minimiz-
es image instability (available for RGB input only).
(Depending on the model, this feature may not be sup-
ported.)
EXIT : Quit all OSD tasks and applications.
SETTINGS : Accesses the main menus or saves your
input and exit menus.
Navigation buttons : Scrolls through menus or options.
OK : Selects menus or options and conrms your input.
1
2
3
4
5
6
7
8
9
10
11
12
(MARCHE) : Allume ou éteint le moniteur.
MONITOR ON/OFF : Mettez le moniteur sous tension. /
Mettez le moniteur hors tension.
ENERGY SAVING : Permet de réduire la consommation
d’énergie en réglant le pic de luminosité de l’écran.
Volume +/- : Règle le niveau du volume.
Touches de contrôle du menu USB : Permettent de contrôler
un lecteur multimédia.
INPUT : Permet de sélectionner le mode d'entrée.
BRIGHTNESS : Permet de régler la luminosité de l'image. Ce
modèle ne prend pas en charge la fonction PAGE. (Selon le
modèle, cette fonctionnalité ne sera pas prise en charge.)
AUTO : Permet de régler automatiquement la position de
l'image et de réduire l'instabilité de l'image (uniquement dis-
ponible pour l'entrée RGB). (Selon le modèle, cette fonction-
nalité ne sera pas prise en charge.)
EXIT : Quitter toutes les tâches et les applications OSD.
BACK : Pour revenir à l'étape précédente dans une applica-
tion interactive.
SETTINGS : Permet d'accéder aux menus principaux ou
d'enregistrer votre entrée et de quitter les menus.
Touches de navigation : Permettent de parcourir les menus
ou options.
OK: Permet de sélectionner les menus ou options et de con-
rmer votre entrée.
1
2
3
4
5
6
7
8
9
10
11
12
* Para obtener más información sobre cómo utilizar el
mando a distancia, consulte el manual del CD.
ESP
(ENCENDIDO/APAGADO) : Permite encender y
apagar el monitor.
MONITOR ON/OFF : Enciende el monitor. / Apaga el monitor.
ENERGY SAVING : Reduce el consumo de energía al
ajustar el brillo de la pantalla.
Volumen +/- : Permiten ajustar el nivel de volumen.
Botones de control del menú USB : Permite controlar
la reproducción de medios.
BACK : Permite al usuario retroceder un paso en una
aplicación interactiva, en la EPG o en otra función de
interacción por parte del usuario.
INPUT : Permite seleccionar el modo de entrada.
Botón BRIGHTNESS : Ajusta la luminosidad de la
pantalla. La función de PAGE no es compatible con este
modelo. (Dependiendo del modelo, esta función podría no
estar disponible).
AUTO : Ajusta automáticamente la posición de la imagen
y minimiza su inestabilidad (disponible solo para entrada
RGB). (Dependiendo del modelo, esta función podría no
estar disponible.)
SETTINGS : Permite acceder a los menús principales,
guardar la información introducida y salir de los menús.
Botones de navegación : Permiten desplazarse por los
menús y las opciones.
OK : Permite seleccionar menús y opciones, y conrmar las
entradas.
1
2
3
4
5
6
7
8
9
10
11
EXIT : Salga de todas las aplicaciones y tareas OSD.
13
13
13
HOME : Activates the Launcher.
HOME : Permet de revenir à la page
12
HOME : Activa el Iniciador.
Connecting the power / Raccordement à l'alimentation /
Conexión a la alimentación
ENG
FRA
Power turn On / Off
Marche / Arrêt
ESP
Apagado / Encendido
42LS75A
42LS73B
948.7 mm x 555.3 mm x 31.7 mm / 12.5 kg
948,7 mm x 555,3 mm x 31,7 mm / 12,5 kg
49LS75A
49LS73B
1094.6 mm x 637.4 mm x 31.7 mm / 15.6 kg
1 094,6 mm x 637,4 mm x 31,7 mm / 15,6 kg
55LS75A
55LS73B
1230.4 mm x 713.7 mm x 31.7 mm / 20.7 kg
1 230,4 mm x 713,7 mm x 31,7 mm / 20,7 kg
42LS75A
42LS73B
948.7 mm x 617.7 mm x 298.3 mm / 13.9 kg
948,7 mm x 617,7 mm x 298,3 mm / 13,9 kg
49LS75A
49LS73B
1094.6 mm x 699.7 mm x 298.3 mm / 17.0 kg
1 094,6 mm x 699,7 mm x 298,3 mm / 17,0 kg
55LS75A
55LS73B
1230.4 mm x 776.1 mm x 298.3 mm / 22.1 kg
1 230,4 mm x 776,1 mm x 298,3 mm / 22,1 kg
42LS75A
42LS73B
948.7 mm x 555.3 mm x 81.3 mm / 13.3 kg
948,7 mm x 555,3 mm x 81,3 mm / 13,3 kg
49LS75A
49LS73B
1094.6 mm x 637.4 mm x 81.3 mm / 16.4 kg
1 094,6 mm x 637,4 mm x 81,3 mm / 16,4 kg
55LS75A
55LS73B
1230.4 mm x 713.7 mm x 81.3 mm / 21.5 kg
1 230,4 mm x 713,7 mm x 81,3 mm / 21,5 kg
42LS75A
42LS73B
948.7 mm x 617.7 mm x 298.3 mm / 14.7 kg
948,7 mm x 617,7 mm x 298,3 mm / 14,7 kg
49LS75A
49LS73B
1094.6 mm x 699.7 mm x 298.3 mm / 17.8 kg
1 094,6 mm x 699,7 mm x 298,3 mm / 17,8 kg
55LS75A
55LS73B
1230.4 mm x 776.1 mm x 298.3 mm / 22.9 kg
1 230,4 mm x 776,1 mm x 298,3 mm / 22,9 kg
1
4
6
8
9
10
11
13
2
3
5
7
12
Alimentación
42LS75A/42LS73B AC 100-240 V ~ 50/60 Hz 1,6 A
49LS75A/49LS73B AC 100-240 V ~ 50/60 Hz 1,8 A
55LS75A/55LS73B AC 100-240 V ~ 50/60 Hz 1,8 A
-
 1
1
-
 2
2
-
 3
3
-
 4
4


dans d''autres langues
Documents connexes
-
LG 42LS73B-5B Guide d'installation
-
LG KT-OPSA Guide de démarrage rapide
-
LG 98LS95A-5B Guide d'installation rapide
-
-
LG 49MS75A-MB Le manuel du propriétaire
-
-
-
-
LG 29UM69G-B Guide d'installation
-