Fantech EDF1 Installation And Wiring Manual
- Taper
- Installation And Wiring Manual

Installation and Wiring Manual
Manuel pour l'Installation et le Câblage
EDF1
Ventilation Control System
Système de contrôle de ventilation
Item #: 403260
Rev Date: 2015-05-12
Selectable operation modes
An electronic wall control timer that is compatible with all Fantech HRV/ERV
models (except SH/VH 704). This control activates the system on 3 possible
modes of operation:
• LOW Continuous Speed Operation (Green)
• 20 MINUTES ON, 40 MINUTES OFF Intermittent (Yellow)
• HIGH Continuous Speed or Boost (Red)
Introduction du EDF1
Un dispositif de commande mural à trois fonctions qui est compatible avec
tous les modèles de VRC de Fantech (sauf SH/VH 704). Cette commande
active le système à trois modes de fonctionnement possible.
• BASSE (LOW) vitesse continue (vert)
• 20 MINUTES EN MARCHE ET 40 MINUTES EN ARRÊT (20MIN ON/40MIN
OFF) cycle répétitif (jaune)
• HAUTE (HIGH) vitesse continue (rouge)
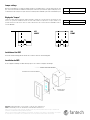
Wiring of the EDF1
Connect the wires to the EDF1 wall control. Insert the stripped end of the wires into the electrical connection. Insert the wire into the + and – of the EDF terminal connections or
the "W" position of the terminal connection bloc located on the outside of the HRV/ERV system, near the power cord. Tighten screws using slot head screwdriver.
Wiring of the EDF1
Insérez les fils au contrôle mural EDF1. Insérez les bouts rayés des fils dans les connecteurs électriques. Insérez les fils dans le + et – des connecteurs du terminal ou
des les position "W" des connecteurs du terminal situés sur le panneau extérieur du VRH/VRE, à proximité du cordon d'alimentation. Serrez les vis à l’aide d’un stylo-
tournevis.
EDF1
W
or/or
EDF1

United States
Canada
Fantech, reserves the right to modify, at any time and without notice, any or all of its products’ features, designs, components and
specifications to maintain their technological leadership position.
Fantech se réserve le droit de modier partiellement ou entièrement, en tout temps et sans préavis, les caractéristiques, la conception,
les composantes et les spécications de ces produits an de conserver sa position de leader en matière de technologie.
Jumper settings
Réglage du "Jumper"
opération (il ferme le circuit entre les bornes) le mode continu à basse vitesse fera fonctionner le VRH/VRE à la vitesse
fantech
Installation of the EDF1
Screw the control mounting plate to the box then screw the cover over the mounting plate.
Insstallation du EDF1
Visser la plaque de montage à la boite électrique puis visser le couvert à la plaque de montage.
OFF
OUVERT Basse vitesse
Vitesse normale moyenne
ON/
FERMÉ
OFF/
OUVERT
-
 1
1
-
 2
2


Fantech EDF1 Installation And Wiring Manual
- Taper
- Installation And Wiring Manual
dans d''autres langues
- English: Fantech EDF1
Documents connexes
-
Fantech SHR 1505 R Guide d'installation
-
-
-
Fantech VHR 1405R Guide d'installation
-
Fantech Fresh Air Appliance Guide d'installation
-
-
-
-
-