
Quick‐
s
tart
EN / IEC 60825-1:2014
I
EC60825-1:2007
Maximum pulse power < 500 mW
Puls length: ≤ 2 ns
Wavelength: 650 - 670 nm
Complies with 21 CFR 1040.10
and 1040.11 except for deviations
pursuant to Laser Notice No. 50,
dated June 24, 2007
Laser
1
C
LASS 1 LASER PRODUCT
2006/42/EC
NO
S
AFETY
8022570:
Q U I C K S T A R T
en
T
hese instructions are only valid in connection with the (8022570) operating
instructions. You can find the operating instructions at www.sick.com.
de
Die
se Anleitung ist ausschließlich in Verbindung mit der Betriebsanleitung
(8022570) gültig. Die Betriebsanleitung finden Sie unter www.sick.com.
it
L
e presenti istruzioni sono valide solo in abbinamento alle istruzioni per l'uso
(8022570). Le istruzioni per l’uso sono a disposizione su www.sick.com.
fr
C
ette notice n’est valable qu’avec la notice d'instruction (8022570). Elle est
disponible sur le site Internet www.sick.com.
es
E
stas instrucciones solo son válidas junto con las instrucciones de uso
(8022570). Puede encontrar las instrucciones de uso en www.sick.com.
zh
本指南仅在结合使用操作指南 (8022570) 的情况下有效。查看操作指南可访问
www
.sick.com 网页。
ko
이 지침서는 작동 지침서(8022570)와 함께 사용하는 경우에만 유효합니다. 작
동 지침서는 www
.sick.com에 있습니다.
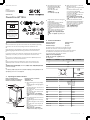
1 Operating and status indicators
Bedien- und Anzeigeelemente Elementos de mando y visualización
Elementi di comando e di visualizzazione 操作及显示元件
Éléments de commande et d’affichage 조작 및 표시 요소
1
2
3
4
6
5
1
LED indicator green: supply voltage
ac
tive
Anzeige-LED grün: Versorgungsspan‐
nung aktiv
Indicatore LED verde: tensione di ali‐
mentazione attiva
LED d'état verte : tension d'alimenta‐
tion active
LED indicador verde: tensión de ali‐
mentación activa
绿色 LED 指示灯:工作电压激活
초록색 LED 표시부: 공급 전압 활성
상태
2
LED indicator yellow: status of recei‐
v
ed light beam
Anzeige-LED gelb: Status Lichtemp‐
fang
Indicatore LED giallo: stato ricezione
luce
LED d’état jaune : état réception de
lumière
LED indicador amarillo: estado de
recepción de luz
黄色 LED 指示灯:光接收状态
노란색 LED 표시부: 광 수신 상태
3
M3 threaded mounting hole
Be
festigungsgewinde M3
Filettatura di serraggio M3
Taraudage M3
Rosca de fijación M3
紧固螺纹 M3
M3 스레드형 마운팅 홀
4
Male connector/Cable / Cable with
M8 male connector
Stecker/Leitung/ Leitung mit Stecker
M8
Connettore maschio/Cavo / cavo
con connettore maschio M8
Connecteur mâle/Câble / câble avec
connecteur mâle M8
Conector macho/Cable/cable con
conector macho M8
插头/电缆/配有 M8 插头的电缆
수 커넥터/케이블/M8 수 커넥터 케
이블
5
Single teach-in button for setting the
sensin
g range
Einfach-Teach-in-Taste zur Einstel‐
lung des Schaltabstands
Pulsante teach-in semplice per
impostazione della distanza di lavoro
Bouton d’apprentissage simple pour
le réglage de la distance de commu‐
tation
Tecla teach-in sencilla para el ajuste
de la distancia de conmutación
单示教键,用于设置触发触发感应
距离
스위칭 거리 설정용 싱글 티치인 버
튼
6
Optical axis, sender and receiver
Optikachse, Sender und Empfänger
Asse ottico, emettitore e ricevitore
Axe optique, émetteur et récepteur
Eje óptico, emisor y receptor
光轴,发射器和接收器
광축, 송신기 및 수신기
2 Electrical installation
Elektrische Installation Instalación eléctrica
Installazione elettrica 电气安装
Installation électrique 전기 설치
The sensors must be connected in a voltage-free state.
Anschluss der Sensoren muss spannungsfrei erfolgen.
Il collegamento dei sensori deve avvenire in assenza di tensione.
Le raccordement des capteurs doit s'effectuer hors tension.
Los sensores deben conectarse sin tensión.
必须在无电压状态 连接传感器。
센서를 무전압 상태로 연결해야 합니다.
Pin assignment
WTT4SLC -3X32xxAxx -3X22xxAxx -3X11xxAxx
1 + (L+)
2 MF
3 - (M)
4 Q
1
/C
1
2
4
3
1 = brn
2 = wht
3 = blu
4 = blk
0.14 mm
2
A
WG26
Process data structure (IO-Link version: V1.1 Process data length: 4 bytes)
No. Description Data type
Byte 0: bits 31...24
B
yte 1: bits 23...16
Byte 2: bits 15...8
Byte 3: bits 7...0
Bit 0 Q
L1
Boolean
Bit 1 Q
L2
Boolean
Bit 2 Qint.1 Boolean
Bit 3 Qint.2 Boolean
Bit 4 Qint.3 Boolean
Bit 5 Qint.4 Boolean
Bit 6 Qint.5 Boolean
Bit 7 Qint.6 Boolean
Bit 8 Qint.7 Boolean
Bit 9 Qint.8 Boolean
Bits 10...15 Empty -
Bits 16...31 Analog value UInt16
8022571.1AEG / 2021-01-08/de PowerProx WTT4SL | SICK 1
8022571.1AEG / 2021-01-08
www.sick.com
PowerProx WTT4SL
SICK AG
E
rwin-Sick
-Straße 1
D-79183 Waldkirch

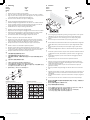
3 Mounting
Montage Montaje
Montaggio 安装
Montage 마운팅
en
1 Mount sensor on suitable mounting bracket.
2 Note the maximum permissible tightening torque for the sensor of 0.8 Nm.
3 Align the sensor with the object. The correct alignment can only be detected
via the LED indicators (yellow indicator LED lights up).
4 Observe minimum distance from object to background.
de
1 Sensor am geeigneten Befestigungswinkel montieren.
2 Maximal zulässiges Anzugsdrehmoment des Sensors von 0.8 Nm beachten.
3 Sensor auf Objekt ausrichten. Die korrekte Ausrichtung kann nur über die
Anzeige-LEDs erkannt werden (gelbe Anzeige-LED leuchtet).
4 Mindestabstand von Objekt zu Hintergrund beachten.
it
1 Montare il sensore sulla staffa di fissaggio adatta.
2 Rispettare la massima coppia di serraggio consentita del sensore di 0,8 Nm.
3 Allineare il sensore all'oggetto. Il corretto allineamento può essere rilevato
solo attraverso i LED indicatori (il LED indicatore giallo si accende).
4 Osservare la distanza minima dell’oggetto rispetto allo sfondo.
fr
1 Monter le capteur sur l’équerre de fixation adaptée.
2 Respecter le couple de serrage maximum autorisé du capteur de 0,8 Nm.
3 Alignez le capteur avec l'objet. Un alignement correct ne peut être détecté
que par les LEDs d'indication (la LED jaune d'indication s'allume).
4 Respecter la distance minimale de l'objet par rapport à l'arrière-plan.
es
1 Montar el sensor en la escuadra de fijación apropiada.
2 Respetar el par de apriete máximo admisible del sensor de 0,8 Nm.
3 Alinee el sensor con el objeto. La alineación correcta sólo se puede detectar
a través de los LEDs indicadores (el LED indicador amarillo se enciende).
4 Respetar la distancia mínima entre el objeto y el fondo.
zh
1 将传感器安装在合适的安装支架上。
2 注意传感器的最大允许拧紧力矩为 0.8 Nm。
3 将传感器与对象对准。正确的对准只能通过 LED 指示灯检测(黄色指示灯
亮起)。
4 注意目标与背景之间的最小距离。
ko
1 적합한 고정 브래킷에 센서를 마운팅하십시오.
2 센서의 최대 허용 조임 토크 0.8Nm에 유의하십시오.
3 센서를 물체에 맞춰 정렬하십시오. 올바른 정렬 상태는 LED를 통해서만 알
수 있습니다(노란색 표시 LED가 켜짐).
4 물체와 배경 간 최소 거리에 유의하십시오.
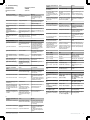
WTT4SLC-3Xxx3xAxx WTT4SLC-3Xxx6xAxx
100
(3.94)
75
(2.95)
50
(1.97)
25
(0.98)
0
Min. distance from object to background in mm (inch)
0
250
(9.84)
500
(19.69)
750
(29.53)
1,000
(39.37)
Distance in mm (inch)
150
(5.91)
125
(4.92)
1
6%/90%
2
90%/90%
120
(4.72)
80
(3.15)
40
(1.57)
0
Min. distance from object to background in mm (inch)
0
500
(19.69)
1,000
(39.37)
1,500
(59.06)
Distance in mm (inch)
200
(7.87)
160
(6.30)
1
6%/90%
2
90%/90%
4 Teach-in
Teach-In Aprendizaje
Teach-in 示教
Apprentissage 티치인
Q1
en
1 The sensing range is adjusted by pressing the single teach-in button (yellow
LED lights up). Do not operate the teach-in button using sharp objects.
2 It is recommended to set the switching point in the object (see graphic
above).
3 Other teach options are described in the operating instructions.
de
1 Durch Drücken der Einfach-Teach-in-Taste wird der Schaltabstand eingestellt
(gelbe LED leuchtet). Teach-in-Taste nicht mit spitzen Gegenständen betäti‐
gen.
2 Es wird empfohlen den Schaltpunkt in das Objekt zu legen (siehe Grafik
oben).
3 Weitere Teach-Möglichkeiten werden in der Betriebsanleitung beschrieben.
it
1 Premendo il pulsante teach-in semplice viene impostata la distanza di lavoro
(il LED giallo si illumina). Non azionare il pulsante teach-in con oggetti app‐
untiti.
2 Si consiglia di impostare il punto di commutazione nell'oggetto (vedere la
figura sopra).
3 Nelle istruzioni per l'uso sono descritte altre possibilità di Teach.
fr
1 Appuyer sur le bouton simple d’apprentissage pour régler la distance de
commutation (LED jaune s’allume). Ne pas appuyer sur le bouton d’appren‐
tissage avec des objets pointus.
2 Il est recommandé de définir le point de commutation dans l'objet (voir
graphique ci-dessus).
3 D'autres possibilités d'apprentissage sont décrites dans la notice d'instruc‐
tion.
es
1 Pulsando la tecla teach-in sencilla, se ajusta la distancia de conmutación (el
LED amarillo se ilumina). La tecla teach-in no debe accionarse con objetos
puntiagudos.
2 Se recomienda establecer el punto de conmutación en el objeto (ver gráfico
arriba).
3 En las instrucciones de uso se describen otras opciones de aprendizaje.
zh
1 通过按下单示教键可设置触发触发感应距离(黄色 LED 亮起)。不得使用尖
锐物操作示教键。
2 建议在对象中设置开关点(请参见上图)。
3 其他示教选项在操作指南中描述。
ko
1 티치인 버튼을 누르면 스위칭 거리가 설정됩니다(노란색 LED가 켜짐). 티
치인 버튼을 뾰족한 물건으로 작동하지 마십시오.
2 스위칭 포인트를 물체 안에 둘 것을 권장합니다(위 그래픽 참조).
3 기타 티치인 옵션은 작동 지침서에서 설명합니다.
8022571.1AEG / 2021-01-08/de PowerProx WTT4SL | SICK 2

5 Troubleshooting
Störungsbehebung Resolución de problemas
Eliminazione difetti 故障排除
Élimination des défauts 장애 제거
en
Display, error situation Cause Measure
Green LED does not light up No voltage or voltage below
the limit values
Check the power supply,
check all electrical connec‐
tions (cables and plug con‐
nections)
Green LED does not light up Voltage interruptions Ensure there is a stable power
supply without interruptions
Green LED does not light up Sensor is faulty If the power supply is OK,
replace the sensor
Yellow LED flashes (only
briefly)
Teach-in mode Check the teach-in mode
Yellow LED flashes quickly
(only briefly)
Teach-in button lock active Deactivate the button lock
Yellow LED lights up, no
object in the path of the
beam
Distance between the sensor
and the background is too
short
Reduce the sensing range, see
teach-in
Object is in the path of the
beam, yellow LED does not
light up
Distance between the sensor
and the object is too long or
sensing range is set too short
Increase the sensing range,
see teach-in
de
Anzeige, Fehlerbild Ursache Maßnahme
grüne LED leuchtet nicht keine Spannung oder Span‐
nung unterhalb der Grenz‐
werte
Spannungsversorgung prüfen,
den gesamten elektrischen
Anschluss prüfen (Leitungen
und Steckerverbindungen)
grüne LED leuchtet nicht Spannungsunterbrechungen Sicherstellen einer stabilen
Spannungsversorgung ohne
Unterbrechungen
grüne LED leuchtet nicht Sensor ist defekt Wenn Spannungsversorgung
in Ordnung ist, dann Sensor
austauschen
gelbe LED blinkt (nur kurz) Teach-Modus Teach-Modus überprüfen
gelbe LED blinkt schnell (nur
kurz)
Teach-Button-Sperre aktiv Tastensperre deaktivieren
gelbe LED leuchtet, kein
Objekt im Strahlengang
Abstand zwischen Sensor
und Hintergrund ist zu gering
Schaltabstand verringern,
siehe Teach-In.
Objekt ist im Strahlengang,
gelbe LED leuchtet nicht
Abstand zwischen Sensor
und Objekt ist zu groß oder
Schaltabstand ist zu gering
eingestellt
Schaltabstand vergrößern,
siehe Teach-In
it
Indicatore, schermata di
errore
Causa Provvedimento
Il LED verde non si accende nessuna tensione o tensione
al di sotto del valore soglia
Verificare la tensione di ali‐
mentazione e/o il collega‐
mento elettrico
Il LED verde non si accende Interruzioni di tensione Assicurarsi che ci sia un'ali‐
mentazione di tensione sta‐
bile
Il LED verde non si accende Il sensore è guasto Se l'alimentazione di tensione
è regolare, allora chiedere una
sostituzione del sensore
il LED giallo lampeggia (solo
brevemente)
Modalità Teach Verificare la modalità Teach
il LED giallo lampeggia rapi‐
damente (solo brevemente)
Blocco del pulsante teach
attivo
Disattivazione blocco tasti
il LED giallo si accende, nes‐
sun oggetto nella traiettoria
del raggio
La distanza tra sensore e
sfondo è inferiori alle capa‐
cità di funzionamento
Diminuire la distanza di
lavoro, vedi teach-in.
L'oggetto è nella traiettoria
del raggio, il LED giallo non si
accende
La distanza tra sensore e
oggetto è troppo grande o
la distanza di commutazione
ha un'impostazione troppo
bassa
Aumentare la distanza di
lavoro, vedi Teach-in
fr
Affichage, représentation de
l'erreur
Cause Mesure
La LED verte ne s'allume pas Pas de tension ou tension
inférieure aux valeurs limites
Contrôler l'alimentation élec‐
trique, contrôler tous les bran‐
chements électriques (câbles
et connexions)
La LED verte ne s'allume pas Coupures d'alimentation
électrique
S'assurer que l'alimentation
électrique est stable et inin‐
terrompue
La LED verte ne s'allume pas Le capteur est défectueux Si l'alimentation électrique
est en bon état, remplacer le
capteur
Affichage, représentation de
l'erreur
Cause Mesure
La LED jaune clignote
(brièvement)
Mode apprentissage Contrôler le mode apprentis‐
sage
la LED jaune clignote rapide‐
ment (brièvement)
Blocage bouton d’apprentis‐
sage actif
Désactiver le blocage des tou‐
ches
La LED jaune s'allume, pas
d'objet dans la trajectoire du
faisceau
La distance entre le capteur
et l'arrière-plan est trop fai‐
ble
Réduire la distance de com‐
mutation, voir apprentissage.
L'objet est dans la trajectoire
du faisceau, la LED jaune ne
s'allume pas
La distance entre le capteur
et l'objet est trop grande ou
la portée est trop faible
Augmenter la distance de
commutation, voir apprentis‐
sage
es
Indicador, imagen de error Causa Acción
El LED verde no se ilumina Sin tensión o tensión por
debajo de los valores límite
Comprobar la fuente de ali‐
mentación, comprobar toda la
conexión eléctrica (cables y
conectores)
El LED verde no se ilumina Interrupciones de tensión Asegurar una fuente de ali‐
mentación estable sin inter‐
rupciones de tensión
El LED verde no se ilumina El sensor está defectuoso Si la fuente de alimentación
no tiene problemas, cambiar
el sensor
El LED amarillo parpadea
(solo brevemente)
Modo de aprendizaje (Teach) Comprobar el modo de apren‐
dizaje
El LED amarillo parpadea
rápido (solo brevemente)
Bloqueo de la tecla teach
activo
Desactivar el bloqueo de
teclas
El LED amarillo se ilumina,
no hay ningún objeto en la
trayectoria del haz
La distancia entre el sensor y
el fondo es insuficiente
Reducir la distancia de con‐
mutación, véase Aprendizaje.
El objeto se encuentra en la
trayectoria del haz, el LED
amarillo no se ilumina
La distancia entre el sensor y
el objeto es excesiva o la dis‐
tancia de conmutación aju‐
stada es insuficiente
Aumentar la distancia de con‐
mutación, véase Aprendizaje
zh
指示灯,故障图 原因 措施
绿色 LED 未亮起 无电压或电压低于极限值 检查电源,检查整体电气连接
(导线和插头连接)
绿色 LED 未亮起 电压中断 确保电源稳定无中断
绿色 LED 未亮起 传感器损坏 如果电源正常,则更换传感器
黄色 LED 闪烁(非常短暂) 示教模式 检查示教模式
黄色 LED 快速闪烁(非常短
暂)
示教键按键锁已激活 禁用按键锁
黄色 LED 亮起,光路中无物
体
传感器和背景之间的间距过小 降低触发感应距离,参见“示
教”章节
光路中有物体,黄色 LED 未
亮起
传感器和物体之间的间距过大
或开关距离设置的过小
增大触发感应距离,参见“示
教”章节
ko
표시, 오류 증상 원인 조치
초록색 LED가 켜지지 않
음
전압이 없거나 전압이 한
계값을 밑돎
전압 공급 장치 점검, 전체
전기 연결 점검(케이블 및
플러그 연결부)
초록색 LED가 켜지지 않
음
전압 공급 중단 중단 없이 안정적인 전압
공급 확보
초록색 LED가 켜지지 않
음
센서에 결함이 있음 전압 공급 장치에 문제가
없는 경우, 센서 교체
노란색 LED 깜박거림(잠
깐만)
티치인 모드 티치인 모드 점검
노란색 LED가 빠르게 깜
빡임(짧게만)
티치인 버튼 차단 활성 버튼 차단 비활성화하기
노란색 LED가 켜짐, 빔 경
로에 물체가 없음
센서와 배경 간 거리가
너무 가까움
스위칭 거리를 줄이십시
오(티치인 참조).
물체가 빔 경로에 있음,
노란색 LED가 켜지지 않
음
센서와 물체 간 거리가
너무 크거나 스위칭 거리
가 너무 작게 설정됨
스위칭 거리를 늘리십시
오(티치인 참조).
8022571.1AEG / 2021-01-08/de PowerProx WTT4SL | SICK 3
-
 1
1
-
 2
2
-
 3
3


dans d''autres langues
- italiano: SICK PowerProx WTT4SL
- English: SICK PowerProx WTT4SL
- español: SICK PowerProx WTT4SL
- Deutsch: SICK PowerProx WTT4SL
Documents connexes
-
SICK PowerProx WTT4SL Quickstart
-
-
-
-
-
-
-
-