Weber 57060001 Manuel utilisateur
- Catégorie
- Barbecues
- Taper
- Manuel utilisateur
Ce manuel convient également à

48613
US - ENGLISH
07/01/14
LP
REGISTER
YOUR GRILL
Thank you for purchasing
a Weber
®
grill. Take a
few minutes to protect
your investment by
registering your grill
online at www.weber.com.
Reference the serial
number on the front cover
of this owner’s guide.
37 57
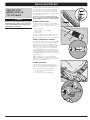
m DANGER
If you smell gas:
1) Shut off gas to the
appliance.
2) Extinguish any open
flames.
3) Open lid.
4) If odor continues, keep
away from the appliance
and immediately call your
gas supplier or your fire
department.
m WARNING
1) Do not store or use
gasoline or other
flammable liquids or
vapors in the vicinity of this
or any other appliance.
2) An LP tank not connected
for use shall not be stored
in the vicinity of this or any
other appliance.
Leaking gas may cause a fire
or explosion which can cause
serious bodily injury, death, or
damage to property.
Carefully follow all leak-check
procedures in this Owner’s
Guide prior to grill operation.
Dothis even if the grill was
dealer-assembled.
Do not ignite this appliance
without first reading the burner
ignition sections of this manual.
THIS GAS APPLIANCE IS
DESIGNED FOR OUTDOOR
USEONLY.
NOTICE TO INSTALLER: These
instructions must be left with
the owner, who should keep
them for future use.
YOU MUST READ THIS OWNER’S GUIDE
BEFORE OPERATING YOUR GAS GRILL.
GRILL OWNER’S GUIDE

2 WWW.WEBER.COM
®
WARNINGS
m DANGER
Failure to follow the DANGERS, WARNINGS
and CAUTIONS contained in this Owner’s
Guide may result in serious bodily injury
or death, or may result in a fire or an
explosion causing damage to property.
WARNINGS:
m Improper assembly of grill may be
dangerous. Please follow the assembly
instructions carefully.
m Do not use this grill unless all parts
are in place. The grill must be properly
assembled according to the assembly
instructions.
m Your Weber
®
gas grill should never be
used by children. Accessible parts of
the grill may be very hot. Keep young
children away while grill is in use.
m Exercise caution when using your
Weber
®
gas grill. It will be hot during
cooking or cleaning, and should never
be left unattended, or moved while in
operation.
m Do not use charcoal or lava rock in your
Weber
®
gas grill.
m While igniting the grill or cooking, never
lean over open grill.
m Never place hands or fingers on the front
edge of the cookbox when the grill is hot
or the lid is open.
m Do not attempt to disconnect the gas
regulator and hose assembly or any gas
fitting while your grill is in operation.
m Use heat-resistant barbecue mitts or
gloves when operating grill.
m Use the pressure regulator and hose
assembly that is supplied with your
Weber
®
gas grill.
m Should the burners go out while grill
is in operation, turn all gas valves off.
Open the lid and wait five minutes before
attempting to relight grill, using the
igniting instructions.
m Do not use the grill within 24 inches
(61cm) of combustible materials. This
includes the top, bottom, back or sides of
the grill.
m Do not build this model of grill in any
built-in or slide-in construction. Ignoring
this WARNING could cause a fire or an
explosion that can damage property and
cause serious bodily injury or death.
m Do not store an extra (spare) or
disconnected liquid propane tank under
or near this grill.
m After a period of storage and/or nonuse,
the Weber
®
gas grill should be checked
for gas leaks and burner obstructions
before use. See instructions in this
Owner’s Guide for correct procedures.
m Do not operate the Weber
®
gas grill if
there is a gas leak present.
m Do not use a flame to check for gas
leaks.
m Do not put a grill cover or anything
flammable on, or in the storage area
under the grill while grill is in operation
or is hot.
m Liquid propane gas is not natural gas.
The conversion or attempted use of
natural gas in a liquid propane gas unit
or liquid propane gas in a natural gas
unit is dangerous and will void your
warranty.
m Keep any electrical supply cord and the
fuel supply hose away from any heated
surfaces.
m Do not enlarge valve orifices or burner
ports when cleaning the valves or
burners.
m The Weber
®
gas grill should be
thoroughly cleaned on a regular basis.
m A dented or rusty liquid propane tank
may be hazardous and should be
checked by your liquid propane supplier.
Do not use a liquid propane tank with a
damaged valve.
m Although your liquid propane tank
may appear to be empty, gas may still
be present, and the tank should be
transported and stored accordingly.
m If you see, smell or hear the hiss of gas
escaping from the liquid propane tank:
1. Move away from liquid propane tank.
2. Do not attempt to correct the problem
yourself.
3. Call your fire department.
m Should a grease fire occur, turn off all
burners and leave lid closed until fire is
out.
ADDITIONAL WARNINGS
FOR STATE OF CALIFORNIA:
m Combustion byproducts produced when
using this product contain chemicals
known to the state of California to
cause cancer, birth defects, or other
reproductive harm.
m Proposition 65 Warning: Handling the
brass material on this product exposes
you to lead, a chemical known to the
state of California to cause cancer,
birth defects or other reproductive
harm. (Wash hands after handling this
product.)

WWW.WEBER.COM
®
3
WARRANTY TABLE OF CONTENTS
The grills illustrated in this Owner’s Guide may vary
slightly from the model purchased.
WARNINGS ..............................2
WARRANTY ..............................3
TABLE OF CONTENTS .....................3
WEBER
®
Q
®
3200 EXPLODED VIEW ..........4
PARTS LIST ..............................6
ASSEMBLY ...............................7
STORAGE FEATURES ..................... 20
IMPORTANT INFORMATION
ABOUT LP GAS ..........................21
WHAT IS LP GAS? ..........................................21
SAFE HANDLING TIPS FOR LP GASTANK
S ....................21
STORAGE AND/OR NONUSE ................................21
US INSTALLATION CODES .................................21
MEXICO INSTALLATION CODES .............................21
CANADIAN INSTALLATION CODES ..........................21
US LP TANK REQUIREMENTS ..............................21
CANADIAN LP TANK REQUIREMENTS .......................21
IMPORTANT INFORMATION ABOUT
LP GAS CONNECTIONS ...................22
WHAT IS A REGULATOR? ..................................22
REGULATOR CONNECTIONS ...............................22
LP TANK INSTALLATION AND REMOVAL ....23
INSTALLING THE LP TANK .................................23
REMOVING THE LP TANK FOR REFILLING OR REPLACEMENT ...23
FILLING THE LP GAS TANK ................................23
FUELING YOUR GRILL .....................................23
PREPARING TO USE YOUR GRILL ..........24
WHAT IS A LEAK CHECK? ..................................24
CHECKING FOR GAS LEAKS ................................24
SAFETY CHECKS BEFORE
USING YOUR GRILL ......................25
SAFETY FIRST ...........................................25
REMOVABLE CATCH PAN AND DISPOSABLE DRIP PAN .........25
HOSE INSPECTION .......................................25
BURNER IGNITION & USAGE ..............26
METHODS OF BURNER IGNITION ...........................26
BURNER IGNITION – Electronic Ignition System ...............26
TO EXTINGUISH BURNER ..................................26
BURNER IGNITION – Lighting with a Match ...................27
TO EXTINGUISH BURNER ..................................27
GRILLING TIPS & HELPFUL HINTS .........28
TIPS & HINTS ............................................28
PREHEATING ............................................28
COVERED COOKING .......................................28
GREASE COLLECTION SYSTEM .............................28
COOKING METHODS .....................29
DIRECT METHOD OR INDIRECTMETHOD? ....................29
TROUBLESHOOTING .....................30
GENERAL TROUBLESHOOTING ............................30
GRILL OUT
®
HANDLE LIGHT TROUBLESHOOTING .............30
ANNUAL MAINTENANCE .................31
KEEPING YOUR WEBER
®
GRILL IN TIP-TOP SHAPE ............31
BURNER FLAME PATTERN .................................31
WEBER
®
SPIDER/INSECT SCREEN(S) ........................31
BURNER TUBE PORTS ....................................31
BURNER TUBE CLEANING OR REPLACEMENT ................32
ROUTINE MAINTENANCE .................34
BEAUTIFUL—INSIDE AND OUT .............................34
CLEANING THE OUTSIDE OF THE GRILL .....................34
CLEANING THE INSIDE OF THE GRILL .......................34
HOSE INSPECTION .......................................34
IGNITION SYSTEM OPERATIONS ............................35
MAINTAINING THE ELECTRONIC IGNITION SYSTEM ............35
MAINTAINING THE GRILL OUT
®
HANDLELIGHT ...............35
Thank you for purchasing a WEBER
®
product. Weber-Stephen
Products LLC, 200 East Daniels Road, Palatine, Illinois 60067-6266
(“Weber”) prides itself on delivering a safe, durable, and reliable
product.
This is Weber’s Voluntary Warranty provided to you at no extra
charge. It contains the information you will need to have your
WEBER
®
product repaired in the unlikely event of a failure or defect.
Pursuant to applicable laws, the customer has several rights in
case the product is defective. Those rights include supplementary
performance or replacement, abatement of the purchasing price,
and compensation. In the European Union, for example, this
would be a two-year statutory warranty starting on the date of the
handover of the product. These and other statutory rights remain
unaffected by this warranty provision. In fact, this warranty grants
additional rights to the Owner that are independent from statutory
warranty provisions.
WEBER’S VOLUNTARY WARRANTY
Weber warrants, to the purchaser of the WEBER
®
product (or in
the case of a gift or promotional situation, the person for whom
it was purchased as a gift or promotional item), that the WEBER
®
product is free from defects in material and workmanship for the
period(s) of time specified below when assembled and operated
in accordance with the accompanying Owner’s Guide. (Note: If
you lose or misplace your WEBER
®
Owner’s Guide, a replacement
is available online at www.weber.com, or such country-specific
website to which Owner may be redirected.) Under normal, private
single family home or apartment use and maintenance, Weber
agrees within the framework of this warranty to repair or replace
defective parts within the applicable time periods, limitations
and exclusions listed below. TO THE EXTENT ALLOWABLE BY
APPLICABLE LAW, THIS WARRANTY IS EXTENDED ONLY TO
THE ORIGINAL PURCHASER AND IS NOT TRANSFERABLE TO
SUBSEQUENT OWNERS, EXCEPT IN THE CASE OF GIFTS AND
PROMOTIONAL ITEMS AS NOTED ABOVE.
OWNER’S RESPONSIBILITIES UNDER THIS WARRANTY
To ensure trouble-free warranty coverage, it is important (but it is
not required) that you register your WEBER
®
product online at www.
weber.com, or such country-specific website to which Owner may
be redirected). Please also retain your original sales receipt and/or
invoice. Registering your WEBER
®
product confirms your warranty
coverage and provides a direct link between you and Weber in case
we need to contact you.
The above warranty only applies if the Owner takes reasonable
care of the WEBER
®
product by following all assembly instructions,
usage instructions, and preventative maintenance as outlined in the
accompanying Owner’s Guide, unless the Owner can prove that the
defect or failure is independent of non-compliance with the above
mentioned obligations. If you live in a coastal area, or have your
product located near a pool, maintenance includes regular washing
and rinsing of the exterior surfaces as outlined in the accompanying
Owner’s Guide.
WARRANTY HANDLING / EXCLUSION OF WARRANTY
If you believe that you have a part which is covered by this Warranty,
please contact Weber Customer Service using the contact
information on our website (www.weber.com, or such country-
specific website to which Owner may be redirected). Weber will,
upon investigation, repair or replace (at its option) a defective
part that is covered by this Warranty. In the event that repair or
replacement are not possible, Weber may choose (at its option)
to replace the grill in question with a new grill of equal or greater
value. Weber may ask you to return parts for inspection, shipping
charges to be pre-paid.
This WARRANTY lapses if there are damages, deteriorations,
discolorations and/or rust for which Weber is not responsible
caused by:
• Abuse, misuse, alteration, modification, misapplication,
vandalism, neglect, improper assembly or installation, and failure
to properly perform normal and routine maintenance;
• Insects (such as spiders) and rodents (such as squirrels),
including but not limited to damage to burner tubes and/or gas
hoses;
• Exposure to salt air and/or chlorine sources such as swimming
pools and hot tubs/spas;
• Severe weather conditions such as hail, hurricanes, earthquakes,
tsunamis or surges, tornadoes or severe storms.
The use and/or installation of parts on your WEBER
®
product
that are not genuine Weber parts will void this Warranty, and any
damages that result hereby are not covered by this Warranty. Any
conversion of a gas grill not authorized by Weber and performed by
a Weber authorized service technician will void this Warranty.
PRODUCT WARRANTY PERIODS
Cookbox:
5 years, no rust through/burn through
(2 years paint excluding fading or discoloration)
Lid assembly:
5 years, no rust through/burn through
(2 years paint excluding fading or discoloration)
Stainless steel burner tubes:
5 years, no rust through/burn through
Porcelain-enameled cast iron cooking grates:
5 years, no rust through/burn through
Plastic components:
5 years, excluding fading or discoloration
All remaining parts:
2 years
DISCLAIMERS
APART FROM THE WARRANTY AND DISCLAIMERS AS DESCRIBED
IN THIS WARRANTY STATEMENT, THERE ARE EXPLICITLY NO
FURTHER WARRANTY OR VOLUNTARY DECLARATIONS OF
LIABILITY GIVEN HERE WHICH GO BEYOND THE STATUTORY
LIABILITY APPLYING TO WEBER. THE PRESENT WARRANTY
STATEMENT ALSO DOES NOT LIMIT OR EXCLUDE SITUATIONS
OR CLAIMS WHERE WEBER HAS MANDATORY LIABILITY AS
PRESCRIBED BY STATUTE.
NO WARRANTIES SHALL APPLY AFTER THE APPLICABLE
PERIODS OF THIS WARRANTY. NO OTHER WARRANTIES
GIVEN BY ANY PERSON, INCLUDING A DEALER OR RETAILER,
WITH RESPECT TO ANY PRODUCT (SUCH AS ANY “EXTENDED
WARRANTIES”), SHALL BIND WEBER. THE EXCLUSIVE REMEDY
OF THIS WARRANTY IS REPAIR OR REPLACEMENT OF THE PART
OR PRODUCT.
IN NO EVENT UNDER THIS VOLUNTARY WARRANTY SHALL
RECOVERY OF ANY KIND BE GREATER THAN THE AMOUNT OF THE
PURCHASE PRICE OF THE WEBER PRODUCT SOLD.
YOU ASSUME THE RISK AND LIABILITY FOR LOSS, DAMAGE, OR
INJURY TO YOU AND YOUR PROPERTY AND/OR TO OTHERS AND
THEIR PROPERTY ARISING OUT OF THE MISUSE OR ABUSE OF
THE PRODUCT OR FAILURE TO FOLLOW INSTRUCTIONS PROVIDED
BY WEBER IN THE ACCOMPANYING OWNER’S GUIDE.
PARTS AND ACCESSORIES REPLACED UNDER THIS WARRANTY
ARE WARRANTED ONLY FOR THE BALANCE OF THE ABOVE
MENTIONED ORIGINAL WARRANTY PERIOD(S).
THIS WARRANTY APPLIES TO PRIVATE SINGLE FAMILY HOME OR
APARTMENT USE ONLY AND DOES NOT APPLY TO WEBER GRILLS
USED IN COMMERCIAL, COMMUNAL OR MULTI-UNIT SETTINGS
SUCH AS RESTAURANTS, HOTELS, RESORTS, OR RENTAL
PROPERTIES.
WEBER MAY FROM TIME TO TIME CHANGE THE DESIGN OF ITS
PRODUCTS. NOTHING CONTAINED IN THIS WARRANTY SHALL
BE CONSTRUED AS OBLIGATING WEBER TO INCORPORATE
SUCH DESIGN CHANGES INTO PREVIOUSLY MANUFACTURED
PRODUCTS, NOR SHALL SUCH CHANGES BE CONSTRUED AS AN
ADMISSION THAT PREVIOUS DESIGNS WERE DEFECTIVE.
WEBER-STEPHEN PRODUCTS LLC
Customer Service Center
2900 Golf Road
Rolling Meadows, IL 60008
U.S.A.
For replacement parts, call:
1-800-446-1071

4 WWW.WEBER.COM
®
WEBER
®
Q
®
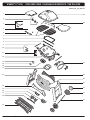
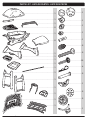
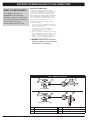
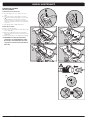
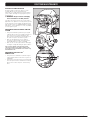
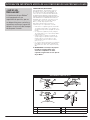
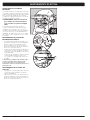
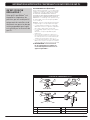
3200 EXPLODED VIEW · DIAGRAMA DE DESPIECE · VUE ECLATEE
1
2
6
7
8
9
10
11
13
12
14
15
16
17
24
25
26
30
31
32
Q3200_US_LP_070114
18
4
5
3
19
23
21
22
20
27
28
29

WWW.WEBER.COM
®
5
WEBER
®
Q
®
3200 EXPLODED VIEW · DIAGRAMA DE DESPIECE · VUE ECLATEE
1. Fold-Down Table
2. Thermometer Assembly
3. Grill Out
®
Handle Light Assembly
4. Handle Spacer
5. Handle
6. Cooking Grate
7. Outside Burner Tube
8. Inside Burner Tube
9. Wire Brace
10. Igniter Electrode Assembly
11. Electronic Igniter Button/
Electronic Igniter Module
12. Cookbox/Cradle Assembly
13. Large Burner Control Knob
14. Small Burner Control Knob
15. Disposable Drip Pan
16. Removable Catch Pan
17. Left Cart Leg
18. Front Cross Brace
19. Tool Holder
20. Tank Rest
21. Tank Bracket
22. Tank Strap
23. Bottom Rack
24. Lid
25. Warming Rack
26. Manifold, Valve and Regulator Assembly
27. Rear Cross Brace
28. Tank Screen
29. Right Cart Leg
30. Wheel Cover
31. Wheel
32. Axle
1. Mesa plegable
2. Conjunto del termómetro
3. Conjunto de la agarradera Grill Out
®
4. Espaciador del asa
5. Asa
6. Rejilla para cocinar
7. Tubo del quemador externo
8. Tubo del quemador interno
9. Refuerzo de alambre
10. Conjunto del electrodo de encendido
11. Botón de encendido electrónico/
Módulo de encendido electrónico
12. Conjunto de la caja/Cuna para cocinar
13. Perilla de control del quemador grande
14. Perilla de control del quemador chico
15. Bandeja de goteo desechable
16. Bandeja de recuperación desmontable
17. Pata izquierda del carro
18. Soporte transversal frontal
19. Sujetador de herramientas
20. Descanso del tanque
21. Soporte del tanque
22. Correa del tanque
23. Estante inferior
24. Tapa
25. Estante de calentamiento
26. Conjunto del colector, válvula y regulador
27. Soporte transversal trasero
28. Pantalla del tanque
29. Pata derecha del carro
30. Cubierta de la rueda
31. Rueda
32. Eje
1. Plan de travail repliable
2. Thermomètre
3. Ensemble de poignée et lumière «Grill
Out
®
» (Barbecue partout)
4. Ecarteur de poignée
5. Poignée
6. Grille de cuisson
7. Tube de réchaud externe
8. Tube de réchaud interne
9. Renfort métallique
10. Ensemble d'électrode d'allumage
11. Bouton/Module d'allumage électronique
12. Ensemble cuve de cuisson/Châssis
13. Gros bouton de réglage de brûleur
14. Petit bouton de réglage de brûleur
15. Cuvette ramasse-gouttes jetable
16. Bac de récupération amovible
17. Pied gauche de chariot
18. Renfort avant
19. Porte-ustensiles
20. Support de réservoir
21. Crochet pour support de réservoir de gaz
22. Sangle de réservoir
23. Étagère inférieure
24. Couvercle
25. Grille de réchauffage
26. Ensemble collecteur, robinet, détendeur
27. Renfort arrière
28. Grille de réservoir
29. Pied droit de chariot
30. Cache-roue
31. Roue
32. Essieu

6 WWW.WEBER.COM
®
PARTS LIST · LISTA DE PARTES · LISTE DES PIECES
.....................................1
.......................................................................1
........................................................................1
.....................................................................................1
................................................................................1
..............................................................................2
...............................................................................................1
.........................2
..............................4
..........................................2
........................2
........................................1
.........................................1
........................................1
.........................12
..............................1
......................................................1
...................................1
...................................................................1
..........................................................................................1
.....................................2
..................................1
....................................1
.................1
.......................................................................1
.................1
.........................2
..................................2
..............................1
.......................................1
.......................................1

WWW.WEBER.COM
®
7
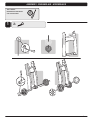
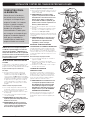
1
2-
ASSEMBLY · ENSAMBLAJE · ASSEMBLAGE
TOOLS NEEDED:
HERRAMIENTAS REQUERIDAS:
OUTILS NECESSAIRES:

8 WWW.WEBER.COM
®
2
ASSEMBLY · ENSAMBLAJE · ASSEMBLAGE
3

WWW.WEBER.COM
®
9
4
5
8-
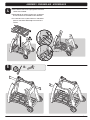
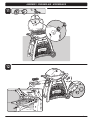
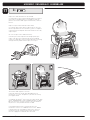
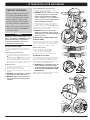
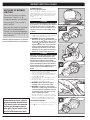
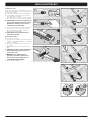
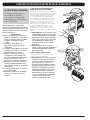
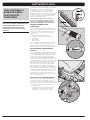
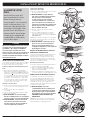
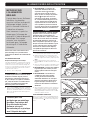
m Place wheel frame on the right. Ignition instruction
sticker faces forward.
m El bastidor de la rueda va a la derecha. La etiqueta
de instrucciones de encendido ve hacia adelante.
m Le cadre des roues se place à droite. L’autocollant
pour les instructions d’allumage est orienté vers
l’avant.
ASSEMBLY · ENSAMBLAJE · ASSEMBLAGE

10 WWW.WEBER.COM
®
6
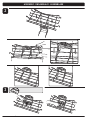
ASSEMBLY · ENSAMBLAJE · ASSEMBLAGE

WWW.WEBER.COM
®
11
7
8
4-
ASSEMBLY · ENSAMBLAJE · ASSEMBLAGE

12 WWW.WEBER.COM
®
9
10
ASSEMBLY · ENSAMBLAJE · ASSEMBLAGE
2- 2-

WWW.WEBER.COM
®
13
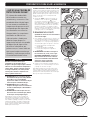
11
1-
12
ASSEMBLY · ENSAMBLAJE · ASSEMBLAGE

14 WWW.WEBER.COM
®
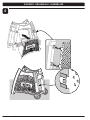
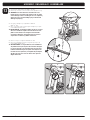
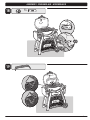
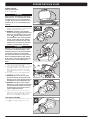
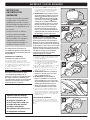
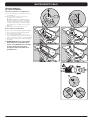
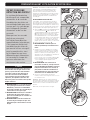
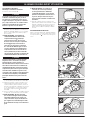
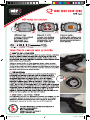
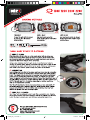
A) Uncoil the hose and regulator of the Weber
®
Q
®
3200.
B) Remove leg screw then secure hose and retention clip (1) to cart leg.
m WARNING: The hose must be secured to the cart
leg by the hose retention clip. Failure to do so could
cause damage to hose resulting in a fire or explosion,
which can cause serious bodily injury or death and
damage to property.
A) Desenrolle la manguera y el regulador de la barbacoa
Weber
®
Q
®
3200.
B) Retire el tornillo de la pata y luego asegure la manguera y el clip de
retención (1) a la pata del carro.
m ADVERTENCIA: La manguera debe sujetarse a la pata
del carro usando el clip de retención. El no hacerlo
podría causar daños a la manguera ocasionando
un fuego o explosión, que pueden causar lesiones
corporales o la muerte y daños materiales.
A) Déroulez le tuyau et le régulateur du Weber
®
Q
®
3200.
B) Retirez la vis du pied puis fixez bien le tuyau ainsi que la pince de
rétention (1) au pied du chariot.
m MISE EN GARDE : Le tuyau doit être fixé solidement
au pied du chariot par la pince de rétention du tuyau.
Le non respect de cette consigne pourrait entraîner
la détérioration du tuyau avec pour conséquence un
incendie ou une explosion, susceptible de provoquer
des blessures graves voire un décès ainsi que des
dégâts matériels.
13
1
ASSEMBLY · ENSAMBLAJE · ASSEMBLAGE

WWW.WEBER.COM
®
15
14
1 2
3
ASSEMBLY · ENSAMBLAJE · ASSEMBLAGE

16 WWW.WEBER.COM
®
15
1 2
3 4
ASSEMBLY · ENSAMBLAJE · ASSEMBLAGE

WWW.WEBER.COM
®
17
2-
ASSEMBLY · ENSAMBLAJE · ASSEMBLAGE
16
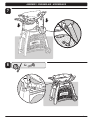
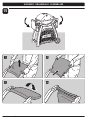
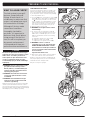
You may hear a rattle in lightpod. This is normal.
Podría escuchar un traqueteo en la lámpara. Esto es normal.
Vous entendrez peut-être un bruit à l’intérieur de la douille
de la lampe. C’est tout à fait normal.

18 WWW.WEBER.COM
®
17
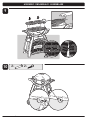
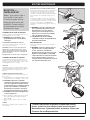
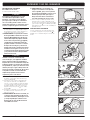
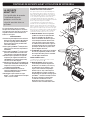
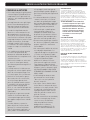
The Grill Out
®
Handle Light has a “tilt sensor”:
Lid up - ON / Lid Closed - OFF. The power button (1) activates or
deactivates the “tiltsensor.” For daytime use, deactivate the sensor by
pressing power button.
La Lámpara de Asa Grill Out
®
cuenta con un “sensor de inclinación.” Tapa
abierta - ENCENDIDA / Tapa cerrada - APAGADA. El botón de encendido
(1) activa o desactiva al “sensor de inclinación.” Para usarse durante el
día, desactive el sensor pulsando el botón de encendido.
L'Eclairage de Poignée Grill Out
®
est pourvue d’un “détecteur
d’inclinaison” : Couvercle levé - MARCHE / Couvercle fermé - ARRÊTE.
Le bouton de mise sous tension (1) active ou désactive le “détecteur
d’inclinaison.” Pour une utilisation en pleine journée, désactivez le
détecteur en appuyant sur le bouton de mise sous tension.
1
Requires three “AAA” alkaline batteries (not included).
Use alkaline batteries only. Do not mix old and new batteries or different
types of batteries (standard, alkaline or rechargeable). If you do not
plan to use the Grill Out
®
Handle Light for a month or more, remove the
batteries.
Requiere tres pilas alcalinas “AAA” (no están incluidas).
Use solamente pilas alcalinas. No mezcle baterías nuevas con viejas o
diferentes tipos de baterías entre sí (normales, alcalinas o recargables).
Si no piensa utilizar la Lámpara de Asa Grill Out
®
durante un mes o más,
sáquele las pilas.
Nécessite trois piles alcalines “AAA” (non fournies).
Utilisez des piles alcalines uniquement. Ne mélangez pas des piles
usagées et des piles neuves ou différents types de piles (standards,
alcalines ou rechargeables). Si vous ne prévoyez pas d’utiliser l’Eclairage
de Poignée Grill Out
®
pendant un mois ou plus, retirez les piles.
3-
ASSEMBLY · ENSAMBLAJE · ASSEMBLAGE

WWW.WEBER.COM
®
19
19
18
1-
ASSEMBLY · ENSAMBLAJE · ASSEMBLAGE
AAA

20 WWW.WEBER.COM
®
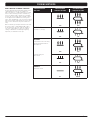
STORAGE FEATURES
·
CARACTERÍSTICAS DE ALMACENAMIENTO
·
FONCTIONS DE STOCKAGE
La page est en cours de chargement...
La page est en cours de chargement...
La page est en cours de chargement...
La page est en cours de chargement...
La page est en cours de chargement...
La page est en cours de chargement...
La page est en cours de chargement...
La page est en cours de chargement...
La page est en cours de chargement...
La page est en cours de chargement...
La page est en cours de chargement...
La page est en cours de chargement...
La page est en cours de chargement...
La page est en cours de chargement...
La page est en cours de chargement...
La page est en cours de chargement...
La page est en cours de chargement...
La page est en cours de chargement...
La page est en cours de chargement...
La page est en cours de chargement...
La page est en cours de chargement...
La page est en cours de chargement...
La page est en cours de chargement...
La page est en cours de chargement...
La page est en cours de chargement...
La page est en cours de chargement...
La page est en cours de chargement...
La page est en cours de chargement...
La page est en cours de chargement...
La page est en cours de chargement...
La page est en cours de chargement...
La page est en cours de chargement...
La page est en cours de chargement...
La page est en cours de chargement...
La page est en cours de chargement...
La page est en cours de chargement...
La page est en cours de chargement...
La page est en cours de chargement...
La page est en cours de chargement...
La page est en cours de chargement...
La page est en cours de chargement...
La page est en cours de chargement...
La page est en cours de chargement...
La page est en cours de chargement...
La page est en cours de chargement...
La page est en cours de chargement...
La page est en cours de chargement...
La page est en cours de chargement...
La page est en cours de chargement...
La page est en cours de chargement...
La page est en cours de chargement...
La page est en cours de chargement...
La page est en cours de chargement...
La page est en cours de chargement...
La page est en cours de chargement...
La page est en cours de chargement...
La page est en cours de chargement...
La page est en cours de chargement...
La page est en cours de chargement...
La page est en cours de chargement...
La page est en cours de chargement...
La page est en cours de chargement...
-
 1
1
-
 2
2
-
 3
3
-
 4
4
-
 5
5
-
 6
6
-
 7
7
-
 8
8
-
 9
9
-
 10
10
-
 11
11
-
 12
12
-
 13
13
-
 14
14
-
 15
15
-
 16
16
-
 17
17
-
 18
18
-
 19
19
-
 20
20
-
 21
21
-
 22
22
-
 23
23
-
 24
24
-
 25
25
-
 26
26
-
 27
27
-
 28
28
-
 29
29
-
 30
30
-
 31
31
-
 32
32
-
 33
33
-
 34
34
-
 35
35
-
 36
36
-
 37
37
-
 38
38
-
 39
39
-
 40
40
-
 41
41
-
 42
42
-
 43
43
-
 44
44
-
 45
45
-
 46
46
-
 47
47
-
 48
48
-
 49
49
-
 50
50
-
 51
51
-
 52
52
-
 53
53
-
 54
54
-
 55
55
-
 56
56
-
 57
57
-
 58
58
-
 59
59
-
 60
60
-
 61
61
-
 62
62
-
 63
63
-
 64
64
-
 65
65
-
 66
66
-
 67
67
-
 68
68
-
 69
69
-
 70
70
-
 71
71
-
 72
72
-
 73
73
-
 74
74
-
 75
75
-
 76
76
-
 77
77
-
 78
78
-
 79
79
-
 80
80
-
 81
81
-
 82
82


Weber 57060001 Manuel utilisateur
- Catégorie
- Barbecues
- Taper
- Manuel utilisateur
- Ce manuel convient également à
dans d''autres langues
- English: Weber 57060001 User manual
- español: Weber 57060001 Manual de usuario
Documents connexes
-
Weber Q 3200 LP Titanium Literature Kit
-
Weber 57067001 Manuel utilisateur
-
-
-
-
-
-
-
-