
1507263 Rev B 20170509
This instruction sheet covers the installation of the Nuvo P30 7" Android Touch Screen, model NV-P30-BK. The Nuvo P30 provides
instant access to the full Nuvo Player app and other key streaming music service apps, like Spotify. This touch screen runs Android 5.1.
The Nuvo P30 is powered by a single 802.11af POE (Power Over Ethernet) connection that is supplied from a compatible POE switch or
injector connected to the same network as the Nuvo Player Portfolio system.
A Google Play Store account is required to enter the Google Play Store, to use any additional apps, or to acquire updates for the newest
version of the Nuvo Player app. Enter your existing Google Play account information or create a new account by following the on-screen
prompts the first time the Google Play Store opens.
Note: After installing the P30 and entering your credentials for the Google Play Store, navigate to settings>accounts>Google>select
your Google account>turn off sync for everything except app data in your Google account to prevent Google from automatically syncing
your gmail, calendar, Google fit data, and people details.
Cette fiche d’instructions porte sur l’installation du Nuvo P30 7 po Android à écran tactile, modèle NV-P30-BK. Le Nuvo P30 permet un
accès instantané à toute l’application Nuvo Player et aux autres applications essentielles de diffusion de musique en continu telles que
Spotify. Cet écran tactile fonctionne sous Android 5.1. Le Nuvo P30 est alimenté par une simple connexion POE 802.11af (Power Over
Ethernet, Alimentation par Ethernet) qui est fournie par un commutateur ou injecteur POE connecté au même réseau que le système de
la gamme Nuvo Player.
Un compte Google Play Store est nécessaire pour accéder au Google Play Store ou pour obtenir les mises à jour de la dernière version
de l’application Nuvo Player. Entrer les données existantes de votre compte Google Play ou créer un nouveau compte en suivant les
instructions affichées à l’écran lors de l’utilisation initiale de Google Play Store.
Remarque: Après avoir installé le P30 et entré vos données d’accès à Google Play Store, naviguer jusqu’à settings
(Paramètres)>accounts (Comptes)>Google>sélectionnez votre compte Google>désactiver la sync (Synchronisation) pour tout sauf les
app data (Données des applis) dans votre compte Google pour éviter que Google ne synchronise automatiquement votre Gmail, votre
calendrier, vos données d’activité Google et vos renseignements personnels.
Diese Anleitung dient der Installation des Nuvo P30 7'' Android Touchscreen, Modell NV-P30-BK. Der Nuvo P30 ermöglicht direkten
Zugang zur kompletten Nuvo-Player-App und zu anderen wichtigen Apps für die Musikwiedergabe wie z.B. Spotify. Dieser Touchscreen
verwendet Android 5.1. Der Nuvo P30 wird durch eine einfache 802.11af PoE-(Power Over Ethernet, Stromversorgung über Ethernet)
Verbindung betrieben, die über einen kompatiblen PoE-Schalter oder Injektor versorgt wird, der an dasselbe Netzwerk wie das Nuvo-
Player-Bestandssystem angeschlossen ist.
Sie benötigen ein Konto für den Google-Play-Store, um in den Google Play-Store zu gelangen, um zusätzliche Apps zu nutzen oder um
Aktualisierungen für die neueste Version der Nuvo-Player-App zu erhalten. Geben Sie die Informationen Ihres bestehenden Google
Play-Kontos an oder erstellen Sie ein neues Konto, indem Sie den Anweisungen auf dem Bildschirm folgen, die beim ersten Öffnen des
Google-Play-Stores erscheinen.
Hinweis: Nach der Installation des P30 und der Eingabe Ihrer Daten für den Google Play-Store, wählen Sie settings
(Einstellunge)>accounts (Konten)>Google>Google-Konto auswählen> sync (Synchronisierung) ausschalten für alles außer app
data (App-Daten) in Ihrem Google-Konto, damit Google Daten für Gmail, Kalender, Google-Fit und Personen nicht automatisch
synchronisiert.
Instruction sheet for Nuvo 7" Android POE Touch Screen NV-P30-BK
Fiche d’instructions pour le Nuvo 7 po Android POE à écran tactile, NV-P30-BK
Gebrauchsanleitung für den NUVO 7'' Android POE Touchscreen, NV-P30-BK
Manuale di istruzioni per il Touch Screen Nuvo 7" Android POE, NV-P30-BK
Folha de instruções para o Ecrã Tátil POE Android de 7", NV-P30-BK
Hoja de instrucciones para la pantalla táctil Android POE de 7" Nuvo, NV-P30-BK
Instructieblad voor het Nuvo 7" Android PoE touchscreen, NV-P30-BK
La page est en cours de chargement...
La page est en cours de chargement...

Note: These instructions assume that the Nuvo Player Portfolio system is already installed. If the system is not currently installed, refer
to the Nuvo Player Portfolio Installation Manual for detailed installation instructions.
Remarque: Il est supposé dans ces instructions que le système de la gamme Nuvo Player est déjà installé. Si le système n’est pas
installé actuellement, se référer au guide d’installation de la gamme Nuvo Player pour obtenir des instructions d’installation précises.
Hinweis: Diese Anleitung setzt voraus, dass das Nuvo-Player- Bestandssystem bereits installiert ist. Falls das System gegenwärtig
nicht installiert ist, finden Sie detaillierte Hinweise für dessen Installation im Handbuch für die Installation des Nuvo-Player-
Bestandssystems.
Nota: le istruzioni riportate di seguito presuppongono che il sistema Nuvo Player Portfolio sia già installato. Qualora il sistema non sia
ancora stato installato, fare riferimento al relativo manuale di Nuvo Player Portfolio per istruzioni di installazione dettagliate.
Nota: Estas instruções assumem que o sistema Nuvo Player Portfolio já se encontra instalado. Se o sistema já não se encontrar
instalado, consulte o Manual de Instalação do Nuvo Player Portfolio para obter instruções de instalação detalhadas.
Nota: Estas instrucciones dan por supuesto que el sistema Nuvo Player Portfolio ya está instalado. Si el sistema aún no está instalado,
consulte el manual de instalación de Nuvo Player Portfolio para ver instrucciones detalladas de instalación.
Let op: In deze instructies gaat men er vanuit dat het Nuvo Player Portfolio systeem reeds is geïnstalleerd. Als het systeem nog niet is
geïnstalleerd, raadpleeg dan de Nuvo Player Portfolio Installatiehandleiding voor gedetailleerde instructies.
Adding a P30 to the Nuvo Player System
Ajout d’un P30 au Player System de Nuvo
Hinzufügen einer P30 zum Nuvo Player System
Aggiunta di un P30 al sistema Nuvo Player
Adicionar um P30 ao Sistema de leitor Nuvo
Agregado de un P30 al Sistema reproductor Nuvo
Een P30 toevoegen aan het Nuvo Player Systeem
La page est en cours de chargement...

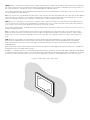
Fig. 4 / Fig. 4 / Abb.4 / Fig. 4 / Fig. 4 / Fig. 4 / Fig. 4
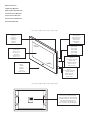
STEP 2: Connect the Ethernet cable to the Nuvo P30 and place the Nuvo P30 over the mounting bracket. Turn on the Nuvo P30. If the
Nuvo P30 does not connect to the Internet or fails to immediately update the time on-screen, disconnect the ethernet cable on the back
of the touch screen then reconnect the cable to seat the cable properly in the connection port.
Launch the Nuvo Player app. The Nuvo Player App may require an update to the latest version. If so, you will be redirected to the Google
Play store.
Note: A Google Play Store account is required to enter the Google Play Store, to use any additional apps, or to acquire updates for the
newest version of the Nuvo Player app. Enter your existing Google Play account information or create a new account by following the
on-screen prompts the first time the Google Play Store opens.
ÉTAPE 2: Connecter le câble Ethernet au Nuvo P30 et placer le Nuvo P30 sur le support de fixation. Allumer le Nuvo P30. Si le Nuvo
P30 ne se connecte pas à Internet ou n’arrive pas à mettre à jour immédiatement l’heure sur l’écran, débrancher le câble Ethernet à
l’arrière de l’écran tactile et rebrancher le câble en s’assurant qu’il est bien enclenché dans le port de connexion.
Lancer l’application Nuvo Player. L'application Nuvo Player peut vous demander de télécharger la dernière version. Si c'est le cas, vous
serez redirigé(e) vers le Google Play store.
Remarque: Un compte Google Play Store est nécessaire pour accéder au Google Play Store ou pour obtenir les mises à jour de la
dernière version de l’application Nuvo Player. Entrer les données existantes de votre compte Google Play ou créer un nouveau compte
en suivant les instructions affichées à l’écran lors de l’utilisation initiale de Google Play Store.
SCHRITT 2: Verbinden Sie das Ethernetkabel mit dem Nuvo P30 und bringen Sie den Nuvo P30 an der Halterung an. Schalten Sie
den Nuvo P30 ein. Falls der Nuvo P30 sich nicht automatisch mit dem Internet verbindet oder die Uhrzeit auf dem Bildschirm nicht
aktualisiert, entfernen Sie das Ethernetkabel von der Rückseite des Touchscreen und verbinden Sie es dann erneut, damit das Kabel
richtig mit der Schnittstelle verbunden ist.
Starten Sie die Nuvo-Player-App. Eventuell ist es erforderlich, die Nuvo-Player-App zu aktualisieren. In diesem Fall werden Sie zum
Google Play-Store umgeleitet.
Hinweis: Sie benötigen ein Konto für den Google Play-Store, um in den Google Play-Store zu gelangen, um zusätzliche Apps zu nutzen
oder um Aktualisierungen für die neueste Version der Nuvo-Player-App zu erhalten. Geben Sie die Informationen Ihres bestehenden
Google Play-Kontos an oder erstellen Sie ein neues Konto, indem Sie den Anweisungen auf dem Bildschirm folgen, die beim ersten
Öffnen des Google Play-Stores erscheinen.
PASSAGGIO 2: collegare il cavo Ethernet a Nuvo P30 e collocare quest'ultimo sulla staffa di montaggio. Accendere il Nuvo P30. Qualora
Nuvo P30 non si connetta a Internet o non riesca ad aggiornare immediatamente l'ora sullo schermo, scollegare il cavo Ethernet sul
retro del touch screen quindi ricollegarlo per alloggiarlo adeguatamente nella porta di connessione.
Lanciare l'app Nuvo Player. L’app Nuvo Player può richiedere un aggiornamento alla versione più recente. In questo caso, sarete
reindirizzati allo Google Play Store.
Nota: per accedere a Google Play Store, utilizzare le app aggiuntive o acquistare gli aggiornamenti per la versione più recente dell'app
Nuvo Player, è necessario disporre di un account Google Play. Inserire i dati del proprio account Google Play o crearne uno nuovo
seguendo le istruzioni su schermo che appaiono aprendo Google Play Store per la prima volta.
La page est en cours de chargement...

Doc #1507263 Rev B 20170509
Doc. #1507263 Rév. B 20170509
Doc #1507263 Rev B 20170509
Doc n. 1507263 Rev B 20170509
Doc #1507263 Rev B 20170509
N.º doc. 1507263 Rev. B 20170509
Doc. nr. 1507263 Herz. B 20170509
Power / Alimentation / Strom / Alimentazione /
Alimentação / Alimentación / Voeding
802.11af Class 1 / 802.11af Classe 1 / 802.11af Klasse 1 / 802.11af Classe 1 /
802.11af Classe 1 / 802.11af clase 1 / 802.11af klasse 1
Ethernet / Ethernet / Ethernet / Ethernet /
Ethernet / Ethernet / Ethernet
10/100 Base T Minimum / 10/100 Base T Minimum / 10/100 Basis T Minimum /
10/100 Base T minimo / Mínimo 10/100 Base T / Mínimo 10/100 Base T /
Minimaal 10/100 basis T
Operating Temperature / Température
de fonctionnement / Betriebstemperatur
/ Temperatura operativa / Temperatura
de Funcionamento / Temperatura de
funcionamiento / Gebruikstemperatuur
0° - 40°C, 32° - 104°F / 0° - 40 °C, 32° - 104 °F / 0° - 40°C, 32° - 104°F /
0° - 40 °C, 32° - 104 °F / 0 ° - 40 °C, 32 ° - 104 °F / De 0 a 40°C /
0° - 40°C, 32° - 104°F
Humidity / Humidité / Feuchtigkeit / Umidità /
Humidade / Humedad / Vochtigheid
70% Non-Condensing / 70% sans condensation / 70% Nicht kondensierend / 70%
senza condensa / 70% Não condensante / 70%, sin condensación /
70%, niet-condenserend
Country of Origin / Pays d’origine /
Herkunftsland / Paese di origine / País de
Origem / País de origen / Land van oorsprong
China / Chine / China / Cina / China / China / China
Compliance
Conformité
Konformität
Conformità
Conformidade
Cumplimiento
Naleving
US: FCC CFR Title 47 Part 15, Subpart B; CANADA: ICES-003; EUROPE: CISPR13;
EUROPE: 55020; AUSTRALIA / NEW ZEALAND: C-TICK standard AS / NZS CISPR13;
RoHS (Restriction of Hazardous Substances Directive 2002 / 95 / EC)
États-Unis: FCC CFR Titre 47 Partie 15, Sous-partie B; CANADA: ICES-003;
EUROPE: CISPR13; EUROPE: 55020; AUSTRALIE / NOUVELLE-ZÉLANDE:
C-TICK standard AS / NZS CISPR13; RoHS (Limitation de l’utilisation de certaines
substances dangereuses, directive 2002 / 95 / EC)
US: FCC CFR Title 47 Part 15, Subpart B; KANADA: ICES-003; EUROPA: CISPR13;
EUROPA: 55020; AUSTRALIEN / NEU SEELAND: C-TICK standard AS / NZS
CISPR13; RoHS (Richtlinie 2002/95/EG zur Beschränkung bestimmter gefährlicher
Stoffe in Elektro- und Elektronikgeräten)
US: FCC CFR Title 47 Part 15, Subpart B; CANADA: ICES-003; EUROPA: CISPR13;
EUROPA: 55020; AUSTRALIA / NUOVA ZELANDA: C-TICK standard AS / NZS
CISPR13; RoHS (Direttiva 2002 / 95 / CE sulla restrizione dell'uso di determinate
sostanze pericolose nelle apparecchiature elettriche ed elettroniche)
EU: FCC CFR Title 47 Part 15, Subpart B; CANADÁ: ICES-003; EUROPA: CISPR13;
EUROPA: 55020; AUSTRÁLIA/NOVA ZELÂNDIA: C-TICK standard AS/NZS CISPR13;
RoHS (Diretiva Relativa à Restrição do Uso de Determinadas Substâncias 2002/95/
CE)
EE.UU.: FCC CFR título 47 parte 15, subparte B; CANADÁ: ICES-003; EUROPA:
CISPR13; EUROPA: 55020; AUSTRALIA/NUEVA ZELANDA: C-TICK estándar AS/NZS
CISPR13; RoHS (directiva sobre restricción de sustancias peligrosas 2002/95/CE)
US: FCC CFR titel 47 onderdeel 15, subonderdeel B; CANADA: ICES-003; EUROPA:
CISPR13; EUROPA: 55020; AUSTRALIË / NIEUW-ZEELAND C-TICK standaard AS /
NZS CISPR13; RoHS-richtlijn (richtlijn beperking van het gebruik van gevaarlijke
stoffen 2002 / 95 / EC)
Technical Specifications
Caractéristiques techniques
Technische Merkmale
Specifiche tecniche
Especificações Técnicas
Especificaciones técnicas
Technische specificaties
-
 1
1
-
 2
2
-
 3
3
-
 4
4
-
 5
5
-
 6
6
-
 7
7
-
 8
8


Nuvo NV-P30-BK Guide d'installation
- Taper
- Guide d'installation
dans d''autres langues
- English: Nuvo NV-P30-BK Installation guide
- español: Nuvo NV-P30-BK Guía de instalación