Simpli Home 3AXCCRL-05 Guide d'installation
- Catégorie
- Coffres de rangement
- Taper
- Guide d'installation

REQUIRES 2 PEOPLE
FOR EASE OF ASSEMBLY
REQUIERT 2 PERSONNES
POUR FACILITER
L'ASSEMBLAGE
USER ASSEMBLY GUIDE
GUIDE D’ASSEMBLAGE
ITEM /NUMBER NUMÉRO D’ARTICLE
3AXCCRL-05
Like us on
& share your pictures and
comments to be eligible
for exclusive promotions.
Suivez-nous sur
partagez vos photos et vos
commentaires afin d’être admissibles
à des promotions exclusives.
TM
TM
TM
1/9
STORAGE CABINET
CABINET DE RANGEMENT
CARLTON / RICHLAND / STERLING

Allen Key Screw
VisAllen
Cam Lock
Verrou
Allen Key
ClefAllen
Cam Lock Pin
Goujons de Serrage
M6 x 30 mm
12 PIECES
12 PIÈCES
2 SETS
2 ENSEMBLES
12 SPIECE
12 PIÈCES
10 SETS
10 ENSEMBLES
HARDWARE / QUINCAILLERIE
REQUIRES 2 PEOPLE FOR EASE OF ASSEMBLY
REQUIERT 2 PERSONNES POUR FACILITER L'ASSEMBLAGE
1 PIECE
1 PIÈCE
1 PIECE
1 PIÈCE
2/9
A
1 2 3 4
C
D F
I
H
1 PIECE
1 PIÈCE
ONE PAIR
UNE PAIRE
1 PIECE
1 PIÈCE
21 SPIECE
21 PIÈCES
7 8 9 10
G
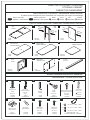
Bottom Panel
Panneau inférieur
Bottom Shelf
Tablette inférieure
Cabinet Shelf
Tablette d’armoire
Back Panel
Panneau arrière
Top
Dessus
Side
Côté
8 x 30 mm
14 SPIECE
14 PIÈCES
1 PIECE
1 PIÈCE
Shelf Support
Support à Tablette
Handle
Poignée
1 SET
1 ENSEMBLE
65
M3 x 12 mm
12 SPIECE
12 PIÈCES
M3 x 15 mm
8SPIECE
8 PIÈCES
2 SETS
2 ENSEMBLES
M4 x 15 mm
11
Magnet and Plate
Aimant et Plaque
Wood dowel
Goujon en bois
Phillips Screw
Vis cruciforme
Phillips Screw
Vis cruciforme
TIPPING RESTRAINT - 1 SET
COURROIE DE RETENUE - 1 ENSEMBLE
M4 x 25mm - 1 - 1 PIÈCEPIECE
M4 x 15mm - 1 - 1 PIÈCEPIECE
M4 x 25mm - 1 - 1 PIÈCEPIECE
a.
b.
c.
Phillips screw round head
Vis cruciforme à tête ronde
PARTS DESCRIPTION / DESCRIPTIONS DES PI
ÈCES
INFOGRAPHIC LEGEND / :LÉGENDE GRAPHIQUE
In relative spatial arrangement to the assembled unit / Disposition par rapport à l'assemblage
INNER
Panel: Inner side Back
OUTER
F
B
Panneau : côté intérieur
Panel: Outer side
Front
Top
Panneau: côté externe
Bottom
T
Arrière Avant Supérieur Inférieur
M4 x 25 mm
CARLTON / RICHLAND / STERLING
STORAGE CABINET
CABINET DE RANGEMENT
B
E
1 PIECE
1 PIÈCE
Door
Portes
ONE PAIR
UNE PAIRE
ONE PAIR
UNE PAIRE
Divider
Séparateur
Front Bar
Barre avant
Front Side
Avant
Back Side
Arrière
Front Side
Avant
Back Side
Arrière

3/9
AB
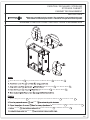
ASSEMBLY INSTRUCTIONS / INSTRUCTIONS D’ASSEMBLAGE
NOTICE / AVIS
Please use a screwdriver for the screws. The screwdriver is not included in the pack.
SVP utilisez un tournevis pour les vis. Le tournevis n’est pas fourni avec le produit.
Please use a screwdriver for the screws. The screwdriver is not included in the pack.
SVP utilisez un tournevis pour les vis. Le tournevis n’est pas fourni avec le produit.
CARLTON / RICHLAND / STERLING
STORAGE CABINET
CABINET DE RANGEMENT
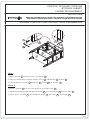
Insert Wood dowels 6 into pre-drilled holes of Bottom Panel D and Front Bar I .
Inseùrer Goujons en bois 6 dans les trous preùpereùs des Panneau Infeùrieur D and Barre avant I .
Coâte
Verrou
Bottom Panel D and Bottom Shelf E .
Bottom Panel D and Bottom Shelf E .
Panneau Infeùrieur D et Tablette Infeùrieure E .
Panneau Infeùrieur D et Tablette Infeùrieure E .
Verrou

4/9
ABAB
ASSEMBLY INSTRUCTIONS / INSTRUCTIONS D’ASSEMBLAGE
NOTICE / AVIS
Please use a screwdriver for the screws. The screwdriver is not included in the pack.
SVP utilisez un tournevis pour les vis. Le tournevis n’est pas fourni avec le produit.
Please use a screwdriver for the screws. The screwdriver is not included in the pack.
SVP utilisez un tournevis pour les vis. Le tournevis n’est pas fourni avec le produit.
CARLTON / RICHLAND / STERLING
STORAGE CABINET
CABINET DE RANGEMENT
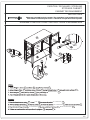
Insert Wood dowels 6 into pre-drilled holes of Divider C .
Inseùrer Goujons en bois 6 dans les trous preùpereùs des Seùparateur C .
2. Attach Divider C to Bottom panel D with Allen Key Screws 1 through pre-drilled holes .
2. Fixer la Seùparateur C au Panneau infeùrieur D au moyer de Vis allen 1 dans les trous preùperceùs.

5/9
ABAB
ASSEMBLY INSTRUCTIONS / INSTRUCTIONS D’ASSEMBLAGE
NOTICE / AVIS
Please use a screwdriver for the screws. The screwdriver is not included in the pack.
SVP utilisez un tournevis pour les vis. Le tournevis n’est pas fourni avec le produit.
Please use a screwdriver for the screws. The screwdriver is not included in the pack.
SVP utilisez un tournevis pour les vis. Le tournevis n’est pas fourni avec le produit.
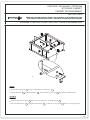
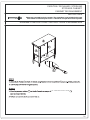
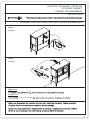
STEP 3
EÙTAPE 3
1. Insert 2 Dowels 6 into top corners of each Side B .
2. Align pre-drilled holes on bottom corners of Top A with Dowels 6 in Sides B .
3. Using 9 Allen Key Screws 1 attach Top A to Side B and Divider C .
1. Inseùrer 2 goujons 6 dans les coins supeùrieurs de chaque Coâteùs B .
2. Aligner les trous preùperceùs infeùrieur au dessus A avec des goujons 6 dans les Coâteùs B .
3. Utiliser des 9 Vis Allen 1 pour attacher le dessus A aux Coâteùs B Seù C .parateur
CARLTON / RICHLAND / STERLING
STORAGE CABINET
CABINET DE RANGEMENT
La page est en cours de chargement...
La page est en cours de chargement...
La page est en cours de chargement...
La page est en cours de chargement...
-
 1
1
-
 2
2
-
 3
3
-
 4
4
-
 5
5
-
 6
6
-
 7
7
-
 8
8
-
 9
9


Simpli Home 3AXCCRL-05 Guide d'installation
- Catégorie
- Coffres de rangement
- Taper
- Guide d'installation
dans d''autres langues
Documents connexes
-
Simpli Home 3AXCCRL-02 Mode d'emploi
-
Simpli Home 3AXCCRL-06 Mode d'emploi
-
-
-
-
-
-
-
-