Indesit HI 50.A (BK)/1 Le manuel du propriétaire
- Catégorie
- Fours
- Taper
- Le manuel du propriétaire
Ce manuel convient également à

English
Ελληνικά
GB
GR
Operating Instructions
COOKER AND OVEN
Contents
Operating Instructions,1
Description of the appliance-Overall view,8
Description of the appliance-Control Panel,8
Installation,9
Start-up and use,12
Cooking modes,12
Using the hob,14
Precautions and tips,15
Care and maintenance,16
Assistance,16
Οδηγίες χρήσης
ΚΟΥΖΙΝΑ ΚΑΙ ΦΟΥΡΝΟΣ
Περιεχόμενα
Οδηγίες χρήσης,1
Περιγραφή της συσκευής-Συνολική άποψη,8
Περιγραφή της συσκευής-Πίνακας ελέγχου,8
Εγκατάσταση,41
Εκκίνηση και χρήση,44
Προγράμματα μαγειρέματος,44
Χρηση της επιφανειας μαγειρεματος,46
Προφυλάξεις και συμβουλές,47
Συντήρηση και φροντίδα,48
Τεχνική υποστήριξη,48
FR
Français
Mode d’emploi
CUISINIERE ET FOUR
Sommaire
Mode d’emploi,1
Description de l’appareil-Vue d’ensemble, 8
Description de l’appareil-Tableau de bord, 8
Installation,17
Mise en marche et utilisation20
Utilisation du four,20
Utilisation du plan de cuisson,22
Précautions et conseils, 23
Nettoyage et entretien,24
Assistance,24
Nederland
NL
Gebruiksaanwijzing
FORNUIS EN OVEN
Inhoud
Gebruiksaanwijzing,1
Beschrijving van het apparaat-Aanzichttekening,8
Beschrijving van het apparaat-Bedieningspaneel,8
Installatie, 25
Starten en gebruik, 28
Gebruik van de oven,28
De kookzones,30
Voorzorgsmaatregelen en advies,31
Onderhoud en verzorging,32
Servicedienst,32
DE
Deutsch
Bedienungsanleitungen
HERD UND OFEN
Inhalt
Bedienungsanleitungen,1
Beschreibung des Geräts-Übersicht,8
Beschreibung des Geräts-Schalttafel,8
Installation,33
Inbetriebnahme und Benutzung,36
Gebrauch des Ofens,36
Gebrauch des Kochfeldes,38
Vorsichtsmaßnahmen und Tipps,39
Pflege und Wartung,40
Hilfe,40
Español
ES
Manual de instrucciones
COCINA Y HORNO
Sumario
Manual de instrucciones,1
Descripción del aparato-Vista de conjunto,8
Descripción del aparato-Panel de control,8
Instalación,49
Puesta en funcionamiento y uso,52
Uso del horno,52
Uso de la encimera,54
Precauciones y consejos,55
Mantenimiento y cuidados,56
Asistencia,56
HI 50.A/1
HI 50.A IX/1
WARNING
ATTENTION
ATENCIÓN
PAS OP
ZUR BEACHTUNG
ΠΡΟΣΟΧΉ
,2
,2
,2
,2
,2
,2
EnglishEnglish
DeutschDeutsch
Οδηγίες χρήσης
ΚΟΥΖΙΝΑ ΚΑΙ ΦΟΥΡΝΟΣ
Περιεχόμενα
Οδηγίες χρήσης
ΚΟΥΖΙΝΑ ΚΑΙ ΦΟΥΡΝΟΣ
Περιεχόμενα
EspañolEspañol

WARNING: The appliance and its
accessible parts become hot during
use.
Care should be taken to avoid
touching heating elements.
Children less than 8 years of age shall
be kept away unless continuously
supervised.
This appliance can be used by
children aged from 8 years and
above and persons with reduced
physical, sensory or mental
capabilities or lack of experience
and knowledge if they have been
given supervision or instruction
concerning use of the appliance in a
safe way and understand the hazards
involved. Children shall not play with
the appliance. Cleaning and user
maintenance shall not be made by
children without supervision.
WARNING: Unattended cooking on a
hob with fat or oil can be dangerous
and may result in fire.
NEVER try to extinguish a fire with
water, but switch off the appliance
and then cover flame e.g. with a lid or
a fire blanket.
WARNING: Danger of fire: do not
store items on the cooking surfaces.
WARNING: If the surface in glass-
ceramic is cracked, switch off the
appliance to avoid the possibility of
electric shock.
Do not use harsh abrasive cleaners
or sharp metal scrapers to clean
the oven door glass since they can
scratch the surface, which may result
in shattering of the glass.
The internal surfaces of the
compartment (where present) may
become hot.
Never use steam cleaners or pressure
cleaners on the appliance.
Remove any liquid from
the lid before opening it.
Do not close the glass cover (if present)
when the gas burners or electric
hotplates are still hot.
WARNING: Ensure that the appliance is
switched off before replacing the lamp
to avoid the possibility of electric shock.
English
GB
EnglishEnglish
WARNINGWARNINGWARNING
2
! When you place the rack inside,
make sure that the stop is directed
upwards and in the back of the cavity.

FR
Français
ATTENTION : cet appareil ainsi que ses
parties accessibles deviennent très chauds
pendant leur fonctionnement.
Il faut faire attention de ne pas toucher les
éléments chauffants.
Ne laisser s'approcher les enfants de mo-
ins de 8 ans à moins qu’ils ne soient sous
surveillance constante.
Le présent appareil peut être utilisé par
des enfants de plus de 8 ans et par des
personnes présentant des capacités phy-
siques, sensorielles ou mentales réduites
ou n’ayant pas l’expérience ou les connais-
sances nécessaires, à condition qu’ils so-
ient sous bonne surveillance ou qu’ils aient
reçu les instructions nécessaires pour une
utilisation de l’appareil en toute sécurité et
à condition qu’ils se rendent compte des
dangers encourus. Les enfants ne doivent
pas jouer avec l’appareil. Les opérations
de nettoyage et d’entretien ne doivent pas
être effectuées par des enfants non surve-
illés.
ATTENTION : laisser un récipient de cuis-
son contenant de l’huile ou de la graisse
sur le foyer est dangereux et risque d’en-
traîner un incendie.
Il ne faut JAMAIS essayer d’éteindre une
flamme ou un incendie avec de l’eau ! Il
faut éteindre l’appareil et couvrir la flamme
avec un couvercle, par exemple, ou avec
une couverture anti-feu.
Ne pas utiliser de produits abrasifs ni de
spatules métalliques coupantes pour net-
toyer la porte du four en verre, sous peine
d’érafler la surface et de briser le verre.
Les surfaces intérieures du tiroir (s’il y en a
un) peuvent devenir chaudes.
Ne jamais nettoyer l’appareil avec des net-
toyeurs vapeur ou haute pression.
Essuyer tout liquide pouvant se trouver
sur le couvercle avant de l’ouvrir. Ne
pas abaisser le couvercle en verre (s’il y
en a un) tant que les brûleurs gaz ou la
plaque électrique sont chauds.
ATTENTION : s’assurer que l’appareil
est éteint avant de procéder au rempla-
cement de l’ampoule, afin d’éviter tout
risque d’électrocution.
ATTENTION : risque d’incendie : ne
pas laisser d’objets sur les surfaces de
cuisson.
ATTENTION : si la surface vitrocérami-
que est fêlée, éteindre l’appareil afin
d’éviter tout risque d’électrocution.
ATTENTIONATTENTIONATTENTION
3
! Lors de l’introduction de la grille,
s’assurer que l’arrêt est bien tourné
vers le haut et se trouve dans la par-
tie arrière de l’enceinte.

PAS OP: Dit apparaat en zijn bereikbare
onderdelen worden tijdens gebruik zeer
heet.
Zorg ervoor de verwarmende elementen
niet aan te raken.
Zorg ervoor dat kinderen die kleiner dan
8 jaar oud zijn niet dichtbij het apparaat
kunnen komen, tenzij onder constant
toezicht.
Het huidige apparaat mag alleen door
kinderen van 8 jaar en ouder en door
personen met een beperkt lichamelijk,
sensorieel of geestelijk vermogen, of
zonder ervaring en kennis worden ge-
bruikt, mits ze onder adequaat toezicht
zijn, of mits ze zijn onderricht m.b.t. het
veilige gebruik van het apparaat en zich
bewust zijn van de betreffende gevaren.
Voorkom dat kinderen met het apparaat
spelen. De reinigings- en onderhoud-
shandelingen mogen niet door kinderen
worden uitgevoerd, tenzij onder toezicht.
PAS OP: Het kan gevaarlijk zijn een for-
nuis met vet of olie onbewaakt te laten.
Er kan brand ontstaan.
U moet NOOIT proberen een vlam/
brand te blussen met water. U dient da-
arentegen het apparaat uit te schakelen
en de vlam te bedekken met bijvoorbe-
eld een (blus)deken.
Gebruik geen schurende producten,
noch snijdende metalen spatels om de
glazen deur van de oven te reinigen,
aangezien deze het oppervlak zouden
kunnen krassen, en als gevolg het glas
doen verbrijzelen.
De interne oppervlakken van de lade (in-
dien aanwezig) kunnen warm worden.
Gebruik nooit huishoudapparaten met
stoom of hoge druk voor het reinigen
van de kookplaat.
Verwijder eventuele geknoeide vloeistof-
fen van de dekplaat voordat u hem opent.
Doe het glazen deksel (waar aanwezig)
niet omlaag als de gasbranders of de
elektrische plaat nog warm zijn.
PAS OP: Controleer of het apparaat uit
staat voor u de lamp vervangt, om te
voorkomen dat u een elektrische schok
krijgt.
Plaats geen metalen voorwerpen (mes-
sen, lepels, deksels enz.) op de kookpla-
at aangezien zij heet kunnen worden.
Na het gebruik dient u de kookplaat uit
te schakelen door middel van het bedie-
ningsmechanisme en niet uitsluitend te
vertrouwen op de pannensensor.
Nederland
NL
PAS OPPAS OPPAS OP
4
! Bij het inbrengen van de grill
erop letten dat de bevestigingsklem
omhoog gericht is en zich achterin
de oven bevindt.

DE
DeutschDeutschDeutsch
ZUR BEACHTUNG: Bei Gebrauch wird
dieses Gerät und alle zugänglichen Teile
sehr heiß.
Es ist darauf zu achten, dass die Heizele-
mente nicht berührt werden.
Kinder unter 8 Jahren, die nicht ständig
beaufsichtigt sind, von dem Gerät fernhal-
ten.
Das Gerät darf von Kindern ab 8 Jahren
und Personen mit eingeschränkten kör-
perlichen, geistigen oder Wahrnehmungs-
fähigkeiten oder aber ohne ausreichende
vorausgesetzt sie werden ausreichend
überwacht oder sie wurden in den siche-
haben eine ausreichende Wahrnehmung
der mit dem Gebrauch des Geräts verbun-
denen Gefahren. Erlauben
Sie Kindern nicht, mit dem Gerät zu spie-
len. Reinigungs- und Wartungsarbeiten
dürfen nicht von unbewachten Kindern
ausgeführt werden.
ZUR BEACHTUNG: Lassen Sie keine Fette
oder Öle unbewacht auf dem Herd stehen.
Das ist gefährlich und kann einen Brand
verursachen.
NIEMALS eine Flamme/Brandherd mit
Wasser löschen. Schalten Sie das Ge-
rät aus und ersticken Sie die Flamme mit
einem Deckel oder einer feuerfesten Dec-
ke.
Verwenden Sie zur Reinigung der Glastür
des Backofens keine Scheuermittel oder
scharfkantige Metallspachtel, um die Obe-
rfläche nicht zu zerkratzen und so das
Zerspringen des Glases zu verursachen.
Die internen Flächen des Geschirrwagens
(falls vorhanden) können äußerst heiß wer-
den.
Verwenden Sie zur Reinigung des Kochfeldes
keine Dampf- oder Hochdruckreinigungsge-
räte.
Trocknen Sie eventuell auf der Herdabdec-
kung befindliche Flüssigkeiten, bevor Sie sie
aufklappen. Schließen Sie die Glasabdec-
kung (falls vorhanden) nicht, wenn die Gas-
brenner oder die Elektroplatte noch heiß sind.
ZUR BEACHTUNG: Versichern Sie sich, dass
das Gerät ausgeschaltet ist, bevor Sie die
Lampe austauschen. Stromschlaggefahr.
ZUR BEACHTUNG: Brandgefahr: Keine Ge-
genstände auf den Kochstellen liegen lassen.
ZUR BEACHTUNG: Sollte die Glaskeramito-
berfläche gesprungen sein, schalten Sie das
Gerät aus, um so mögliche Stromschläge zu
vermeiden.
ZUR BEACHTUNG ZUR BEACHTUNG ZUR BEACHTUNG
5
! Beim Einsetzen des Rosts darauf
achten, dass die Arretierung nach
oben zeigt und sich im hinteren Bere-
ich be¿ ndet.

ΠΡΟΣΟΧΉ: Η συσκευή αυτή και τα
προσβάσιμα μέρη της καθίστανται πολύ
θερμά κατά τη χρήση.
Θα πρέπει να προσέχετε και να
αποφεύγετε να αγγίζετε τα θερμαντικά
στοιχεία.
Κρατάτε μακριά τα παιδιά ηλικίας
μικρότερης των 8 ετών ή να τα επιτηρείτε
συνεχώς.
Η παρούσα συσκευή μπορεί να
χρησιμοποιηθεί από παιδιά μεγαλύτερα
των 8
ετών και από άτομα με μειωμένες
φυσικές, αισθητηριακές ή νοητικές
ικανότητες ή χωρίς εμπειρία και γνώση αν
βρίσκονται υπό κατάλληλη επιτήρηση ή αν
έχουν εκπαιδευτεί στη χρήση της συσκευής
με τρόπο ασφαλή και αν αντιλαμβάνονται
τους σχετικούς κινδύνους. Τα παιδιά δεν
πρέπει να παίζουν με τη συσκευή. Οι
ενέργειες καθαρισμού και συντήρησης δεν
πρέπει να διενεργούνται από τα παιδιά
χωρίς επιτήρηση.
ΠΡΟΣΟΧΉ: Είναι επικίνδυνο και μπορεί να
προκληθεί πυρκαγιά αν αφήσετε φούρνο
αφύλακτο με λίπη και λάδια.
Δεν πρέπει ΠΟΤΕ να προσπαθείτε να
σβήσετε μια φλόγα/πυρκαγιά με νερό, αλλά
θα πρέπει να σβήσετε τη συσκευή και να
καλύψετε τη φλόγα,
για παράδειγμα, με ένα
καπάκι ή μια πυρίμαχη κουβέρτα.
Μη χρησιμοποιείτε προϊόντα αποξυστικά κι
ούτε σπάτουλες μεταλλικές κοφτερές για να
καθαρίσετε τη γυάλινη πόρτα του φούρνου
επειδή μπορεί να προξενηθούν ξυσίματα
στην επιφάνεια, προκαλώντας, έτσι, τη
θραύση του γυαλιού.
Οι εσωτερικές επιφάνειες του συρταριού
(αν υπάρχει) μπορεί θερμανθούν.
Απομακρύνετε ενδεχόμενα
υγρά που
υπάρχουν στο καπάκι πριν το ανοίξετε.
Μην κλείνετε το γυάλινο καπάκι (αν
υπάρχει) όσο οι καυστήρες αερίου ή η
ηλεκτρική εστία είναι ακόμα θερμά.
ΠΡΟΣΟΧΉ: Βεβαιωθείτε ότι η συσκευή
είναι σβηστή πριν αντικαταστήστε τη
λυχνία για να αποφευχθεί ενδεχόμενο
ηλεκτροπληξίας.
ΠΡΟΣΟΧΉ: Κίνδυνος πυρκαγιάς: Μην
αφήνετε αντικείμενα στις επιφάνειες
μαγειρέματος.
ΠΡΟΣΟΧΉ: Αν η υαλοκεραμική
επιφάνεια ραγίσει, σβήστε τη συσκευή
για να αποφευχθεί το ενδεχόμενο
ηλεκτροπληξίας.
Ελληνικά
GR
ΠΡΟΣΟΧΉΠΡΟΣΟΧΉΠΡΟΣΟΧΉ
6
! ǵIJĮȞ İȚıȐȖİIJĮȚ IJȠ ʌȜȑȖȝĮ
ȕİȕĮȚȦșİȓIJİ ȩIJȚ IJȠ ıIJȠʌ İȓȞĮȚ
ıIJȡĮȝȝȑȞȠ ʌȡȠȢ IJĮ ʌȐȞȦ țĮȚ ıIJȠ
ʌȓıȦ ȝȑȡȠȢ IJȘȢ țȠȚȜȩIJȘIJĮȢ.

ATENCIÓN: Este aparato y sus partes
accesibles se calientan mucho durante
el uso.
Por lo tanto, es importante evitar tocar
los elementos calentadores.
Mantenga alejados a los niños meno-
res de 8 años si no son continuamente
vigilados.
El presente aparato puede ser utiliza-
do por niños mayores de 8 años y por
personas con capacidades físicas,
sensoriales o mentales disminuidas o
sin experiencia ni conocimientos, si se
encuentran bajo una adecuada vigi-
lancia o si han sido instruidos sobre
el uso del aparato de modo seguro y
comprenden los peligros relacionados
con el mismo. Los niños no deben
jugar con el aparato. Las operacio-
nes de limpieza y de mantenimiento
no deben ser realizadas por niños sin
vigilancia.
ATENCIÓN: Dejar un quemador con
grasas o aceites sin vigilancia puede
ser peligroso y provocar un incendio.
NUNCA intente apagar una llama/in-
cendio con agua, se debe apagar el
aparato y cubrir la llama, por ejemplo,
con una tapa o con una manta ignífu-
ga.
No utilice productos abrasivos ni
espátulas de metal cortantes para
limpiar la puerta de cristal del horno ya
que podrían rayar la superficie y qu-
ebrar el cristal.
Las superficies internas del cajón (cu-
ando existe) pueden calentarse.
No utilice nunca limpiadores a vapor
o de alta presión para la limpieza del
aparato.
Elimine eventuales líquidos presentes
sobre la tapa antes de abrirla. No cierre
la tapa de vidrio (si existe) cuando los
quemadores o la placa eléctrica todavía
están calientes.
ATENCIÓN: Antes de sustituir la lámpara
controle que el aparato esté apagado
para evitar la posibilidad de choques
eléctricos.
ATENCIÓN: Riesgo de incendio: no deje
objetos sobre las superficies de coc-
ción.
ATENCIÓN: Si la superficie de vitroce-
rámica está agrietada, apague el apara-
to para evitar sacudidas eléctricas.
Español
ES
ATENCIÓNATENCIÓNATENCIÓN
7
! Cuando introduzca la parrilla, con-
trole que el tope esté dirigido hacia
arriba y en la parte posterior de la
cavidad.

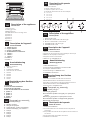
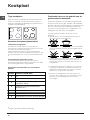
1.Control panel
2..Sliding grill rack
3.DRIPPING pan
4.GUIDE RAILS for the sliding racks
5.position 5
6.position 4
7.position 3
8.position 2
9.position 1
Description of the appliance
Overall view
GB
1. Πίνακας οργάνων
2. Πλέγμα του φούρνου
3. Λιποσυλλέκτης ή πιάτο μαγειρέματος
4. ΟΔΗΓΟΙ ολίσθησης των επιπέοων
5. Θέση 5
6. Θέση 4
7. Θέση 3
8. Θέση 2
9. Θέση 1
GR
Περιγραφή της συσκευής
Συνολική άποψη
1. Tableau de bord
2. Support GRILLE
3. Support LECHEFRITE
4. GLISSIERES de coulissement
5. niveau 5
6. niveau 4
7. niveau 3
8. niveau 2
9. niveau 1
Description de l’appareil
Vue d’ensemble
FR
1. Bedieningspaneel
2. Ovenrek
3. Lekplaat of bakplaat
4. Geleidersvan de roosters
5. stand 5
6. stand 4
7. stand 3
8. stand 2
9. stand 1
Aanzichttekening
Aanzichttekening
NL
1. Bedienfeld
2. Einschub BACKOFENROST
3. Einschub FETTPFANNE
4. GLEITFÜHRUNGEN für die Einschübe
5. position 5
6. position 4
7. position 3
8. position 2
9. position 1
Beschreibung des Gerätes
Geräteansicht
DE
1. Panel de mandos
2. Rejilla estante del horno
3. Asadera o plano de cocción
4. GUÍAS de deslizamiento de las bandejas
5.
POSICIÓN
5
6.
POSICIÓN
4
7. POSICIÓN 3
8.
POSICIÓN
2
9.
POSICIÓN
1
Descripción del aparato
Vista de conjunto
ES
1
2
3
4
5
6
7
8
9
1
2
3
4
5
Description of the appliance
Control panel
GB
1. SELECTOR knob
2. ELECTRIC HOTPLATE indicator light
3. Electric HOTPLATE control knob
4. THERMOSTAT indicator light
5. THERMOSTAT knob
Περιγραφή της συσκευής
Πίνακας ελέγχου
Description de l’appareil
Tableau de bord
FR
Descripción del aparato
Panel de control
ES
Aanzichttekening
Bedieningspaneel
NL
1.Επιλογέας φούρνου
2.Το ενδεικτικό φωτάκι λειτουργίας των ηλεκτρικών
εστιών
3.Επιλογείς χειρισμού των ηλεκτρικών εστιών
4.Το ενδεικτικό φωτάκι του θερμοστάτη φούρνου
5.Επιλογέας θερμοστάτη
1.Perilla PROGRAMAS
2.Luz indicadora de funcionamiento de las placas
eléctricas
3.Las perillas de mando de las placas eléctricas de la
encimera
4.La luz piloto del termóstato del horno
5.Perilla del termóstato
1.Manette PROGRAMMES
2.Voyant de fonctionnement de la plaque électrique
3.Manette de la plaque électrique
4.Voyant lumineux thermostat
5.Manette du THERMOSTAT
1.PROGRAMMAKNOP
2.Controlelampje WERKING KOOKPLATEN
3. Knoppen KOOKPLATEN
4.Controlelampje THERMOSTAAT
5.THERMOSTAATKNOP
Beschreibung des Gerätes
Bedienfeld
DE
1.Schalter zur Wahl der Backofenfunktionen
2.Betriebskontrollleuchte Elektrokochzonen
3.Schalter zur Einstellung der Kochfeld-Kochzonen
4.Betriebskontrollleuchte THERMOSTAT
5.Drehschalter THERMOSTAT
GR

9
GB
! Before placing your new appliance into operation
please read these operating instructions carefully.
They contain important information for safe use, for
installation and for care of the appliance.
! Please keep these operating instructions for future
reference. Pass them on to possible new owners of the
appliance.
Positioning
! Keep packaging material out of the reach of children.
It can become a choking or suffocation hazard (see
Precautions and tips).
! The appliance must be installed by a qualified person
in compliance with the instructions provided. Incorrect
installation may cause harm to persons, animals or may
damage property.
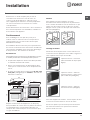
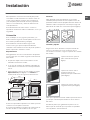
Fitting the appliance
Use the appropriate cabinet to ensure that the
appliance functions properly.
• The panels adjacent to the oven must be made of
heat-resistant material.
• Cabinets with a veneer exterior must be assembled
with glues which can withstand temperatures of up
to 100°C.
• To install the oven under the counter (see diagram)
and in a kitchen unit, the cabinet must have the
following dimensions:
! The appliance must not come into contact with
electrical parts once it has been installed.
The consumption indications on the data plate have
been calculated for this type of installation.
Ventilation
To ensure good ventilation, the back panel of the
cabinet must be removed. It is advisable to install the
oven so that it rests on two strips of wood, or on a
completely flat surface with an opening of at least 45 x
560 mm (see diagrams).
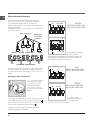
Centring and fastening
Position the 4 tabs on the side of the oven according
to the 4 holes of the outer frame. Adjust the tabs
according to the thickness of the cabinet side panel,
as shown below:
thickness of 20 mm: take off the
removable part of the tab (see
diagram)
thickness of 18 mm: use the
first groove, which has already
been set in the factory (see
diagram)
thickness of 16 mm: use the
second groove (see diagram)
Secure the appliance to the cabinet by opening the
oven door and putting 4 screws into the 4 holes of the
outer frame.
! All parts which ensure the safe operation of the
appliance must not be removable without the aid of a
tool.
595
558
min
45
min
575-585
min
560
+4 -0
480
+4 -0
547 min
555
580
500
39
15
595
23
572
54354
3545
560 mm.
45 mm.
Installation

10
GB
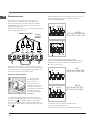
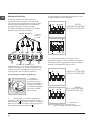
Electrical connections
The cooker must be connected to the mains electricity
supply. It is designed to operate with alternating
current at the voltage and frequency indicated on the
data plate (see the following page).
The hob is connected to the cooker using a special
connector.
BUILT-IN HOB
BUILT-IN COOKER
WHITE RED
YELLOW
BLUE GREEN
Only on
certain models
Replace the metal protection after performing all the
necessary hob connections. If the hob is removed from
its position, the red cap which was originally protecting
the red connector must be replaced.
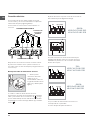
Fitting the power supply cable
1. Open the terminal
board by inserting a
screwdriver into the side
tabs of the cover. Use
the screwdriver as a
lever by pushing it down
to open the cover (see
diagram).
2. Install the power supply cable by loosening the
cable clamp screw and the wire contact screws L-N-
. Connect the wires to the corresponding terminals:
the Blue wire to the terminal marked (N), the Brown
wire to the terminal marked (L) and the Yellow Green
wire to the terminal marked
.
The terminal board is designed for a 400 V three-phase
connection (see diagrams below).
If the electrical system has other characteristics (see
diagrams below), carry out the electrical connection
using the connection supports provided in the box P.
3. Secure the power supply cable by fastening the
clamp screw.
4. Close the cover of the terminal board.
NL1L3L2
1
3
2
4
5
N
L2
L1
L3
P
NL
1
3
2
4
5
NL1L2
1
3
2
4
5
400V 3N~
H05 RR-F5x2.5 CEI-UNEL 35363
H05 VV-F5x2.5 CEI-UNEL 35746
230V~
H05 RR-F 3x4 CEI-UNEL 35363
400V 2N~
H05 RR-F4x4 CEI-UNEL 35363
H05 VV-F4x4 CEI-UNEL 35746
H05 VV-F 3x4 CEI-UNEL 35746

11
GB
Connecting the supply cable to the mains
Install a standardised plug corresponding to the load
indicated on the data plate (see side).
The appliance must be directly connected to the
mains using an omnipolar circuit-breaker with a
minimum contact opening of 3 mm installed between
the appliance and the mains, suitable for the load
indicated and complying with current electrical
regulations (the earthing wire must not be interrupted
by the circuit-breaker). The supply cable must not
come into contact with surfaces with temperatures
higher than 50°C.
! The installer must ensure that the correct electrical
connection has been made and that it is compliant with
safety regulations.
Before connecting to the power supply, make sure that:
• The appliance is earthed and the plug is compliant
with the law.
• The socket can withstand the maximum power of the
appliance, which is indicated on the data plate (see
below).
• The voltage must be in the range between the
values indicated on the data plate (see below).
• The socket is compatible with the plug of the
appliance. If the socket is incompatible with the
plug, ask an authorised technician to replace it. Do
not use extension cords or multiple sockets.
! Once the appliance has been installed, the power
supply cable and the electrical socket must be easily
accessible.
! The cable must not be bent or compressed.
! The cable must be checked regularly and replaced
by authorised technicians only (see Assistance).
! The manufacturer declines any liability should these
safety measures not be observed.
DATA PLATE
Dimensions
width 43.5 cm
height 32,4 cm
depth 40,4 cm
Volume
lt. 58
Electrical
connections
voltage: 230V/400V~ 3N 50/60Hz
maximum power absorbed 8450W
ENERGY LABEL
Energy consumption for Forced
convection heating mode:
Multi-cooking
Declared energy consumption for
Natural convection Class heating
mode: Convection
This appliance conforms to the
following European Economic
Community directives:
73/23/EEC of 19/02/73 (Low
Voltage) and subsequent
amendments;
- 89/336/EEC of 03/05/89
(Electromagnetic Compatibility) and
subsequent amendments;
- 93/68/EEC of 22/07/93 and
subsequent amendments.
- 2002/96/EC
Regulation (EU) No 65/2014 supplemen-
ting Directive 2010/30/EU.
Regulation (EU) No 66/2014 implementing
Directive 2009/125/EC.
Standard EN 60350-1
Standard EN 50564.
and ECODESIGN

12
GB
! The first time you use your appliance, heat the empty
oven with its door closed at its maximum temperature
for at least half an hour. Ensure that the room is well
ventilated before switching the oven off and opening
the oven door. The appliance may produce a slightly
unpleasant odour caused by the burning away of
protective substances used during the manufacturing
process.
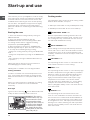
Starting the oven
1. Select the desired cooking mode by turning the
SELECTOR knob.
2. Select the desired temperature with the
THERMOSTAT knob. See the Cooking advice table
for cooking modes and the suggested cooking
temperatures (see Cooking Modes).
3. When preheating is finished, the THERMOSTAT
indicator light will stay on: place the food in the oven.
4. You may do the following during cooking:
- change the cooking mode by turning the SELECTOR
knob.
- change the temperature by turning the THERMOSTAT
knob.
- stop cooking by turning the SELECTOR knob to the
“0” position.
! Never put objects directly on the oven bottom to
avoid damaging the enamel coating.
! Always place cookware on the rack(s) provided.
Cooling ventilation
In order to cool down the external temperature of the
oven, some models are fitted with a cooling fan that
blows out air between the control panel and the oven
door.
! Once the cooking has been completed, the cooling
fan remains on until the oven has cooled down
sufficiently.
Oven light
It goes on when selecting
with the SELECTOR knob.
It stays on when a cooking mode is selected.
Start-up and use
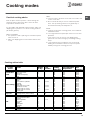
Cooking modes
! A temperature value can be set for all cooking modes
between 60°C and Max, except for
• GRILL (recommended: set only to MAX power level);
• GRATIN (recommended: do not exceed 200°C).
TRADITIONAL OVEN mode
Both the top and bottom heating elements will come
on. With this traditional cooking mode, it is best to use
one cooking rack only; if more than one rack is used,
the heat will be distributed unevenly.
MULTI-COOKING mode
All the heating elements (top and bottom), as well as
the fan, will come on. Since the heat remains constant
throughout the oven, the air cooks and browns food
uniformly. A maximum of two racks may be used at the
same time.
TOP OVEN mode
The top heating element comes on. This mode can be
used to brown food at the end of cooking.
GRILL mode
The top heating element comes on. The extremely high
and direct temperature of the grill makes it possible to
brown the surface of meats and roasts while locking
in the juices to keep them tender. The grill is also
highly recommended for dishes that require a high
temperature on the surface: such as beef steaks,
veal, rib steak, filets, hamburgers etc... Some grilling
examples are included in the “Practical Cooking
Advice” paragraph. Always cook in this mode with the
oven door closed.
GRATIN mode
The top heating element, as well as the fan, will
come on. This combination of features increases the
effectiveness of the unidirectional thermal radiation of
the heating elements through forced circulation of the
air throughout the oven. This helps prevent food from
burning on the surface, allowing the heat to penetrate
right into the food. Always cook in this mode with the
oven door closed.
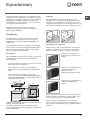
WARNING! The oven is
provided with a stop sys-
tem to extract the racks
and prevent them from
coming out of the oven.(1)
As shown in the drawing,
to extract them comple-
tely, simply lift the racks,
holding them on the front
part, and pull (2).

13
GB
Cooking modes
Practical cooking advice
! Do not place racks in position 1 and 5 during fan-
assisted cooking. Excessive direct heat can burn
temperature sensitive foods.
! In the GRILL and GRATIN cooking modes, place the
dripping pan in position 1 to collect cooking residues
(fat and/or grease).
MULTI-COOKING
• Use position 2 and 4, placing the food that requires
more heat on 2.
• Place the dripping pan on the bottom and the rack
on top.
GRILL
• Insert the rack in position 3 or 4. Place the food in the
centre of the rack.
• We recommend that you set the maximum power
level. The top heating element is regulated by a
thermostat and may not always be on.
PIZZA
• For best results when cooking pizza, use the MULTI-
COOKING mode.
• Use a light aluminium pizza pan. Place it on the rack
provided.
For a crispy crust, do not use the dripping pan
(prevents crust from forming by extending cooking
time).
• If the pizza has a lot of toppings, we recommend
adding the mozzarella cheese on top of the pizza
halfway through the cooking process.
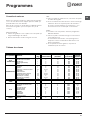
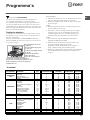
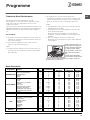
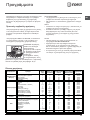
Cooking advice table
Cooking
modes
Foods
Weight
(in kg)
Rack
position
Pre-
heating
time (min)
Recommended
temperature
Cooking
time
(minutes)
Convection
Oven
Duck
Roast veal or beef
Pork roast
Biscuits (short pastry)
Tarts
1
1
1
-
1
3
3
3
3
3
15
15
15
15
15
200
200
200
180
180
65-75
70-75
70-80
15-20
30-35
Multi-cooking
Pizza (on 2 racks)
Lasagne
Lamb
Roast chicken + potatoes
Mackerel
Plum cake
Cream puffs (on 2 racks)
Biscuits (on 2 racks)
Sponge cake (on 1 rack)
Sponge cake (on 2 racks)
Savoury pies
1
1
1
1+1
1
1
0.5
0.5
0.5
1
1.5
2 and 4
3
2
2 and 4
2
2
2 and 4
2 and 4
2
2 and 4
3
15
10
10
15
10
10
10
10
10
10
15
230
180
180
200
180
170
190
180
170
170
200
15-20
30-35
40-45
60-70
30-35
40-50
20-25
10-15
15-20
20-25
25-30
Top oven
Browning food to perfect cooking - 3/4 15 220 -
Grill
Soles and cuttlefish
Squid and prawn kebabs
Cod filet
Grilled vegetables
Veal steak
Cutlets
Hamburgers
Mackerels
Toasts
1
1
1
1
1
1
1
1
4
4
4
4
3 or 4
4
4
4
4
4
5
5
5
5
5
5
5
5
5
Max
Max
Max
Max
Max
Max
Max
Max
Max
8-10
6-8
10
10-15
15-20
15-20
7-10
15-20
2-3
Gratin
Grilled chicken
Cuttlefish
1.5
1.5
2
2
5
5
200
200
55-60
30-35

14
GB
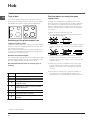
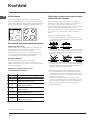
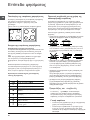
Hob
Type of hob
The oven is combined with a hob that can be made up
of two types of heating elements: cast-iron electric plates
(see diagram 1) or glass ceramic hobs (see diagram 2).
Switching on the glass ceramic hob
Traditional cooking zones
Traditional cooking zones are made up of circular heating
elements. They turn red approximately ten seconds after
they have been turned on.
Each cooking zone is fitted with a control knob allowing
you to select from 6 different temperature settings from a
minimum of 1 to a maximum of 6.
Residual heat indicator lights*
The indicator lights (C) indicate that the temperature of the
corresponding cooking zones have exceeded 60°C, even
after the heating element has been switched off.
Recommended power levels for various types of
cooking:
Practical advice on using the glass
ceramic hob
! The glue that is applied on the gaskets leaves some
traces of grease on the glass. Before using the appliance,
we recommend you eliminate these with a special non-
abrasive cleaning product. During the first few hours of
use there may be a smell of rubber which will disappear
very quickly.
To obtain the best results with your hob:
• Use flat-bottomed pans to ensure that they adhere to
the cooking zone perfectly.
• Always use pans with a diameter that is large enough to
cover the hotplate fully, in order to use all the available
heat.
• Make sure that the bottom of the cookware is always
dry and clean to guarantee correct adherence and
long life, not only for the cooking zones but also for the
cookware itself.
• Avoid using the same cookware that is used on gas
burners: the heat concentration on gas burners may
deform the base of the pan, causing it not to adhere
correctly.
• Never leave a cooking zone on without cookware on
it because as it heats up and rapidly reaches the
maximum level, it could damage the heating elements.
diagram 2
diagram 1
C
A
A
A
A
* Only on certain models
Setting Normal or Fast Plate
0
Off
1
Cooking vegetables, fish
2
Cooking potatoes (using steam) soups,
chickpeas, beans.
3
Continuing the cooking of large quantities
of food, minestrone
4
For roasting (average)
5
For roasting (above average)
6
For browning and reaching a boil in a
short time.

15
GB
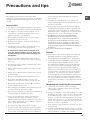
Precautions and tips
! The appliance was designed and manufactured in
compliance with international safety standards. The following
warnings are provided for safety reasons and must be read
carefully.
General safety
• The appliance was designed for domestic use inside the
home and is not intended for commercial or industrial use.
• The appliance must not be installed outdoors, even in
covered areas. It is extremely dangerous to leave the
appliance exposed to rain and storms.
• When handling the appliance, always use the handles
provided on the sides of the oven.
• Do not touch the appliance with bare feet or with wet or
moist hands and feet.
• The appliance must be used to cook food by adults only
and according to the instructions in this manual.
• Do not touch the heating elements and parts of the
oven door when the appliance is in use; these parts
become extremely hot. Keep children well away from
the appliance.
• Ensure that the power supply cable of other electrical
appliances does not come into contact with the hot parts
of the oven.
• The openings used for ventilation and dispersion of heat
must never be covered.
• Always grip the oven door handle in the centre: the ends
may be hot.
• Always use oven gloves to place cookware in the oven or
when removing it.
• Do not use aluminium foil to line the bottom of the oven.
• Do not place flammable materials in the oven: if the
appliance is switched on by mistake, it could catch fire.
• Always make sure the knobs are in the “”/“
” position
when the appliance is not in use.
• When unplugging the appliance always pull the plug from
the mains socket, do not pull on the cable.
• Never carry out any cleaning or maintenance work without
having unplugged the plug from the mains.
• In the case of a malfunction, under no circumstances
should you attempt to repair the appliance yourself.
Repairs carried out by inexperienced persons may cause
injury or further malfunctioning of the appliance. Contact a
Service Centre (see Assistance).
• Do not rest heavy objects on the open oven door.
• The glass ceramic hob is resistant to mechanical shocks,
but it may crack (or even break) if hit with a sharp object
such as a tool. If this happens, disconnect the appliance
from the electricity mains immediately and contact a
Service Centre.
• Remember that the temperature of the cooking zones
remains relatively high for at least thirty minutes after they
have been switched off.
• Keep any object that could melt away from the hob, for
example plastic and aluminium objects, or products with
a high sugar content. Keep plastic or aluminium objects
away from the hob: if you forget them on surfaces that are
still hot, they may cause serious damage to the hob.
• The appliance should not be operated by people
(including children) with reduced physical, sensory
or mental capacities, by inexperienced individuals or
by anyone who is not familiar with the product. These
individuals should, at the very least, be supervised by
someone who assumes responsibility for their safety or
receive preliminary instructions relating to the operation of
the appliance.
• Do not let children play with the appliance.
Disposal
• Observe local environmental standards when disposing
packaging material for recycling purposes. Observe
existing legislation when disposing of the old appliance.
• The European Directive 2002/96/EC on Waste Electrical
and Electronic Equipment (WEEE), requires that old
household electrical appliances must not be disposed
of in the normal unsorted municipal waste stream. Old
appliances must be collected separately in order to
optimise the recovery and recycling of the materials they
contain and reduce the impact on human health and the
environment. The crossed out “wheeled bin” symbol on
the product reminds you of your obligation, that when you
dispose of the appliance it must be separately collected.
Consumers should contact their local authority or retailer
for information concerning the correct disposal of their old
appliance.
Respecting and conserving the environment
• Always keep the oven door closed when using the
GRILL mode to attain best results and to save energy
(approximately 10%).
• Whenever possible, avoid pre-heating the oven
and always try to fill it. Open the oven door as little
as possible because heat is lost every time it is
opened. To save a substantial amount of energy,
simply switch off the oven 5 to 10 minutes before the
end of your planned cooking time and use the heat
the oven continues to generate.
• Keep gaskets clean and tidy to prevent any door
energy losses
• If you have a timed tariff electricity contract, the “delay
cooking” option will make it easier to save money by
moving operation to cheaper time periods.

16
GB
Switching the appliance off
Disconnect your appliance from the electricity supply
before carrying out any work on it.
Cleaning the appliance
• The stainless-steel or enamel-coated external
parts as well as the rubber seals may be cleaned
using a sponge that has been soaked in lukewarm
water and neutral soap. If these stains are difficult
to remove, use only specialised products. After
cleaning, rinse and dry thoroughly. Do not use
abrasive powders or corrosive substances.
• Ideally, the inside of the oven should be cleaned
after each use, when it is still lukewarm. Use hot
water and detergent, rinse and dry with a soft cloth.
Do not use abrasive products.
• The accessories can be washed like everyday
crockery (even in your dishwasher).
! Never use steam cleaners or pressure cleaners on
the appliance.
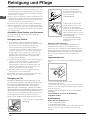
Cleaning the oven door
Clean the glass part of the oven door using a sponge
and a non-abrasive cleaning product, then dry
thoroughly with a soft cloth. Do not use rough abrasive
material or sharp metal scrapers as these could
scratch the surface and cause the glass to crack.
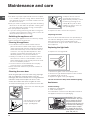
To clean more thoroughly, you can remove the oven door.
1. Open the oven door fully (see
diagram).
2. lift up and turn the small
levers situated on the two
hinges; (see diagram).
3. Grip the door on the two
external sides and close it
approximately half way. Unlock
the door by pressing on the
clamps F, then pull the door
towards you lifting it out of its
seat (see diagram).
To replace the door, reverse this sequence.
Inspecting the seals
Check the door seals around the oven periodically. If
the seals are damaged, please contact your nearest
After-sales Service Centre (see Assistance). We
recommend not using the oven until the seals have
been replaced.
Replacing the light bulb
To replace the oven light bulb:
1. Remove the glass cover of the lamp-holder.
2. Remove the light bulb and replace it with a similar
one: Wattage 25 W, cap E 14.
3. Replace the glass cover (see diagram).
Assistance
Communicating:
• appliance model (Mod.)
• serial number (S/N)
This information is found on the data plate located on
the appliance and/or on the packaging.
F
F
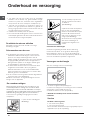
Maintenance and care
! Do not use the oven lamp as/for ambient lighting.
WARNING! The oven is
provided with a stop sys-
tem to extract the racks
and prevent them from
coming out of the oven.(1)
As shown in the drawing,
to extract them comple-
tely, simply lift the racks,
holding them on the front
part, and pull (2).
• The base of your pot or pan should cover the hot plate.
If it is smaller, precious energy will be wasted and
pots that boil over leave encrusted remains that can
be difficult to remove.
• Cook your food in closed pots or pans with well-fitting
lids and use as little water as possible. Cooking with
the lid off will greatly increase energy consumption
• Use purely flat pots and pans
• If you are cooking something that takes a long time,
it's worth using a pressure cooker, which is twice as
fast and saves a third of the energy.

17
FR
! Conservez ce mode d’emploi pour pouvoir le
consulter à tout moment. En cas de vente, de
cession ou de déménagement, veillez à ce qu’il
suive l’appareil pour informer le nouveau propriétaire
sur son fonctionnement et lui fournir les conseils
correspondants.
! Lisez attentivement les instructions : elles contiennent
des conseils importants sur l’installation, l’utilisation et
la sécurité de votre appareil
Positionnement
! Les emballages ne sont pas des jouets pour
enfants, il faut les mettre au rebut en respectant la
réglementation sur le tri sélectif des déchets (voir
Précautions et conseils).
! L’installation doit être effectuée par un professionnel
du secteur conformément aux instructions du fabricant.
Une mauvaise installation peut causer des dommages
à des personnes, des animaux ou des biens.
Encastrement
Pour garantir le bon fonctionnement de l’appareil, il faut que
le meuble possède des caractéristiques bien précises :
• les panneaux adjacents doivent être fabriqués dans
un matériau résistant à la chaleur ;
• dans le cas notamment de meubles plaqués bois,
il faut que les colles résistent à une température de
100°C ;
• la cavité du meuble pour encastrement du four, tant
sous plan (voir gure) qu’en colonne , doit avoir les
dimensions suivantes :
! Après encastrement de l’appareil, il ne doit plus y
avoir possibilité de contact avec les parties électrifiées.
Les déclarations de consommation indiquées sur
l’étiquette des caractéristiques ont été mesurées pour
ce type d’installation.
Aération
Pour garantir une bonne aération, la cavité
d’encastrement doit être dépourvue de paroi arrière.
Il est conseillé d’installer le four de manière à ce qu’il
repose sur deux cales en bois ou bien sur un plan
d’appui continu qui ait une découpe d’au moins 45 x
560 mm (voir gures).
Centrage et fixation
Positionnez les 4 taquets situés sur les côtés du four
en face des 4 trous pratiqués sur le cadre et réglez-les
selon l’épaisseur de la joue du meuble :
épaisseur 20 mm : enlevez la
partie amovible du taquet (voir
gure) ;
épaisseur 18 mm : utilisez la
première rainure, comme prévu
par le fabricant (voir gure);
épaisseur 16 mm : utilisez la
deuxième rainure (voir gure).
Pour fixer l’appareil au meuble : ouvrez la porte du four
et vissez 4 vis à bois dans les 4 trous du cadre.
! Toutes les parties qui servent de protection doivent
être fixées de manière à ne pouvoir être enlevées
qu’avec l’aide d’un outil.
595
558
min
45
min
575-585
min
560
+4 -0
480
+4 -0
547 min
555
580
500
39
15
595
23
572
54354
3545
560 mm.
45 mm.
Installation

18
FR
Raccordement électrique
Le raccordement électrique au réseau doit être
effectué sur le four qui est prévu pour fonctionner
en courant alternatif à la tension et fréquence
d’alimentation indiquées sur la plaquette signalétique
(voir page suivante).
La table de cuisson est raccordée au four à l’aide d’un
connecteur spécial.
Table à encastrer
CUISINIERE A ENCASTRER
BLANC ROUGE JAUNE BLEU VERT
N'existe que
sur certains
modèles
Remettre la protection métallique en place après avoir
connecté la table. En cas de démontage de la table,
remettre le bouchon rouge d’origine sur le connecteur
rouge.
Montage du câble d’alimentation
1. Pour ouvrir le bornier,
faites pression à l’aide
d’un tournevis sur les
languettes latérales
du couvercle : tirez et
ouvrez le couvercle (voir
gure).
2. Montage du câble d’alimentation : dévissez la vis du
serre-câble ainsi que les trois vis des contacts L-N-
puis fixez les fils sous les têtes de vis en respectant les
couleurs Bleu (N) Marron (L) Jaune-Vert (
).
Le bornier est prévu pour raccordement à 400 V
triphasé (voir gures ci-dessous).
Si l’installation électrique
présente d’autres
caractéristiques (voir gures ci-dessous), procédez au
raccordement électrique au moyen des cavaliers de
raccordement logés dans le boîtier P.
3. Fixez le câble
d’alimentation dans le
serre-câble prévu.
4. Fermez le couvercle du bornier.
NL1L3L2
1
3
2
4
5
N
L2
L1
L3
P
NL
1
3
2
4
5
NL1L2
1
3
2
4
5
400V 3N~
H05 RR-F5x2.5 CEI-UNEL 35363
H05 VV-F5x2.5 CEI-UNEL 35746
230V~
H05 RR-F 3x4 CEI-UNEL 35363
400V 2N~
H05 RR-F4x4 CEI-UNEL 35363
H05 VV-F4x4 CEI-UNEL 35746
H05 VV-F 3x4 CEI-UNEL 35746

19
FR
Branchement du câble d’alimentation au réseau
électrique
Montez sur le câble une prise normalisée pour la
charge indiquée sur l’étiquette des caractéristiques
(voir ci-contre).
En cas de raccordement direct au réseau, il faut
intercaler entre l’appareil et le réseau un interrupteur
à coupure omnipolaire ayant au moins 3 mm
d’écartement entre les contacts, dimensionné à la
charge et conforme aux normes en vigueur (le fil de
terre ne doit pas être interrompu par l’interrupteur). Le
câble d’alimentation ne doit atteindre, en aucun point,
des températures dépassant de 50°C la température
ambiante.
! L’installateur est responsable du bon raccordement
électrique de l’appareil et du respect des normes de
sécurité.
Avant de procéder au branchement, assurez-vous que
:
• la prise est bien munie d’une terre conforme à la loi;
• la prise est bien apte à supporter la puissance
maximale de l’appareil, indiquée sur la plaquette
signalétique (voir ci-dessous);
• la tension d’alimentation est bien comprise entre les
valeurs indiquées sur la plaquette signalétique (voir
ci-dessous);
• la prise est bien compatible avec la fiche de
l’appareil. Si ce n’est pas le cas, remplacez la prise
ou la fiche, n’utilisez ni rallonges ni prises multiples.
! Après installation de l’appareil, le câble électrique et
la prise de courant doivent être facilement accessibles
! Le câble ne doit être ni plié ni excessivement écrasé.
! Il doit être contrôlé périodiquement et ne peut être
remplacé que par un technicien agréé (voir Assistance).
! Nous déclinons toute responsabilité en cas de non respect
des normes énumérées ci-dessus.
PLAQUETTE SIGNALETIQUE
Dimensions
largeur cm 43,5
hauteur cm 32,4
profondeur cm 40,6
Volume l 58
Raccordements
électriques
tension 230V/400V~ 3N 50/60Hz
puissance maxi. absorbée 8450W
Consommation énergie convection
forcée
fonction four : Multicuisson
Consommation énergie déclarée
pour Classe convection naturelle
fonction four : Traditionnel
Cet appareil est conforme aux
Directives Communautaires
suivantes :
73/23/CEE du 19/02/73 (Basse
Tension) et modifications
successives
-89/336/CEE du 03/05/89
(Compatibilité électromagnétique)
et modifications successives
93/68/CEE du 22/07/93 et
modifications successives
2002/96/EC
Directive de l’UE n°65/2014 intégrant la
Directive 2010/30/UE.
Règlement n°66/2014 de l’UE intégrant
la Directive 2009/125/EC. Norme EN
60350-1,
Norme EN 50564
ÉTIQUETTE ÉNERGIE et
ÉCOCONCEPTION

20
FR
! Lors de son premier allumage, faites fonctionner
le four à vide, porte fermée, pendant au moins une
heure en réglant la température à son maximum. Puis
éteignez-le, ouvrez la porte et aérez la pièce. L’odeur
qui se dégage est due à l’évaporation des produits
utilisés pour protéger le four.
Mise en marche du four
1. Pour sélectionner le programme de cuisson
souhaité, tournez le bouton PROGRAMMES.
2. Pour choisir la température, tournez le bouton
THERMOSTAT. Un tableau de cuisson vous guidera
dans vos cuissons en vous indiquant notamment les
températures conseillées pour chacune d’elles (voir
Programmes).
3. Le voyant THERMOSTAT reste allumé pendant la
durée de montée en température.
4. En cours de cuisson, vous pouvez à tout moment :
- modifier le programme de cuisson à l’aide du bouton
PROGRAMMES;
- modifier la température à l’aide du bouton
THERMOSTAT ;
- interrompre la cuisson en ramenant le bouton
PROGRAMMES sur “0”.
! Ne posez jamais d’objets à même la sole du four,
vous pourriez abîmer l’émail.
! Placez toujours vos plats sur la grille fournie avec
l’appareil.
Système de refroidissement
Pour obtenir un abaissement des températures
extérieures, certains modèles sont équipés d’un
système de refroidissement. Ce dernier souffle de l’air
à l’extérieur par une fente située entre le tableau de
bord et la porte du four.
! Le ventilateur continue à tourner après l’arrêt du four
jusqu’à ce que ce dernier se soit suffisamment refroidi.
Eclairage du four
Pour l’allumer, sélectionnez
à l’aide du bouton
PROGRAMMES. La lampe reste allumée quand vous
sélectionnez un programme de cuisson.
Mise en marche et
utilisation
Programmes de cuisson
! Pour tous les programmes vous pouvez sélectionner
une température comprise entre 60°C et MAX., sauf
pour :
• GRIL (il est conseillé dans ce cas de sélectionner
MAX.);
• GRATIN (il est conseillé de ne pas dépasser 200°C).
Programme FOUR TRADITION
Mise en marche des résistances de voûte et de sole.
Pour cette cuisson traditionnelle mieux vaut cuire
sur un seul niveau : la cuisson sur plusieurs niveaux
entraînerait une mauvaise distribution de la chaleur.
Programme MULTICUISSON
Mise en marche de toutes les résistances (sole et
voûte) ainsi que de la turbine. La chaleur est constante
et bien répartie à l’intérieur du four, l’air cuit et dore de
façon uniforme en tous points. Vous pouvez cuire au
maximum sur deux niveaux en même temps.
Programme CHALEUR VOUTE
Mise en marche de la résistance de voûte. Cette
fonction est conseillée pour parfaire la cuisson des
aliments.
Programme GRIL
Mise en marche de la résistance de voûte. La
température élevée et directe du gril permet de
saisir l’aliment en surface pour qu’il ne perde pas
son jus et reste tendre à souhait. La cuisson au gril
est particulièrement recommandée pour les plats qui
exigent une température élevée à leur surface : côtes
de veau et de bœuf, entrecôtes, filet, hamburgers,
etc... Vous trouverez des exemples d’utilisation dans le
paragraphe “Conseils utiles pour la cuisson”. Cuisson
porte du four fermée.
Programme GRATIN
Mise en marche de la résistance de voûte ainsi que
de la turbine. L’irradiation thermique unidirectionnelle
s’ajoute au brassage de l’air pour une répartition
uniforme de la chaleur dans l’enceinte du four. Plus
de risques de brûler vos aliments en surface et plus
grande pénétration de la chaleur. Cuisson porte du
four fermée.
La page est en cours de chargement...
La page est en cours de chargement...
La page est en cours de chargement...
La page est en cours de chargement...
La page est en cours de chargement...
La page est en cours de chargement...
La page est en cours de chargement...
La page est en cours de chargement...
La page est en cours de chargement...
La page est en cours de chargement...
La page est en cours de chargement...
La page est en cours de chargement...
La page est en cours de chargement...
La page est en cours de chargement...
La page est en cours de chargement...
La page est en cours de chargement...
La page est en cours de chargement...
La page est en cours de chargement...
La page est en cours de chargement...
La page est en cours de chargement...
La page est en cours de chargement...
La page est en cours de chargement...
La page est en cours de chargement...
La page est en cours de chargement...
La page est en cours de chargement...
La page est en cours de chargement...
La page est en cours de chargement...
La page est en cours de chargement...
La page est en cours de chargement...
La page est en cours de chargement...
La page est en cours de chargement...
La page est en cours de chargement...
La page est en cours de chargement...
La page est en cours de chargement...
La page est en cours de chargement...
La page est en cours de chargement...
-
 1
1
-
 2
2
-
 3
3
-
 4
4
-
 5
5
-
 6
6
-
 7
7
-
 8
8
-
 9
9
-
 10
10
-
 11
11
-
 12
12
-
 13
13
-
 14
14
-
 15
15
-
 16
16
-
 17
17
-
 18
18
-
 19
19
-
 20
20
-
 21
21
-
 22
22
-
 23
23
-
 24
24
-
 25
25
-
 26
26
-
 27
27
-
 28
28
-
 29
29
-
 30
30
-
 31
31
-
 32
32
-
 33
33
-
 34
34
-
 35
35
-
 36
36
-
 37
37
-
 38
38
-
 39
39
-
 40
40
-
 41
41
-
 42
42
-
 43
43
-
 44
44
-
 45
45
-
 46
46
-
 47
47
-
 48
48
-
 49
49
-
 50
50
-
 51
51
-
 52
52
-
 53
53
-
 54
54
-
 55
55
-
 56
56


Indesit HI 50.A (BK)/1 Le manuel du propriétaire
- Catégorie
- Fours
- Taper
- Le manuel du propriétaire
- Ce manuel convient également à
dans d''autres langues
- English: Indesit HI 50.A (BK)/1 Owner's manual
- español: Indesit HI 50.A (BK)/1 El manual del propietario
- Deutsch: Indesit HI 50.A (BK)/1 Bedienungsanleitung
- Nederlands: Indesit HI 50.A (BK)/1 de handleiding