
1
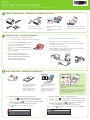
Unpack and assemble • Déballez et assemblez le scanner
Start Here • Point de départ
Read these instructions before using your product. • Lisez ces instructions avant d’utiliser votre produit.
DS-530
2
Install software • Installez les logiciels
3
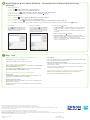
Scan a document • Numérisez un document
1
4
Load your original facedown and top
edge first. Then, slide in the edge
guides.
Chargez vos originaux face vers le bas
et bord supérieur en premier. Puis,
faites glisser les guide-papier vers
l’intérieur.
3
Note: If you are scanning a business or plastic card, load it
facedown and top edge first. See your online User’s Guide
for instructions.
Remarque : Si vous numérisez une carte professionnelle ou
une carte de plastique, chargez-la face vers le bas et le bord
supérieur en premier. Consultez le Guide de l’utilisateur en
ligne pour obtenir les instructions.
2
Align the originals with the printed
side facing down and slide the
leading edge at an angle.
Alignez les originaux avec la face
imprimée vers le bas et faites
glisser le bord avant en angle.
Ouvrez Document Capture Pro (Windows) ou Document Capture (OS X).
• Windows 10 : Cliquez sur > Toutes les applications > EPSON Software > Document
Capture Pro.
• Windows 8.x : Naviguez vers l’écran Applications et sélectionnez Document Capture Pro.
• Windows (autres versions) : Cliquez sur ou Démarrer > Tous les programmes ou
Programmes > EPSON Software > Document Capture Pro.
• OS X : Sélectionnez Applications > Epson Software > Document Capture.
Cliquez sur le bouton Scanner, réglez les options de numérisation et cliquez sur Numériser.
Open Document Capture Pro (Windows) or Document Capture (OS X).
• Windows 10: Click > All apps > EPSON Software > Document Capture Pro.
• Windows 8.x: Navigate to the Apps screen and select Document Capture Pro.
• Windows (other versions): Click or Start > All Programs or Programs > EPSON
Software > Document Capture Pro.
• OS X: Select Applications > Epson Software > Document Capture.
Click the Scan button, set your scan options, and click Scan.
Note: An internet connection is required to obtain product software.
Remarque : Une connexion Internet est requise pour obtenir les logiciels du produit.
1 Make sure the scanner is NOT CONNECTED to your computer.
Windows
®
: If you see a Found New Hardware screen, click
Cancel and disconnect the USB cable.
Assurez-vous que le scanner N’EST PAS BRANCHÉ à votre
ordinateur.
Windows
®
: Si une fenêtre Nouveau matériel détecté s’affiche, cliquez sur Annuler et
débranchez le câble USB.
2 Download the DS-530 software package from:
www.epson.com/support/ds530downloads (U.S.)
www.epson.ca/support/ds530downloads (Canada)
Téléchargez le progiciel DS-530 à l’adresse :
www.epson.ca/support/ds530downloadsfr
3 Double-click the software package you downloaded in the previous step.
Double-cliquez sur le progiciel que vous avez téléchargé à l’étape précédente.
4 Select English, and follow the on-screen instructions. Then connect the USB cable and
turn on your scanner when prompted.
OS X: Make sure you install Software Updater.
Sélectionnez Français et suivez les instructions qui s’affichent à l’écran. Puis, branchez
le câble USB et mettez le scanner sous tension, à l’invite.
OS X : Assurez-vous d’avoir installé Software Updater.
Open the unit and remove all packing
materials.
Ouvrez l’unité et retirez tout le matériel
d’emballage.
2
Extend the paper guide and the output tray.
Allongez le guide-papier et le plateau de sortie.
3
1
Remove all packing materials.
Retirez tout le matériel d’emballage.

?
EPSON is a registered trademark and EPSON Exceed Your Vision is a registered logomark of Seiko Epson Corporation.
Mac and OS X are trademarks of Apple Inc., registered in the US and other countries. App Store is a service mark of Apple Inc.
General Notice: Other product names used herein are for identification purposes only and may be trademarks of their respective owners. Epson disclaims any and all rights in those marks.
This information is subject to change without notice.
EPSON est une marque déposée et EPSON Exceed Your Vision est un logotype déposé de Seiko Epson Corporation.
Mac et OS X sont des marques de commerce d’Apple Inc., déposées aux États-Unis et dans d’autres pays. App Store est une marque de service d’Apple Inc.
Avis général : Les autres noms de produit figurant dans le présent document ne sont cités qu’à titre d’identification et peuvent être des marques de commerce de leurs propriétaires respectifs. Epson renonce à
tous les droits associés à ces marques.
L’information contenue dans le présent document peut être modifiée sans préavis.
© 2016 Epson America, Inc., 4/16 Printed in XXXXXX
CPD-51584 Pays d’impression : XXXXXX
Help • Aide
Scanner software help • Aide pour le logiciel du scanner
Click the Help button on your scanner software screen.
Cliquez sur le bouton Aide sur l’écran du logiciel de numérisation.
User’s Guide • Guide de l’utilisateur
Double-click the Epson DS-530 User’s Guide icon on your desktop (or in the Applications/
Epson Software/Guide folder in OS X).
Double-cliquez sur l’icône Guide Epson DS-530 sur le bureau de l’ordinateur (ou dans le
dossier Applications/Epson Software/Guide sous OS X).
Epson technical support • Soutien technique Epson
Internet support
Visit www.epson.com/support (US) or www.epson.ca/support (Canada) where you can
download drivers, view manuals, get FAQs, or e-mail Epson.
Speak to a support representative
(562) 276-4382 (US) or (905) 709-3839 (Canada), 6 AM to 8 PM, Pacific Time, Monday through
Friday, and 7 AM to 4 PM Saturday.
Days and hours of support are subject to change without prior notice. Toll or long distance
charges may apply.
Soutien Internet
Visitez le site Web www.epson.ca et cliquez sur Français. Vous pouvez contacter Epson à partir
de cette page. Ensuite, suivez les instructions à l’écran.
Parler à un représentant du soutien technique
Composez le 905 709-3839, de 6 h à 20 h, heure du Pacifique, du lundi au vendredi, et de 7 h à 16 h,
heure du Pacifique, le samedi.
Les heures et les jours de soutien peuvent être sujets à changement sans préavis. Des frais
d’interurbain sont éventuellement à prévoir.
Software technical support • Soutien technique pour les logiciels
ABBYY
®
FineReader
®
: www.abbyy.com, [email protected], support@abbyy.ca
NewSoftware
®
Presto! BizCard
®
Reader: www.newsoftinc.com
Customizing the start button (Windows) • Personnalisation du bouton de démarrage
(Windows)
1 Start Document Capture Pro.
Windows 10: Click > All apps > EPSON Software > Document Capture Pro.
Windows 8.x: Navigate to the Apps screen and select Document Capture Pro.
Windows (other versions): Click or Start > All Programs or Programs > EPSON Software > Document Capture Pro.
Note: Mac users, see the online User’s Guide for more information about customizing the start button.
Lancez Document Capture Pro.
Windows 10 : Cliquez sur > Toutes les applications > EPSON Software > Document Capture Pro.
Windows 8.x : Naviguez vers l’écran Applications et sélectionnez Document Capture Pro.
Windows (autres versions) : Cliquez sur ou Démarrer > Tous les programmes ou Programmes > EPSON Software > Document Capture Pro.
Remarque : Les utilisateurs de Mac doivent consulter le Guide de l’utilisateur en ligne pour obtenir plus d’informations concernant la personnalisation du bouton de démarrage.
2 Create a new job.
Click the Manage Job button, then click
Add in the Job Management window. Specify
desired Job Settings, such as image quality
and destination, then click OK.
Créez un nouveau travail.
Cliquez sur le bouton Gérer le travail, puis
cliquez sur Ajouter dans la fenêtre Liste des
travaux. Spécifiez les Paramètres des travaux
souhaités, tels que la qualité de l’image et la
destination, puis cliquez sur OK.
3 Assign a job to the start button.
Click Event Settings in the Job Management window. Click the job 1 field and
select the job you want to assign, then click OK. Close the Job Management
window.
Note: Jobs 2 through 30 can only be selected when the scanner is connected
to a network.
Attribuez un travail au bouton de démarrage.
Cliquez sur Paramètres événements dans la fenêtre Liste des travaux.
Cliquez sur le champ de travail 1 et sélectionnez le travail que vous souhaitez
attribuer, puis cliquez sur OK. Fermez la fenêtre Liste des travaux.
Remarque : Les travaux 2 à 30 peuvent seulement être sélectionnés lorsque le
scanner est connecté à un réseau.
-
 1
1
-
 2
2


dans d''autres langues
- English: Epson DS-530 Installation guide
Documents connexes
-
Epson ES-400 Manuel utilisateur
-
Epson DS-530 Guide d'installation
-
-
Epson WorkForce DS-40 Guide d'installation
-
-
Epson WORKFORCE DS-780N Guide d'installation
-
-
Epson WorkForce DS-560 Guide d'installation
-
Epson DS-1630 Guide d'installation
-
Epson DS-520 Guide d'installation