
www.xpower.com | 1-(855)-855-8868 | info@xpower.com
Index: NA-1-B3
Edition: 1.4.Alpha
Read and save these instructions
Lea y guarde estas instrucciones
Lisez et épargnez ces instructions
(115V 60HZ)
A-2
Model / Modelo / Modèle:
Electric Duster Owner's Manual
Plumero Eléctrico Manual de Usuario
Dépoussiéreur Électrique Manuel d'emploi

English - 2
Safety Instructions
WARNING - READ AND SAVE THESE INSTRUCTIONS BEFORE USING THIS
PRODUCT.
The user of electrical products may create hazards that include, but are not limited to
injury, fire, electrical shock. Failure to follow these instructions may damage and/or impair
its operation and void the warranty.
• Before operating, remove all packaging material and check for any damage that may
have occurred during shipping or any missing items.
• Check household power supply to ensure it matches the appliance’s specification.
• To reduce the risk of electric shock, this appliance has a polarized plug (one blade is
wider than the other). This plug is intended to fit into a polarized outlet only one way. If
the plug does not fit fully into the outlet, reverse the plug. If it still does not fit, contact a
qualified electrician. Do not change the plug in any way.
• Do not use with damaged cord or plug. If the appliance is not working as it would, or
has been dropped, damaged, left outdoors, or dropped into water, return it to a service
center.
• Do not pull or carry by cord, use cord as a handle, close a door on cord, or pull cord
around sharp edges or corners.
• Do not run appliance over cord. Keep cord away from heated surfaces.
• The unit’s electrical cord cannot be replaced. If the cord is damaged, the appliance
should not be used further.
• Do not touch this appliance or the plug with wet hands or while standing in water.
• Do not allow to be used as a toy. Close attention is necessary when used by or near
children.
• Do not leave appliance when plugged in. Unplug from outlet when not in use and
before servicing.
• Turn off all controls before unplugging. Remove the power cord from the electrical
receptacle by grasping and pulling on the power cord plug-end only, Do not pull the
cord directly.
• Use only as described in this manual. Use only manufacturer’s recommended
attachments.
• Do not put any object into openings. Do not use with any opening blocked; keep free
of dust, lint, hair, and anything that may reduce air flow.
• Keep hair, loose clothing, fingers and all parts of body away from openings.
• Use extra care when cleaning on stairs.
• If the appliance is damaged or it malfunctions, Do not continue to use it. Unplug the
product from the electrical outlet. Refer to troubleshooting guide or contact XPOWER.
• Store in a dry indoor area, away from exposure to sunlight, rain, extreme temperature
and humidity, or other extreme environments, when not in use.
• An electronic instruction manual can be obtained through manufacturer’s website www.
xpower.com.
!

English - 3
This product is ETL/C-ETL certied.
• The ETL (Electrical Testing Laboratory) Listed Mark is proof that this product has been
independently tested and meets the applicable published safety standard of North America.
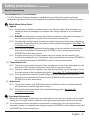
Safety Instructions
Eletric Motor Driven Tools:
(1) Sparks
(1.1) Sparks may be visible on occasion due to the electric motor. Various factors may
cause this such as prolonged or intensive use, foreign objects or an imbalanced
motor.
(1.2) Do not use this product around flammable or explosive materials such as gas, oil
and chemicals. Sparks can ignite these materials and cause fire.
(1.3) Occasionally small amounts of sparks are safe if away from flammable or explosive
materials. Please follow the instructions of the troubleshooting guide. (See Page 12:
Troubleshooting Guide)
(1.4) If the amount of sparks exceeds the safe range, a thermal protection fuse will stop
this product completely. Please contact XPOWER or other parties authorized by
XPOWER for further instructions.
(1.5) If sparks continue or you have a large amount of sparks, we will consider your
machine as a defective unit. Please stop using immediately and contact XPOWER or
other parties authorized by XPOWER for return or further instructions.
(2) Temperature Level
(2.1) This product generates heated air from the powerful motor. After prolonged use, the
airflow and the machine surface can reach high temperature levels.
(2.2) Please be aware that the objects under high temperatures can be damaged. Follow
the instructions of the troubleshooting guide. (See Page 12: Troubleshooting Guide)
(2.3) If the temperature exceeds the safe range, a thermal protection fuse will shut
down the unit automatically. Please contact XPOWER or other parties authorized by
XPOWER for further instructions.
(3) Noise Level
(3.1) This product uses a high RPM (Revolutions Per Minute) motor to provide powerful
airflow and can create a high level of noise.
(3.2) Please follow the instructions of the troubleshooting guide. (See Page 12:
Troubleshooting Guide)
!
!
(Continued)
Special Instructions
If you drop this product:
(1) Before the next usage, please point to a safe area and turn on the unit with the low speed
setting for 5 minutes. And then switch to the higher speed setting for another 5 minutes.
(2) If you experience abnormal sparks, temperature or noise level occur during the above
operation, please immediately stop using and contact XPOWER or other parties authorized
by XPOWER for further instructions.

English - 4
Items Included
Air Mover Owner's Manual
XXX Manual De Usuario (página 10)
XXX Mode d'emploi (page 18)
Model / Modelo / Modèle:
P-80 Series, P-100 Series, P-200 Series
(115V 60HZ)
Read and save these instructions before use
Lea y guarde estas instrucciones antes de usar la unidad
Lire et conserver ces instructions avant utilisation
www.xpower.com | 1-(855)-8868 | [email protected]
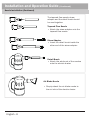
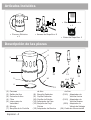
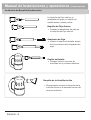
• Owner’s Manual x 1
• Nozzle Pouch x 1
• Electric Duster x 1 • Nozzle Attachments x 9
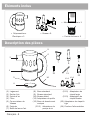
(1) Housing
(2) Air Outlet
(3) Air Inlet
(4) Filter
(5) Speed Switch
(6) Handle
(7) Air Blade Nozzle
(8) Standard Nozzle
(9) Standard Brush
(10) Detail Brush
(11) Straw Adapter
(12) Tapered Flow Nozzle
(13) Air Pump Adapter set
(13.1) Wide Valve
Adapter
(13.2) Boston Valve
Adapter
(13.3) Stem Valve
Adapter
(14) Power Cord
Parts Description
4
1
3
2
5
7
6
14
11
10
8
13
13.1
13.2
13.3
12
9

English - 5
Electric Duster Introduction
Installation and Operation Guide
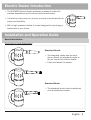
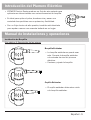
Nozzle Installation
• The XPOWER Electric Duster produces a powerful airflow for
endless applications with various nozzle attachments.
• It’s ideal to dust, pump air, and dry a variety of surfaces with its
power and flexibility.
• With a high pressure airflow, it’s also designed to help drying a
bathed pet in your home.
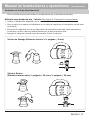
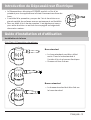
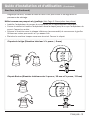
Standard Nozzle
• The standard nozzle can be used
alone. Attach the standard nozzle to
the air inlet of the electric duster.
• Push and fasten the nozzle.
Standard Brush
• The standard brush must be attached
onto the standard nozzle.
(See Page 4: Parts Description)

English - 6
Installation and Operation Guide
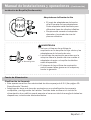
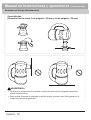
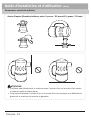
Nozzle Installation (Continued)
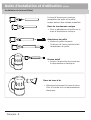
The tapered flow nozzle, straw
adapter and the detail brush should
be used together.
Tapered Flow Nozzle
• Attach the straw adapter onto the
tapered flow nozzle.
Straw Adapter
• Insert the detail brush inside the
other end of the straw adapter.
Detail Brush
• Attach the whole set of the nozzles
onto the electric duster.
(Continued)
Air Blade Nozzle
• Simply attach the air blade nozzle to
the air inlet of the electric duster.

English - 7
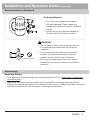
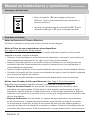
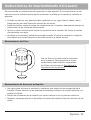
Breathing Hole
WARNING
• Do not tape or block the breathing holes on
the tapered flow nozzle and the air pump
adapters.
• The breathing holes allow the machine to
release the air pressure when the straw
adapter or the detail brush is blocked.
• Blocking the breathing holes could cause
serious failure on the machine and void the
warranty.
Installation and Operation Guide
Nozzle Installation (Continued)
Power Supply
(Continued)
Air Pump Adapters
• The air pump adapter set consists
of three adapters. Each adapter is
designed for different kind of inflatable
valves.
• Simply attach the desired adapter to
the air inlet of the electric duster.
Amperage Rating
• This appliance consumes high amperage electricity of 4.5 A (See Page 13: Technical
Specifications).
• Make sure you have a power socket with a compatible amperage rating and fuse
setting. You should also check if the power circuit of your building can support the total
power consumption of all the devices including this appliance.
!

English - 8
Installation and Operation Guide
Start Your Job
(Continued)
Before Turning on the Electric Duster:
Please hold the handle tightly and point to a safe area.
Dusting a Computer or Other Devices (See Page 4: Parts Description)
Recommended nozzles: standard nozzle, standard brush, tapered flow nozzle, straw
adapter and detail brush.
• Disassemble the computer (or other desired devices) and put the computer (or other
desired devices) in a outdoor place (recommended).
• Install the standard nozzle and turn on the electric duster with the higher speed setting.
Roughly dust the surface of the computer (or other desired devices).
• Install the standard brush onto the standard nozzle to remove difficult dirts.
• Switch to tapered flow nozzle with straw adapter and detail brush installed to clean
crawl places.
• Switch to standard nozzle again to dust out the whole surface.
Used As a Hair Dryer for Pet (See Page 4: Parts Description)
Recommended nozzles: standard nozzle and air blade nozzle.
• Force Drying Stage: In this stage, pets have been bathed and are saturated with heavy
water. High-pressure airflow can remove the heavy water efficiently. You can achieve
high-pressure air by installing the standard nozzle or air blade nozzle and dry at the
higher speed setting of the machine.
• Finish Stage: In this stage, most of the heavy water on the pets have been removed in
the force drying stage, but there is still some moisture. Heated-temperature and high-
volume soft airflow can help to vaporize the rest of the moisture or to fluff and style.
Switch to the lower speed setting and dry. For long coated pets, use the air blade nozzle
to prevent knotting in the drying process.
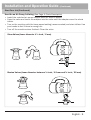
Speed Switch
• Switch to “o” position to turn the electric duster OFF.
Switch to other positions to turn the electric duster
ON.
• There are two speeds settings: I and II. “I” is the
lower speed and “II” is the higher speed.

English - 9
Installation and Operation Guide
Start Your Job (Continued)
(Continued)
Stem Valves (Inner diameter ≥ ¼ inch / 6 mm)
Boston Valves (Inner diameter between ½ inch / 12 mm and ⅞ inch / 22 mm)
Used As an Air Pump/Inating (See Page 4: Parts Description)
• Install the matched air pump adapter onto the electric duster.
• Open the valve and insert the adapter into the valve until the adapter cover the whole
intake.
• Turn on the machine with the lower speed setting (recommended) and start inflate. Use
your hands to feel if there is enough air.
• Turn off the machine when finished. Close the valve.

English - 10
Start Your Job (Continued)
Installation and Operation Guide
(Continued)
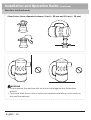
Other Valves (Inner diameter between ⅞ inch / 22 mm and 1¼ inch / 32 mm)
WARNING
• Do not operate the machine with air inlet or outlet against any flat surface
directly.
• This could block the air inlet or outlet and cause serious failure on the machine
and void the warranty.
!

English - 11
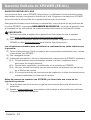
Frequent maintenance is recommended on this appliance. Failure to follow the
maintenance instructions may cause failure of the appliance and void the warranty.
• When not in use, unplug and store the appliance in a dry and cool indoor place. Make
sure it’s out of reach of children.
• Before performing any maintenance or cleaning, always disconnect the electric from its
power source.
• Use a damp cloth to wipe the surface of the housing. Do not clean the unit with water
directly.
• Check if the air inlet and outlet are clean. Remove dirt or any other objects that could
block the air inlet and air outlet.
• Use water to remove dirts or any other objects on the nozzle attachments. Pay attention
to the possible hidden dirts on the standard brush and detail brush.
• Dry the nozzle attachments in natural wind or with the electric duster.
• Restore the nozzle attachments in the nozzle pouch out of reach of children.
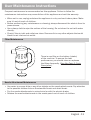
User Maintenance Instructions
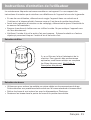
Filter Maintenance
Nozzle Attachment Maintenance
There is one filter on the bottom (intake)
of the machine. To ensure the best
performance, you should clean or replaces
the filters frequently. (See Also Page 3: Parts
Description).

English - 12
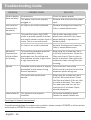
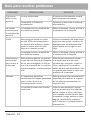
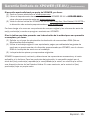
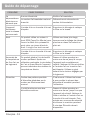
PROBLEM POSSIBLE CAUSE SOLUTION
Electric duster
does not start
No electricity. Check for power supply.
The power cord is not properly
plugged in.
Remove and reconnect the power
cord.
Unit runs but
the speed is
abnormal
Air inlet or air outlet is blocked. Remove blockage and clean the
filter or nozzle attachment.
Noise This product uses a high RPM
motor to provide powerful airflow
and could create a certain level of
noise. This is a normal sound.
Use a wider opening nozzle
attachment, switch to the lower
speed setting or operate in a
outdoor place.
Air inlet or air outlet is blocked Remove blockage and clean the
filter or nozzle attachment.
Abnormal
Temperature
of the airflow
or housing
This product generates powerful
motor heated air. After a
prolonged use, the airflow and
the machine surface might reach
a high temperature.
Stop using for at least one hour
until fully cooled down. Clean the
filter and check if the air inlet or
outlet is blocked. Use a glove the
isolate the heat coming from the
housing.
Sparks Occasion small amount of sparks
generated by the motor during
normal operation.
This is normal. Use nozzle
attachments to arrest most of the
occasion sparks along use.
Unit works with continuous
sparks.
Stop using for at least one hour
until the unit cools down. Clean
the filter and check if the air inlet
or outlet is blocked. Then point
to a safe area and turn on the
machine for 5 minutes. Spark
should disappear.
Nozzle falls off The nozzle is not properly
installed.
Follow the installation guide.
Fasten the nozzle before use.
(See Page 3: Special Instructions)
If troubleshooting does not resolve your problem, please contact XPOWER or other parties
authorized by XPOWER for further instructions.
Troubleshooting Guide

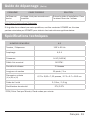
English - 13
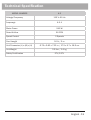
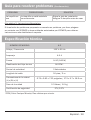
MODEL NUMBER A-2
Voltage/Frequency 115 V~60 Hz
Amperage 4.5 A
Motor Power 540 W
Rated Airflow 90 CFM
Speed Control 2 Speeds
Cord Length 10 ft. / 3 m
Unit Dimension (L) x (W) x (H) 6.75 x 3.82 x 7.22 in. / 17.2 x 9.7 x 18.3 cm
Unit Weight 2.3 lbs. / 1.0 kg
Safety Certification ETL/C-ETL
Technical Specication

English - 14
1 YEAR LIMITED WARRANTY
XPOWER-branded products purchased in the U.S. from authorized distributors include
a 1-year limited warranty. Contact XPOWER to confirm warranty information about your
product(s).
This limited warranty covers defects in materials and workmanship in your XPOWER-
branded products, purchased in the U.S. only. Local warranty policy (if any) in your
country will cover products purchased outside the U.S.
Items mentioned but not limited to below are not covered by warranty:
(1) Power cord, filters or any other components considered as a “consumable parts” by
XPOWER.
(2) Normal wear and tear.
(3) Problems that result, directly or indirectly, at XPOWER’s sole discretion, from:
(3.1) External causes such as accident, abuse, misuse or problems with electrical
power supply.
(3.2) Disassembling, servicing or modification not authorized by XPOWER.
(3.3) Usage that is not accordant with product instructions stated in Owner’s Manual.
(3.4) Failure to follow the product instructions or lack of necessary maintenance
stated in Owner’s Manual.
Before contacting XPOWER, please try one or more of the following:
(1) Consult this Owner’s Manual and follow the instructions of troubleshooting guide.
(2) Access www.xpower.com for more advice and information that could be helpful to
address your problems.
If you need additional assistance from XPOWER, please:
(1) Email info@xpower.com.
(2) Call XPOWER U.S. Customer Service Department at 855-855-8868 or other numbers
provided on www.xpower.com.
(3) Visit XPOWER U.S. Head Office at 240 Clary Ave., San Gabriel, CA 91776 or the most
current address provided on www.xpower.com.
Please also have your original proof of purchase and the serial number(s) of your
product(s) ready when you contact XPOWER.
IMPORTANT:
(1) Please finish the online warranty registration before usage. Visit www.xpower.
com/service-support/warranty-registration.
(2) This Limited Warranty applies with its own timeliness. Contact XPOWER or visit www.
xpower.com for more information.
!
XPOWER Limited Warranty (USA)

English - 15
If you are instructed to return the unit for service or replacement, please:
(1) Request a RMA (Return-Merchandise-Authorization) number.
(2) Use the original or an equivalent packaging, prepay shipping charges at your own
expense to the address provided by XPOWER, with the RMA number on the shipping
label or the packaging.
(3) Include all the original parts and components.
XPOWER will inspect, assess and advise the repairs needed and applicable cost, if any.
For products under warranty, we will pay to ship the repaired or replaced product(s) to
you if you use an address within the Contiguous United States. Otherwise, we will ship the
product(s) to you at your own expense.
XPOWER Limited Warranty (USA)
(Continued)

Español - 2
Instrucciones de seguridad
ADVERTENCIA: LEA Y GUARDE ESTE MANUAL ANTES DE USAR ESTE PRODUCTO.
El usuario de productos eléctricos puede crear peligros que incluyen, pero no se limitan a, lesiones,
incendios, descargas eléctricas. El incumplimiento de estas instrucciones puede dañar y/o
perjudicar su funcionamiento y anular la garantía.
• Antes de operar, retire todo el material de embalaje y compruebe si hay algún daño que pudiera
haber ocurrido durante el envío o cualquier artículo faltante.
• Revise la fuente de alimentación de su hogar para asegurarse de que coincide con las
especificaciones del aparato.
• Para reducir el riesgo de descarga eléctrica, este electrodoméstico tiene un enchufe polarizado
(una clavija es más ancha que la otra). Este enchufe está diseñado para encajar en una toma
polarizada de una sola manera. Si el enchufe no encaja completamente en la toma de corriente,
invierta el enchufe. Si todavía no encaja, contacte a un electricista calificado. no cambies el
enchufe de ninguna manera.
• no utilice con un cable o enchufe dañado. Si el electrodoméstico no funciona como lo haría,
se ha caído, dañado, se ha dejado al aire libre o se ha caído al agua, devuélvalo a un centro de
servicio.
• no lo jale ni lo lleve por el cable, use el cable como asa, cierre una puerta del cable o tire del
cable alrededor de bordes afilados o esquinas.
• no haga funcionar el artefacto sobre el cable. Mantenga el cable alejado de superficies
calientes.
• El cable eléctrico de la unidad no puede ser reemplazado. Si el cable está dañado, el aparato no
debe usarse más.
• no toque este aparato ni el enchufe con las manos mojadas o mientras esté parado en agua.
• no permita que se use como un juguete. Se necesita mucha atención cuando es utilizado por
niños o cerca de ellos.
• no abandone el aparato cuando esté enchufado. Desenchúfelo del tomacorriente cuando no
esté en uso y antes de repararlo.
• Apague todos los controles antes de desconectar. Retire el cable de alimentación del
tomacorriente eléctrico agarrando y tirando solamente del extremo del enchufe del cable de
alimentación, no tire del cable directamente.
• Use solo como se describe en este manual. Use solo los accesorios recomendados por el
fabricante.
• no coloque ningún objeto en las aberturas. no lo use con ninguna abertura bloqueada;
manténgalo libre de polvo, pelusa, cabello y cualquier cosa que pueda reducir el flujo de aire.
• Mantenga el cabello, la ropa suelta, los dedos y todas las partes del cuerpo alejadas de las
aberturas.
• Tenga especial cuidado cuando limpie las escaleras.
• Si el aparato está dañado o funciona mal, no continúe su uso. Desconecte el producto de la
toma eléctrica. Consulte la guía de solución de problemas o póngase en contacto con XPOWER.
• Cuando el aparato no se encuentre en uso, almacénelo en un área seca, lejos de la exposición a
la luz solar, temperatura extrema y humedad, así como de otros ambientes extremos.
• Se puede obtener un manual de instrucciones electrónico a través del sitio web del fabricante
www.xpower.com.
!

Español - 3
Este producto está certicado por ETL/C-ETL.
• La Marca Listada de ETL (Laboratorio de Pruebas Eléctricas) es una prueba de que este producto
ha sido probado de manera independiente y cumple con los estándares de seguridad publicados
aplicables de Norteamérica.
Instrucciones de seguridad
Herramientas impulsadas por motor eléctrico:
(1) Chispas
(1.1) Las chispas pueden ser visibles ocasionalmente debido al motor eléctrico. Varios factores
pueden causar esto, como un uso prolongado o intensivo, objetos extraños o un motor
desequilibrado.
(1.2) no use este producto con materiales inflamables o explosivos, como gas, petróleo y
productos químicos. Las chispas pueden encender estos materiales y provocar un incendio.
(1.3) Ocasionalmente pequeñas cantidades de chispas son seguras si están lejos de materiales
inflamables o explosivos. Por favor, siga las instrucciones de la guía de solución de problemas.
(Ver página 12: Guía para resolver problemas)
(1.4) Si la cantidad de chispas excede el rango seguro, un fusible de protección térmica detendrá
por completo este producto. Póngase en contacto con XPOWER u otras partes autorizadas
por XPOWER para obtener más instrucciones.
(1.5) Si continúan las chispas o si tiene una gran cantidad de chispas, consideraremos su máquina
como una unidad defectuosa. Por favor deje de usar inmediatamente y póngase en contacto
con XPOWER u otras partes autorizadas por XPOWER para obtener más instrucciones.
(2) Nivel de temperature
(2.1) Este producto genera aire caliente del potente motor. Después de un uso prolongado, el flujo
de aire y la superficie de la máquina pueden alcanzar altos niveles de temperatura.
(2.2) Tenga en cuenta que los objetos a altas temperaturas pueden dañarse. Siga las instrucciones
de la guía de solución de problemas. (Ver página 12: Guía para resolver problemas)
(2.3) Si la temperatura excede el rango seguro, un fusible de protección térmica apagará la unidad
automáticamente. Póngase en contacto con XPOWER u otras partes autorizadas por XPOWER
para obtener más instrucciones.
(3) Nivel de ruido
(3.1) Este producto utiliza un motor de alta RPM (revoluciones por minuto) para proporcionar un
flujo de aire potente y puede crear un alto nivel de ruido.
(3.2) Por favor, siga las instrucciones de la guía de solución de problemas. (Ver página 12: Guía
para resolver problemas)
!
!
(Continuación)
Instrucciones Especiales
Si sueltas este producto:
(1) Antes del siguiente uso, apunte a un área segura y encienda la unidad con la configuración de baja
velocidad durante 5 minutos. Y luego cambie a la configuración de velocidad más alta durante otros
5 minutos.
(2) Si experimenta chispas anormales, temperatura o nivel de ruido durante la operación anterior,
pare inmediatamente de usar y póngase en contacto con XPOWER u otras partes autorizadas por
XPOWER para obtener más instrucciones.

Español - 4
Artículos incluidos
Air Mover Owner's Manual
XXX Manual De Usuario (página 10)
XXX Mode d'emploi (page 18)
Model / Modelo / Modèle:
P-80 Series, P-100 Series, P-200 Series
(115V 60HZ)
Read and save these instructions before use
Lea y guarde estas instrucciones antes de usar la unidad
Lire et conserver ces instructions avant utilisation
www.xpower.com | 1-(855)-8868 | [email protected]
• Manual de usuario
x 1
• Bolsa de Boquilla x 1
• Plumero Eléctrico
x 1
• Anexos de Boquilla x 9
(1) Carcasa
(2) Salida de Aire
(3) Entrada de Aire
(4) Filtro
(5) Interruptor de
Velocidad
(6) Manija
(7) Boquilla de la Cuchilla
de Aire
(8) Boquilla Estándar
(9) Cepillo Estándar
(10) Cepillo de Eetalle
(11) Adaptador de Paja
(12) Boquilla de Flujo
Cónico
(13) Adaptador de Bomba
de Aire
(13.1) Adaptador de
Válvula Ancha
(13.2) Adaptador de
Válvula Boston
(13.3) Adaptador de
Válvula de Vástago
(14) Cable de Alimentación
Descripción de las piezas
4
1
3
2
5
7
6
14
11
10
8
13
13.1
13.2
13.3
12
9

Español - 5
Introducción del Plumero Eléctrico
Manual de instalaciones y operaciones
Instalación de Boquilla
• XPOWER Electric Duster produce un flujo de aire potente para
aplicaciones interminables con varios accesorios de boquilla.
• Es ideal para quitar el polvo, bombear aire y secar una
variedad de superficies con su potencia y flexibilidad.
• Con un flujo de aire de alta presión, también está diseñado
para ayudar a secar una mascota bañada en su hogar.
Boquilla Estándar
• La boquilla estándar se puede usar
solo. Conecte la boquilla estándar
a la entrada de aire del plumero
eléctrico.
• Presione y ajuste la boquilla.
Cepillo Estándar
• El cepillo estándar debe estar unido
a la boquilla estándar.
(Ver página 4: Descripción de las piezas)

Español - 6
Manual de instalaciones y operaciones
Instalación de Boquilla (Continuación)
La boquilla de flujo cónico, el
adaptador de paja y el cepillo de
detalle deben usarse juntos.
Boquilla de Flujo Cónico
• Coloque el adaptador de paja en
la boquilla de flujo cónico.
Adaptador de Paja
• Inserte el cepillo de detalle dentro
del otro extremo del adaptador de
paja.
Cepillo de Detalle
• Coloque todo el conjunto de
boquillas en el plumero eléctrico.
(Continuación)
Boquilla de la Cuchilla de Aire
• Simplemente conecte la boquilla de la
cuchilla de aire a la entrada de aire del
plumero eléctrico.
La page est en cours de chargement...
La page est en cours de chargement...
La page est en cours de chargement...
La page est en cours de chargement...
La page est en cours de chargement...
La page est en cours de chargement...
La page est en cours de chargement...
La page est en cours de chargement...
La page est en cours de chargement...
La page est en cours de chargement...
La page est en cours de chargement...
La page est en cours de chargement...
La page est en cours de chargement...
La page est en cours de chargement...
La page est en cours de chargement...
La page est en cours de chargement...
La page est en cours de chargement...
La page est en cours de chargement...
La page est en cours de chargement...
La page est en cours de chargement...
La page est en cours de chargement...
La page est en cours de chargement...
La page est en cours de chargement...
La page est en cours de chargement...
-
 1
1
-
 2
2
-
 3
3
-
 4
4
-
 5
5
-
 6
6
-
 7
7
-
 8
8
-
 9
9
-
 10
10
-
 11
11
-
 12
12
-
 13
13
-
 14
14
-
 15
15
-
 16
16
-
 17
17
-
 18
18
-
 19
19
-
 20
20
-
 21
21
-
 22
22
-
 23
23
-
 24
24
-
 25
25
-
 26
26
-
 27
27
-
 28
28
-
 29
29
-
 30
30
-
 31
31
-
 32
32
-
 33
33
-
 34
34
-
 35
35
-
 36
36
-
 37
37
-
 38
38
-
 39
39
-
 40
40
-
 41
41
-
 42
42
-
 43
43
-
 44
44


XPOWER A-2 AIRROW PRO ELECTRIC AIR DUSTER Mode d'emploi
- Taper
- Mode d'emploi
- Ce manuel convient également à
dans d''autres langues
Documents connexes
-
 XPOWER A-2 Mode d'emploi
-
XPOWER B-24 Manuel utilisateur
-
XPOWER FC-100 Mode d'emploi
-
-
XPOWER XD-75LH Manuel utilisateur
-
-
XPOWER P-200T Le manuel du propriétaire
-
XPOWER XD-165L Mode d'emploi
-
XPOWER X-47ATR Manuel utilisateur
-
 XPOWER P-230AT-BLUE Manuel utilisateur


