Kichler Lighting 43687NI Manuel utilisateur
- Taper
- Manuel utilisateur

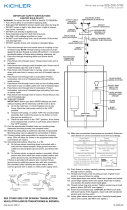
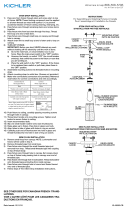
17) Make wire connections (connectors not provided). Reference chart below for
correct connections and wire accordingly.
18) Push fixture to ceiling, carefully passing mounting screws through holes in canopy.
19) Thread knurl knobs onto mounting screws. Tighten knurl knobs to secure fixture
to ceiling.
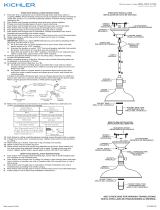
20) Raise glass up to fixture. Pass top of glass through hole in bottom of fixture body.
Pass hole in glass over socket.
21) Slip spacer over socket.
22) Attach socket ring to socket ring tool.
23) Raise socket ring tool with socket ring attached up to fixture. Pass socket ring tool
with socket ring attached through hole in glass. Thread socket ring onto socket.
Tighten socket ring to secure glass in place. (DO NOT over tighten.)
24) Insert recommended bulb. CAUTION: DO NOT touch bulb with bare hands. If this
happens, clean bulb with denatured alcohol and a lint free cloth.
25) Slip glass sleeve over bulb. Carefully thread glass sleeve onto socket. (DO NOT
over tighten.)
IMPORTANT SAFETY INSTRUCTIONS
LIGHTED BULB IS HOT!
WARNING: To reduce the risk of FIRE or INJURY TO PERSON:
• Turnoffandallowtocoolbeforereplacingbulb.
• BulbgetsHOTQUICKLY!Contactswitchonlywhenturningoff.
• DONOTremaininlightifskinfeelswarm.(Lightisintense,maycause“sunburn”)
• DONOTlookdirectlyatlightedbulb.
• Keepmaterialsawayfrombulbthatmayburn.
• UseONLYwithwattagespeciedorlower.
• DONOTtouchbulbatanytime,useasoftcloth.Oilfromskinmaydamagebulb.
• DONOToperatexturewithmissingordamagedglass.
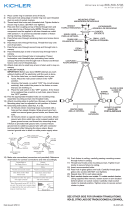
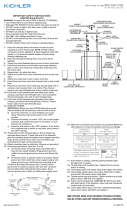
1) Pass fixture wire from each coupling on top of fixture through one stem for each
side and screw each stem into each coupling. NOTE: Thread locking compound
must be applied to all stem threads as noted with symbol (3) to prevent accidental
rotation of fixture during cleaning, relamping, etc.
2) Pass fixture wire through remaining stems and screw stems together.
3) Thread one small threaded pipe into end of each small loop.
4) Pass fixture wire through first loop. Thread one first loop onto end of each last
stem.
5) On one side of fixture, pass fixture wire through second loop and through hole in
canopy. Pass threaded pipe at end of second loop through hole in canopy.
6) Pass fixture wire through hole in lockwasher. Thread lockwasher onto end of
threaded pipe protruding from inside canopy.
7) Pass fixture wire through hole in hexnut. Thread hexnut onto end of threaded pipe.
8) On other side of fixture, pass fixture wire through second loop and through hole in
canopy. Pass threaded pipe at end of second loop through hole in canopy.
9) Pass fixture wire through loop on end of safety cable. Slip loop on safety cable
over end of threaded pipe protruding from inside of canopy.
10) Pass fixture wire through hole in lockwasher. Thread lockwasher onto end of
threaded pipe protruding from inside canopy.
11) Pass fixture wire through hole in hexnut. Thread hexnut onto end of threaded pipe.
12) Attach chain link to small loop at end of each stem and to each loop on canopy.
13) TURN OFF POWER.
IMPORTANT:Beforeyoustart,NEVERattemptanyworkwithoutshuttingoffthe
electricity until the work is done.
a) Go to the main fuse, or circuit breaker, box in your home. Place the main
powerswitchinthe“OFF”position.
b) Unscrewthefuse(s),orswitch“OFF”thecircuitbreakerswitch(s),thatcontrol
the power to the fixture or room that you are working on.
c) Placethewallswitchinthe“OFF”position.Ifthexturetobereplacedhasa
switchorpullchain,placethoseinthe“OFF”position.
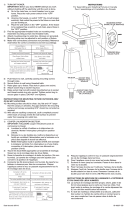
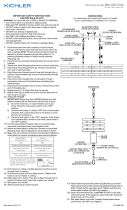
14) Find the appropriate threaded holes on mounting strap. Assemble mounting
screws into threaded holes.
15) Attach mounting strap to outlet box. (Screws not provided). Mounting strap can be
adjusted to suit position of fixture.
16) Connect safety cable assembled to canopy to mounting strap. (This will allow for
fixture to be supported while wire connections are made.)
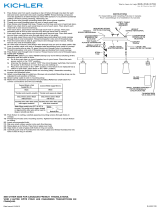
Connect Black or
Red Supply Wire to:
Connect
White Supply Wire to:
Black White
*Parallel cord (round & smooth) *Parallel cord (square & ridged)
Clear, Brown, Gold or Black
without tracer
Clear, Brown, Gold or Black
with tracer
Insulated wire (other than green)
with copper conductor
Insulated wire (other than green)
with silver conductor
*Note: When parallel wires (SPT I & SPT II)
are used. The neutral wire is square shaped
or ridged and the other wire will be round in
shape or smooth (see illus.)
Neutral Wire
IS-43687-CBDate Issued: 10/17/14
3
3
We’re here to help 866-558-5706
Hrs: M-F 9am to 5pm EST
3
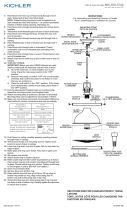
MOUNTING STRAP
PATTE DE FIXATION
CANOPY
CACHE
KNURLKNOB
BOUTONMOLETÉ
SMALLLOOP
PETITEBOUCLE
STEM
TIGE
CHAINLINK
MAILLONDELACHAÎNE
SOCKETRING
ANNEAUDELA
DOUILLE
BULB
L’AMPOULE
GLASSSLEEVE
MANCHONDEVERRE
SPACER
ENTRETOISE
SOCKETRINGTOOL
OUTILDEL’ANNEAU
DELADOUILLE
SEE OTHER SIDE FOR CANADIAN FRENCH TRANSLATIONS.
VOIR L’AUTRE CÔTÉ POUR LES CANADIENS TRADUCTIONS EN
FRANÇAIS.
FIXTUREBODY
LUMINAIRE
GLASS
VERRE
HEXNUT
ECROUHEXAGONAL
LOCKWASHER
RONDELLEDEBLOCAGE
HEXNUT
ECROUHEXAGONAL
LOCKWASHER
RONDELLEDEBLOCAGE
SAFETYCABLE
CÂBLEDESÉCURITÉ

16) Fixer le câble de sécurité à la fente dans le support de montage. (Cela permettra
auluminaired’êtresupportéalorsquelesconnexionsdelssontfaits.)
17) Connecter les fils (connecteurs non fournis). Se reporter au tableau ci-dessous
pour faire les connexions.
18) Pousser le luminaire vers le plafond en passant soigneusement les vis de montage
par les trous dans le cache.
19) Visserlesboutonsmoletéssurlesvisdexation.Resserrerlesboutonsmoletéspour
fixer le luminaire au plafond.
20)Souleverleverrejusqu’auluminaire.Passerlapartiesupérieureduverreàtravers
le trou dans le fond du luminaire. Passer le trou dans le verre sur la douille.
21)Glisserl’entretoisesurladouille.
22)Fixerl’anneaudeprisesurl’outilpourl’anneaudeladouille.
23)Abaisserl’outildel’anneaudeladouilleavecl’anneaudeladouilleattachéenbas
duverre.Resserrerl’anneaudeladouillepourbienxerleverre.(NEPASserrer
avec excès).
24)Introduirel’ampoulerecommandée.ATTENTION:NEPAStoucherl’ampouleà
mainnue.Silapeauentreencontactavecl’ampoule,nettoyerl’ampouleavecde
l’alcooldénaturéetuntissunonpelucheux.
25)Abaisserlemanchondeverreversl’ampoule.Visserdélicatementlemanchonde
verre dans la douille. (NE PAS serrer avec excès).
IS-43687-USDate Issued: 10/17/14
We’re here to help 866-558-5706
Hrs: M-F 9am to 5pm EST
INSTRUCCIONES IMPORTANTES DE SEGURIDAD
LA BOMBILLA ENCENDIDA ES CALIENTE
ADVERTENCIA: ParadisminuirelriesgodeINCENDIOoLESIONESALASPERSONAS:
• Apagueydejequeseenfríeantesdecambiarlabombilla.
• LabombillaSECALIENTARÁPIDAMENTE.Useelinterruptorsóloparaapagar.
• NOpermanezcaenlaluzsisientecalientelapiel.(Laluzesintensaypuedecausar
“quemaduras”).
• NOmiredirectamentealabombillaencendida.
• Mantengaalejadosdelabombillalosartículosquepuedanquemarse.
• UseSOLAMENTEconelvatiajeespecicadoomasbajo.
• NOtoquelabombillaenningúnmomento,useunatelasuave.Lagrasadelamano
puede dañar la bombilla.
• NOhagafuncionarelartefactoconlabombilladañadaofaltante.
1) Passezleldanslatigeetvissezlatigeenhautducorpsduluminaire.
REMARQUE:Appliquerlefreinletsurtouslesletsdelatigeindiquésparle
symbole (3)pourempêcherlarotationaccidentelleduluminairependantle
nettoyage, remplacement de lampe, etc.
2) Passezleldanslestigesrestantesetvissezlestigesensemble.
3) Visserunpetittubeletédansl’extrémitédechaqueboucle.
4) Attachezlapetiteboucleàl’extrémitédelatigesupérieure.
5) Sur un des côtés du luminaire, passer le fil du luminaire par la deuxième boucle
puisparletroudanslecache.Passerletubeletéàl’extrémitédeladeuxième
boucle par le trou situé dans le cache.
6) Passerlelduluminaireparletrousituédanslarondelledeblocage.Visserune
rondelledeblocagesurl’extrémitédutubeletésortantducache.
7) Passerlelduluminaireparletrousituédansl’écrouhexagonal.Visserl’écrou
hexagonalsurl’extrémitédutubeleté.
8) Surl’autrecôtéduluminaire,passerlelduluminaireparladeuxièmebouclepuis
parletroudanslecache.Passerletubeletéàl’extrémitédeladeuxièmeboucle
par le trou situé dans le cache.
9) Passerlelduluminaireparlabouclesituéeàl’extrémitéducâbledesécurité.
Passerunebouclesurlecâbleparl’extrémitédutubeletéducâbledesécurité
sortantdel’intérieurducache.
10) Passerlelduluminaireparletrousituédanslarondelledeblocage.Visserune
rondelledeblocagesurl’extrémitédutubeletésortantducache.
11) Passerlelduluminaireparletrousituédansl’écrouhexagonal.Visserl’écrou
hexagonalsurl’extrémitédutubeleté.
12) Attacherunmaillondelachaîneàunepetiteboucleàl’extrémitédechaquetige
etàchaqueboucleducache.
13) COUPERLECOURANT.
IMPORTANT:TOUJOURScouperl’électricitéavantdecommencerletravail.
a) Localiserlecoffretàfusiblesouledisjoncteurdudomicile.Mettrel’interrupteur
principalenpositiond’Arrêt.
b) Dévisserleoulesfusibles(oumettreledisjoncteursurArrêt)quicontrôlent
l’alimentationversleluminaireoulapiècedanslaquelleletravailesteffectué.
c) Mettrel’interrupteurmuralenpositiond’Arrêt.Sileluminaireàremplacerestdoté
d’uninterrupteuroud’unechaîneconnectéeàl‘interrupteur,placerces
élémentsenpositiond’Arrêt.
14)Trouverlestrousletésappropriéssurlabarrettedemontage.Vissezlesvisde
montage dans les trous filetés.
15)Visserlabarrettedemontageàlaboitedejonction.(Visnonfournies).Labarrette
demontagepeutetreajustéepourconveniràlapositiondel’applique.
Connecter le fil noir ou
rouge de la boite
Connecter le fil blanc de la boîte
A Noir A Blanc
*Au cordon parallèle (rond et lisse)
*Au cordon parallele (à angles droits el strié)
Au bransparent, doré, marron, ou
noir sans fil distinctif
Au transparent, doré, marron, ou
noir avec un til distinctif
Fil isolé (sauf fil vert) avec
conducteur en cuivre
Fil isolé (sauf fil vert) avec
conducteur en argent
*Remarque: Avec emploi d’un fil paralléle
(SPT I et SPT II). Le fil neutre est á angles
droits ou strié et l’autre fil doit étre rond ou
lisse (Voir le schéma).
Fil Neutre
SEE OTHER SIDE FOR ENGLISH TRANSLATIONS.
VOIR L’AUTRE CÔTÉ DES TRADUCTIONS EN ANGLAIS.
3
3
3
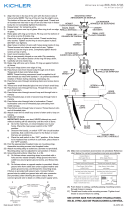
MOUNTING STRAP
PATTE DE FIXATION
CANOPY
CACHE
KNURLKNOB
BOUTONMOLETÉ
SMALLLOOP
PETITEBOUCLE
STEM
TIGE
CHAINLINK
MAILLONDELACHAÎNE
SOCKETRING
ANNEAUDELA
DOUILLE
BULB
L’AMPOULE
GLASSSLEEVE
MANCHONDEVERRE
SPACER
ENTRETOISE
SOCKETRINGTOOL
OUTILDEL’ANNEAU
DELADOUILLE
FIXTUREBODY
LUMINAIRE
GLASS
VERRE
HEXNUT
ECROUHEXAGONAL
LOCKWASHER
RONDELLEDEBLOCAGE
HEXNUT
ECROUHEXAGONAL
LOCKWASHER
RONDELLEDEBLOCAGE
SAFETYCABLE
CÂBLEDESÉCURITÉ
-
 1
1
-
 2
2


Kichler Lighting 43687NI Manuel utilisateur
- Taper
- Manuel utilisateur
dans d''autres langues
- English: Kichler Lighting 43687NI User manual
Documents connexes
-
 Kichler Lighting 44008MIZ Manuel utilisateur
-
 Kichler Lighting 42474PN Manuel utilisateur
-
 Kichler Lighting 49257AZ Manuel utilisateur
-
 Kichler Lighting 43767OZ Manuel utilisateur
-
 Kichler Lighting 43686NI Manuel utilisateur
-
 Kichler Lighting 43457CLP Manuel utilisateur
-
 Kichler Lighting 44009MIZ Manuel utilisateur
-
 Kichler Lighting 42580OZ Manuel utilisateur
-
 Kichler Lighting 43765OZ Manuel utilisateur
-
 Kichler Lighting 43060CLP Manuel utilisateur


