Pfister Marielle RT6-M0XY Specification and Owner Manual
- Catégorie
- Articles sanitaires
- Taper
- Specification and Owner Manual

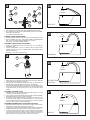
HHL Lever Trim Kits Supplied Separately
Les nécessaries de garniture HHL Leviers fournis séparément Los juegos de Manijas de HHL suministrados por separado
Decorative Lever
Traditional
Levier décoratif
Traditionnel
Palanca decorativa
estilo traditional
Decorative
Lever Bell
Levier décoratif
Cloche
Palanca decorativa
estilo campana
Decorative Lever
Conical
Levier décoratif
Conique
Palanca decorativa
estilo Cónico
Levers Supplied
Separately
Leviers fournis
séparément
Palancas suministradas
por separado
Cross Handles, Ash-
fi eld, & Portland
Manettes à croisillons,
Ashfi eld & Portland
Puños en cruz, Ashfi eld
& Portland
Rope Ring &
Contempra Handles
Manettes à boucles et
Contempra
Puños en bucles y
Contempra
Treviso & Catalina
Decorative Lever
Levier décoratif
Treviso et Catalina
Palanca decorativa
estilo Treviso y Catalina
Marielle & Avalon
Decorative Lever
Levier décoratif
Marielle et Avalon
Palanca decorativa estilo
Marielle y Avalon
French
Decorative Lever
Levier décoratif
Frençais
Palanca decorativa
estilo Francés
08-07-06 EO6930B 25199-1100
A COMPANY
Copyright © 2006, Price Pfi ster, Inc.
RT6 SERIES
Roman Tub Faucets
Marielle
Contempra
Georgetown
High Bell
Avalon
Catalina
Savannah
Bedford
Parisa
Carmel &
Treviso
Georgetown
Ashfi eld
Portland
Ashfi eld
High Arc
Treviso

2
1
2
For optimum performance of your new Price Pfi ster faucet, a minimum water pressure of
25 PSI is recommended.
TOOLS RECOMMENDED
• Pliers • Flashlight • Towel • Phillips Screwdriver
• Adjustable Wrenches • 1” Deep Socket Nut Driver
• PTFE Plumber’s Tape • Plumber’s Putty
Your Price Pfi ster faucet is easy to install using some basic tools and following the
illustrated directions. Any supplies that you do not have may be found at the store where
you purchased your faucet.
If you are replacing an existing faucet, remove the faucet from the tub and clean the tub
surface thoroughly. Price Pfi ster recommends that all holes be 1-1/4” in diameter.
BEFORE PROCEEDING
Your installation will require supply tubes. To preserve the high fl ow characteristics of these
valves, it is necessary to use 1/2” I.D. (5/8” O.D.) copper tubing or Price Pfi ster Quick Connect
Hose Kit 15-112R. Consult the store where you purchased your faucet for the recommended
connections that you may require for your area. If deck thickness exceeds 1-3/8” Price Pfi ster
Stem Extension Kit 974-375 must be used.
Locate water supply inlets and shut off the water supply valves. These are usually found
near the water meter. Check state and local plumbing codes prior to installation to verify
requirements for proper installation procedures. If you are uncertain as to the proper
requirements, we recommend that you consult with a licensed plumbing professional prior
to installation.
Français :
Pour un fonctionnement optimal de votre nouveau robinet Price Pfi ster, il est recommandé
d’avoir une pression minimale de l’eau de 25 PSI.
OUTILS RECOMMANDÉS
• Pinces • Lampe de poche • Serviette • Tournevis Phillips
• Clé à molette • Tourne-écrou 1 po à douille profonde
• Ruban de plomberie en téfl on • Mastic de plomberie
Votre robinet Price Pfi ster est facile à installer en utilisant quelques outils de base et en
suivant les instructions illustrées. Toutes les fournitures que vous n’avez pas peuvent être
trouvées dans le magasin où vous avez acheté votre robinet.
Si vous remplacez un robinet existant, retirez le robinet de l’évier et nettoyez soigneusement
la surface de bagnoir. Price Pfi ster recommande que tous les trous aient un diamètre de
1-1/4 po.
AVANT DE CONTINUER
Votre installation exigera des tubes d’alimentation. Pour conserver les caractéristiques
de débit élevé de ces robinets, il est nécessaire d’utiliser des tubes en cuivre de diamètre
intérieur 1/2 po (D.E. 5/8 po) ou un Ensemble de Tuyaux à Connexion Rapide Price Pfi ster
15-112R. Demandez dans le magasin où vous avez acheté votre robinet les connexions
recommandées dont vous pouvez avoir besoin dans votre région. Si l’épaisseur du comptoir
est supérieure à 1-3/8 po, on doit utiliser un Ensemble Prolongateur de Tige Price Pfi ster
974-375.
Repérer les conduites d’arrivée d’eau et fermer les robinets d’arrivée d’eau, que se trouvent
habituellement près de l’humidimètre. Consulter son code de plomberie municipal et celui
de sa province ou de son état avant l’installation pour connaître les exigences de la
procédure d’installation. En cad de doute quant à ces exigtences, nous recommandons la
consultation d’un professionnel agrée de la plomberie avant de procéder àl’installation.
Español:
Para obtener mejores resultados de su nueva llave de agua de Price Pfi ster, un mínimo de
25 PSI de presión de agua es recomendable.
HERRAMIENTAS NECESARIAS
• Tenazas • Linterna • Toalla • Destornillador Phillips
• Llaves de ajuste • Destornillador de Tuercas de encaje 1”
• PTFE Cinta de Plomería • Masilla de Plomería
Su llave de Price Pfi ster es fácil de instalar cuando se usan algunas herramientas básicas y
cuando se siguen las instrucciones ilustradas en este folleto. Cualquier accesorio que usted
no tenga, puede ser encontrado en la tienda donde usted compró la llave de agua.
Si está reemplazando una llave de agua en uso, quite la llave de la bañera, y limpie la
superfi cie de la misma completamente. Price Pfi ster recomienda que todos los orifi cios
sean de 1-1/4” de diámetro.
ANTES DE COMENZAR
La instalación requerirá tubos de suministro. Para conservar las características de alto fl uido
de estas válvulas, es necesario usar tubería de cobre de 1/2” D.I. (5/8” D.E.) o el estuche
de mangueras de Conexión Rápida de Price Pfi ster 15-112R. Consulte con el vendedor
donde compró la llave de agua para que le recomiende el tipo de conexión que es apropiada
para su área. Si el grueso de la cubierta excede 1-3/8”, el estuche con el Vástago de Extensión
974-375 de Price Pfi ster deberá ser utilizado.
Localice las entradas que proveen agua y cierre las valvulas. Estas usualmente se
encuentran debajo del lavaplatos o cerca del medidor de agua. Verifi que los códigos de
plomería locales y estatales antes de instalar para verifi car los procedimientos correctos
requeridos. Si tiene alguna duda acerca de los requerimientos, recomendamos que consulto
un plomero profesional acreditado antes de instalar.
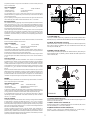
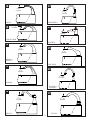
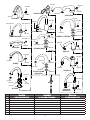
1. CUTTING SHANK (1A)
Cut off top of SHANK (1A) leaving a protrusion of 1/16” (2mm) maximum above
ANCHOR (1B). (1C) Chamfer and deburr SHANK (1A) before inserting ANCHOR (1B).
1. Français : DÉCOUPAGE DE LA TIGE (1A)
Tailler lasommet de la TIGE (1A) en laissant dépasser une saillie de 1/16 po (2mm)
tout au plus au-dessus de l’ANCRE (1B). (1C) Chanfreiner et limer la TIGE (1A)
avant de poser l’ANCRE (1B).
1. Español: CORTE DEL CAÑO (1A)
Cortar el trompo del CAÑO (1A) dejando una saliente máxima de 1/16” (2mm) por
encima del ANCLA (1B). (1C) Biselar y quitar las rebabas del CAÑO (1A) antes de
colocar el ANCLA (1B).
1A
1/16”
(2mm)
1-3/8”
(35mm)
1C
1B
2A 2C
2D
2B
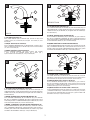
SAVANNAH
2. ATTACHING SAVANNAH SPOUT (2A)
Assemble and align QUICK CONNECT SPOUT (2A) onto ANCHOR (2B) and tighten SET
SCREW (2C). Place BUTTON (2D).
2. Français : MONTAGE DU BEC SAVANNAH (2A)
Assembler et aligner le BEC À CONNEXION RAPIDE (2A) sur L’ANCRAGE (2B) et serrer
la VIS DE FIXATION (2C). Poser le CAPUCHON (2D).
2. Español: CONEXIÓN DEL SURTIDOR SAVANNAH (2A)
Ensamble y alinee la DUCHA DE CONEXIÓN RAPIDA (2A) al ANCLA (2B) y
apriete el TORNILLO DE PRISIONERO (2C). Coloque el BOTÓN (2D).

3
3 5
4
6
3C
3A
5F
5G
5A
5C
4F
4G
4A
4C
GEORGETOWN
HIGH BELL
GEORGETOWN
AVALON
5B 5E
5D
4B 4E
4D
5. ATTACHING GEORGETOWN SPOUT (5A)
Place LOWER WASHER (5B) over ANCHOR (5C), then SPOUT BASE (5D), and
UPPER WASHER (5E). Carefully align these three items and assemble. Align QUICK
CONNECT SPOUT (5A) onto ANCHOR (5C) and tighten LONG SET SCREW (5F).
Place BUTTON (5G).
5. Français : MONTAGE DU BEC GEORGETOWN (5A)
Placez la RONDELLE INFÉRIEURE (5B) sur L’ANCRAGE (5C), puis la BASE DU
BEC (5D), et la RONDALLE SUPÉRIEURE (5E). Alignez soigneusement le tout et
montez et alignez le BEC À CONNEXION RAPIDE (5A) sur L’ANCRAGE (5C) et serrer
la VIS DE FIXATION LONGUE (5F). Poser le CAPUCHON (5G).
5. Español: CONEXIÓN DE EL SURTIDOR GEORGETOWN (5A)
Ponga la RONDANA INFERIOR (5B) sobre el ANCLA (5C), la BASE DE LA DUCHA
(5D), y la RONDANA SUPERIOR (5E). Cuidadosamente alinee estas tres piezas y
ensamble y alinee la DUCHA DE CONEXIÓN RÁPIDA (5A) al ANCLA (5C) y apriete
el TORNILLO DE PRISIONERO LARGO (5F). Coloque el BOTÓN (5G).
3. ATTACHING AVALON SPOUT (3A)
Place LOWER WASHER (3E) over ANCHOR (3B). Assemble and align QUICK
CONNECT SPOUT (3A) onto ANCHOR (3B) and tighten SET SCREW (3C). Place
BUTTON (3D).
3. Français : MONTAGE DU BEC AVALON (3A)
Placez la RONDELLE INFÉRIEURE (3E) sur L’ANCRAGE (3B). Assembler et aligner
le BEC À CONNEXION RAPIDE (3A) sur L’ANCRAGE (3B) et serrer la VIS DE FIXATION
(3C). Poser le CAPUCHON (3D).
3. Español: CONEXIÓN DEL SURTIDOR AVALON (3A)
Ponga la RONDANA INFERIOR (3E) sobre el ANCLA (3B). Ensamble
y alinee la DUCHA DE CONEXIÓN RAPIDA (3A) al ANCLA (3B) y
apriete el TORNILLO DE PRISIONERO (3C). Coloque el BOTÓN (3D).
4. ATTACHING GEORGETOWN HIGH BELL SPOUT (4A)
Place LOWER WASHER (4B) over ANCHOR (4C), then SPOUT BASE (4D), and
UPPER WASHER (4E). Carefully align these three items and assemble. Align QUICK
CONNECT SPOUT (4A) onto ANCHOR (4C) and tighten LONG SET SCREW (4F).
Place BUTTON (4G).
4. Français : MONTAGE DU BEC GEORGETOWN HIGH BELL (4A)
Placez la RONDELLE INFÉRIEURE (4B) sur L’ANCRAGE (4C), puis la BASE DU
BEC (4D), et la RONDALLE SUPÉRIEURE (4E). Alignez soigneusement le tout et
montez et alignez le BEC À CONNEXION RAPIDE (4A) sur L’ANCRAGE (4C) et serrer
la VIS DE FIXATION LONGUE (4F). Poser le CAPUCHON (4G).
4. Español : CONEXIÓN DE EL SURTIDOR GEORGETOWN HIGH BELL (4A)
Ponga la RONDANA INFERIOR (4B) sobre el ANCLA (4C), la BASE DE LA DUCHA
(4D), y la RONDANA SUPERIOR (4E). Cuidadosamente alinee estas tres piezas y
ensamble y alinee la DUCHA DE CONEXIÓN RÁPIDA (4A) al ANCLA (4C) y apriete
el TORNILLO DE PRISIONERO LARGO (4F). Coloque el BOTÓN (4G).
3D
3B
6F 6G
6A
6B
CARMEL & TREVISO
6E
6C
6D
6. ATTACHING CARMEL & TREVISO SPOUT (6A)
Place LOWER WASHER (6B) over ANCHOR (6C), then SPOUT BASE (6D), and UPPER
WASHER (6E). Carefully align these three items and assemble. Align QUICK CONNECT SPOUT
(6A) onto ANCHOR (6C) and tighten LONG SET SCREW (6F). Place BUTTON (6G).
6. Français : MONTAGE DU BEC CARMEL ET TREVISO (6A)
Placez la RONDELLE INFÉRIEURE (6B) sur L’ANCRAGE (6C), puis la BASE DU
BEC (6D), et la RONDALLE SUPÉRIEURE (6E). Alignez soigneusement le tout et montez
et alignez le BEC À CONNEXION RAPIDE (6A) sur L’ANCRAGE (6C) et serrer la VIS DE
FIXATION LONGUE (6F). Poser le CAPUCHON (6G).
6. Español: CONEXIÓN DE EL SURTIDOR CARMEL Y TREVISO (6A)
Ponga la RONDANA INFERIOR (6B) sobre el ANCLA (6C), la BASE DE LA DUCHA (6D),
y la RONDANA SUPERIOR (6E). Cuidadosamente alinee estas tres piezas y ensamble y
alinee la DUCHA DE CONEXIÓN RÁPIDA (6A) al ANCLA (6C) y apriete el TORNILLO DE
PRISIONERO LARGO (6F). Coloque el BOTÓN (6G).
3E

4
8
9
10
11
7
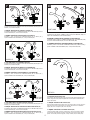
8. ATTACHING MARIELLE & CONTEMPRA SPOUT (8A)
Assemble and align QUICK CONNECT SPOUT (8A) onto ANCHOR (8B) and tighten SET
SCREW (8C). Place BUTTON (8D).
8. Français : MONTAGE DU BEC MARIELLE ET CONTEMPRA (8A)
Assembler et aligner le BEC À CONNEXION RAPIDE (8A) sur L’ANCRAGE (8B) et serrer
la VIS DE FIXATION (8C). Poser le CAPUCHON (8D).
8. Español: CONEXIÓN DEL SURTIDOR MARIELLE Y CONTEMPRA (8A)
Ensamble y alinee la DUCHA DE CONEXIÓN RAPIDA (8A) al ANCLA (8B) y
apriete el TORNILLO DE PRISIONERO (8C). Coloque el BOTÓN (8D).
9. ATTACHING ASHFIELD & ASHFIELD HIGH ARC SPOUT (9A)
Assemble and align QUICK CONNECT SPOUT (9A) onto ANCHOR (9B) and tighten SET
SCREW (9C). Place BUTTON (9D).
9. Français : MONTAGE DU BEC ASHFIELD ET ASHFIELD
HAUTE VOÛTE
(9A)
Assembler et aligner le BEC À CONNEXION RAPIDE (9A) sur L’ANCRAGE (9B) et serrer
la VIS DE FIXATION (9C). Poser le CAPUCHON (9D).
9. Español:
CONEXIÓN DEL SURTIDOR ASFIELD ET ASFIELD
DE ARCO ALTO
(9A)
Ensamble y alinee la DUCHA DE CONEXIÓN RAPIDA (9A) al ANCLA (9B) y
apriete el TORNILLO DE PRISIONERO (9C). Coloque el BOTÓN (9D).
MARIELLE
CONTEMPRA
8A
8B
8D
8C
8A
8C
8D
ASHFIELD
9A
9B
ASHFIELD
HIGH ARC
9B
10C
10D
10B
10A
BEDFORD
PORTLAND
10A
10C
10D
10. ATTACHING BEDFORD & PORTLAND SPOUT (10A)
Assemble and align QUICK CONNECT SPOUT (10A) onto ANCHOR (10B) and
tighten SET SCREW (10C). Place BUTTON (10D).
10. Français : MONTAGE DU BEC BEDFORD ET PORTLAND (10A)
Assembler et aligner le BEC À CONNEXION RAPIDE (10A) sur L’ANCRAGE (10B)
et serrer la VIS DE FIXATION (10C). Poser le CAPUCHON (10D).
10. Español: CONEXIÓN DEL SURTIDOR BEDFORD Y PORTLAND (10A)
Ensamble y alinee la DUCHA DE CONEXIÓN RAPIDA (10A) al ANCLA (10B) y
apriete el TORNILLO DE PRISIONERO (10C). Coloque el BOTÓN (10D).
10B
7. ATTACHING PARISA & CATALINA SPOUT (7A)
Assemble and align QUICK CONNECT SPOUT (7A) onto ANCHOR (7B) and tighten SET
SCREW (7C). Place BUTTON (7D).
7. Français : MONTAGE DU BEC PARISA ET CATALINA (7A)
Assembler et aligner le BEC À CONNEXION RAPIDE (7A) sur L’ANCRAGE (7B) et serrer
la VIS DE FIXATION (7C). Poser le CAPUCHON (7D).
7. Español: CONEXIÓN DEL SURTIDOR PARISA Y CATALINA (7A)
Ensamble y alinee la DUCHA DE CONEXIÓN RAPIDA (7A) al ANCLA (7B) y
apriete el TORNILLO DE PRISIONERO (7C). Coloque el BOTÓN (7D).
7A
PARISA CATALINA
7B
7D
7C
7C
7A 7D
7B
8B
9A
9C 9D
9D
9C
11A
11B
11C
11D
11E
11F
11. ATTACHING TREVISO SPOUT (11A)
Place Washer (11B) and Spout Base (11C) over Anchor (11D). With Spout (11A) facing
forward, align onto Anchor (11D) and tighten with Set Screw (11E). Place Button (11F)
onto the Spout (11A).
11. Français : MONTAGE DU BEC TREVISO (11A)
Placer la rondelle (11B) et la base du bec (11C) sur l’ancrage (11D). S’assurer que le bec
(11A) tourné vers l’avant, joint et alignez sur l’ancrage (11D) et serer la vis de fi xation
longue (11E). Poser le capuchon (11F) sur du bec (11A).
11. Español: CONEXIÓN DE EL SUTRIDOR TREVISO (11A)
Coloque la rondana (11B) y la base de la ducha (11C) sobre el ancla (11D). Asegúrese
que el surtidor (11A) esté mirando al frente, ensamble y alinee sobre el ancla (11D) y
apriete con el tornillo prisionero lorgo (11E). Coloque el boton (11F) al surtidor (11A).
TREVISO

5
12
13
14
15
16
17
BEDFORD
GEORGETOWN
HIGH BELL
SAVANNAH
12C
12A
12D
12C
12A
12D
13A
13B
4-1/4”
(108mm)
6-1/8”
(155mm)
4-7/8”
(123mm)
12E
AVALON
5-3/16”
(148mm)
12. INSTALLING FLANGES
1. Place PROTECTIVE WASHER (12A) against MOUNTING SURFACE (12B).
2. Place FLANGES (12C) onto SUPPLY VALVE BODIES (12E) and secure FLANGE
ADAPTORS (12D) hand tight.
Not encluded in Ashford and Marielle.
12. Français : INSTALLATION DES BRIDES
1.
Ajoutez la RONDELLE DE PROTECTION (
12
A) contre la SURFACE DE MONTAGE (12B).
2. Placez les BRIDES (12C) sur les CORPS DES ROBINETS D’ALIMENTATION
(12E) et serrez les ADAPTATEURS DE BRIDES (12D) à la main.
Non inclus daus les modèles Ashfi eld et Marielle.
12. Español: LA INSTALACIÓN DE LOS REBORDES
1. Agregue las RONDANAS DE PROTECCIÓN (12A) en la SUPERFICIE
DEMONTAJE (12B).
2. Coloque las REBORDES (12C) en los CUERPOS DE LAS VÁLVULAS DE
SUMINISTRO (12E) y asegure los ADAPTADORES DE REBORDES (12D)
apretando manualmente.
No incluido en los modelos Ashfi eld y Marelle.
13. STEM ROTATION SET UP
1. STEM STOP (13A) can be inserted into the stem in either of two ways, depending
on the rotation you want to have for your handles.
2. When removing and/or installing the STEM STOP (13A), you must look for the
MISSING TOOTH (13B) on both the stem and the stop, and align them.
3. If you want both handles rotating in the same direction, you must be able to see the
groove on the stop on both stems when installed. If you want the handles rotating
in opposite directions, you will see the groove on only one of the stems when
installed.
13. Français : ROTATION DE LA TIGE
1. L’ARRÊT DE LA TIGE (13A) peut être introduit dans la tige de deux façons, selon
la rotation que l’on veut obtenir pour les leviers.
2. Lorsqu’on retire ou qu’on installe L’ARRÊT DE LA TIGE (13A), il faut repérer la DENT
MANQUANTE (13B) sur la tige et sur l’arrêt, et les aligner.
3. Si l’on veut que les deux leviers tournent dans le même dans, la rainure dans l’arrêt
des deux tiges doit être visible au moment de l’installation. Par contre, si l’on veut
que les deux leviers tournent dans le sens contraire, la rainure ne devra être visible
que sur une des deux tiges au moment de l’installation.
13. Español: DETERMINACION DE LA ROTACION DE LAS ESPIGAS
1. El TOPE DE LA ESPIGA (13A) puede ser insertado en la espiga en dos posiciones,
dependiendo de la rotación que se quiera tener en los puños.
2. Cuando remueva o instale el TOPE DE LA ESPIGA (13A), usted tiene que identifi car
el DIENTE FALTANTE (13B) en ambas partes la espiga y el tope, y alinearlos.
3. Si usted quiere que ambos puños giren en la misma dirección, usted deve poder
ver la ranura en el tope en las dos espigas cuando esten instalados. Si usted quiera
que los puños giren en direcciones contrarias, usted deve poder ver la ranura en el
tope en solamente una de las espigas cuando los topes esten instalados.
12B

6
21
20
22
19
18 23
24
25
26
27
CATALINA
5-3/4"
(136mm)
CARMEL &
TREVISO
6-1/8"
(155mm)
MARIELLE
GEORGETOWN
2-1/2"
(63.5mm)
PARISA
6-3/4"
(171mm)
6-11/16"
(170mm)
CONTEMPRA
6-13/16"
(172mm)
ASHFIELD
PORTLAND
3-3/16"
(81mm)
4-3/8"
(111mm)
6-13/16"
(173mm)
ASHFIELD
HIGH ARC
6-15/32"
(165mm)
TREVISO

7
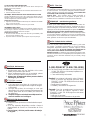
19701 DaVinci
Lake Forest, CA 92610
Phone: 1-800-Pfaucet
www.pricepfi ster.com
A COMPANY
CAUTION: Maintenance
DISASSEMBLY
1. Replacement parts may be available at the store
where you purchased your faucet.
2. When replacement parts are not available, please
write or call Price Pfi ster Consumer Service.
3. Always turn off water and relieve pressure before
working on your faucet.
ATTENTION : entretien
DÉMONTAGE
1. Il se peut que les pièces de rechange soient
disponibles dans le magasin dans lequel le mitigeur
a été acheté.
2. Lorsque des pièces de rechange ne sont pas
disponibles, bien vouloir contacter le département du
service après-vente de Price Pfi ster par courrier ou
par téléphone.
3.
Toujours couper les arrivées d’eau et dépressuriser
avant de travailler sur le mitigeur.
PRECAUCIÓN: Mantenimiento
DESENSAMBLE
1. Podría encontrar repuestos en la tienda donde compró
el grifo.
2. Si no hay repuestos disponibles, escriba o llame al
departamento de Servicio al Consumidor de Price
Pfi ster.
3. Cierre el agua y alivie la presión antes de trabajar
en el grifo.
1–800–PFAUCET (1–800–732–8238)
For Toll-Free Pfaucet information call 1–800–PFAUCET
(1–800–732–8238) or visit www.pricepfi ster.com
• Installation Support
• Care and Warranty Information
Español: Para obtener información sobre “Pfaucet”,
llame al número de llamada gratuita1–800–
PFAUCET (1–800–732–8238) llame o visite www.
pricepfi ster.com
• Ayuda para la instalación
• Cuidado y Información de la garantia
Français: Pour les renseignement concernant le
service san frais de Pfaucet, appelez 1–800–
PFAUCET (1–800–732–8238) appel ou visite www.
pricepfi ster.com
• Aide pour le montage
• Rensignements sur l’entretien et la garantie
13. AIR GAP AND FLUSHING INSTRUCTIONS
AIR GAPS for various RT6 series spouts are as shown. Please consult your local
building code for Air Gap restrictions.
Flush Fitting:
1. Flush the fi tting by running both HOT and COLD water lines until water is clear.
2. Check all connections for leaks.
13. Français : INSTRUCTIONS SUR L’ECART ANTI-RETOUR ET LA PURGE
L’ÉCART ANTI-RETOUR pour les becs de la gamme RT6 s’effectue selon les
illustrations ci-dessus. Pour connaître les restrictions s’appliquant a l’écart anti-retour,
consulter le règlement de construction municipal.
Vaciado De Los Accesorios :
1. Purger le raccord en faisant jaillir en même temps l’eau CHAUDE et l’eau FROIDE
jusqu’à ce que l’eau soit claire.
2. Vérifi er tous les raccords pour s’assurer qu’il n’y a pas de fuite.
13. Español: ALTURA Y VACEO
Los BOQUETES (INTERVALOS DE AIRE) para los diferentes surtidores de la serie
RT6 son según se ilustra. Es importante consultar los reglamentos locales de
construcción para verifi car las restricciones al respecto.
Vaciado De Los Accesorios:
1. Vaciar los accesorios haciendo correr las dos líneas de agua CALIENTE y FRÍA
hasta que el agua salga limpia y clara.
2. Inspeccionar todas las conexiones para asegurarse de que no hayan fugas.
NOTE: Trim Care
Cleaning Instructions:
For all Handles and decorative fi nishes, use only a soft damp cloth
to clean and shine. Use of polish, detergents, abrasive cleaners,
organic solvents or acid may cause damage. Use of other than
a soft damp cloth will nullify our warranty!
Special Trim: Trim products which contain Porcelain or
other similar substance are not acceptable for public areas or
Commercial use. Installation of Said Trim is at Users Risk!
REMARQUE : entretien des garnitures
Instructions de nettoyage :
N’utiliser qu’un chiffon humide pour nettoyer et polir toutes les
manettes et ornementations décoratives. L’utilisation de pâte à
polir, de détergents, de produits nettoyants abrasifs, de solvants
organiques ou d’acide peut endommager ces pièces. L’utilisation
d’autre chose qu’un chiffon humide annulera la garantie !
Garnitures spéciales : les garnitures contenant de la porcelaine
ou une autre substance similaire ne sont pas acceptables dans
les lieux publics ou les établissements commerciaux. La pose de
telles garnitures se fait aux risques de l’utilisateur.
NOTA: Cuidado de las molduras
Instrucciones de limpieza:
Sólo use un paño suave húmedo para limpiar y pulir todas
las manijas y acabados ornamentales. El uso de sacabrillos,
detergentes, limpiadores abrasivos, solventes orgánicos o ácido
podría causar daños. ¡El uso de cualquier otro material que no
sea un paño suave húmedo anulará nuestra garantía!
Moldura especial: Las molduras que contienen porcelana u otras
substancias similares no son aceptables para áreas públicas o uso
comercial. ¡El uso de dichas molduras será por cuenta y riesgo
del usuario!

English
English
Español
Español
Français
Français
*
*
Letter Designates Finish
Letter Designates Finish
La Letra Indica el Terminado
La Letra Indica el Terminado
La Lettre Designe La Fini
La Lettre Designe La Fini
APolished Chrome Cromo Pulido Chrome Poli
ERustic Pewter Peltre Rústico Étain Rustique
FPVD Brushed Brass PVD Latón Cepillado PVD Laiton Balayé
JPVD Brushed Nickel PVD Niquel Cepillado PVD Nickel Brosse
URustic Bronze Bronce Rústico Bronze Rustique
VPVD Polished Brass PVD Latón Pulido PVD Laiton Poli
YTuscan Bronze Bronce Toscano Bronze Le Toscan
ZOil Rubbed Bronze Bronce Frotado Con Aceite Bronze Huilé
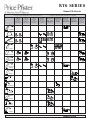
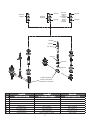
8
950-880
950-885
971-982
931-971
950-250
931-872
960-048*
Catalina
910-019
949-011
960-160*
Bedford
Supplied Separately
Fournies Séparément
Suministran por Separado
910-055
949-005
960-010*
Savanah
Parisa
Georgetown
Carmel
Treviso
Avalon
Portland

English
English
Español
Español
Français
Français
*
*
Letter Designates Finish
Letter Designates Finish
La Letra Indica el Terminado
La Letra Indica el Terminado
La Lettre Designe La Fini
La Lettre Designe La Fini
APolished Chrome Cromo Pulido Chrome Poli
ERustic Pewter Peltre Rústico Étain Rustique
FPVD Brushed Brass PVD Latón Cepillado PVD Laiton Balayé
JPVD Brushed Nickel PVD Niquel Cepillado PVD Nickel Brosse
URustic Bronze Bronce Rústico Bronze Rustique
VPVD Polished Brass PVD Latón Pulido PVD Laiton Poli
YTuscan Bronze Bronce Toscano Bronze Le Toscan
ZOil Rubbed Bronze Bronce Frotado Con Aceite Bronze Huilé
9
BEDFORD
SAVANNAH
GEORGETOWN
HIGH BELL
AVALON
PARISA
GEORGETOWN
CATALINA
CARMEL & TREVISO
931-980A or V
971-940
971-940
971-940
971-940
971-940
971-940
931-980*
971-982
931-980*
931-980*
931-980*
931-980*
941-006A or V
975-006A or V
975-026*
975-026*
975-600*
950-195
960-016A,K,V
950-194
950-195
960-016*
950-194
950-195
960-016*
950-194 MARIELLE 971-940
931-980*
975-026
975-026
975-026
975-026
975-600*
CONTEMPRA
931-980*
971-982
975-026
975-002*
971-940
931-980*
ASHFIELD PORTLAND
971-940 941-006*
971-982
975-026
931-980*
ASHFIELD
HIGH ARCH
975-026
971-982
941-006*
TREVISO
975-026
971-940
931-980*
950-109
960-089*

RT6 SERIES
Roman Tub Faucets
Price Pfi ster
Lifetime Limited Mechanical & Pfi nish Warranty
Covers Pfi nish and Pfunction for as Long as You
Own Your Home
(Commercial Applications Limit the Duration of the
Warranties as Provided Below)
Price Pfi ster provides the following Warranties for its products.
Proof of Purchase may be required in order to obtain any of the
benefi ts set forth below.
Limited Warranties: Price Pfi ster warrants that for as long as
the original purchaser owns the home in which the Price Pfi ster
product (the “Product”) is originally installed, the Product will
be free of all defects in material and workmanship that would
impair the intended and proper use of the Product. If the Product
is installed in a commercial application, the above mechanical
warranty shall be limited for a period of ten (10) years from the
date of purchase of the Product.
Price Pfi ster warrants against deterioration of the Product’s fi nish
for as long as the original purchaser owns the home in which the
Product is originally installed. If the Product is installed in a
commercial application, the above fi nish warranty for Products
that do not contain the Pforever fi nish shall be limited to a period
of fi ve (5) years from the date of purchase.
Exclusive Remedy: In the event of any defect in the Product that
breaches the foregoing warranties, Price Pfi ster, at its option,
will repair or replace the defective part of the Product. Repair or
replacement of the Product is the exclusive remedy.
For any remedy under this warranty, Price Pfi ster is to be notifi ed
describing the problem. In order to notify Price Pfi ster and receive
assistance or service under this warranty, the original purchaser
may: (1) call 1-800-Pfaucet (1-800-732-8238) for a consumer
service representative who can assist you, or (2) write consumer
service department c/o Price Pfi ster Inc., 19701 DaVinci, Lake
Forest, CA 92610, and include a description of the problem, model
number, your name, address, phone number and approximate
date of purchase, or (3) email Price Pfi ster’s customer service
department by going to www.PricePfi ster.com, or (4) notify the
location or distributor from which the Product was purchased. In
any case, you may be required to return the Product to Price Pfi ster
for inspection and proof of purchase may be required.
Limitations and Exclusions:
PRICE PFISTER WILL NOT BE LIABLE FOR ANY
OTHER DAMAGES OR LOSSES, INCLUDING,
BUT NOT LIMITED TO, INCIDENTAL
AND/OR CONSEQUENTIAL DAMAGES, REGARDLESS
OF THE LEGAL THEORY ASSERTED, INCLUDING ANY
CLAIM OR BREACH OF WARRANTY HEREUNDER
OR ANY OTHER CAUSE, AND WHETHER ARISING IN
CONTRACT OR IN TORT (including negligence and strict
liability).
Price Pfi ster has the right to discontinue or modify any product
at any time. Some states do not allow limitations or exclusions
of incidental or consequential damages, so the above limitations
or exclusions may not apply to you. This warranty gives you
specifi c legal rights, and you may also have other rights which
vary from state to state.
The above warranties do not cover damage resulting from
improper maintenance, repair, cleaning or installation, misuse,
abuse, alterations, accidents or Acts of God.
Price Pfi ster
Garantía Mecánica y sobre el Acabado Limitada de por
Vida
Cubre las funciones y el acabado por el tiempo en que
usted sea propietario de su casa
(Las Aplicaciones Comerciales Limitan la Duración
de las Garantías)
Price Pfi ster suministra las siguientes Garantías para sus productos.
Es posible que se requiera la presentación de una Prueba de
compra para obtener cualquiera de los benefi cios indicados a
continuación.
Garantías Limitadas: Price Pfi ster garantiza que por el tiempo
en que el comprador original sea propietario de la casa en el que
se hubiese instalado inicialmente el producto Price Pfi ster (el
“Producto”), este Producto estará libre de todo defecto en material
y mano de obra que pueda afectar el uso proyectado y correcto del
Producto. Si el Producto se instala en una aplicación comercial,
la garantía mecánica que antecede estará limitada a un período de
diez (10) años a partir de la fecha de compra del Producto.
Price Pfi ster garantiza el acabado del Producto contra deterioro
por el tiempo en que el comprador original sea propietario de la
casa en la que hubiese instalado inicialmente el Producto. Si el
Producto se instala en una aplicación comercial, la garantía sobre el
acabado que precede para Productos que no contengan el acabado
“Pforever” estará limitada a un periodo de cinco (5) años a partir
de la fecha de compra.
Recurso exclusivo: En el caso de que haya un defecto en el
Producto que viole las garantías que preceden, Price Pfi ster,
a su opción, reparará o reemplazará la pieza defectuosa del
Producto. La reparación o el reemplazo del Producto es el
recurso exclusivo.
Para todo recurso con respecto a esta garantía, Price Pfi ster deberá
ser notifi cado, con una descripción del problema. Para notifi car
a Price Pfi ster y recibir ayuda o servicio bajo esta garantía,
el comprador original puede: (1) llamar al 1-800-Pfaucet (1-
800-732-8238) para hablar con un representante de servicio al
cliente que lo pueda ayudar, o (2) escribir al departamento de
servicio al consumidor, c/o Price Pfi ster Inc., 19701 DaVinci,
Lake Forest, CA 92610 U.S.A., e incluir una descripción del
problema, el número del modelo, su nombre, dirección, número de
teléfono y fecha aproximada de compra, o (3) enviar un e-mail al
departamento de servicio al consumidor de Price Pfi ster entrando
en la página web www.PricePfi ster.com, o (4) avisarle al lugar o
al distribuidor en donde se compró el Producto. En cualesquiera
de los casos, podría pedírsele devolver el Producto a Price Pfi ster
para su inspección y es posible que se requiera la presentación
de una prueba de compra.
Limitaciones y Exclusiones:
PRICE PFISTER NO SE HARÁ RESPONSABLE DE NINGÚN
OTRO DAÑO O PERJUICIO, INCLUYENDO, PERO SIN
ESTAR LIMITADO A DAÑOS INCIDENTALES Y/O
CONSECUENTES, SIN IMPORTAR LA TEORÍA LEGAL A
LA QUE SE ALEGUE, INCLUYENDO TODO RECLAMO O
VIOLACIÓN DE LA GARANTÍA PRESENTE O CUALQUIER
OTRA CAUSA, Y YA SEAN COMO RESULTADO DE LA LEY
CONTRACTUAL O LA DE ANTECEDENTES (incluyendo
negligencia y responsabilidad estricta).
Price Pfi ster tiene el derecho de discontinuar o modifi car cualquier
producto en cualquier momento. Ciertos estados no permiten
limitaciones o exclusiones de daños incidentales o consecuentes,
de manera que es posible que las limitaciones o exclusiones que
preceden no correspondan en su caso. Esta garantía le otorga
derechos legales específi cos y es posible que usted también tenga
otros derechos que difi eren entre un estado y otro.
Las garantías que preceden no cubren daños y perjuicios
ocasionados como resultado de mantenimiento, reparaciones,
limpieza o instalación inadecuados, mal uso, abuso, alteraciones,
accidentes o causas de fuerza mayor.
Price Pfi ster
Une garantie limitée à vie
pour ce qui est de l’aspect mécanique et de la fi nition,
tant et aussi longtemps que vous serez propriétaire
de votre domicile.
(Garantie limitée en cas d’utilisation commerciale
– voir ci-dessous)
Veuillez noter qu’une preuve d’achat peut être requise en cas
de recours au titre de la garantie.
Garantie limitée : Tant et aussi longtemps que l’acheteur sera
propriétaire du domicile dans lequel le produit Price Pfi ster a été
installé, nous lui garantissons que ce dernier sera exempt de tout
défaut de matériau ou vice de fabrication pouvant en entraver
l’utilisation correcte tel que prévu. Dans le cas des produits
d’utilisation commerciale, la garantie exprimée ci-dessus est
restreinte à une période de dix (10) ans.
Par ailleurs, tant et aussi longtemps que l’acheteur sera
propriétaire du domicile dans lequel le produit Price Pfi ster
a été installé, nous lui garantissons un article dont la fi nition
ne pourra se détériorer. Dans le cas des produits d’utilisation
commerciale qui ne comportent pas la fi nition “Pforever”, la
garantie est restreinte à une période de cinq (5) ans.
Recours exclusif : En cas de défaut du produit relevant de
la garantie, le fabricant pourra, à sa discrétion, réparer ou
remplacer la partie défectueuse. Cette mesure constitue un
recours exclusif.
Pour tout recours au titre de la garantie, les clients doivent
communiquer avec le fabricant pour lui faire part du problème.
L’acheteur d’origine peut : (1) composer le 1 800 732-8238 pour
parler à un représentant qui l’assistera; (2) écrire au service à
la clientèle : Price Pfi ster Inc., 19701 DaVinci, Lake Forest,
CA 92610 U.S.A., et fournir une explication du problème, en
précisant le numéro de modèle, son nom, son adresse et son
numéro de téléphone, ainsi que la date d’achat approximative;
(3) communiquer par courrier électronique avec le service à
la clientèle en utilisant le site www.PricePfi ster.com, ou (4)
aviser le détaillant qui a vendu le produit. On peut être obligé
de retourner le produit au fabricant, et une preuve d’achat peut
être exigée.
Limitations et exclusions :
PRICE PFISTER NE SERA PAS RESPONSABLE DES
AUTRES DOMMAGES OU PERTES, Y COMPRIS LES
DOMMAGES INDIRECTS, INDÉPENDAMMENT DE
TOUTE THÉORIE JURIDIQUE, Y COMPRIS TOUTE
RÉCLAMATION SELON LAQUELLE IL Y AURAIT EU
RUPTURE DE GARANTIE, QUE CE SOIT PAR RAPPORT
À UN CONTRAT OU PAR VOIE DE NÉGLIGENCE (cela
comprend la négligence et la responsabilité stricte).
Price Pfi ster se réserve le droit de discontinuer ou de modifi er
un produit en tout temps. Certaines provinces ne permettent
pas l’exclusion ou la limitation des dommages indirects, de
sorte que la limitation exprimée peut ne pas s’appliquer. La
présente garantie octroie aux clients certains droits d’ordre
juridique, et ceux-ci pourraient en avoir d’autres, selon la
province où ils habitent.
La garantie ne s’applique pas aux dommages résultant d’un
entretien, d’un nettoyage ou d’une installation fautivement
effectués, ou encore d’usages fautifs, d'abus, de modifi cations,
d'accidents ou de catastrophes naturelles.
SAMPLE COPY
-
 1
1
-
 2
2
-
 3
3
-
 4
4
-
 5
5
-
 6
6
-
 7
7
-
 8
8
-
 9
9
-
 10
10


Pfister Marielle RT6-M0XY Specification and Owner Manual
- Catégorie
- Articles sanitaires
- Taper
- Specification and Owner Manual
dans d''autres langues
- English: Pfister Marielle RT6-M0XY
- español: Pfister Marielle RT6-M0XY