Costco SMZPCJB1UC Junction Box Manuel utilisateur
- Taper
- Manuel utilisateur

IMPORTANT SAFETY INFORMATION (Save these instructions)
WARNING
Avoid Electrical Shock or Fire Hazard!
Do not work on an energized circuit. Doing so could
result in serious injury or death. Do not attempt any
work on the dishwasher electric supply circuit until
you are certain the circuit is de-energized.
To avoid possible injury or property damage, exercise
care when the dishwasher is installed or removed to
reduce the likelihood of damage to the power cord.
Make sure electrical components are properly in-
stalled. Only qualified personnel should perform
electrical work.
Make sure there are no loose electrical connections.
Make sure electrical connections are properly made.
Electrical Supply
The customer must ensure that the dishwasher electri-
cal installation is in compliance with all national and lo-
cal electrical codes and ordinances. The dishwasher
is designed for an electrical supply of 120V, 60 Hz, AC,
connected to a dishwasher-dedicated, properly ground-
ed electrical circuit with a fuse or breaker rated for 15
amps. Electrical supply conductors shall be a minimum
#14 AWG copper wire rated at 75º C (167º F) or higher.
Grounding Instructions
The dishwasher must be properly grounded before op-
erating. This appliance must be connected to a ground-
ed metal permanent wiring system or an equipment
grounding conductor must be run with the circuit con-
ductors and connected to the equipment grounding ter-
minal or lead on the dishwasher.
Do not use an extension cord.
Make sure that the dishwasher is connected to a suit-
able ground in compliance with all local codes or, in
the absence of a local code, with the NATIONAL ELEC-
TRICAL CODE in the United States or the CANADIAN
ELECTRIC CODE C22.1-latest edition in Canada as well
as any provincial/state or municipal or local codes that
apply.
Volts Hertz Amperes Watts
120 60 12 1,440 (max)
Electrical Preparation
Dishwasher Electrical Rating
Materials Supplied
Junction Box
JUNCTION BOX INSTALLATION INSTRUCTIONS
To avoid possible injury or property damage, OBSERVE ALL WARNINGS AND CAUTIONS! These instructions
are intended for use by qualified installers only. In addition to these instructions, the dishwasher shall be installed
to meet all electrical codes and ordinances (both national and local). Note that these instructions refer to the
electrical portion of the dishwasher only. For complete installation instructions, please refer to the Dishwasher
Installation Instructions supplied with your dishwasher.
Strain Relief
Tools Needed
Wire StripperPhillips Screwdriver
ACCESSORY KIT
SMZPCJB1UC

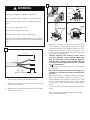
• Attach the included strain relief to opposite side
of junction box. (The included strain relief is rated
for 0.225 to 0.612 inch diameter wiring. If a dif-
ferent form of wiring is used, please refer to all
electric codes and purchase a closed strain relief
to meet the requirements.)
• Without adjusting the terminal screws, insert
the wires properly in the terminal. Make sure
that the black wire connects with the black (L)
and the white connects with the white (N) and
the green or bare copper wire with the green (G
or ). (See box 2b)
• Do NOT insert wire underneath the screw clamp.
(see box 2a)
• Be certain the wire insulation is not trapped in
the terminal. 1-2 mm of wire must be visible (See
box 2b)
• After inserting wire, completely tighten the termi-
nal screws by turning clockwise. (See box 2c)
• After tightening the terminal screws, pull on each
wire to ensure that they are secure. Wire should
not be loose in the terminal after correct instal-
lation.
• Secure the wire in the junction box with the strain
relief.
Note: The arrow (shown in box 2d above) should
align with the power cord.
ab
cd
1-2 mm
ADVERTENCIA
WARNING
AVERTISSEMENT
STRICTLY FOLLOW ALL INSTRUCTIONS IN THIS MANUAL.
USE ONLY 14 OR 12 AWG COPPER WIRE WITH A MIN. TEMP. RATING
OF 75°C (167°F).
PLACE ALL WIRING IN THE POWER SUPPLY BOX AND INSTALL COVER.
CONNECTION SCREWS ARE NOT REMOVABLE.
ESTRICTAMENTE SIGA TODAS LAS INSTRUCCIONES DE ESTE MANUAL.
UTILICE SÓLO EL 14 O 12 DE ALAMBRE DE COBRE AWG CON UN GRADO
DE LA TEMPERATURA MÍNIMA DE 75 ° C (167 ° F).
COLOQUE TODOS LOS CABLES EN LA CAJA DE LA FUENTE DE ALIMEN-
TACIÓN Y LA INSTALACIÓN DE LA CUBIERTA. TORNILLOS DE CONEXIÓN
NO SON EXTRAIBLES.
WIRE STRIP GAGE
1/2" (13 mm)
CALIBRE DE POUR DÉNUDER
INDICADOR DE CABLE PELADO
OBSERVER TOUTES LES INSTRUCTIONS DE CE GUIDE.
UTILISER SEULEMENT DU FIL DE CUIVRE 14 OU 12 AWG AVEC UNE
COTE DE TEMPÉRATURE MINIMALE DE 75°C (167°F).
PLACER TOUS LES FILS DANS LA BOÌTE D‘ALIMENTATION ET
REMETTRE LE COUVERCLE.
LES VIS DE CONNEXIONS NE SONT PAS AMOVIBLES.
view with cover installed
arrow
strain relief
black (L)
white (N) green (G)
2
2" - 3"
(51 mm - 76 mm)
3/8" - 1/2"
(10 mm - 13 mm)
1. Turn off any electricity to installation area.
2. Remove screws and cover from junction box and
set aside for later use.
3. Remove outer casing and insulation of the hardwir-
ing as shown in Fig. 1.
1
WARNING
To Reduce the Risk of Electrical Shock or Fire:
Carefully follow the installation instructions.
Do not remove, alter or bypass the terminal block.
Do not use an extension cord or adapter with this
part.
Do not cut or splice the cord.
Do not alter this part in any way.
Use the metal strain relief per instructions.
This kit is for hard-wired installations only. To plug
into an outlet, use the power cord supplied with the
unit.

• Plug the end of the supply cord into the back of the
dishwasher. Be sure it goes through the strap* on
either the right or left side of the dishwasher.
• The outlet for the power supply cord should be
located in a cabinet or wall adjacent to the dishwasher
cabinet.
• Do not plug dishwasher in until all the steps of
installation are complete.
*not on all models
Note: If clips are required for the power cord use the
Edge Protector with Power Cord clips Kit SMZEPCC1UC.
• Mount the dishwasher electrical supply junction
box in an accessible cabinet adjacent to the
dishwasher (do not mount the junction box behind
the dishwasher).
Note: Screws are not provided for mounting electrical
supply junction box.
3
Volts Amperes Watts
120 12 1,440 (max)
WARNING
Ensure plug is fully seated
Strap
A
lternate cable routing
4
60
-
 1
1
-
 2
2
-
 3
3


