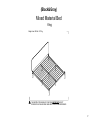
The Home Depot DA4027449 Mixed Material Bed Mode d'emploi
- Taper
- Mode d'emploi

(Black&Gray)
Mixed
M
aterial Bed
THIS INSTRUCTION BOOKLET CONTAINS IMPORTANT SAFETY
INFORMATION. PLEASE READ AND KEEP FOR FUTURE REFERENCE.
1
1
1
1
King
Weight Limit: 500 Lb / 227 Kg

2
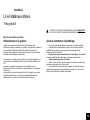
Limited 1 year Warranty
We
warrants this product to be free from defects in material and workmanship
and agrees to remedy any such defect. This warranty covers one year from the
date of original purchase from authorized retailers. This is solely limited to the
repair or replacement of defective parts and assembly labor is not included.
This warranty does not apply to any product which has been improperly
assembled, subjected to misuse or abuse or which has been altered or repaired in
any way.The warranty does not cover wearing, tearing, fading or splitting of the
fabric (where applicable). Liability for consequential damages is excluded to the
extent exclusion is permitted by law. This warranty gives you specific legal rights
and you may also have other rights which vary from state to state or province to
province.
To obtain warranty service, purchaser must present original bill of sale.
Components repaired or replaced are warranted through the remainder of the
original warranty period only. The defective components will be repaired or
replaced without charge, subject to the terms and conditions described above.
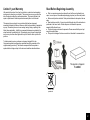
Read Before Beginning Assembly
Work in a spacious area and near where the unit will be used, preferably on a
carpet, or use a piece of the cardboard packaging to protect your floor and product.
Make sure all parts are included. Most parts are labeled or stamped on the raw
edge.
Read each step carefully. It is very important that each step of the instructions is
performed in the correct order. If these steps are not followed in sequence,
assembly difficulties will occur.
This product may contain small components. Please ensure that they are kept
away from small children.
This product is designed for home use and is not intended for commercial use.
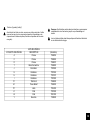
This product is shipped in
1 carton
1.5 hours
Do NOT use
powertools

3
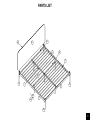
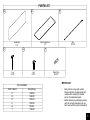
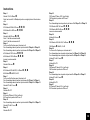
PARTS LIST
A
H
F1
J
J
L1
L2
C
P1
Y
G
I
D
T
A1

4
IMPORTANT:
Each part has unique part number.
Please reference the appropriate part
number when contacting customer
service for replacement parts.
Before throwing any packaging, please
verify all contents and make sure you
have received all the parts listed above!
Leg Cap
T393370
X 4
Leg Cap
T393370
X 4
Post
1 PC
Post
1 PC
Post
2 PCS
Side Rail
2 PCS Brace
2 PCS
Brace
1 PC Brace
1 PC
ADT
JHGI
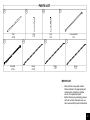
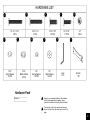
PARTS LIST
Connector Bar
1 PC
C

5
IMPORTANT:
Each part has unique part number.
Please reference the appropriate part
number when contacting customer
service for replacement parts.
Before throwing any packaging, please
verify all contents and make sure you
have received all the parts listed above!
P1
L1Y
L2
Slat
14 PCS
Leg
5 PCS
Plastic Plug
28 PCS
Leg
5 PCS
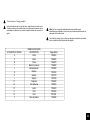
PART LABELS (Black&Gray)
F1 T992290
A1 T992300
P1 T951400
L1 T957390
L2 T957400
YT392590
PARTS LIST
PART NUMBERS
Headboard
1 PC
F1A1
Fabric Back Panel
1 PC

6
Please do not completely tighten all the hardware,
until the entire assembly is complete, unless
otherwise indicated in the step-by-step instructions.
The screw(s), bolt(s) to be used at each step are
shown in actual size in the lower right corner of the
page.
HARDWARE LIST
Hardware Pack
Black&Gray)
1/4" X 1 1/2"
2 PCS
2
5/16" X 7/8"
20 PCS
3
1/4" X 7/8"
17 PCS
89
4
67
1
10
11
1/4"
2 PCS
5/16"
Spring Washer
8 PCS
5/16"
Metal Washer
8 PCS
1/4"
Spring Washer
16 PCS
1/4"
Metal Washer
16 PCS
4mm
1 PC Wrench
1 PC
1/4" X 1 11/16"
6 PCS
5

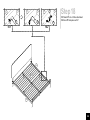
7
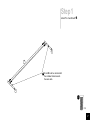
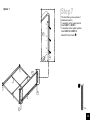
Step1
X 4
D
C
T
Attach T to C and D with .
3
C and D must be oriented with
the indicated holes towards
the same side.

8
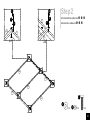
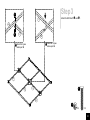
Step2
2.1 Attach H X 2 to J X 2 with , , .
2.2 Attach G to J X 2 with , , .
X 6
9
8
4
X 6
X 6
HJ
G
J
J
J
H
H
G
4
4
8
8
9
9
2.1 2.2

9
Step3
X 2
X 2
2
5
H
H
GI
I
H
IG
2
5
Note:Part I goes
under part H.
Note:Part I goes
above part G.
Attach I to H X 2 with and .

10
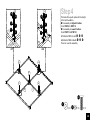
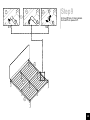
Step4
4
X 10
I
L1L1
G
GI
L1
L1L1
L1L1
9
8X 10
X 10
4444
8
8
88
9
9
9
9
4.1 4.2
This bed offers you 2 options for the height
of the bed foundation.
To assembly in Highest Position:
From STEP 4 to STEP 12.
To assembly in Lower Position:
From STEP 13 to STEP 21.
4.1 Attach L1 X 3 to I with , , .
4.2 Attach L1 X 2 to G with , , .
Then turn over the assembly.

11
Step5
4
X 1
GI
G
I
Attach G to I with .

AA AB
12
Step6
X 16
3
X 8
X 8 6
7
A
AJ
J
AA
J
J
3
3
3
6
6
7
7
6.1 6.2
C
D
6.1 Attach J X 2 to A X 2, C and D with ,
, .
6.2 Screw into A X 2, C and D.

AE
13
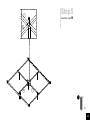
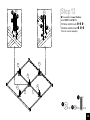
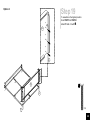
Step7
X 6
1
A
A
F1
F1
A
Option 1
This bed offers you two options of
headboard position:
To assemble in the lowest position:
From STEP 7 to STEP 9.
To assemble in the highest position:
From STEP 10 to STEP 12.
Attach F1 to A X 2 with .

14
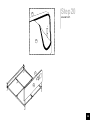
Step8
F1
A1
F1
A1
Attach A1 to F1.

15
Step9
Y
P1 P1 P1
J
J
P1
JJJ
9.1 9.2
9.1 Insert P1 into J X 2 as illustrated.
9.2 Lock P1 into place with Y.

AF
16
Step10
F1
A
A
A
F1
1
X 6
Option 2
To assemble in highest position:
From STEP 10 to STEP 12.
Attach F1 to A X 2 with .

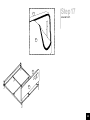
17
Step11
A1
F1
F1
A1
Attach A1 to F1.

18
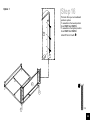
Step12
Y
P1 P1 P1
JJJ
12.1 12.2
12.1 Insert P1 into J X 2 as illustrated.
12.2 Lock P1 into place with Y.
J
J
P1

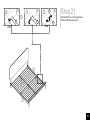
19
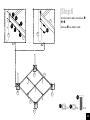
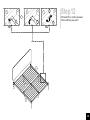
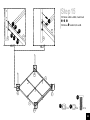
Step13
4
X 10
I
G
I
L2
G
L2
L2L2
L2
L2L2
9
8X 10
X 10
4
4
4
8
8
9
9
To assemble in Lower Position:
From STEP 13 to STEP 15.
13.1 Attach L2 X 3 to I with , , .
13.2 Attach L2 X 2 to G with , , .
Then turn over the assembly.

20
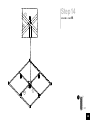
Step14
4
X 1
GI
G
I
Attach G to I with .
La page est en cours de chargement...
La page est en cours de chargement...
La page est en cours de chargement...
La page est en cours de chargement...
La page est en cours de chargement...
La page est en cours de chargement...
La page est en cours de chargement...
La page est en cours de chargement...
La page est en cours de chargement...
La page est en cours de chargement...
La page est en cours de chargement...
La page est en cours de chargement...
La page est en cours de chargement...
La page est en cours de chargement...
La page est en cours de chargement...
La page est en cours de chargement...
-
 1
1
-
 2
2
-
 3
3
-
 4
4
-
 5
5
-
 6
6
-
 7
7
-
 8
8
-
 9
9
-
 10
10
-
 11
11
-
 12
12
-
 13
13
-
 14
14
-
 15
15
-
 16
16
-
 17
17
-
 18
18
-
 19
19
-
 20
20
-
 21
21
-
 22
22
-
 23
23
-
 24
24
-
 25
25
-
 26
26
-
 27
27
-
 28
28
-
 29
29
-
 30
30
-
 31
31
-
 32
32
-
 33
33
-
 34
34
-
 35
35
-
 36
36


