Nilfisk Advenger x2805 305 sc ph Le manuel du propriétaire
- Catégorie
- Machine à plancher
- Taper
- Le manuel du propriétaire

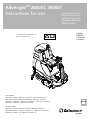
AdvengerTM 2800ST, 3400ST
Instructions for use
Active Models:
56601000 (2805D), 56601003 (2800D ST), 56601004 (3400D ST)
56601005 (X2805D), 56601006 (X3405D), 56601007 (X2805C)
56601011 (X2805D-C), 56601012 (X3405D-C), 56601013 (X2805C-C)
56601891 (X2805R-C), 56601892 (X2805R)
Obsolete Models:
56601001 (3405D), 56601002 (2805C), 56601008 (2805D-C)
56601009 (3405D-C), 56601010 (2805C-C), 56601019 (2800D-C ST)
56601020 (3400D-C ST), 56601022 (3400D-C ST)
12/2008 revised 1/2020 REV D
Form no. 56041735
Instructions for Use
Original Instructions
Instrucciones de uso
Manual de Utilização
Mode d’ emploi
A-English
B-Español
C-Português
D-Français


A-2 / ENGLISH
A-2 - FORM NO. 56041735 - Advenger™
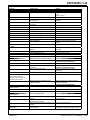
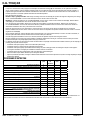
TABLE OF CONTENTS
Page
Introduction ........................................................................................... A-2
Cautions and Warnings ........................................................................ A-3
Know Your Machine .....................................................................A-4 – A-5
Control Panels .............................................................................A-6 – A-8
Prepare the Machine for Use
Install the Batteries ............................................................................... A-9
Install the Brushes ....................................................................A-10 - A-12
Install the Squeegee ........................................................................... A-13
Fill the Solution Tank .......................................................................... A-13
Detergent System ....................................................................A-14 – A-17
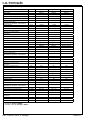
Operating the Machine
Operating the Machine (Disc & Cylindrical) ..............................A-18 - A-19
Wet Vacuuming ........................................................................A-18 - A-19
Operating the Machine (REV) ..................................................A-20 - A-21
Wet Vacuuming .................................................................................. A-21
Operating the Machine (ST) .....................................................A-22 - A-23
Wet Vacuuming ........................................................................A-22 - A-23
After Use ............................................................................................. A-24
Maintenance Schedule ....................................................................... A-24
Lubricating the Machine ..................................................................... A-25
Charging the Batteries (Wet) .............................................................. A-26
Check the Battery Water Level ...........................................................A-26
Charging the Batteries (Gel) ............................................................... A-26
Squeegee Maintenance ...................................................................... A-27
Squeegee Adjustment ........................................................................ A-27
Side Skirt Maintenance ....................................................................... A-28
Side Skirt Height Adjustment .............................................................. A-28
Troubleshooting .................................................................................. A-29
Technical Specifi cations ..................................................................... A-30
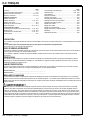
INTRODUCTION
This manual will help you get the most from your Advance Rider Scrubber. Read it thoroughly before operating the machine.
Note: Bold numbers in parentheses indicate an item illustrated on pages A-4 – A-8.
This product is intended for commercial use only.
PARTS AND SERVICE
Repairs, when required, should be performed by your Authorized Advance Service Center, who employs factory trained service personnel, and maintains an
inventory of Advance original replacement parts and accessories.
Call the ADVANCE DEALER named below for repair parts or service. Please specify the Model and Serial Number when discussing your machine.
MODIFICATIONS
Modifi cations and additions to the cleaning machine which affect capacity and safe operation shall not be performed by the customer or user without prior written
approval from Nilfi sk, Inc. Unapproved modifi cations will void the machine warranty and make the customer liable for any resulting accidents.
NAME PLATE
The Model Number and Serial Number of your machine are shown on the Nameplate on the machine. This information is needed when ordering repair parts for
the machine. Use the space below to note the Model Number and Serial Number of your machine for future reference.
MODEL NUMBER ______________________________________________________
SERIAL NUMBER ______________________________________________________
UNCRATE THE MACHINE
When the machine is delivered, carefully inspect the shipping packaging and the machine for damage. If damage is evident, save the shipping carton (if
applicable) so that it can be inspected. Contact the Advance Customer Service Department immediately to fi le a freight damage claim. Refer to the unpacking
instruction sheet included with the machine to remove the machine from the pallet.
WARNING!
The Products sold with this Manual contain or may contain chemicals that are known to certain governments (such as the State of California, as identifi ed in
its Proposition 65 Regulatory Warning Law) to cause cancer, birth defects or other reproductive harm. In certain locations (including the State of California)
purchasers of these Products that place them in service at an employment job site or a publicly accessible space are required by regulation to make certain
notices, warnings or disclosures regarding the chemicals that are or may be contained in the Products at or about such work sites. It is the purchaser’s
responsibility to know the content of, and to comply with, any laws and regulations relating to the use of these Products in such environments. The Manufacturer
disclaims any responsibility to advise purchasers of any specifi c requirements that may be applicable to the use of the Products in such environments.
revised 12/2015

ENGLISH / A-3
FORM NO. 56041735 - Advenger™ - A-3
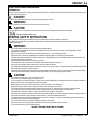
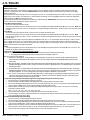
CAUTIONS AND WARNINGS
SYMBOLS
Advance uses the symbols below to signal potentially dangerous conditions. Always read this information carefully and take the necessary steps
to protect personnel and property.
DANGER!
Is used to warn of immediate hazards that will cause severe personal injury or death.
WARNING!
Is used to call attention to a situation that could cause severe personal injury.
CAUTION!
Is used to call attention to a situation that could cause minor personal injury or damage to the machine or other property.
Read all instructions before using.
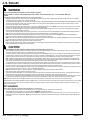
GENERAL SAFETY INSTRUCTIONS
Specifi c Cautions and Warnings are included to warn you of potential danger of machine damage or bodily harm.
This machine is for commercial use, for example in hotels, schools, hospitals, factories, shops and offi ces other than normal residential
housekeeping purposes.
WARNING!
* This machine shall be used only by properly trained and authorized persons.
* This machine is not intended for use by persons (including children) with reduced physical, sensory or mental capabilities, or lack of
experience and knowledge.
* While on ramps or inclines, avoid sudden stops. Avoid abrupt sharp turns. Use low speed down ramps.
* Keep sparks, fl ame and smoking materials away from batteries. Explosive gases are vented during normal operation.
* Charging the batteries produces highly explosive hydrogen gas. Charge batteries only in well-ventilated areas, away from open fl ame. Do
not smoke while charging the batteries.
* Remove all jewelry when working near electrical components.
* Turn the key switch off (O) and disconnect the batteries before servicing electrical components.
* Never work under a machine without safety blocks or stands to support the machine.
* Do not dispense fl ammable cleaning agents, operate the machine on or near these agents, or operate in areas where fl ammable liquids exist.
* Do not clean this machine with a pressure washer.
* Only use the brushes provided with the appliance or those specifi ed in the instruction manual. The use of other brushes may impair safety.
* Observe the Gross Vehicle Weight, GVW, of the machine when loading, driving, lifting or supporting the machine.
CAUTION!
* This machine is not approved for use on public paths or roads.
* This machine is not suitable for picking up hazardous dust.
* Do not use scarifi er discs and grinding stones. Advance will not be held responsible for any damage to fl oor surfaces caused by scarifi ers or
grinding stones (can also cause damage to the brush drive system).
* When operating this machine, ensure that third parties, particularly children, are not endangered.
* Before performing any service function, carefully read all instructions pertaining to that function.
* Do not leave the machine unattended without fi rst turning the key switch off (O), removing the key and applying the parking brake.
* Turn the key switch off (O) and remove the key, before changing the brushes, and before opening any access panels.
* Take precautions to prevent hair, jewelry, or loose clothing from becoming caught in moving parts.
* Use caution when moving this machine in below freezing temperature conditions. Any water in the solution, recovery or detergent tanks or in
the hose lines could freeze, causing damage to valves and fi ttings. Flush with windshield washer fl uid.
* The batteries must be removed from the machine before the machine is scrapped. The disposal of the batteries should be safely done in
accordance with your local environmental regulations.
* Do not use on surfaces having a gradient exceeding that marked on the machine.
* All doors and covers are to be positioned as indicated in the instruction manual before using the machine.
* This machine should only be used and stored indoors.
SAVE THESE INSTRUCTIONS
revised 2/2013

A-4 / ENGLISH
A-4 - FORM NO. 56041735 - Advenger™
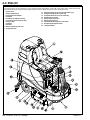
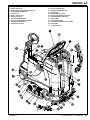
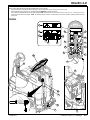
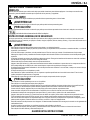
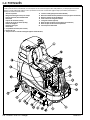
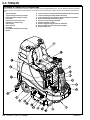
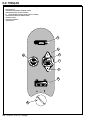
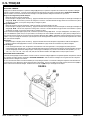
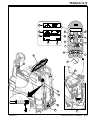
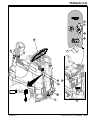
KNOW YOUR MACHINE
As you read this manual, you will occasionally run across a bold number or letter in parentheses - example: (2). These numbers refer to an item shown on these
pages unless otherwise noted. Refer back to these pages whenever necessary to pinpoint the location of an item mentioned in the text.
1 Operator’s Seat
2 Solution Tank Drain Hose
3 Drive Pedal, Directional/Speed
4 Drive Wheel
5 Drive Wheel Circuit Breaker (70 Amp)
6 Control Circuit Circuit Breaker (10 Amp)
7 Emergency Stop
8 Scrub Deck
9 Rear Wheel
10 Battery Compartment (under seat)
11 Squeegee Assembly
12 Detergent Cartridge Access Cover (EcoFlex models only)
13 Detergent Cartridge (EcoFlex models only)
14 Scrub Deck Raise/Lower Lever (ST models only)
15 Deck Skirt Removal Knobs
16 Battery Charger Access Door
17 Battery Charger (optional)
18 Seat Adjustment Knob (optional on ST models)
19 Deck Skirt Height Adjustment Knob
20 Front Roller Bumper
revised 2/13

ENGLISH / A-5
FORM NO. 56041735 - Advenger™ - A-5
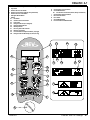
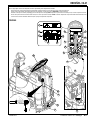
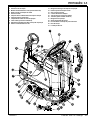
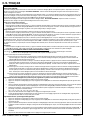
KNOW YOUR MACHINE
21 Solution Shutoff Valve
22 Squeegee Raise/Lower Lever (ST models only)
23 Steering Wheel Tilt Adjust Knob
24 Control Panel
25 Solution Tank Fill Cover
26 Recovery Tank Cover
27 Vacuum Motor Filter Housing
28 Strainer Basket (optional on ST models)
29 Recovery Tank Shutoff Float
30 Squeegee Storage Hook
31 Recovery Tank Drain Hose
32 Squeegee Tilt Adjustment Knob
33 Seat Prop-Rod
34 Machine Battery Connector
35 Rear Squeegee Blade Removal Latch
36 Hopper (Cylindrical models only)
37 Recovery Hose
38 Solution Solenoid Valve
39 Front Squeegee Blade Removal Thumb Nut
40 Solution Filter
41 Tie Down Locations
revised 5/11

A-6 / ENGLISH
A-6 - FORM NO. 56041735 - Advenger™
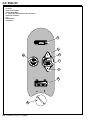
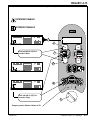
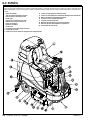
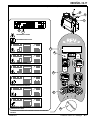
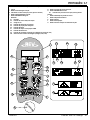
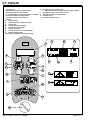
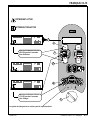
CONTROL PANEL (DISC & CYLINDRICAL MODELS)
A Key Switch
B Solution Increase Switch
C Solution ON/OFF Switch
C1 Solution Flow Indicators (Normal, Heavy & Extreme)
D Solution Decrease Switch
E Detergent ON/OFF Switch
F Display
F1 Hour Meter
F2 Solution Tank Level Indicator
F3 Fault Codes
F4 Detergent Indicator (if so equipped)
F5 Detergent Ratio Indicator
F6 Battery Indicator
F7 Recovery Tank FULL Indicator
F8 Battery Low Indicator
G Scrub Pressure Increase Switch
H Scrub ON/OFF Switch
H1 Scrub Pressure Indicators (Normal, Heavy and Extreme)
I Scrub Pressure Decrease Switch
J Burst of Power Switch
K Horn Switch
L Vacuum/Wand Switch
revised 2/13
A
C
B
C1
D
J
E
G
H
H1
I
K
L
F
F1 F2 F3
F4 F5 F6
F7
F8

ENGLISH / A-7
FORM NO. 56041735 - Advenger™ - A-7
A
B
C1
D
E
G
H
H1
I
K
L
FF1 F2
F3
F4
F5
F6
F7
F8
O
J
F10
F9
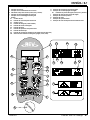
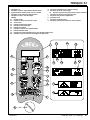
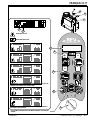
CONTROL PANEL (REV MODELS)
A Key Switch
B Solution ON / Increase Switch
C1 Solution Flow Indicators (Normal, Heavy & Extreme)
D Solution Decrease / OFF Switch
E Detergent ON/OFF Switch
F Display
F1 Hour Meter
F2 Solution Tank Level Indicator
F3 Fault Codes
F4 Detergent Indicator (if so equipped)
F5 Detergent Ratio Indicator
F6 Battery Indicator
F7 Recovery Tank FULL Indicator
F8 Battery Low Indicator
F9 Floor Finish Removal Speed Indicator (low, high)
F10 Detergent Indicator Bar Graph (off, weak, strong)
G Scrub Pressure Increase Switch
H Scrub ON/OFF Switch
H1 Scrub Pressure Indicators (Normal, Heavy and Extreme)
I Scrub Pressure Decrease Switch
J Burst of Power Switch
K Horn Switch
L Vacuum/Wand Switch
O Floor Finish Removal Mode Switch
revised 2/13

A-8 / ENGLISH
A-8 - FORM NO. 56041735 - Advenger™
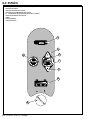
CONTROL PANEL (ST MODELS)
A Key Switch
B Solution Increase Switch
C Solution ON/OFF Switch
C1 Solution Flow Indicators (Normal, Heavy & Extreme)
D Solution Decrease Switch
K Horn
M Battery Indicator
N Fault Indicator
N
B
C
C1
D
A
K
M

ENGLISH / A-9
FORM NO. 56041735 - Advenger™ - A-9
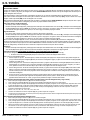
BATTERIES
If your machine shipped with batteries installed do the following:
Check that the batteries are connected to the machine (34).
Turn ON the Key Switch (A) and check the Battery Indicator (F6 or M). If the gauge is completely fi lled or the green light is ON, the batteries are ready for
use. If the gauge is less than full or the green light is OFF, the batteries should be charged before use. See the “Charging The Batteries” section.
IMPORTANT!: IF YOUR MACHINE HAS AN ONBOARD BATTERY CHARGER REFER TO THE OEM PRODUCT MANUAL FOR INSTRUCTIONS
REGARDING SETTING THE CHARGER FOR BATTERY TYPE.
If your machine shipped without batteries installed do the following:
Consult your Authorized Advance dealer for recommended batteries.
Install the batteries by following the instructions below.
DO NOT install two 12 volt batteries in your machine. This affects the stability of the machine.
IMPORTANT!: IF YOUR MACHINE HAS AN ONBOARD BATTERY CHARGER REFER TO THE OEM PRODUCT MANUAL FOR INSTRUCTIONS
REGARDING SETTING THE CHARGER FOR BATTERY TYPE.
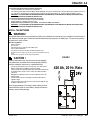
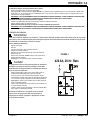
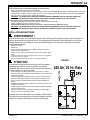
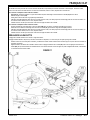
INSTALL THE BATTERIES
WARNING !
Use extreme caution when working with batteries. Sulfuric acid in batteries can cause severe injury if allowed to contact the skin or
eyes. Explosive hydrogen gas is vented from inside the batteries through openings in the battery caps. This gas can be ignited by
any electrical arc, spark or fl ame.
When Servicing Batteries...
* Remove all jewelry.
* Do not smoke.
* Wear safety glasses, a rubber apron and rubber gloves.
* Work in a well-ventilated area.
* Do not allow tools to touch more than one battery terminal at a time.
* ALWAYS disconnect the negative (ground) cable fi rst when replacing batteries to prevent
sparks.
* ALWAYS connect the negative cable last when installing batteries.
CAUTION !
Electrical components in this machine can be severely damaged
if the batteries are not installed and connected properly. Batteries
should be installed by Advance or by a qualifi ed electrician.
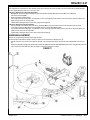
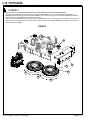
1 Turn the Key Switch (A) off (O) and remove the key. Then swing open the
Battery Compartment Cover (10) and set the Prop-Rod (33).
2 Using (2) people and an appropriate lifting strap, carefully lift the batteries into
the compartment tray exactly as shown. Refer to decal 56601416 battery
cable layout.
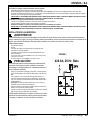
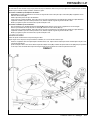
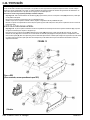
3 See Figure 1. Install battery cables as shown and tighten the nuts on the
battery terminals.
4 Install the battery boots and secure tightly to the battery cables with the
supplied tie straps.
5 Connect the battery pack connector to the machine connector (34) and close
the battery compartment cover.
When changing batteries or the charger, please contact your local
authorized service center for correct battery, charger and machine
settings to prevent battery damage.
FIGURE 1
420 Ah, 20 Hr. Rate
revised 11/12

A-10 / ENGLISH
A-10 - FORM NO. 56041735 - Advenger™
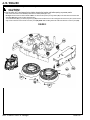
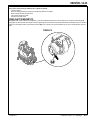
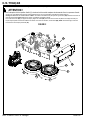
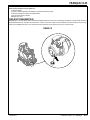
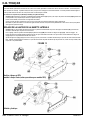
INSTALL THE BRUSHES (DISC SYSTEM)
CAUTION !
Turn the key switch off (O) and remove the key, before changing the brushes, and before opening any access panels.
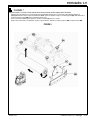
1 Make sure the Scrub Deck is in the RAISED position. Make sure the Key Switch (A) is off (O).
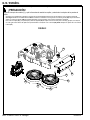
2 See Figure 2. Remove both side skirt assemblies. NOTE: The skirts are held in place by two large Knobs (AA). Loosen these knobs and slide the Skirt
Assemblies (AB) slightly forward and then off the Scrub Deck.
3 To mount the Brushes (AC) (or pad holders) align the Lugs (AD) on the brush with the holes on the mounting plate and turn to lock in place (turn the outside
edge of brush towards the front of machine as shown by arrow (AE)). NOTE: While scrubbing the brushes rotate in the direction as shown by arrow (AF).
FIGURE 2
revised 1/20

ENGLISH / A-11
FORM NO. 56041735 - Advenger™ - A-11
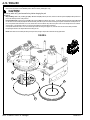
INSTALL THE BRUSHES (CYLINDRICAL SYSTEM)
CAUTION !
Turn the key switch off (O) and remove the key, before changing the brushes, and before opening any access panels.
1 Make sure the Scrub Deck is in the RAISED position. Make sure the Key Switch (A) is off (O).
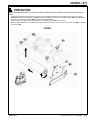
2 See Figure 3. Remove both side skirt assemblies. NOTE: The skirts are held in place by two large Knobs (BA). Loosen these knobs and then slide the Skirt
Assemblies (BB) off of the Scrub Deck.
3 Loosen the Black Knobs (BC) on top of the Idler Assemblies (BD) and remove the assembly
4 Slide the brush into the housing, lift slightly, push and turn until it seats. Re-install the Idler Assemblies (BD) and Skirt Assemblies (BB).
FIGURE 3
revised 11/12

A-12 / ENGLISH
A-12 - FORM NO. 56041735 - Advenger™
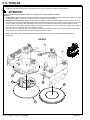
INSTALLING THE PADS (REV SYSTEM)
1 Make sure the Scrub Deck is in the RAISED position. Make sure the Key Switch (A) is off (O).
CAUTION !
Turn the key switch off (O) and remove the key, before changing the pad
See Figure 4.
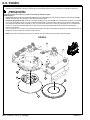
2 Daily Scrubbing: Slide a daily scrubbing pad (CD) or Microfi ber Pad (CA) under the pad driver, center it on the fi xed pad driver (CB) and lift it upwards and
press it onto the harpoon face of the pad driver.
3 Floor Finish Removal: Install a new red pad (CD) to the pad driver (CB) as described in step 2 above. If using the optional double sided Velcro (CE), attach
it to the center of maroon SPP pad (CC) and slide this assembly under the red pad and center it and then press upwards to attach this assembly to the red
pad. If the optional double sided Velcro is not used, install a new red as described in step 2 above and place a new maroon SPP pad on the fl oor centered
on the red pad. Lower the deck to the fl oor on top of the maroon SPP pad and check that it is centered.
If the optional double sided Velcro is not used: when the pad needs to be changed or fl ipped over, raise the scrub deck and remove both pads before
transporting the machine. This will prevent them from being run over.
NOTE: Never attach a maroon SPP pad directly to the pad driver, damage to the pad driver will result causing replacement.
FIGURE 4
CA
CB
CC
CE
CD
revised 2/13

ENGLISH / A-13
FORM NO. 56041735 - Advenger™ - A-13
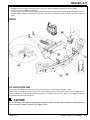
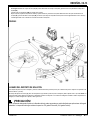
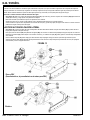
INSTALL THE SQUEEGEE
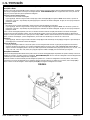
1 See Figure 5. Slide the Squeegee Assembly (11) onto the squeegee mount bracket and tighten the Squeegee Mount Thumb Nuts (AA).
2 Connect the Recovery Hose (AB) to the squeegee inlet.
3 Lower the squeegee, move the machine ahead slightly and adjust the squeegee tilt and height using the Squeegee Tilt Adjust Knob (32) and Squeegee
Height Wheel (AC) so that the rear squeegee blade touches the fl oor evenly across its entire width and is bent over slightly as shown in the squeegee cross
section.
FIGURE 5
FILL THE SOLUTION TANK
Read the cleaning chemical label and calculate the proper amount of chemical to mix for a tank that holds 28 US gallons (110 liters).
Open the Solution Tank Cover (2), then fi ll the tank 1/3 full of water, add the cleaning chemical, then fi ll up the tank the remainder of the way. NOTE: EcoFlex
machines can either be used conventionally with detergent mixed in the tank or the detergent system can be used. When using the detergent dispensing do not
mix detergent in the tank, plain water should be used.
CAUTION!
Use only low-foaming, non-fl ammable liquid detergents intended for automatic scrubber machine applications. Water temperature
should not exceed 130 degrees Fahrenheit (54.4 degrees Celsius).
revised 11/12

A-14 / ENGLISH
A-14 - FORM NO. 56041735 - Advenger™
DETERGENT SYSTEM PREPARATION AND USE (ECOFLEX)
COMMON INSTRUCTIONS:
Pressing and releasing the Detergent Switch (E) while the solution system is active will cause the detergent system to alternately turn on and off. The system
should be purged of previous detergent when switching to a different detergent. SERVICE NOTE: Move machine over fl oor drain before purging because a small
amount of detergent will be dispensed in the process.
To Purge When Changing Chemicals:
1 Disconnect and remove the detergent cartridge.
2 Turn the Key Switch (A) ON. Press and hold the Solution Switch (C) and the Detergent Switch (E) down for 3 seconds. NOTE: Once activated the purge
process takes 10 seconds. See illustration on next page for Detergent System indicators. Normally one purge cycle is adequate to purge the system.
To Purge Weekly:
1 Disconnect and remove the detergent cartridge. Install and connect a Cartridge fi lled with clean water.
2 Turn the Key Switch (A) ON. Press and hold Solution Switch (C) and the Detergent Switch (E) down for 3 seconds. NOTE: Once activated the purge
process takes 10 seconds. See illustration on next page for Detergent System indicators. Normally one purge cycle is adequate to purge the system.
When the Detergent Cartridge (13) is almost empty a Display Panel (F4) indicator will come on. The “Low Detergent” indicator will remain on until you reset the
system. Once this indicator comes on you should be able to simply pour an entire gallon bottle of detergent into the Cartridge to refi ll without worrying about
measuring. NOTE: Only reset the system when the cartridge is full. When switching cartridges, the “Low Detergent” indicator is only accurate if the replacement
cartridge is at the same level as the cartridge being replaced.
To Reset:
1 Turn the Key Switch (A) ON. Press and hold the Solution Increase Switch (B) and the Solution Decrease Switch (D) down for 3 seconds. See illustration on
next page for Detergent System indicators.
Detergent Ratio:
1 The detergent ratio is locked at 1:400, except while overriding the EcoFlex cleaning mode. The pre-programmed ratio that is used during EcoFlex override
can be adjusted. With the detergent system OFF, press and hold the Detergent ON/OFF Switch (E) for 2 seconds. The detergent indicator will fl ash and
each press of the switch will cycle through the available ratios (1:32, 1:50, 1:64, 1:100, 1:128, 1:150, 1:200, 1:256, 1:300, 1:400). Once the desired ratio is
displayed on the screen (F5), stop and it will lock in after 5 seconds.
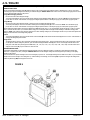
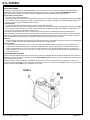
CARTRIDGE INSTRUCTIONS:
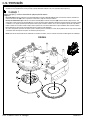
The Detergent Cartridge (13) is located behind the Detergent Cartridge Access Door (12) in the operator’s compartment. Fill the detergent cartridge with a
maximum of 1.25 gallons (4.73 Liters) of detergent. SERVICE NOTE: Remove the detergent cartridge from the detergent box prior to fi lling to avoid spilling
detergent on the machine.
It is recommended that a separate cartridge be used for each detergent you plan to use. The detergent cartridges have a white decal on them so you can write the
detergent name on each cartridge to avoid mixing them up. When installing a new cartridge, remove the Cap (AA) and place the cartridge in the detergent box.
Install the Dry Break Cap (BB) and detergent hose as shown.
FIGURE 6
revised 1/10

ENGLISH / A-15
FORM NO. 56041735 - Advenger™ - A-15
A
C
B
D
E
F
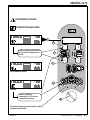
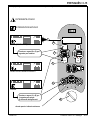
DETERGENT SYSTEM PREPARATION AND USE (ECOFLEX)
DETERGENT ENABLED
DETERGENT DISABLED
FULL (RESET)
Press and hold (B) & (D) for 3
seconds to Reset.
LOW DETERGENT
PURGE
Press and hold (C) & (E) for 3
seconds to Purge.
Detergent system is ON when indicator is ON.
revised 1/10

A-16 / ENGLISH
A-16 - FORM NO. 56041735 - Advenger™
DETERGENT SYSTEM PREPARATION AND USE (REV ECOFLEX)
COMMON INSTRUCTIONS:
The Detergent Cartridge (13) is located behind the Detergent Cartridge Access Door (12) in the operator’s compartment. Fill the detergent cartridge with a
maximum of 1.25 gallons (4.73 Liters) of detergent. SERVICE NOTE: Remove the detergent cartridge from the detergent box prior to fi lling to avoid spilling
detergent on the machine.
It is recommended that a separate cartridge be used for each detergent you plan to use. The detergent cartridges have a white decal on them so you can write the
detergent name on each cartridge to avoid mixing them up. When installing a new cartridge, remove the Cap (AA) and place the cartridge in the detergent box.
Install the Dry Break Cap (BB) and detergent hose as shown.
The system should be purged of previous detergent when switching to a different detergent. SERVICE NOTE: Move machine over fl oor drain before purging
because a small amount of detergent will be dispensed in the process.
To Purge When Changing Detergent:
1 Disconnect and remove the detergent cartridge.
2 Turn the Key Switch (A) ON. Press and hold the Solution ON / Increase Switch (B) and the Detergent ON/OFF Switch (E) down for 3 seconds. NOTE: Once
activated the purge process takes 10 seconds. See illustration on next page for Detergent System indicators. Normally one purge cycle is adequate to purge
the system.
To Purge Weekly:
1 Disconnect and remove the detergent cartridge. Install and connect a Cartridge fi lled with clean water.
2 Turn the Key Switch (A) ON. Press and hold the Solution ON / Increase Switch (B) and the Detergent ON/OFF Switch (E) down for 3 seconds. NOTE:
Once activated the purge process takes 10 seconds. See illustration on next page for Detergent System indicators. Normally one purge cycle is adequate to
purge the system.
When the Detergent Cartridge (13) is almost empty a Display Panel (F4) indicator will come on. The “Low Detergent” indicator will remain on until you reset the
system. Once this indicator comes on you should be able to simply pour an entire gallon bottle of detergent into the Cartridge to refi ll without worrying about
measuring. NOTE: Only reset the system when the cartridge is full. When switching cartridges, the “Low Detergent” indicator is only accurate if the replacement
cartridge is at the same level as the cartridge being replaced.
To Reset:
1 Turn the Key Switch (A) ON. Press and hold the Solution ON / Increase Switch (B) and the Solution Decrease / OFF Switch (D) down for 3 seconds. See
illustration on next page for Detergent System indicators.
Detergent Ratio (SCRUB AND SOLUTION SYSTEM MUST BE ON):
No detergent is dispensed until the scrub and detergent systems are activated and the Drive Pedal (3) is pushed forward.
The Detergent Ratio Indicator (F5) will always be displayed when the detergent system is on.
There are 4 modes of EcoFlex operation:
1. Chemical Free Cleaning Mode – During scrubbing, the detergent system can be turned off at any time to allow scrubbing with water only.
Press the Detergent Switch (E) until the Detergent Indicator is OFF and Detergent Indicator Bar Graph (F10) displays both left and right
boxes empty.
2. Weak Detergent Mode – Detergent Indicator ON, Detergent Indicator Bar Graph (F10) displays left box fi lled and right box empty. Pressing the
Detergent Switch (E) will cycle from weak to strong to OFF and back to weak in a repeating sequence. See below the steps “To program the
Weak Detergent Ratio”.
3. Strong Detergent Mode – Detergent Indicator ON, Detergent Indicator Bar Graph (F10) displays both left and right boxes fi lled. Pressing the
Detergent Switch (E) will cycle from weak to strong to OFF and back to weak in a repeating sequence. See below the steps “To program the
Strong Detergent Ratio”. Do not use a detergent level exceeding the detergent manufacturer’s recommendation.
4. Burst of Power – Press the Burst of Power Switch (J) to temporarily (1 minute) engage the strong detergent strength and increase both the
solution fl ow rate and brush pressure to the next available level. The Burst of Power Indicator will blink during this 1 minute interval, after
which all scrub parameters will return to their previous state.
To program the Strong Detergent Ratio (Always program the strong detergent strength fi rst and then the weak)
1. Press the OneTouch™ Scrub Switch (H) to activate the scrub system.
2. Press the Detergent Switch (E) until the Bar Graph (F10) displays Strong detergent (both left and right boxes fi lled).
3. Press and hold the Detergent Switch (E) again for 3 seconds to enter the programming mode. Once you have entered the strong detergent adjustment
mode the right box of (F10) will fl ash. Also the detergent ratio (F5) and indicator will begin to fl ash.
4. While the indicators are fl ashing, pressing and releasing the Detergent Switch (E) will cycle through the options. The ratio and it’s corresponding
percentage are displayed together.
Ratio = 1:32, 1:50, 1:64, 1:100, 1:128, 1:150, 1:200, 1:256, 1:300.
5. Once the desired ratio is displayed on the screen (F5), stop and it will save the setting after 3 seconds.
6. If the weak setting is currently set to a higher value than the new strong programmed setting, the software will automatically adjust the weak setting to
be one value weaker than the strong setting.
To program the Weak Detergent Ratio/Percentage
1. Press the OneTouch™ Scrub Switch (H) to activate the scrub system.
2. Press the Detergent Switch (E) until the Bar Graph (F10) displays Weak detergent (left box fi lled and right box empty).
3. Press and hold the Detergent Switch (E) again for 3 seconds to enter the programming mode. Once you have entered the weak detergent adjustment
mode the left box of (F10) will fl ash. Also the detergent ratio (F5) and indicator will begin to fl ash.
4. While the indicators are fl ashing, pressing and releasing the Detergent Switch (E) will cycle through the available options. The weak setting must be a
value weaker than or equal to the strong setting, so only the values that fall within that range will be displayed as you cycle through them.
5. Once the desired ratio is displayed on the screen (F5), stop and it will save the setting after 3 seconds.
revised 2/13

ENGLISH / A-17
FORM NO. 56041735 - Advenger™ - A-17
DETERGENT SYSTEM PREPARATION AND USE (REV ECOFLEX)
A
B
D
E
F
13
AA
BB
F10
F5
DETERGENT ENABLED
DETERGENT DISABLED
DETERGENT OFF
WEAK DETERGENT MODE
STRONG DETERGENT MODE
FULL (RESET) PRESS AND HOLD (B) & (D) FOR 3 SECONDS TO RESET.
LOW DETERGENT
PURGE PRESS AND HOLD (B) & (E) FOR 3 SECONDS TO PURGE.
DETERGENT SYSTEM IS ON WHEN INDICATOR IS ON.
revised 2/13

A-18 / ENGLISH
A-18 - FORM NO. 56041735 - Advenger™
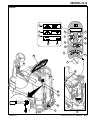
OPERATING THE MACHINE (DISC & CYLINDRICAL)
WARNING!
Be sure you understand the operator controls and their functions.
While on ramps or inclines, avoid sudden stops when loaded. Avoid abrupt sharp turns. Use low speed down hills.
To Scrub...
Follow the instructions in “preparing the machine for use” section of this manual.
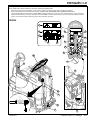
1 See Figure 7. While seated on the machine, adjust the steering wheel to a comfortable position using the Steering Wheel Tilt Adjust Knob (23). The seat can be adjusted if
necessary by tipping up the seat and using the adjustment knob (18).
2 Turn the Master Key Switch (A) ON (I). This will display the control panel indicator lights. Reference the Battery Condition Indicator (F6) and Hour Meter (F1) before proceeding.
3 To transport the machine to the work area, apply even pressure with your foot on the front of the Drive Pedal (3) to go forward or the rear of the pedal for reverse. Vary the
pressure on the foot pedal to obtain the desired speed.
4 Press and hold the Solution Switch (C) to pre-wet the fl oor, solution will be dispensed while the switch is held. NOTE: This will help prevent scarring of the fl oor surface when
starting to scrub with dry brushes. This must be done prior to pressing the Scrub ON Switch (H).
5 Press the Scrub ON/OFF Switch (H), the scrub deck and squeegee will automatically be lowered to the fl oor. The scrub, vacuum, solution and detergent (EcoFlex models)
systems all start when the Drive Pedal (3) is activated.
The scrub pressure will default to Normal (one scrub pressure indicator lit). Use the Scrub Pressure Increase Switch (G) and Scrub Pressure Decrease Switch (I) to change
between Normal, Heavy and Extreme Scrub modes. The solution fl ow rate will automatically adjust to coincide with the scrub pressure.
NOTE: The solution fl ow rate can be changed independently of the scrub pressure by pressing the Solution Increase Switch (B) or Solution Decrease Switch (D). Any
subsequent scrub pressure adjustments will reset the solution fl ow rate to correspond with the scrub pressure.
NOTE: The scrub, solution, vacuum and detergent (EcoFlex models) systems are automatically enabled when the Scrub ON/OFF Switch (H) is pressed. Any individual system
can be turned OFF or back ON by simply pressing its switch at any time during scrubbing.
NOTE: When operating the machine in reverse the squeegee automatically raises.
6 Begin scrubbing by driving the machine forward in a straight line at a normal walking speed and overlap each path by 2-3 inches (50-75 mm). Adjust the machine speed and
solution fl ow when necessary according to the condition of the fl oor.
CAUTION!
To avoid damaging the fl oor, keep the machine moving while the brushes are turning.
7 When scrubbing, check behind the machine occasionally to see that all of the waste water is being picked up. If there is water trailing the machine, you may be dispensing too
much solution, the recovery tank may be full, or the squeegee tool may require adjustment.
8 The machine defaults to the EcoFlex cleaning mode (Burst of Power Switch Indicator is lit GREEN) conserving solution and detergent. Press the Burst of Power Switch (J) to
override the EcoFlex cleaning mode and temporarily increase scrub pressure, solution fl ow and the detergent ratio. This will cause the indicator to fl ash yellow for one minute,
solution fl ow rate will increase to the next level, scrub pressure will increase to the next level and the detergent ratio will increase to the pre-programmed ratio.
NOTE: Pressing and holding the Burst of Power Switch (J) for 2 seconds disables the EcoFlex system. The only way to re-enable is to push the Burst of Power Switch (J)
again. Cycling the Key Switch (A) does not re-enable the system. The EcoFlex system will only function if the Scrub System (H) has been enabled. See “Detergent System
Preparation and Use (EcoFlex)” for more detailed information regarding the adjustment and use of the detergent system.
9 For extremely dirty fl oors, a one-pass scrubbing operation may not be satisfactory and a “double-scrub” operation may be required. This operation is the same as a one-pass
scrubbing except on the fi rst pass the squeegee is in the up position (press the Vacuum/Wand Switch (L) to raise the squeegee). This allows the cleaning solution to remain on
the fl oor to work longer. The fi nal pass is made over the same area, with the squeegee lowered to pick up the accumulated solution.
10 The recovery tank has a shut-off fl oat (29) that causes ALL systems to turn OFF except the drive system when the recovery tank is full. When this fl oat is activated, the recovery
tank must be emptied. The machine will not pick up water or scrub with the fl oat activated.
NOTE: All other indicators vanish and a “Recovery Tank FULL” Indicator (F7) appears on the Display Panel when the fl oat is activated.
11 When the operator wants to stop scrubbing or the recovery tank is full;
Press the Scrub ON/OFF Switch (H) once. This will automatically stop the scrub brushes and solution fl ow and the scrub deck will raise up. The squeegee will raise up after a
brief delay and the vacuum will stop after a brief delay (this is to allow any remaining water to be picked up without turning the vacuum back on).
12 Drive the machine to a designated waste water “DISPOSAL SITE” and empty the recovery tank. To empty, pull the Drain Hose (31) from its rear storage area, then unscrew the
cap (hold the end of the hose above the water level in the tank to avoid sudden, uncontrolled fl ow of waste water). Refi ll the solution tank and continue scrubbing.
NOTE: Make sure the Recovery Tank Cover (26) and the Recovery Tank Drain Hose (31) cap are properly seated or the machine will not pick-up water correctly.
When the batteries require recharging the Battery LOW Indicator (F8) will come on. Then the scrub brushes and solution fl ow will stop and the scrub deck will raise up. The squeegee
will raise up after a brief delay and the vacuum will stop after a brief delay. Transport the machine to a service area and recharge the batteries according to the instructions in the
Battery section of this manual.
WET VACUUMING
Steps to follow in fi tting the machine with optional attachments for wet vacuuming.
1 Disconnect the Recovery Hose (37) from the Squeegee (11). Connect the coupler and hose from the wand kit to the recovery hose.
2 Attach suitable wet pick-up tools to the hose. (An optional Wand Kit PN56601087 is available from Advance).
3 Turn the Master Key Switch (A) ON and press the Wand Switch (L). NOTE: The operator cannot be in the seat for the vacuum motor to run on. The vacuum motor will run
continuously until the switch is pressed again. NOTE: The “Recovery Tank FULL” indicator is disabled when the wand mode is activated. The fl oat will stop the fl ow into the
recovery tank.
revised 2/13

ENGLISH / A-19
FORM NO. 56041735 - Advenger™ - A-19
3
18
37
26
29
31
11
23
G
H
I
L
A
J
D
C
B
F
F7
F8
F1
F5 F6
E
revised 2/13
FIGURE 7
La page est en cours de chargement...
La page est en cours de chargement...
La page est en cours de chargement...
La page est en cours de chargement...
La page est en cours de chargement...
La page est en cours de chargement...
La page est en cours de chargement...
La page est en cours de chargement...
La page est en cours de chargement...
La page est en cours de chargement...
La page est en cours de chargement...
La page est en cours de chargement...
La page est en cours de chargement...
La page est en cours de chargement...
La page est en cours de chargement...
La page est en cours de chargement...
La page est en cours de chargement...
La page est en cours de chargement...
La page est en cours de chargement...
La page est en cours de chargement...
La page est en cours de chargement...
La page est en cours de chargement...
La page est en cours de chargement...
La page est en cours de chargement...
La page est en cours de chargement...
La page est en cours de chargement...
La page est en cours de chargement...
La page est en cours de chargement...
La page est en cours de chargement...
La page est en cours de chargement...
La page est en cours de chargement...
La page est en cours de chargement...
La page est en cours de chargement...
La page est en cours de chargement...
La page est en cours de chargement...
La page est en cours de chargement...
La page est en cours de chargement...
La page est en cours de chargement...
La page est en cours de chargement...
La page est en cours de chargement...
La page est en cours de chargement...
La page est en cours de chargement...
La page est en cours de chargement...
La page est en cours de chargement...
La page est en cours de chargement...
La page est en cours de chargement...
La page est en cours de chargement...
La page est en cours de chargement...
La page est en cours de chargement...
La page est en cours de chargement...
La page est en cours de chargement...
La page est en cours de chargement...
La page est en cours de chargement...
La page est en cours de chargement...
La page est en cours de chargement...
La page est en cours de chargement...
La page est en cours de chargement...
La page est en cours de chargement...
La page est en cours de chargement...
La page est en cours de chargement...
La page est en cours de chargement...
La page est en cours de chargement...
La page est en cours de chargement...
La page est en cours de chargement...
La page est en cours de chargement...
La page est en cours de chargement...
La page est en cours de chargement...
La page est en cours de chargement...
La page est en cours de chargement...
La page est en cours de chargement...
La page est en cours de chargement...
La page est en cours de chargement...
La page est en cours de chargement...
La page est en cours de chargement...
La page est en cours de chargement...
La page est en cours de chargement...
La page est en cours de chargement...
La page est en cours de chargement...
La page est en cours de chargement...
La page est en cours de chargement...
La page est en cours de chargement...
La page est en cours de chargement...
La page est en cours de chargement...
La page est en cours de chargement...
La page est en cours de chargement...
La page est en cours de chargement...
La page est en cours de chargement...
La page est en cours de chargement...
La page est en cours de chargement...
La page est en cours de chargement...
La page est en cours de chargement...
La page est en cours de chargement...
La page est en cours de chargement...
La page est en cours de chargement...
La page est en cours de chargement...
La page est en cours de chargement...
La page est en cours de chargement...
La page est en cours de chargement...
La page est en cours de chargement...
La page est en cours de chargement...
La page est en cours de chargement...
La page est en cours de chargement...
La page est en cours de chargement...
La page est en cours de chargement...
-
 1
1
-
 2
2
-
 3
3
-
 4
4
-
 5
5
-
 6
6
-
 7
7
-
 8
8
-
 9
9
-
 10
10
-
 11
11
-
 12
12
-
 13
13
-
 14
14
-
 15
15
-
 16
16
-
 17
17
-
 18
18
-
 19
19
-
 20
20
-
 21
21
-
 22
22
-
 23
23
-
 24
24
-
 25
25
-
 26
26
-
 27
27
-
 28
28
-
 29
29
-
 30
30
-
 31
31
-
 32
32
-
 33
33
-
 34
34
-
 35
35
-
 36
36
-
 37
37
-
 38
38
-
 39
39
-
 40
40
-
 41
41
-
 42
42
-
 43
43
-
 44
44
-
 45
45
-
 46
46
-
 47
47
-
 48
48
-
 49
49
-
 50
50
-
 51
51
-
 52
52
-
 53
53
-
 54
54
-
 55
55
-
 56
56
-
 57
57
-
 58
58
-
 59
59
-
 60
60
-
 61
61
-
 62
62
-
 63
63
-
 64
64
-
 65
65
-
 66
66
-
 67
67
-
 68
68
-
 69
69
-
 70
70
-
 71
71
-
 72
72
-
 73
73
-
 74
74
-
 75
75
-
 76
76
-
 77
77
-
 78
78
-
 79
79
-
 80
80
-
 81
81
-
 82
82
-
 83
83
-
 84
84
-
 85
85
-
 86
86
-
 87
87
-
 88
88
-
 89
89
-
 90
90
-
 91
91
-
 92
92
-
 93
93
-
 94
94
-
 95
95
-
 96
96
-
 97
97
-
 98
98
-
 99
99
-
 100
100
-
 101
101
-
 102
102
-
 103
103
-
 104
104
-
 105
105
-
 106
106
-
 107
107
-
 108
108
-
 109
109
-
 110
110
-
 111
111
-
 112
112
-
 113
113
-
 114
114
-
 115
115
-
 116
116
-
 117
117
-
 118
118
-
 119
119
-
 120
120
-
 121
121
-
 122
122
-
 123
123
-
 124
124


Nilfisk Advenger x2805 305 sc ph Le manuel du propriétaire
- Catégorie
- Machine à plancher
- Taper
- Le manuel du propriétaire