afx light IPAR 518 Le manuel du propriétaire
- Catégorie
- Projecteurs
- Taper
- Le manuel du propriétaire
Ce manuel convient également à

© Copyright LOTRONIC 2013 IPAR-518 Page 1
O
O
U
U
T
T
D
D
O
O
O
O
R
R
L
L
E
E
D
D
P
P
R
R
O
O
J
J
E
E
C
C
T
T
O
O
R
R
P
P
R
R
O
O
J
J
E
E
C
C
T
T
E
E
U
U
R
R
A
A
L
L
E
E
D
D
S
S
E
E
X
X
T
T
E
E
R
R
I
I
E
E
U
U
R
R
E
E
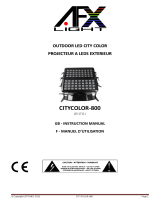
IPAR518
(15-1662 )
GB‐INSTRUCTIONMANUAL
F‐MANUELD’UTILISATION

© Copyright LOTRONIC 2013 IPAR-518 Page 2
Thankyou forhavingchosen our AFXLIGHTOUTDOORLEDPROJECTOR.Foryourown safety,pleasereadthisusermanual
carefully beforeinstallingthedevice.
SAFETYINTRODUC TION
If thedevicehas been exposed totemperature changes due to environmental changes,do not switchit on immediately.
Thearisingcondensation
coulddamagethedevice.Leavethedeviceswitchedoffuntilithasreachedroomtemperature.
Itisessentialthatthedeviceisearthed.Aqualifiedpersonmustcarryouttheelectricconnection.
Makesurethattheavailablevoltageisnothigherthanstatedattheendofthis
manual.
Makesurethe powercordisnevercrimpedordamaged.Ifitisdamaged,askyour dealer orauthorizedagent toreplace
thepowercord.
Alwaysdisconnectfromthemains,whenthedeviceisnotinuseorbeforecleaningit.Onlyhand le thepowercordbyplug.
Neverpullouttheplugbytuggingthepowercord.
DISCONNECT DEVICE: Where the MAINS plug or an appliance coupler is used as the disconnect device, the disconnect
deviceshallremainreadilyoperable.
Shields, lensesor ultravioletscreens shall be changed if they havebecome visibly damaged to
such an extentthat their
eff ectivenessisimp aired,forexamplebycracksordeepscratches.
CAUTION:
1. Be very careful during installation. Since you will be working with a dangerous voltage you can suffer a lif e‐threatening
electricshockwhentouchinglivewired.
2.Neverlookdirectlyintothelight
source,assensitivepersonsmaysufferanepilepticshock.
3.Pleasebeawarethatdamagescaused bymanualmodificationstothedevicearenotsubjecttowarranty.Keepawayfrom
childrenandnon‐professionals.
4. The light doesn’t include any spare parts for repair, please check if all the parts are
well installed and screws are fitted
tightlybeforeoperating.Donotusethelightwhenthecoverisopen.
GENERALGUIDELINES
Thisdeviceisonlyallowedtobeoperatedwithanalternatingcurrentofmax.100‐240VACandwasdesignedforindooruse
only.
Donotshakethe
device.Avoidbruteforcewheninstallingoroperatingit.
Whenchoosing theinstallationspot,pleasemakesurethatthedeviceisnotexposedto extremeheat,moistureor dust.
Theminimumdistancebetweenlight‐outputfromtheprojectorandtheilluminatedsurfacemustbemorethan1meter.
Keepa
distancetoanyflammableobjectsofatleast5m.
Operate the device only after having familiarized yourself with its functions. Do not permit operation by person not
qualifiedforoper atingthedevice.Mostdamagesaretheresultofunprofessionaloperation.
Pleaseusetheoriginalpackagingifthedevice
istobetransported.
Forsafetyreasons,pleasebeawarethatallmodificationsonthedeviceareforbidden.Furthermore,anyotheroperation
may lead to short‐circuit, burns, electric shock, lamp explosion, crash, etc. If this device will be operated in any way
differenttotheonedescribedinthis
manual,theproductmaysufferdamagesandtheguaranteebecomesvoid.
GB

© Copyright LOTRONIC 2013 IPAR-518 Page 3
MOUNTING
Orientation
Thisfixturemaybemountedinanyposition,providedthereisadequateroomforventilation
Whenselectinginstallationlocation,takeintoconsiderationlampreplacementaccessandroutinemaintenance.
Safetycablesmustalwaysbeused.
Never mountin placeswherethefixturewill beexposed to rain, high humidity,extreme
temperaturechangesor restricted
ventilation.
Iftheexternalflexiblecableorcordofthislightisdamaged,itshallbeexclusivelyreplacedbythemanufacturerorhisservice
agentorasimilarqualifiedpersoninordertoavoidahazard.
Makesuretheinstallationpositionisstablebeforeyoufix
thelight.Whenthelightisreversehanging,makesurethelightwill
notfallfromthetruss,usethesafetycablegothroughthetrussandbracketofthelightasasupporting,toavoidthelightto
fall down.Thereisno entrancetothe work areaduring mounting.
Periodicallycheckif thesafetycablehas frettedawayor
clampisloosened.Wewillnottakeanyresponsibilityfordamagescausedbyabadlyinstalledunit.
PowerSupplyandSignalCableConnection
1.MainsPowerconnection
The exclusive plug should be used between the connection of unit and power.
Please ensure that the rated voltage and
frequencyareaccordancewiththepowersupply.Therequiredinputvoltageandfrequencyare:100‐240VAC
Wesuggestthateverylighthasanindependentswitchsothatyoucanturnonorturnoffthelightrandomly.
Note:thegroundwire(yellow/greendouble‐color
wire)mustbesafelyconnected,theelectricalinstallationmustbein
accordancewiththerelatedstandards
CAUTION:Wheninstallingthedevice,makesurethereisnohighlyinflammablematerialwithinadistanceofmin.5m!
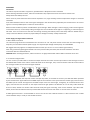
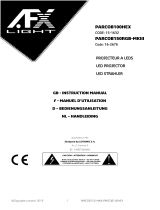
2.ConnectionofSignalCable
Youcanusethe3‐pinXLRcabletoconnectthe
outputsocketofthemaster andthe inputsocketoftheslavelight.Connect
theDIGITALOUTsocketofthemasterandtheINsocketoftheslavelight,then,connecttheOUTsockettotheINsocketof
thenextlight.Ordinaltoconnectallthelightsasbelow:
IN
OUT
IN
OUT OUT
IN
12 3
Theconnectionbetweentheoutputofmasterandinputofproduct,it’savailabletousethe3pinsXLRcablewhichprovided
bythemanufacturer.SignalcablefromtheDMXoutputofthecontrollertotheinputofthefirstmasterlight,andconnectto
the DMX input of second
slave light fromthe DMX output of the firstmaster light, analogously, tillconnected all the slave
lights, and insert the last connector to the output of the final light. (Notice: the diameterof core of every cable should be
0.5mm at least, double core shelter cable should be used).The signal
connecting must use the attached 3 pins XLR cable.
Notice,alltheinternalleadwireofthe3pinsXLRcableshouldnottouchtoeachotherorconnecttotheconnector.
A DMX signal terminator is recommended on the last unit of the chain. DMX terminator is a XLR
connector with a 120Ω
resistorbetweenthepin2andpin3oftheXLRconnector

© Copyright LOTRONIC 2013 IPAR-518 Page 4
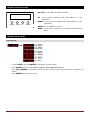
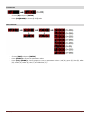
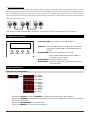
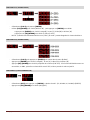
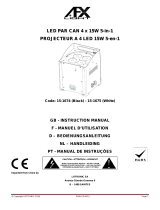
INSTRUCTIONOFBUTTONS
MENUENTERUPDOWN
DESCRIPTIONOFMENU
STATFUNCTION
‐ Choose [STAT] and press [ENTER] to “stat mode” ( manual mode )
‐ Press [ENTER] to choose : [Red], [Green], [Blue], [Amber], [White], [Strobe]
‐ Press [UP] / [DOWN] to choose the value ( 0 to 255 for level of each color and 0 to 20 for frequency of
strobe )
‐ Press [MENU] back to the main menu
Key code : UP, DOWN, UP, DOWN + ENTER
UP : Use to choose operating mode, DMX address or to set
parameters
DOWN : Use to choose operating mode, DMX address or to set
parameters
ENTER : Use to validate your choice
MENU : Use to select a function or to come back to the previous
menu

© Copyright LOTRONIC 2013 IPAR-518 Page 5
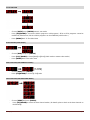
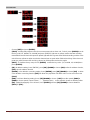
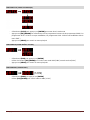
AUTOFUNCTION
‐ Choose [AUTO] press [ENTER] toenter I auto mode
‐ Press [UP]/[DOWN] to choose the built-in program or edit program ( AT01 to AT10 programs cannot be
modified by edit function / PR01 to PR10 programs can be modified by edit function )
‐ Press [MENU] Back To The Main Menu
RUNFUNCTION(DMX&M/S)
‐ Choose [RUN] and press [ENTER]
‐ Press [UP] / [DOWN] to choose [DMX] or [SLAV] ( DMX mode or master-slave mode )
‐ Press [MENU] back to the main menu
DMXFUNCTION(DMXADDRESSSET TING)
‐ Choose [DMX] press [ENTER]
‐ Press [UP]/[DOWN] to choose [1~512] value
PERSFUNCTION(DMXOPERATINGMODE)
‐ Choose [PERS] and press [ENTER]
‐ Press [UP]/[DOWN] to choose the dmx channel modes, (for details, please check on the dmx channels on
the following)

© Copyright LOTRONIC 2013 IPAR-518 Page 6
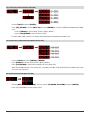
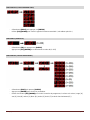
IDFUNCTION
‐ Choose [ID] and press [ENTER]
‐ Press [UP]/[DOWN] to choose [1~255] value
EDITFUNCTION
‐ Choose [EDIT] and press [ENTER]
‐ Press [ENTER] to choose the parameter values
‐ Press [UP] / [DOWN] to choose program, scene or parameters values ( red [R), green [G], blue [B], white
[W], amber [A], strobe [S], time [T] and fade time [F] )

© Copyright LOTRONIC 2013 IPAR-518 Page 7
SETFUNCTION
‐ Choose [SET] and press [ENTER]
‐ [UPLD] : sending edit program value from current master unit to slave unit : To do it, press [ENTER] then do
the key code [UP, DOWN, UP, DOWN] and press [ENTER], light turn to yellow, means data was sending
meanwhile there will show the speed of upload, light will turn to green when finished sending, and the slave
unit will turn to yellow too when receive the data,and turn to green when finished receiving. if the slave unit
protect to yellow,it means fail receiving, please cut off the power and receive again.
‐ [REST] : To load the factory setup. Press [ENTER] and do the key code : [UP, DOWN, UP, DOWN] then
press [ENTER]
‐ [ID] : ID address setting, Press [ENTER], press [UP] / [DOWN] to choose [ON] to allow ID address function,
[OFF] close ID address function
‐ [RGBW] : color deviation correcting setting, Press [ENTER], press [UP] /[DOWN] to choose [ON] to allow
color deviation correcting function,[OFF] not allow. the proportion of RGBW colors can be set in the menu
[CAL2]
‐ [DIM] : non-linear dimming setting, Press [UP] /[DOWN] to choose : [OFF] close dim speed, [DIM1] to
[DIM9] to choose speed ( speed 1 (fast ), ….., speed94 (slow), as the speed is slower as dimming softer.
‐ [DV] : Digital photography color choosen, Press [ENTER], and use [UP] /[DOWN] to choose between
[NTSC] or [PAL]

© Copyright LOTRONIC 2013 IPAR-518 Page 8
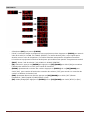
CAL1FUNCTION(WHITEBALANCEFUNCTION)
‐ Choose [CAL1] and press [ENTER]
‐ Press [UP] /[DOWN] to choose [WT1~11] then press [ENTER] to set up to 11 different temperature of white
color
o Press [ENTER] to choose [Red], [Green], [Blue], [White]
o Press [UP] /[DOWN] to choose value [0~255]
‐ In STAG DMX mode, channel 7 is used to select between 11 temperature of white color
CAL2FUNCTION(COLORDEVIATIONCORRECTINGSETTING)
‐ Choose [CAL2] then press [ENTER] to [RGBW]
‐ Press [ENTER] to choose [Red], [Green], [Blue], [White]
‐ Press [UP] /[DOWN] to choose the proportion of colors [128~255]
‐ When the RGBW function is on ( menu SET ) and when on DMX RGB =255,255,255, the white color is the
one set in CAL2 function
KEYFUNCTION(PROTECTIONKEYSETTING)
‐ Choose [KEY] then press [ENTER] ; The key code is [UP, DOWN, UP, DOWN] and press [ENTER]
‐ Press [UP] /[DOWN] to choose [ON] or [OFF]

© Copyright LOTRONIC 2013 IPAR-518 Page 9
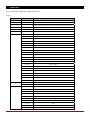
DMXCHANNELTABLE
5 kindDMXchannelmode:[STAG],[AR2.d],[ARC.3],[AR3.d],[HSV]
‐ STAGCHANNELMODE
CHANNEL VALUE FUNCTION
1 0-255 MASTER DIMMING
2 0-255
RED(when CH9 as PR01~10,CH2 control TIME)
3 0-255
GREEN(when CH9 as PR01~10,CH3 control FADE)
4 0-255 BLUE
5 0-255 WHITE
6 0-255 AMBER
7 0-9 COLOR MACRO ( NO FUNCTION )
10-29 RED 100% / GREEN UP / BLUE 0%
30-49 RED DOWN / GREEN 100% / BLUE 0%
50-69 RED 0% / GREEN 100% / BLUE UP
70-89 RED 0% / GREEN 100% / BLUE UP
90-109 RED UP / GREEN 0% / BLUE 100%
110-129 RED 100% / GREEN 0% / BLUE DOWN
130-149 RED 100% / GREEN 0% / BLUE UP
150-169 RED DOWN / GREEN DOWN / BLUE 100%
170-200 RED 100% / GREEN 100% / BLUE 100% / WHITE 100%
201-205 WHITE ( 3200K )
206-210 WHITE ( 3400K )
211-215 WHITE ( 4200K )
216-220 WHITE ( 4900K )
221-225 WHITE ( 5600K )
226-230 WHITE ( 5900K )
231-235 WHITE ( 6500K )
236-240 WHITE ( 7200K )
241-245 WHITE ( 8000K )
246-250 WHITE ( 8500K )
251-255 WHITE ( 10000K )
8 0~9 NO STROBE
10~255
SPEED OF STROBE(255 faster)
9 0~40 NO FUNCTION
41-70 Auto 1 ( edit )
71-80 Auto 2
81-90 Auto 3
91-100 Auto 4
101-110 Auto 5
111-120 Auto 6
121-130 Auto 7
131-140 Auto 8
141-150 Auto 9
151-160 Auto 10

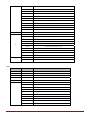
© Copyright LOTRONIC 2013 IPAR-518 Page 10
161-170 Prog 1
171-180 Prog 2
181-190 Prog 3
191-200 Prog 4
201-210 Prog 5
211-220 Prog 6
221-230 Prog 7
231-240 Prog 8
241-250 Prog 9
251-255 Prog 10
10 0~255 Adjust Speed of Build-in program
11 0-24 Linear dimming speed ( Dim=Off )
25-49 Non linear dimming speed ( Dim=1)
50-74 Non linear dimming speed ( Dim=2)
75-99 Non linear dimming speed ( Dim=3)
100-124 Non linear dimming speed ( Dim=4)
125-149 Non linear dimming speed ( Dim=5)
150-174 Non linear dimming speed ( Dim=6)
175-199 Non linear dimming speed ( Dim=7)
200-224 Non linear dimming speed ( Dim=8)
225-255 Non linear dimming speed ( Dim=9)
12 0 Whole ID address controlled
1-255 The same ID address controlled
‐ AR2.dCHANNELMODE
CHANNEL VALUE FUNCTION
1 0-255 MASTER DIMMER
2 0-255 RED
3 0-255 GREEN
4 0-255 BLUE
5 0-255 WHITE
6 0-24 Linear dimming speed ( Dim=Off )
25-49 Non linear dimming speed ( Dim=1)
50-74 Non linear dimming speed ( Dim=2)
75-99 Non linear dimming speed ( Dim=3)
100-124 Non linear dimming speed ( Dim=4)
125-149 Non linear dimming speed ( Dim=5)
150-174 Non linear dimming speed ( Dim=6)
175-199 Non linear dimming speed ( Dim=7)
200-224 Non linear dimming speed ( Dim=8)
225-255 Non linear dimming speed ( Dim=9)

© Copyright LOTRONIC 2013 IPAR-518 Page 11
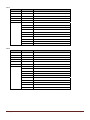
‐ ARC.3CHANNELMODE
CHANNEL VALUE FUNCTION
1 0-255 RED
2 0-255 GREEN
3 0-255 BLUE
4 0-255 WHITE
5 0-255 AMBER
6 0-24 Linear dimming speed ( Dim=Off )
25-49 Non linear dimming speed ( Dim=1)
50-74 Non linear dimming speed ( Dim=2)
75-99 Non linear dimming speed ( Dim=3)
100-124 Non linear dimming speed ( Dim=4)
125-149 Non linear dimming speed ( Dim=5)
150-174 Non linear dimming speed ( Dim=6)
175-199 Non linear dimming speed ( Dim=7)
200-224 Non linear dimming speed ( Dim=8)
225-255 Non linear dimming speed ( Dim=9)
‐ AR3.dCHANNELMODE
CHANNEL VALUE FUNCTION
1 0~255 MASTER DIM
2 0-255 RED
3 0-255 GREEN
4 0-255 BLUE
5 0-255 WHITE
6 0-255 AMBER
7 0-24 Linear dimming speed ( Dim=Off )
25-49 Non linear dimming speed ( Dim=1)
50-74 Non linear dimming speed ( Dim=2)
75-99 Non linear dimming speed ( Dim=3)
100-124 Non linear dimming speed ( Dim=4)
125-149 Non linear dimming speed ( Dim=5)
150-174 Non linear dimming speed ( Dim=6)
175-199 Non linear dimming speed ( Dim=7)
200-224 Non linear dimming speed ( Dim=8)
225-255 Non linear dimming speed ( Dim=9)

© Copyright LOTRONIC 2013 IPAR-518 Page 12
‐ HSVCHANNELMODE
CHANNEL VALUE FUNCTION
1 0~255 H hue(0~100%)
2 0~255 S saturation (0~100%)
3 0~255 V brightness(0~100%)
4 0-24 Linear dimming speed ( Dim=Off )
25-49 Non linear dimming speed ( Dim=1)
50-74 Non linear dimming speed ( Dim=2)
75-99 Non linear dimming speed ( Dim=3)
100-124 Non linear dimming speed ( Dim=4)
125-149 Non linear dimming speed ( Dim=5)
150-174 Non linear dimming speed ( Dim=6)
175-199 Non linear dimming speed ( Dim=7)
200-224 Non linear dimming speed ( Dim=8)
225-255 Non linear dimming speed ( Dim=9)
Thefollowingpointshavetobeconsideredduringtheinspection:
Allscrewsforinstallingthedevicesorpartsofthedevicehavetobetightlyconnect edandmustnotbecorroded.
Theremustnotbeanydeformationsonthehousing,glasspane,fixationsandinstallationspots.
Theelectricpowersupplycables
mustnotshow anydamage,materialfatigueorsediments.Furtherinstructionsdepending
ontheinstallationspotandusagehavetobeadheredtobyaskilledinstallerandanysafetyproblemshavetoberemoved.
Werecommendafrequentcleaningofthedevice.Pleaseuseamoist,lint‐freecloth.
Neverusealcoholorsolvents.
CAUTION:Disconnectfrommainsbeforestartingmaintenanceopera tion!
CleaningandUsingFrequencyofProduct
Please make sure that the light is power off before dismantling or maintaining, it’s very important to keep the light clean.
Frequent cleaning will ensure maximum brightness output, but also prolong
the life time. It’s suggested to use the high
quality,professionalglassdetergentandsoftclothtocleanthelight.It’snotallowedtousealcoholorchemicalsolvent.The
innerpartofthelightshouldbecleanedbyvacuumcleaneratleastonceayear.
Whenthelightdoesn’twork,
pleasecheckifthefuseisburntoutornot.Ifitis,thesamefuseshouldbereplaced,findout
thefaultyandrestartthelight.Butpleasenotetherepairmustbehandledbyprofessional.
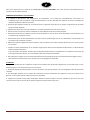
TECHNICALSPECIFICATIONS
DMXChannels:...........................................................................................................................4/12
Beamangle:....................................................................................................................................25°
Control
mode:...........................................................................................Auto,Master/Slave,DMX
LEDpower:...........................................................................................18x15WRGBAWLEDs5‐in‐1
Lifetimeled...................................................................................................................50000hours
IPnorm:…………………………………………………………………………………………………..………………………..……IP‐65
Workingenvironment:..........................................................................................indoor/Outdoor
Voltage:.........................................................................................................AC100‐240V/50‐60Hz
Power:.......................................................................................................................................300W
Electricproductsmustnotbeputintohouseholdwaste.Pleasebringthemtoarecyclingcentre.Askyourlocalauthoritiesoryourdealerabout
thewaytoproceed.

© Copyright LOTRONIC 2013 IPAR-518 Page 13
Nous vous remercions pour l’achat de ce PROJECTEUR A LED DMX AFX LIGHT. Pour votre sécurité, lisez attentivement ce
manuelavantd’installerl’appareil.
CONSIGNESDESECURITEETD’UTILISATION
Si l’appareil a été exposé à des changements de température, ne le mettez pas immédiatement sous tension. La
condensation qui peut se produire,risque d’endommager les circuits. Attendez que l’appareil ait atteint la température
ambianteavantdelemettresoustension.
Nepasbougerl’appareillorsqu’ilestenfonctionnement.
Lagarantieneprendrapasenchargecetypedepannequirelève
d’unemauvaiseutilisation.
L’appareilfaitpartiedelaclassedeprotectionI.Ilestdoncprimordialqu’ilsoitreliéàlaterre.
Assurez‐vousquelatensionsecteurnedépassepascelleindiquéeàla
findecemoded’emploi.
Nejamaisfairefonctionnerl’appareilsansleverredeprotectionouavecunverrecassé.Demandezàvotrerevendeurouà
untechnicienderemplacerleverre.
Assurez‐vousquelecordond’alimentationn’estpasécr aséouendommagé.Danscecas,demandezàvotre
revendeurou
untechnicienderemplacerlecordon.
Débrancheztoujoursl‘appareildusecteurlorsqu’iln’estpasutiliséouavantdelenettoyer.Netirezquesurlafiche,jamais
surlecordon.
Lorsquelecordond'alimentationouuncoupleurd'appareilestutilisécommedispositifdedéconnexion,cedispositif
doit
resterfacilementaccessible;
Siuninterrupteuromnipolaireestutilisécommedispositifdedéconnexion,l'emplacementsurl'appareiletlafonctionde
l'interrupteurdoitêtredécrite,etlecommutateurdoitresterfacilementaccessible
Desprotections,lentillesouécransultravioletsdoiventêtreremplacéslorsqu’ilssontvisiblementendommagésaupoint
qu’ilsperdentleur
efficacitép.ex.pardesfissuresoudeségratignuresprofondes.
ATTENTION:
1.Soyeztrèsprudentlorsdel’installation.Puisquevoustravaillezavecdestensionsdangereuses,vouspouvezsubirunchoc
électriquegravesivoustouchezdesfilsnussoustension.
2.Ne jamais regarderdirectementdans la sourcede lumière.Elle peut provoquer une crised’épilepsie chezdespersonnes
sensibles.
3. Les
dommages résultant du non respect des instructions ou de la modification de l’appareil ne sont pas couverts par la
garantie.Tenirloindesenfantsetdespersonnesnon‐qualifiées.
4. L’appareil ne contient aucune pièce remplaçable. Vérifiez si toutes les piècessont bien installées et que les vis sont bien
serréesavantlamiseenservice.Nepasutiliserl’appareillorsqueleboîtierestouvert.
F

© Copyright LOTRONIC 2013 IPAR-518 Page 14
REGLESGENERALES
Cetappareildoitêtrealimentéuniquementencourantalternatifde100‐240Vacetutiliséuniquementàl’intérieur.
Nepassecouerl’appareil.Nepasforcerpendantl’installationoul’utilisation.
Lorsduchoixdulieud’installation,assurez‐vousquel’appareiln’estpasexposéàlachaleur,l’humiditéoulapoussière.
La
distance minimum entre la sortie lumineuse de la lyre et la surface éclairée doit être de plus de 1m. Respectez une
distancedesécuritéd’aumoins5mavecdesmatériauxouobjetsinflammables.
Utilisez cet appareil uniquement si vous vous êtes familiarisés avec ses fonctions. Ne pas autoriser
une personne
inexpérimentéed’utilisercetappareil.Laplupartdesdommagesrésultentd’unemauvaiseutilisation.
Conservezl’emballaged’originepourtouttransport.
Pourdesraisonsdesécurité,ilestinterditdemodifiercetappareildequelquesortequecesoit.Toutemanipulationnon
décritedanscemanuelpeutconduireàdes
courts‐circuits,unchocélectrique,l’explosiondelalampe,unechute,etc.et
invalideraitlagarantie.
MONTAGE
Orientation
Vouspouvezinstallercetappareildansn’importequellepositionpourvuqu’ilyaitsuffisammentd’espacepourassurerune
ventilationsuffisante.
Lorsque vous installez l’appareil, choisissez un emplacement qui permet d’accéder facilement à
l’appareil afin d’effectuer
l’entretienderoutine.
Utiliseztoujoursdescâblesdesécurité.
Nejamaisinstallerl’appareilàunendroitoùilseraexposéàlapluie,àl’humidité,auxchangementssoudainsdetempérature
ouàuneventilationinsuffisante.
Si le cordon secteur de l’appareil est endommagé, il ne doit être remplacé
que par le fabricant ou son agent ou bien un
technicienqualifiéafind’évitertoutrisqued’électrocution.
Assurez‐vousque l’emplacementprévueststable avantd’installerleprojecteur.Assurez‐vousque le projecteurnepeutpas
tomberdelastructureenpassantuncâbled’acierdansla structureetl’étrier.
Personnenedoitsetrouveren‐dessousdela
zonedetravailpendantl’installation.Nousdéclinonstouteresponsabilitépourdesdommagesetblessuressurvenussuiteà
unechuteduprojecteurenraisond’unemauvaisefixation.
Connexiondel’alimentationetducâblesignal
1.Connexiondel’alimentationsecteur
Utilisez le cordon fourni
pour brancher l’appareil sur le secteur. Assurez‐vous que la tension et la fréquence du secteur
correspondàlatensionetlafréquenced’alimentationdel’appareil,àsavoir:100‐240Vac.Chaqueappareildoitpouvoirêtre
missousethorstensionindividuellement.

© Copyright LOTRONIC 2013 IPAR-518 Page 15
2.Connexionducâblesignal
Laconnexion entrela sortie du Maîtreet l’entréede l‘Esclavese fait au moyen du cordonXLRà 3 brochesfourni.Lasortie
DMXdelaconsoledecommandedoitêtrebranchéesurl’entréeDMXdupremierMaître.BranchezlasortieDMXduMaître
sur l’entrée DMX de l’Esclave et
ainsi de suite jusqu’au dernier Esclave. Branchez une terminaison sur la sortie du dernier
appareilafind’éviterdesparasites.CetterésistancedefindeligneconsisteenuneficheXLRquicomporteunerésistancede
120Ωentrelesbroches2et3.
IN
OUT
IN
OUT OUT
IN
12 3
Note:Utilisezducâbleàdoubleblindage.Lediamètreduconducteurdechaquecâbledoitêtred’aumoins0,5mm.
PANNEAUDECONTROLE
MENUENTERUPDOWN
MENUDESCRIPTION
FONCTIONSTAT(MODEMANUEL)
‐ Sélectionnez [STAT] puis pressez [ENTER] pour entrer dans le mode STAT ( mode manuel )
‐ Appuyez sur [ENTER] pour sélectionner soit rouge [R], soit vert [G], soit bleu [B], soit ambre [A], soit blanc
[W] ou soit le strobe [ST]
‐ Appuyez sur [UP] /[DOWN] pour ajuster la valeur
‐ Appuyez sur [MENU] pour revenir au menu principal
Code de sécurité : UP, DOWN, UP, DOWN + ENTER
Bouton UP : permet de sélectionner un mode de fonctionnement,
d’augmenter l’adresse DMX ou de sélectionner une
couleurs
Bouton DOWN : permet de sélectionner un mode de
fonctionnement, de diminuer l’adresse DMX ou
de sélectionner une couleurs.
Bouton ENTER : Permet de valider le choix
Bouton MODE : permet de Sélectionner un menu ou de revenir au
menu précédent.

© Copyright LOTRONIC 2013 IPAR-518 Page 16
FONCTIONAUTO(MODEAUTOMA TIQUE)
‐ Sélectionnez [AUTO] puis appuyez sur [ENTER] pour entrer dans le mode auto
‐ Appuyez sur [UP] /[DOWN] pour sélectionner soit les programmes internes soit les programmes édités ( les
programmes AT01 à AT10 ne sont pas modifiables, les programmes PR01 à PR10 sont modifiables dans le
menu EDIT )
‐ Appuyez sur [MENU] pour revenir au menu principal
FONCTIONRUN(MODEMAÎTRE‐ESCLAVE)
‐ Sélectionnez [RUN] puis appuyez sur [ENTER]
‐ Utilisez les boutons [UP] /[DOWN] pour choisir entre mode DMX [DMX] et mode esclave[SLAV]
‐ Appuyez sur [MENU] pour revenir au menu principale
FONCTIONDMX(ADRESSEDMX)
‐ Sélectionnez [DMX] puis appuyez sur [ENTER]
‐ Utilisez [UP] /[DOWN] pour choisir l’adresse DMX[1~512]

© Copyright LOTRONIC 2013 IPAR-518 Page 17
FONCTIONPERS(FONCTIONNEMENTDMX)
‐ Sélectionnez [PERS] puis appuyez sur [ENTER]
‐ Utilisez [UP] /[DOWN] pour choisir le type de fonctionnement DMX ( voir tableau plus loin )
FONCTIONID(ADRESSEID)
‐ Sélectionnez [ID] puis appuyez sur [ENTER]
‐ Appuyez sur [UP] /[DOWN] pour sélectionner la valeur ID [1~255]
FONCTIONEDIT(EDITIONPROGRAMME)
‐ Sélectionnez [EDIT] puis pressez [ENTER]
‐ Appuyez sur [ENTER] pour choisir les paramètres
‐ Utilisez les boutons [UP] /[DOWN] pour choisir le numéro de programme, la scène et la valeur ( rouge [R],
vert [G], bleu [B], ambre [A], blanc [W], strobe [S], durée [T] et durée d’enchainement [F] )

© Copyright LOTRONIC 2013 IPAR-518 Page 18
FONCTIONSET
‐ Sélectionnez [SET] puis pressez [ENTER]
‐ [UPLD] : Permet de charger un programme vers un projecteur esclave. Appuyez sur [ENTER] pour entrer le
code de sécurité [UP, DOWN, UP, DOWN] +[ENTER] , La lumière devient jaune ( ce qui signifie que le
données sont en cours de chargement ), La lumière redevient verte quand le chargement est terminé.
La lumière sur le projecteur led esclave devient jaune puis redevient vert quand le chargement est terminé
‐ [REST] : Reset. Code de sécurité : [UP, DOWN, UP, DOWN] +[ENTER]
‐ [ID] : Adresse ID, appuyez sur [ENTER] puis appuyez sur [UP] /[DOWN] pour choisir [ON] pour autoriser
l’utilisation des adresse ID ou [OFF] pour annuler la fonction ID
‐ [RGBW] : Ajustement de correction des couleurs. Appuyez sur [ENTER] puis sur [UP] /[DOWN] pour
choisir [ON] pour autoriser la fonction de correction des couleurs, [OFF] pour annuler. La correction des
couleurs se fait dans la fonction CAL2
‐ [DIM] : Ajustement dimmer non linéaire, Appuyez sur [UP] /[DOWN] pour choisir, [OFF] dimmer
instantannée , [DIM1] (rapide) à [DIM9] Vitesse 4 (lent)
‐ [DV] : Mode photographie. Appuyez sur [ENTER] puis sur [UP] /[DOWN] pour choisir [NTSC] ou [PAL]

© Copyright LOTRONIC 2013 IPAR-518 Page 19
FONCTIONCAL1(BALANCEBLANC)
‐ Sélectionnez [CAL1] puis pressez [ENTER]
‐ Utilisez [UP] /[DOWN] pour choisir [White 1~11] puis appuyez sur [ENTER] pour valider
o Appuyez sur [ENTER] pour choisir le rouge[R], le vert [G], le bleu[B] ou le blanc [W]
o Appuyez sur [UP] /[DOWN] pour choisir la valeur [0~255]
‐ NOTE : Quand le fonctionnement DMX est sur [STAG], le canal 7 permet d’appeler 11 niveaux de blancs.
FONCTIONCAL2(BALANCERGBW)
‐ Sélectionnez [CAL2] puis appuyez sur [ENTER] pour entrer dans le menu [RGBW]
‐ Appuyez sur [ENTER] pour choisir le rouge[R] , le vert [G], le bleu [B] ou le blanc [W]
‐ Appuyez [UP] /[DOWN] pour choisir la proportion de couleurs [128~255] . Si la fonction RGBW du menu set
est activée, en DMX, quand les couleurs RGB sont à 255, le blanc prendra la valeur ajusté ici
FONCTIONKEY(PROTECTIONBOU TON)
‐ Sélectionnez [KEY] puis appuyez sur [ENTER] ; code de sécurité : [UP, DOWN, UP, DOWN] +[ENTER]
‐ Appuyez sur [UP] /[DOWN] pour choisir [ON] /[OFF]

© Copyright LOTRONIC 2013 IPAR-518 Page 20
CANAUXDMX
Ilya5modesDMX:STAG,AR2d,ARC3,AR3.d,HSV
STAG
CHANNEL VALUE FUNCTION
1 0-255 MASTER DIMMING
2 0-255
ROUGE(quand CH9 est PR01~10 alors CH2 controle la durée)
3 0-255
VERT(quand CH9 est PR01~10 alors CH3 controle le temps d’enchainement)
4 0-255 BLEU
5 0-255 BLANC
6 0-255 AMBRE
7
0-9 COLOR MACRO ( NO FUNCTION )
10-29 ROUGE 100% / VERT MAX / BLEU 0%
30-49 ROUGE MIN / VERT 100% / BLEU 0%
50-69 ROUGE 0% / VERT 100% / BLEU MAX
70-89 ROUGE 0% / VERT 100% / BLEU MAX
90-109 ROUGE MAX / VERT 0% / BLEU 100%
110-129 ROUGE 100% / VERT 0% / BLEU MIN
130-149 ROUGE 100% / VERT 0% / BLEU MAX
150-169 ROUGE MIN / VERT MIN / BLEU 100%
170-200 ROUGE 100% / VERT 100% / BLEU 100% / BLANC 100%
201-205 BLANC ( 3200K )
206-210 BLANC ( 3400K )
211-215 BLANC ( 4200K )
216-220 BLANC ( 4900K )
221-225 BLANC ( 5600K )
226-230 BLANC ( 5900K )
231-235 BLANC ( 6500K )
236-240 BLANC ( 7200K )
241-245 BLANC ( 8000K )
246-250 BLANC ( 8500K )
251-255 BLANC ( 10000K )
8
0~9 NO STROBE
10~255
VITESSE DE STROBE(255 VITESSE MAX)
9
0~40 PAS DE FONCTION
41-70 Auto 1 ( edit )
71-80 Auto 2
81-90 Auto 3
91-100 Auto 4
101-110 Auto 5
111-120 Auto 6
121-130 Auto 7
131-140 Auto 8
141-150 Auto 9
La page est en cours de chargement...
La page est en cours de chargement...
La page est en cours de chargement...
La page est en cours de chargement...
-
 1
1
-
 2
2
-
 3
3
-
 4
4
-
 5
5
-
 6
6
-
 7
7
-
 8
8
-
 9
9
-
 10
10
-
 11
11
-
 12
12
-
 13
13
-
 14
14
-
 15
15
-
 16
16
-
 17
17
-
 18
18
-
 19
19
-
 20
20
-
 21
21
-
 22
22
-
 23
23
-
 24
24


afx light IPAR 518 Le manuel du propriétaire
- Catégorie
- Projecteurs
- Taper
- Le manuel du propriétaire
- Ce manuel convient également à
dans d''autres langues
- English: afx light IPAR 518 Owner's manual
Documents connexes
-
 afx light PARCOB150MKII Le manuel du propriétaire
-
 afx light CITYCOLOR800 Le manuel du propriétaire
-
 afx light BARLED1215 Le manuel du propriétaire
-
 afx light IBAR1815 Le manuel du propriétaire
-
 afx light PARLED-1820Z Le manuel du propriétaire
-
 afx light IPAR507 Le manuel du propriétaire
-
 afx light 15-1634 Le manuel du propriétaire
-
 afx light 15-1656 Manuel utilisateur
-
 afx light PROPAR18-HEX Manuel utilisateur
-
 afx light PARLED-W15BK Le manuel du propriétaire


