IKEA ICS500VB0 Le manuel du propriétaire
- Catégorie
- Cuisinières
- Taper
- Le manuel du propriétaire

for
| IK mA ®
by
WHIRLPOOL CORPORATION
GAS SEALEDBURNERCOOKTOP
For questions about features, operation/performance, parts, accessories or service, cal_: 1-800-253-1301
or visit our website at www.ikea.com
In Canada, call for assistance, installation or service, call: 1-800-807-6777
or visit our website at www.ikea.ca
TABLEDECUISSON A BRULEURSA GAZ SCELLES
Au Canada, pour assistance, installation ou service, composer Je1-800-807-6777
ou visitez notre site web & www.ikea.ca
Table of Contents/Table des mati_res ............................ 2
8186960/501961902003

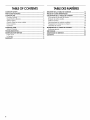
TABLEOF CONTENTS
COOKTOP SAFETY ........................................................................ 3
PARTS AND FEATURES ................................................................ 5
COOKTOP USE .............................................................................. 7
Cooktop Controls ......................................................................... 7
Sealed Surface Burners ............................................................... 8
Surface Grates ............................................................................. 8
Ceramic Glass (on some models) ................................................ 9
Home Canning ............................................................................. 9
Cookware ..................................................................................... 9
COOKTOP CARE .......................................................................... 10
General Cleaning ........................................................................ 10
TROUBLESHOOTING .................................................................. 11
ASSISTANCE OR SERVICE ......................................................... 12
In the U.S.A................................................................................ 12
In Canada ................................................................................... 12
WAR RANTY .................................................................................. 13
TABLEDESMATIERES
SI_CURITI_ DE LA TABLE DE CUISSON .................................... 14
PII=CES ET CARACTI_RISTIQUES .............................................. 16
UTILISATION DE LA TABLE DE CUlSSON ................................ 18
Commandes de latable de cuisson .......................................... 18
BrQleurs de surface scelles ........................................................ 18
Grilles de surface ........................................................................ 19
Vitroceramique (sur certains modeles) ....................................... 20
Preparation de conserves &la maison ....................................... 20
Ustensiles de cuisson ................................................................ 20
ENTRETIEN DE LA TABLE DE CUlSSON .................................. 21
Nettoyage gen6ral ...................................................................... 21
DlePANNAGE ................................................................................. 23
ASSISTANCE OU SERVICE ......................................................... 23
GARANTIE ..................................................................................... 24
2

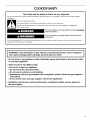
COOKTOP SAFETY
Your safety and the safety of others are very important.
We have provided many important safety messages in this manual and on your appliance. Always read and obey all safety
messages.
This is the safety alert symbol.
This symbol alerts you to potential hazards that can kill or hurt you and others.
All safety messages will follow the safety alert symbol and either the word "DANGER" or "WARNING."
These words mean:
You can be killed or seriously injured if you don't immediately
follow instructions.
You can be killed or seriously injured if you don't follow
instructions.
All safety messages will tell you what the potential hazard is, tell you how to reduce the chance of injury, and tell you what can
happen if the instructions are not followed.
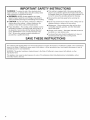
WARNING: If the information in this manual is not followed exactly, a fire or explosion
may result causing property damage, personal injury or death,
- Do not store or use gasoline or other flammable vapors and liquids in the vicinity of this
or any other appliance,
- WHAT TO DO IF YOU SMELL GAS:
• Do not try to light any appliance.
• Do not touch any electrical switch.
• Do not use any phone in your building.
• Immediately call your gas supplier from a neighbor's phone. Follow the gas supplier's
instructions.
• If you cannot reach your gas supplier, call the fire department.
- Installation and service must be performed by a qualified installer, service agency or
the gas supplier.

iMPORTANT SAFETY iNSTRUCTiONS
WARNING: To reduce the risk of fire, electrical shock, [] This cooktop is equipped with a three-prong grounding
injury to persons, or damage when using the cooktop, follow
basic precautions, including the following:
[] WARNING: NEVER use this appliance as a space
heater to heat or warm the room. Doing so may result in
carbon monoxide poisoning and overheating of the cooktop.
• CAUTION: Do not store items of interest to children in
cabinets above the cooktop - children climbing on the
cooktop to reach items could be seriously injured.
• Proper Installation - The cooktop, when installed, must be
electrically grounded in accordance with local codes or, in
the absence of local codes, with the National Electrical
Code, ANSl/NFPA70 or the Canadian Electrical Code,
Part 1. Be sure the cooktop is properly installed and
grounded by a qualified technician.
SAVE THESE
plug for your protection against shock hazard and should
be plugged directly into a properly grounded receptacle. Do
not cut or remove the grounding prong from this plug.
[] Disconnect the electrical supply before servicing the
cooktop.
[] Injuries may result from the misuse of the cooktop such as
stepping, leaning, or sitting on the top surface.
[] Maintenance - Keep cooktop area clear and free from
combustible materials, gasoline, and other flammable
vapors and liquids.
[] Storage on the cooktop - Flammable materials should not
be stored on or near surface units.
[] Top burner flame size should be adjusted so it does not
extend beyond the edge of the cooking utensil.
INSTRUCTIONS
The California Safe Drinking Water and Toxic Enforcement Act requires the Governor of California to publish a list of substances
known to the State of California to cause cancer, birth defects, or other reproductive harm, and requires businesses to warn of
potential exposure to such substances.
WARNING: This product contains a chemical known to the State of California to cause cancer, birth defects, or other
reproductive harm.
This appliance can cause low-level exposure to some of the substances listed, including benzene, formaldehyde, carbon
monoxide, toluene, and soot.

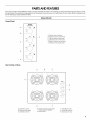
PARTSAND FEATURES
This manual covers several different models, and not all models are shown. The cooktop you have purchased may have some or all of
the items listed. The locations and appearances of the features shown here may not match those of your model. All Btu/h ratings shown
are for Natural gas unless otherwise noted.
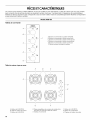
Model HOB 450
Control Panel
W_POOL CORPORA_N
A ..........................................................................................................oF_ O®
O0
S
LO
LO
OFF O0
®0
LO
OFF O0
/_: \ oo
Hi( }i
.............................F
A. Control knob off position
B. Right rear burner control knob
C. Left rear burner control knob
D. Left front burner control knob
E. Right front burner control knob
F. Surface burner indicator fight
Gas Cooktop on Glass
A B C
......................................D
,o
E
A. 5,600 Btu/h burner
B. Surface burner grates
C. 5,600 Btu/h burner
G F
D. Model and serial number plate
(under center of cooktop)
E. Control panel
F. 3,400 Btu/h burner
G. 10,300 Btu/h burner
H. Surface burner cap

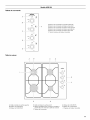
Model HOB 250
Control Panel
I °°
B
C
LO
OFF
LO
E
O0
®0
OFF O0
o0
LO
A. Control knob off position
B. Right rear burner control knob
C. Left rear burner control knob
D. Left front burner control knob
E Right front burner control knob
F. Surface burner indicator light
Cooktop
B C
D
i
I
E
off Lo O0
H
G
,4.Left surface burner grate
B.5,600 Btu/h burner
C. 5,600 Btu/h burner
D. Right surface burner grate
E.Model and serial number plate
(under center of cooktop)
F. Control panel
G. 3,400 Btu/h burner
H. 10,300 Btu/h burner
L Surface burner cap
6

COOKTOP USE
Fire Hazard
Do not let the burner flame extend beyond the edge of
the pan.
Turn off all controls when not cooking.
Failure to follow these instructions can result in death
or fire.
IMPORTANT: Your cooktop is factory-set for use with Natural
gas. If you wish to use LP gas, an LP Gas Conversion Kit is
included with your new cooktop. See the instructions included
with the LP Gas Conversion Kit for details on making this
conversion.
Electric igniters automatically light the surface burners when
control knobs are turned to LITE.
The large burners (10,300 Btu/h) provide the highest heat setting,
and are ideal for cooking large quantities of food or liquid, using
large pots and pans. The small burners (3,400 Btu/h and
5,600 Btu/h) allow more accurate simmer control at the lowest
setting, and are ideal for cooking smaller quantities of food, using
smaller pots and pans.
Before setting a control knob, place filled cookware on the grate.
Do not operate a burner while using empty cookware or without
any cookware on the grate.
NOTE: Visually check that the burner has lit. If the burner does
not ignite, listen for a clicking sound. If you do not hear the igniter
click, turn the burner off. Check for a tripped circuit breaker or
blown household fuse.
Check that the control knob is pressed completely down on the
valve shaft. If the spark igniter still does not operate, call a trained
repair specialist.
Proper grounding and polarity are necessary for correct operation
of the electric ignition system. If the wall receptacle does not
provide correct polarity, the igniter will become grounded and
occasionally click, even after the burner has ignited. Contact a
trained repair specialist to check the wall receptacle to see
whether it is wired with the correct polarity.
To Set:
1. Push in and turn knob counterclockwise to LITE.
All surface burners will click. Only the burner with the control
knob turned to LITE will produce a flame.
2. Turn knob to anywhere between HI and LO. Use the following
chart as a guide when setting heat levels.
SETTING RECOMMENDED USE
LITE
HI
Medium
Between HI & LO
• Light the burner.
• Start food cooking.
• Bring liquid to a boil.
• Hold a rapid boil.
• Quickly brown or sear food.
• Fry or saute foods.
• Cook soups, sauces and gravies.
• Stew or steam foods.
LO • Keep food warm.
• Simmer.
I REMEMBER: When cooktop is in use, the entire cooktop I
I
area may become hot.
I
Power failure
In case of prolonged power failure, the surface burners can be lit
manually. Hold a lit match near a burner and turn knob
counterclockwise to LITE. After burner lights, turn knob to
setting. Do not use a grill or griddle accessory during a power
failure, as the vent fan will not operate.

S Su c® Burners
IMPORTANT: Do not obstruct the flow of combustion and
ventilation air around the burner grate edges.
Before cleaning, make sure all controls are off and the cooktop is
cool. Do not use oven cleaners, bleach or rust removers.
Burner cap: Always keep the burner cap in place when using a
surface burner. A clean burner cap will help avoid poor ignition
and uneven flames. Always clean the burner cap after a spillover
and routinely remove and clean the caps according to the
"General Cleaning" section.
A
3=
Clean clogged burner ports with a straight pin as shown. Do
not enlarge or distort the port. Do not use a wooden
toothpick. If the burner needs to be adjusted, contact a
trained repair specialist.
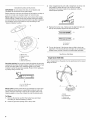
4. Replace the burner cap, making sure the alignment pins on
the cap are properly aligned with the burner base.
C
A. Burner cap
B.Afignment pins
C. Igniter
D. Burner base
E. Gas tube opening
E
Gas tube opening: Gas must flow freely throughout the gas tube
opening for the burner to light properly. Keep this area free of soil
and do not allow spills, food, cleaning agents or any other
material to enter the gas tube opening. Protect it from spillovers
by always using a burner cap.
B
A. 1-11/2'' (25-38 mm)
B. Burner ports
Burner ports: Check burner flames occasionally for proper size
and shape as shown above. A good flame is blue in color, not
yellow. Keep this area free of soil and do not allow spills, food,
cleaning agents or any other material to enter the burner ports.
To Clean:
1. Remove the burner cap from the burner base and clean
according to "General Cleaning" section.
2. Clean the gas tube opening with a damp cloth.
5=
A. Incorrect
B. Correct
Turn on the burner. If the burner does not light, check cap
alignment. If the burner still does not light, do not service the
sealed burner yourself. Contact a trained repair specialist.
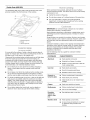
Single Grate (HOB 450)
The X-shaped slot on the grate must be positioned on the raised
flange as shown.
A
C
A. Grate
B. X-shaped slot
C. Burner cap
D. Raised flange
8

DoubleGrate(HOB250)
The positioning feet on the grate must be placed in the round
grooves located at the front and rear of the cooktop.
A
A. Positioning feet
B. Grate
C. Round grooves
It is normal for the surface of white or biscuit ceramic glass to
appear to change color when surface cooking areas are hot. As
the glass cools, it will return to its original color.
Cleaning off the cooktop before and after each use will help keep
it free from stains and provide the most even heating. On
cooktops with white or biscuit ceramic glass, soils and stains
may be more visible, and may require more cleaning and care.
Cooktop cleaner and a cooktop scraper are recommended. For
more information, see "General Cleaning" section.
• Do not store jars or cans above the cooktop. Dropping a
heavy or hard object onto the cooktop could crack the
cooktop.
• Do not leave a hot lid on the cooktop. As the cooktop cools,
air can become trapped between the lid and the cooktop,
and the ceramic glass could break when the lid is removed.
• For foods containing sugar in any form, clean up all spills and
soils as soon as possible. Allow the cooktop to cool down
slightly. Then, while wearing oven mitts, remove the spills
while the surface is still warm. If sugary spills are allowed to
cool down, they can adhere to the cooktop and can cause
pitting and permanent marks.
• Do not allow objects that could melt, such as plastic or
aluminum foil, to touch any part of the entire cooktop.
When canning for long periods, alternate the use of surface
burners between batches. This allows time for the most recently
used areas to cool.
• Center the canner on the grate.
• Do not place canner on 2 surface burners at the same time.
• For more information, contact your local agricultural
department. Companies that manufacture home canning
products can also offer assistance.
IMPORTANT: Do not leave empty cookware on a hot surface
cooking area, element or surface burner.
Ideal cookware should have a flat bottom, straight sides, and a
well-fitting lid and the material should be of medium-to-heavy
thickness.
Rough finishes may scratch the cooktop. Aluminum and copper
may be used as a core or base in cookware. However, when used
as a base they can leave permanent marks on the cooktop or
grates.
Cookware material is a factor in how quickly and evenly heat is
transferred, which affects cooking results. A nonstick finish has
the same characteristics as its base material. For example,
aluminum cookware with a nonstick finish will take on the
properties of aluminum.
Use the following chart as a guide for cookware material
characteristics.
COOKWARE CHARACTERISTICS
Aluminum
Cast iron
Ceramic or
Ceramic glass
Copper •
Earthenware •
Porcelain •
enamel-on-
steel or cast
iron
Stainless steel •
• Heats quickly and evenly.
• Suitable for all types of cooking.
• Medium or heavy thickness is best for
most cooking tasks.
• Heats slowly and evenly.
• Good for browning and frying.
• Maintains heat for slow cooking.
• Follow manufacturer's instructions.
• Heats slowly, but unevenly.
• Ideal results on low to medium heat
settings.
Heats very quickly and evenly.
Follow manufacturer's instructions.
Use on low heat settings.
See stainless steel or cast iron.
Heats quickly, but unevenly.
A core or base of aluminum or copper
on stainless steel provides even
heating.

COOKTOP CARE
IMPORTANT: Before cleaning, make sure all controls are off and
the cooktop is cool. Always follow label instructions on cleaning
products.
Soap, water and a soft cloth or sponge are suggested first unless
otherwise noted.
EXTERIOR PORCELAIN ENAMEL SURFACES
(on some models)
Cleaning Method:
Food spills containing acids, such as vinegar and tomato, should
be cleaned as soon as the entire appliance is cool. These spills
may affect the finish.
• Glass cleaner, mild liquid cleaner or nonabrasive scrubbing
pad: Gently clean around the model and serial number plate
because scrubbing may remove numbers.
• All Purpose Appliance Cleaner Part Number 31662 (not
included):
See "Assistance or Service" section to order.
STAINLESS STEEL (on some models)
Cleaning Method:
Rub in direction of grain to avoid damaging.
• Stainless Steel Cleaner & Polish Part Number 31464 (not
included):
See "Assistance or Service" section to order.
• Liquid detergent or all-purpose cleaner:
Rinse with clean water and dry with soft, lint-free cloth.
• Vinegar for hard water spots
Do not use soap-filled scouring pads, abrasive cleaners, Cooktop
Cleaner, steel-wool pads, gritty washcloths or some paper
towels. Damage may occur.
CERAMIC GLASS (on some models)
Cleaning Method:
Always wipe with a clean, wet cloth or sponge and dry thoroughly
to avoid streaking and staining.
Cooktop Cleaner Part Number 31464 is recommended for regular
use to help avoid scratches, pitting and abrasions, and to
condition the cooktop. It may be ordered as an accessory. See
"Assistance or Service" section to order.
Cooktop Scraper Part Number 3183488 is also recommended for
stubborn soils, and can be ordered as an accessory. See
"Assistance or Service" section to order. The Cooktop Scraper
uses razor blades. Store razor blades out of the reach of
children.
Light to moderate soil
• Paper towels or clean damp sponge:
Clean while the cooktop is still warm. You may want to wear
oven mitts while cleaning the cooktop.
Sugary spills (jellies, candy, syrup)
• Cooktop Scraper:
Clean while the cooktop is still warm. You may want to wear
oven mitts while cleaning the cooktop.
• Cooktop Cleaner and clean damp paper towel:
Clean as soon as cooktop has cooled down. Rub creme into
surface with a damp paper towel or soft cloth. Continue
rubbing until white film disappears.
Heavy soil, dark streaks, specks and discoloration
• Cooktop Cleaner or nonabrasive cleanser:
Rub product into soil with a damp paper towel or soft cloth.
Continue rubbing until white film disappears.
Burned-on soil
• Cooktop Cleaner and Cooktop Scraper:
Rub creme into soil with damp paper towel. Hold scraper as
flat as possible on surface and scrape. Repeat for stubborn
spots. Polish entire cooktop with creme and paper towel.
Metal marks from aluminum and copper
• Cooktop Cleaner:
Clean as soon as cooktop has cooled down. Rub creme into
surface with a damp paper towel or soft cloth. Continue
rubbing until white film disappears. The marks will not totally
disappear but after many cleanings become less noticeable.
Tiny scratches and abrasions
• Cooktop Cleaner:
Rub creme into surface with a damp paper towel or soft
cloth. Continue rubbing until white film disappears. Scratches
and abrasions do not affect cooking performance and after
many cleanings become less noticeable.
Do not use steel wool, abrasive powder cleansers, chlorine
bleach, rust remover or ammonia because damage may occur.
COOKTOP CONTROLS
Cleaning Method:
When replacing knobs, make sure knobs are in the Off position.
On some models, do not remove seals under knobs.
• Soap and water or dishwasher:
Pull knobs straight away from control panel to remove.
Do not use steel wool, abrasive cleansers or oven cleaner.
Do not soak knobs.
10

PORCELAIN-COATED GRATES AND CAPS
(on some models)
Cleaning Method:
Food spills containing acids, such as vinegar and tomato, should
be cleaned as soon as the cooktop, grates and caps are cool.
These spills may affect the finish.
To avoid chipping, do not bang grates and caps against each
other or hard surfaces such as cast iron cookware.
• Nonabrasive plastic scrubbing pad and mildly abrasive
cleanser:
Clean as soon as cooktop, grates and caps are cool.
• Dishwasher (grates only, not caps):
Use the most aggressive cycle.
Do not reassemble caps on burners while wet.
CAST IRON GRATES AND CAPS (on some models)
Cleaning Method:
• Liquid detergent and water.
Wipe with damp cloth or sponge then rinse with clean water
and wipe dry.
Do not clean in dishwasher.
Do not clean in self-cleaning ovens.
Do not reassemble caps on burners while wet.
SURFACE BURNERS
Sealed Burner models
See "Sealed Surface Burners" section.
TROUBLESHOOTING
Try the solutions suggested here first in order to avoid the cost of an unnecessary service call.
Nothing will operate
• Is the power supply cord unplugged?
Plug into a grounded 3 prong outlet.
• Has a household fuse blown, or has a circuit breaker
tripped?
Replace the fuse or reset the circuit breaker. If the problem
continues, call an electrician.
Is the cooktop properly connected to the gas supply?
Contact a service technician or see Installation Instructions.
Surface burners will not operate
is this the first time the surface burners have been used?
The first time a surface burner is lit, it may take longer to light
because of air in the gas line.
Is the control knob set correctly?
Push in knob before turning to a setting.
Are the burner ports clogged?
See "Sealed Surface Burners" section.
Is the main gas shutoff valve in the off position?
See the Installation Instructions.
Surface burner flames are uneven, yellow and/or noisy
• Are the burner ports clogged?
See "Sealed Surface Burners" section.
• On models with caps, are the burner caps positioned
properly?
See "Sealed Surface Burners" section.
Is propane gas being used?
The appliance may have been converted improperly.
Contact a service technician or see "Assistance or Service"
section.
Surface burner makes popping noises
• Is the burner wet?
Let it dry.
Excessive heat around cookware on cooktop
Is the cookware the proper size?
Use cookware about the same size as the surface cooking
area, element or surface burner. Cookware should not extend
more than V2"(1.3 cm) outside the cooking area.
Cooktop cooking results not what expected
Is the proper cookware being used?
See "Cookware" section.
Is the control knob set to the proper heat level?
See "Cooktop Controls" section.
Is the appliance level?
Level the appliance. See the Installation Instructions.
11

ASSISTANCEOR SERVICE
Before calling for assistance or service, please check
"Troubleshooting." It may save you the cost of a service call. If
you still need help, follow the instructions below.
When calling, please know the purchase date and the complete
model and serial number of your appliance. This information will
help us to better respond to your request.
If you need replacement parts
If you need to order replacement parts, we recommend that you
use only factory specified parts. Factory specified parts will fit
right and work right because they are made with the same
precision used to build every new IKEA® appliance.
To locate factory specified parts in your area, call us or your
nearest designated service center.
L}°@°/"_,,.
Call the Whirlpool Customer eXperience Center
toll free: 1-800-253-1301.
Our consultants provide assistance with:
• Features and specifications on our full line of appliances.
• Installation information.
• Use and maintenance procedures.
• Accessory and repair parts sales.
• Specialized customer assistance (Spanish speaking, hearing
impaired, limited vision, etc.).
• Referrals to local dealers, repair parts distributors and service
companies. Whirlpool designated service technicians are
trained to fulfill the product warranty and provide after-
warranty service, anywhere in the United States.
To locate the Whirlpool designated service company in your
area, you can also look in your telephone directory Yellow
Pages.
For further assistance
If you need further assistance, you can write to Whirlpool
Corporation with any questions or concerns at:
Whirlpool Brand Home Appliances
Customer eXperience Center
553 Benson Road
Benton Harbor, MI 49022-2692
Accessories U.S.A.
To order accessories, call the Whirlpool Customer eXperience
Center toll free at 1-800-442-9991 and follow the menu prompts.
Or visit our website at www.whirlpool.com and click on "Parts &
Accessories."
Accessories List
Stainless Steel Cleaner & Polish
Order Part Number 31462
All-Purpose Appliance Cleaner
Order Part Number 31662
Cooktop Cleaner
Part Number 31464
Cooktop Scraper
Part Number 3183488
Call the Whirlpool Canada LP Customer Interaction Centre toll
free: 1-800-807-6777.
Our consultants provide assistance with:
• Features and specifications on our full line of appliances.
• Use and maintenance procedures.
• Accessory and repair parts sales.
• Referrals to local dealers, repair parts distributors, and
service companies. Whirlpool Canada LP designated service
technicians are trained to fulfill the product warranty and
provide after-warranty service, anywhere in Canada.
For further assistance
If you need further assistance, you can write to Whirlpool
Canada LP with any questions or concerns at:
Customer Interaction Centre
Whirlpool Canada LP
1901 Minnesota Court
Mississauga, Ontario L5N 3A7
Please include a daytime phone number in your correspondence.
Please include a daytime phone number in your correspondence.
12

WHIRLPOOLCORPORATIONMAJOR APPLIANCEWARRANTY
ONE YEAR LIMITED WARRANTY
For one year from the date of purchase, when this major appliance is operated and maintained according to instructions attached to or
furnished with the product, Whirlpool Corporation or Whirlpool Canada LP (hereafter "Whirlpool") will pay for Factory Specified Parts
and repair labor to correct defects in materials or workmanship. Service must be provided by a Whirlpool designated service company.
This limited warranty applies only when the major appliance is used in the country in which it was purchased.
ITEMS WHIRLPOOL WILL NOT PAY FOR
1. Service calls to correct the installation of your major appliance, to instruct you how to use your major appliance, to replace or repair
house fuses or to correct house wiring or plumbing.
2. Service calls to repair or replace appliance light bulbs, air filters or water filters. Those consumable parts are excluded from warranty
coverage.
3. Repairs when your major appliance is used for other than normal, single-family household use.
4. Damage resulting from accident, alteration, misuse, abuse, fire, flood, acts of God, improper installation, installation not in
accordance with electrical or plumbing codes, or use of products not approved by Whirlpool.
5. Any food loss due to refrigerator or freezer product failures.
6. Replacement parts or repair labor costs for units operated outside the United States or Canada.
7. Pickup and delivery. This major appliance is designed to be repaired in the home.
8. Repairs to parts or systems resulting from unauthorized modifications made to the appliance.
9. Expenses for travel and transportation for product service in remote locations.
10. The removal and reinstallation of your appliance if it is installed in an inaccessible location or is not installed in accordance with
published installation instructions.
11. Replacement parts or repair labor costs when the major appliance is used in a country other than the country in which it was
purchased.
DISCLAIMER OF IMPLIED WARRANTIES; LIMITATION OF REMEDIES
CUSTOMER'S SOLE AND EXCLUSIVE REMEDY UNDER THIS LIMITED WARRANTY SHALL BE PRODUCT REPAIR AS PROVIDED
HEREIN. IMPLIED WARRANTIES, INCLUDING WARRANTIES OF MERCHANTABILITY OR FITNESS FOR A PARTICULAR PURPOSE,
ARE LIMITED TO ONE YEAR OR THE SHORTEST PERIOD ALLOWED BY LAW. WHIRLPOOL SHALL NOT BE LIABLE FOR
INCIDENTAL OR CONSEQUENTIAL DAMAGES. SOME STATES AND PROVINCES DO NOT ALLOW THE EXCLUSION OR LIMITATION
OF INCIDENTAL OR CONSEQUENTIAL DAMAGES, OR LIMITATIONS ON THE DURATION OF IMPLIED WARRANTIES OF
MERCHANTABILITY OR FITNESS, SO THESE EXCLUSIONS OR LIMITATIONS MAY NOT APPLY TO YOU. THIS WARRANTY GIVES
YOU SPECIFIC LEGAL RIGHTS AND YOU MAY ALSO HAVE OTHER RIGHTS, WHICH VARY FROM STATE TO STATE OR PROVINCE
TO PROVINCE.
Outside the 50 United States and Canada, this warranty does not apply. Contact your authorized Whirlpool dealer to determine if
another warranty applies.
If you need service, first see the "Troubleshooting" section of the Use & Care Guide. After checking "Troubleshooting," additional help
can be found by checking the "Assistance or Service" section or by calling Whirlpool. In the U.S.A., call 1-800-253-1301. In Canada,
call 1-800-807-6777. 12/05
Keep this book and your sales slip together for future
reference. You must provide proof of purchase or installation
date for in-warranty service.
Write down the following information about your major appliance
to better help you obtain assistance or service if you ever need it.
You will need to know your complete model number and serial
number. You can find this information on the model and serial
number label located on the product.
Dealer name
Address
Phone number
Model number
Serial number
Purchase date
13

SECURITEDELATABLEDECUlSSON
Votre securite et celle des autres est tres importante.
Nous donnons de nombreux messages de s_curit_ importants dans ce manuel et sur votre appareil m_nager. Assurez-vous de
toujours lire tousles messages de s_curit_ et de vous y conformer.
Voici le symbole d'alerte de s_curit&
Ce symbole d'alerte de s_curit_ vous signale les dangers potentiels de d_c_s et de blessures graves & vous
et &d'autres.
Tousles messages de s_curit_ suivront le symbole d'alerte de s_curit_ et le mot "DANGER" ou
"AVERTISSEMENT". Ces mots signifient •
Risque possible de d_cbs ou de blessure grave si vous ne
suivez pas imm_diatement les instructions.
Risque possible de d_cbs ou de blessure grave si vous
ne suivez pas les instructions.
Tousles messages de s_curit_ vous diront quel est le danger potentiel et vous disent comment r_duire le risque de blessure et
ce qui peut se produire en cas de non-respect des instructions.
AVERTISSEMENT • Pour votre securite, les renseignements dans ce manuel doivent
_tre observes pour reduire au minimum les risques d'incendie ou d'explosion ou pour
eviter des dommages au produit, des blessures ou un deces.
- Ne pas entreposer ni utiliser de ressence ou d'autres vapeurs ou liquides inflammables
proximite de cet appareil ou de tout autre appareil electromenager.
- QUE FAIRE DANS LE CAS D'UNE ODEUR DE GAZ :
• Ne pas tenter d'allumer un appareil.
• Ne pas toucher a un commutateur electrique.
• Ne pas utiliser le telephone se trouvant sur les lieux.
• Appeler immediatement le fournisseur de gaz d'un telephone voisin. Suivre
ses instructions.
• .&.defaut de joindre votre fournisseur de gaz, appeler les pompiers.
- L'installation et rentretien doivent _tre effectues par un installateur qualifie, une agence
de service ou le fournisseur de gaz,
14

IMPORTANTES iNSTRUCTiONS DE SECURITi
AVERTISSEiVlENT : Pour r_duire le risque d'incendie, de
choc _lectrique, de blessures ou de dommages Iors de
I'utilisation de la table de cuisson, il convient d'observer
certaines pr6cautions _l_mentaires dont les suivantes :
[] AVERTISSEMENT : NE JAMAIS utiliser cet appareil
comme dispositif de chauffage de la piece. Le non-respect
de cette instruction peut entrafner une intoxication au
monoxyde de carbone et une surchauffe de la table de
cuisson.
[] MISE EN GARDE - Ne pas remiser clans des
armoires au-dessus de la table de cuisson, des objets que
des enfants pourraient vouloir atteindre. Les enfants
pourraient se blesser gravement en grimpant sur la table
de cuisson.
[] Installation appropri6e - La table de cuisson Iorsqu'elle est
correctement install6e doit _tre reli6e & la terre
conform6ment aux codes Iocaux ou, en I'absence de codes
Iocaux, scion le Code national electrique, ANSI/NFPA70 ou
/e Code canadien des installations electriques, Pattie 1.
S'assurer que la table de cuisson est correctement
install6e et reli6e & la terre par un technicien qualifi&
[] La table de cuisson est munie d'une fiche de liaison & la
terre & trois broches pour votre protection contre les
risques de choc _lectrique et dolt @re branch6e
directement darts une prise de courant bien reli_e &la
terre. Ne pas couper ni enlever la broche de liaison & la
terre de cette fiche.
[] D6brancher I'alimentation _lectrique avant d'ex6cuter des
r6parations & la table de cuisson.
[] Des blessures peuvent survenir du mauvais usage de la
table de cuisson tel que se tenir debout sur la surface, se
pencher ou s'asseoir sur le dessus de la surface.
[] Entretien - Garder I'espace autour de la table de cuisson
d_gag6 et exempt de mat@iaux combustibles, d'essence
et d'autres vapeurs et liquides inflammables.
[] Remisage sur la table de cuisson - Des produits
inflammables ne doivent pas @re remis_s sur ou pros des
_l_ments de surface.
[] La taille de la flamme des brOleurs de surface devrait @re
ajust_e de sorte qu'elle ne d_passe pas le bord d'un
ustensile de cuisson.
CONSERVEZ CES iNSTRUCTiONS
15

PIECESETCARACTERISTIQUES
Ce manuel couvre plusieurs modeles differents, et tous les modeles ne sont pas illustres. La table de cuisson que vous avez achetee
peut comporter tous les articles 6numer6s ou seulement certains d'entre eux. L'emplacement et I'apparence des caracteristiques
illustrees ci-dessous peuvent ne pas correspondre a ceux de votre modele. Toutes les caracteristiques BTU/h illustrees correspondent
au gaz naturel sauf mention contraire.
ModUle HOB 450
Tableau de commande
A ............................................................................................................oFF O®
O0
g .......................................................................................
LO
OFF
®0
O0
., ,,K......_"
E ....................................................................................:_ -_
LO
A. Bouton de commande _ la position Off (arr_t)
B. Bouton de commande du brOleur arriere droit
C. Bouton de commande du brOleur arriere gauche
D. Bouton de commande du brOleur avant gauche
E.Bouton de commande du brOleur avant droit
F. T_moin lumineux du brOleur de surface
Table de cuisson & gaz en verre
A B C
........................................D
A. BrOleur de 5 600 BTU/h
B. Grilles du brOleur de surface
C. BrOleur de 5 600 BTU/h
G F
D. Plaque signal_tique des num_ros de modele et de
s_rie (sous le centre de la table de cuisson)
E. Tableau de commande
F. BrOleur de 3 400 BTU/h
G. BrOleur de 10 300 BTU/h
H. Chapeau du brOleur de surface
16

ModUle HOB 250
Tableau de commande
00
oo
C
LO
OFF
kO
oo
®0
o_ O0
O®
F
A. Bouton de commande _ la position Off (arr#t)
B. Bouton de commande du brOleur arriere droit
C. Bouton de commande du brOleur arriere gauche
D. Bouton de commande du brOleur avant gauche
E. Bouton de commande du brOleur avant droit
F. T_moin lumineux du brOleur de surface
Table de cuisson
A B
C D
A. Grille du brOleur de surface gauche
B. BrDleur de 5 600 BTU/h
C. BrOleur de 5 600 BTU/h
H G
D. Grille du brOleur de surface droit
E.Plaque signal_tique des num_ros de modele et
de s_rie (sous le centre de la table de cuisson)
F. Tableau de commande
G. BrOleur de 3 400 BTU/h
H. BrOleur de 10 300 BTU/h
L Chapeau du brOleur de surface
17

UTILISATIONDELATABLEDECUISSON
Risque d'incendie
La flamme d'un br6leur ne devrait pas d_passer le bord
du r_cipient de cuisson.
Fermer tous les r_glages Iorsque la cuisson est
termin_e.
Le non-respect de ces instructions peut causer un
d_cbs ou un incendie.
IMPORTANT : Cette table de cuisson a 6te configuree & I'usine
pour I'alimentation au gaz naturel. Si vous souhaitez utiliser du
gaz propane, une trousse de conversion au gaz propane est
fournie avec la table de cuisson. Voir les instructions incluses
avec la trousse de conversion au gaz propane pour des details
sur la realisation de cette conversion.
Des allumeurs electriques allument automatiquement les brQleurs
de surface Iorsque les boutons de commande sont tournes &
LITE (allumage).
Les grands brQleurs (10 300 BTU/h) fournissent le reglage de
chaleur le plus eleve et sont parfaits pour faire cuire de grandes
quantites d'aliments ou de liquides, en utilisant de grandes
marmites et casseroles. Les petits brQleurs (3 400 BTU/h et
5 600 BTU/h) permettent un contr61e plus precis du mijotage au
reglage le plus bas et sont parfaits pour la cuisson de plus petites
quantites d'aliments, en utilisant des marmites et casseroles plus
petites.
Avant de regler un bouton de commande, placer I'ustensile de
cuisson rempli sur la grille. Ne pas faire fonctionner un brQleur
avec un ustensile de cuisson vide ou sans ustensile de cuisson
sur la grille.
REMARQUE :Verifier visuellement que le brQleur est allum& Si le
brQleur ne s'allume pas, guetter un declic. Si aucun declic ne se
fait entendre, eteindre le brQleur. Verifier si le disjoncteur s'est
declenche ou si un fusible est grille.
Verifier que le bouton de commande est completement enfonce
sur la tige de la soupape. Si I'allumeur ne fonctionne toujours
pas, appeler un technicien de reparation qualifi&
La liaison & la terre et la polarite appropriees sont necessaires
pour le bon fonctionnement du systeme d'allumage electrique. Si
la prise de courant murale ne fournit pas la polarite correcte,
I'allumeur deviendra relie & la terre et pourra occasionnellement
emettre un declic, m_me apres I'allumage du brQleur. Faire
verifier la prise murale par un technicien de reparation qualifie
pour voir si la polarite du c&blage est correcte.
R_glage :
1. Pousser et tourner le bouton dans le sens antihoraire &LITE.
Tousles brQleurs de surface emettront un declic. Seul le
brQleur dont le bouton est tourne & LITE produira une flamme.
2. Tourner le bouton n'importe oQ entre HI et LO. Utiliser le
tableau suivant comme guide Iors du reglage des niveaux de
chaleur.
RI_GLAGE UTILISATION RECOMMANDI_E
LITE (allumage) • Pour allumer le brQleur.
HI (_lev_) • Pour commencer la cuisson des
aliments.
• Pour porter un liquide a ebullition.
Moyen • Pour maintenir une ebullition
Entre HI et LO rapide.
• Pour brunir ou saisir rapidement
les aliments.
• Pour faire frire ou sauter les
aliments.
• Pour cuire les soupes et les
sauces.
• Pour faire mijoter ou etuver les
aliments.
LO (has) • Pour garder les aliments au
chaud.
• Pour faire mijoter & feu doux.
N'OUBLIEZ PAS : Quand I'appareil est utilise, toute la
surface de la table de cuisson peut devenir chaude.
I
Panne de courant
En cas de panne de courant prolongee, les brQleurs de surface
peuvent _tre allumes manuellement. Tenir une allumette allumee
pros d'un brQleur et tourner le bouton dans le sens antihoraire &
LITE. Une fois le brQleur allume, tourner le bouton au reglage. Ne
pas utiliser le gril ni la plaque &frire Iors d'une panne de courant.
Le ventilateur de I'event ne fonctionnera pas.
IMPORTANT : Ne pas entraver I'evacuation de I'air de
combustion et de ventilation autour des bords des grilles de
brQleur.
Avant le nettoyage, s'assurer que toutes les commandes sont
eteintes et que la table de cuisson a refroidi. Ne pas utiliser de
nettoyants & four, d'agent de blanchiment ou de decapants &
rouille.
18

Chapeau de brQleur : Toujours garder le chapeau de brQleur en
place Iorsqu'un brQleur de surface est utilise. Un chapeau de
brQleur propre aide & emp_cher le mauvais allumage et les
flammes irregulieres. Toujours nettoyer le chapeau du brQleur
apres un renversement de produits et enlever et nettoyer
regulierement les chapeaux tel qu'indique &la section
"Nettoyage general".
A
3.
4.
Nettoyer les orifices de brQleur obstrues avec une epingle
droite tel qu'indiqu& Ne pas agrandir ni deformer I'orifice. Ne
pas utiliser un cure-dents en bois. Si le brQleur a besoin d'etre
ajuste, contacter un technicien de reparation qualifi&
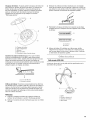
Reinstaller le chapeau du brQleur et s'assurer que les tiges
d'alignement sur le chapeau sont bien alignees avec la base
du brQleur.
A. Chapeau de brOleur
B. Tiges d'alignement
C. Allumeur
D. Base du brOleur
E. Ouverture du tube d'arriv_e de gaz
E
Ouverture du tube d'arriv_e de gaz : Pour que le brQleur
s'allume convenablement, il faut que le gaz puisse passer
librement & travers I'orifice. Garder cette zone propre et ne pas
laisser les produits renverses, les aliments, les agents de
nettoyage ou tout autre produit penetrer dans I'ouverture du tube
d'arrivee de gaz. La proteger contre les renversements en
utilisant toujours un chapeau de brQleur.
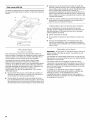
A. Incorrect
B. Correct
5.
Allumer le brQleur. Si le brQleur ne s'allume pas, verifier
I'alignement du chapeau. Si le brQleur ne s'allume toujours
pas, ne pas reparer vous-m_me le brQleur scell& Contacter
un technicien de reparation qualifi&
Grille simple (HOB 450)
La fente en forme de X sur la grille doit _tre positionnee sur le
bord releve tel qu'illustr&
B
A. 1-11/_'' (25-38 mm)
B. Orifices de brDleur
Orifices de brOleur : Examiner occasionnellement les flammes
des brQleurs pour en verifier la taille et la forme tel qu'indique ci-
dessus. Une bonne flamme est bleue plut6t que jaune. Garder
cette zone propre et ne pas laisser les produits renverses, les
aliments, les agents de nettoyage ou tout autre produit penetrer
dans les orifices de brQleur.
Nettoyage :
1. Enlever le chapeau de brQleur de la base du brQleur et
nettoyer tel qu'indique & la section "Nettoyage general".
2. Nettoyer I'ouverture du tube d'arrivee de gaz avec un chiffon
humide.
A
C
B
A. Grille
B.Fente en forme de X
C. Chapeau de brOleur
D. Bord relev_
19

Grille double (HOB 250)
Les pieds de positionnement sur la grille doivent _tre places dans
les rainures arrondies situees a I'avant et & I'arriere de la table de
cuisson.
A
A. Tige de positionnement
B. Grille
C. Les rainures arrondies
• Nettoyer tous les renversements et toutes les saletes des
aliments contenant du sucre sous n'importe quelle forme des
que possible. Laisser la table de cuisson refroidir legerement;
puis, en portant des mitaines de four, essuyer les
renversements tandis que la surface est encore tiede. Si on
laisse le sucre refroidir sur la table de cuisson, il se peut que
celui-ci adhere & la surface et entra_ne de la corrosion et des
marques permanentes.
• Veiller & ce que les matieres qui pourraient fondre, telles que
le plastique ou le papier d'aluminium, ne touchent pas la
table de cuisson Iorsqu'elle est chaude.
Lors de la preparation de conserves pendant de Iongues
periodes, alterner I'utilisation des brQleurs de surface entre les
quantites preparees. Cette alternance permet aux dernieres
surfaces utilisees de refroidir.
• Centrer I'autoclave sur la grille.
• Ne pas placer I'autoclave sur deux brQleurs de surface & la
fois.
Pour plus de renseignements, communiquez avec votre
service local d'agriculture. Les compagnies qui fabriquent
des produits pour la preparation de conserves peuvent aussi
offrir de I'aide.
II est normal pour la surface de la vitroceramique blanche ou
biscuit de donner I'impression de changer de couleur Iorsque les
zones de cuisson & la surface sont chaudes. Elle reprendra sa
couleur initiale au fur et & mesure que le verre refroidira.
L'essuyage de la table de cuisson avant et apres chaque
utilisation evitera les taches et donnera une chaleur plus
uniforme. Sur les tables de cuisson avec vitroceramique blanche
ou biscuit, les souillures et taches peuvent _tre plus visibles et
necessiter davantage de nettoyage et de soin. L'utilisation d'un
nettoyant pour table de cuisson et d'un grattoir est
recommandee. Pour plus de renseignements, voir la section
"Nettoyage general".
• Ne pas remiser des bocaux ou des boites de conserve au-
dessus de la table de cuisson. La chute d'un objet Iourd ou
dur sur la table de cuisson pourrait la fissurer.
• Ne pas laisser de couvercle chaud sur la table de cuisson.
Lors du refroidissement de la surface de cuisson, de I'air peut
_tre emprisonne entre le couvercle et la table de cuisson, et la
vitroceramique peut se casser Iorsque le couvercle est retire.
J_ ,_,4_ ,_*_,_s
IMPORTANT : Ne pas laisser un ustensile de cuisson vide sur la
surface chaude d'une table de cuisson, d'un element ou d'un
brQleur de surface.
Les ustensiles de cuisson ideals doivent avoir un fond plat, des
parois droites, un couvercle qui ferme bien et le materiau dolt _tre
d'epaisseur moyenne & forte.
Les surfaces rudes peuvent egratigner la table de cuisson.
L'aluminium et le cuivre peuvent _tre employes comme fond ou
base dans un ustensile de cuisson. Cependant, utilises comme
base, ils peuvent laisser des marques permanentes sur la table
de cuisson ou les grilles.
Le materiau d'un ustensile de cuisson affecte la rapidite et
I'uniformite de la transmission de la chaleur, et contribue aux
resultats de cuisson. Un fini antiadhesif a les m_mes
caracteristiques que son materiau de base. Par exemple, un
ustensile de cuisson en aluminium avec un fini antiadhesif aura
les proprietes de I'aluminium.
20
La page est en cours de chargement...
La page est en cours de chargement...
La page est en cours de chargement...
La page est en cours de chargement...
-
 1
1
-
 2
2
-
 3
3
-
 4
4
-
 5
5
-
 6
6
-
 7
7
-
 8
8
-
 9
9
-
 10
10
-
 11
11
-
 12
12
-
 13
13
-
 14
14
-
 15
15
-
 16
16
-
 17
17
-
 18
18
-
 19
19
-
 20
20
-
 21
21
-
 22
22
-
 23
23
-
 24
24


IKEA ICS500VB0 Le manuel du propriétaire
- Catégorie
- Cuisinières
- Taper
- Le manuel du propriétaire
dans d''autres langues
- English: IKEA ICS500VB0 Owner's manual
Documents connexes
Autres documents
-
Whirlpool WCG52424AS Le manuel du propriétaire
-
Maytag GLS3665RS01 Le manuel du propriétaire
-
-
-
Maytag MGC7424AS0 Le manuel du propriétaire
-
KitchenAid KGCV566 Manuel utilisateur
-
KitchenAid KGCK306VSS02 Le manuel du propriétaire
-
Dometic D21 SBC Cooker Outdoor - IOM AMER Mode d'emploi