Toro SnowMaster e24 60V Snowthrower Manuel utilisateur
- Taper
- Manuel utilisateur

Form No. 3461-601 Rev A
SnowMaster
®
e24 60V Snowthrower
39915, 39915T
Lanzanieves SnowMaster
®
e24 60 V
39915, 39915T
Soufeuse à neige SnowMaster
®
e24 de 60 V
39915, 39915T
www .T oro.com.
*3461-601*


Form No. 3461-598 Rev A
SnowMaster
®
e24 60V
Snowthrower
Model No. 39915 —Serial No. 400000000 and Up
Model No. 39915T —Serial No. 400000000 and Up
Register at www .T oro.com.
Original Instructions (EN)
*3461-598*

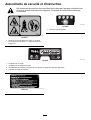
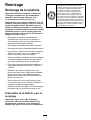
W ARNING
CALIFORNIA
Proposition 65 W arning
The power cord on this product contains
lead, a chemical known to the State
of California to cause birth defects
or other reproductive harm. W ash
hands after handling.
Use of this product may cause exposure
to chemicals known to the State of
California to cause cancer , birth defects,
or other reproductive harm.
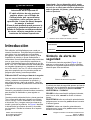
Introduction
This machine is intended to be used by residential
homeowners. It is designed primarily for removing
snow from paved surfaces, such as driveways and
sidewalks, and other surfaces for traf c on residential
or commercial properties. It is not designed for
removing materials other than snow , nor is it designed
for clearing gravel surfaces. It is designed to use
T oro 60V lithium-ion battery packs. These battery
packs are designed to be charged only by T oro 60V
lithium-ion battery chargers. Using this product for
purposes other than its intended use could prove
dangerous to you and bystanders.
Model 39915T does not include a battery or a
charger .
Read this information carefully to learn how to operate
and maintain your product properly and to avoid
injury and product damage. Y ou are responsible for
operating the product properly and safely .
V isit www .T oro.com for product safety and operation
training materials, accessory information, help nding
a dealer , or to register your product.
Whenever you need service, genuine T oro parts, or
additional information, contact an Authorized Service
Dealer or T oro Customer Service and have the model
and serial numbers of your product ready . Figure 1
identies the location of the model and serial numbers
on the product. W rite the numbers in the space
provided.
Important: W ith your mobile device, you can
scan the QR code on the serial number decal (if
equipped) to access warranty , parts, and other
product information.
g397375
Figure 1
1. Model and serial number location
Model No.
Serial No.
Safety-Alert Symbol
The safety-alert symbol ( Figure 2 ) shown in this
manual and on the machine identies important safety
messages that you must follow to prevent accidents.
g000502
Figure 2
Safety-alert symbol
The safety-alert symbol appears above information
that alerts you to unsafe actions or situations and
is followed by the word DANGER ,W ARNING , or
CAUTION .
DANGER indicates an imminently hazardous situation
which, if not avoided, will result in death or serious
injury .
W ARNING indicates a potentially hazardous situation
which, if not avoided, could result in death or serious
injury .
CAUTION indicates a potentially hazardous situation
which, if not avoided, may result in minor or moderate
injury .
This manual uses two other words to highlight
information. Important calls attention to special
mechanical information and Note emphasizes general
information worthy of special attention.
© 2023—The T oro® Company
81 1 1 L yndale A venue South
Bloomington, MN 55420
2
Contact us at www .T oro.com.
Printed in Mexico
All Rights Reserved

Contents
Safety-Alert Symbol . . . . . . . . . . . . . . . . . . . . . . . . . . . . . . . . . . . . . . . . . . . . 2
Safety . . . . . . . . . . . . . . . . . . . . . . . . . . . . . . . . . . . . . . . . . . . . . . . . . . . . . . . . . . . . . . . . . . . . . . . 3
. . . . . . . . . . . . . . . . . . . . . . . . . . . . . . . . . . . . . . . . . . . . . . . . . . . . . . . . . . . . . . . . . . . . . . . . . . . 3
Safety and Instructional Decals . . . . . . . . . . . . . . . . . . . . . . . . . . 6
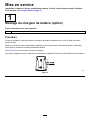
Setup . . . . . . . . . . . . . . . . . . . . . . . . . . . . . . . . . . . . . . . . . . . . . . . . . . . . . . . . . . . . . . . . . . . . . . . . 9
1 Mounting the Battery Charger
(Optional) . . . . . . . . . . . . . . . . . . . . . . . . . . . . . . . . . . . . . . . . . . . . . . . . . . . . . . . . 9
2 Unfolding the Handle . . . . . . . . . . . . . . . . . . . . . . . . . . . . . . . . . . . . . . . 9
3 Installing the Discharge Chute . . . . . . . . . . . . . . . . . . . . . . . 10
4 Installing the Chute-Control Rod . . . . . . . . . . . . . . . . . . . . 10
5 Checking the T ire Pressure . . . . . . . . . . . . . . . . . . . . . . . . . . . . . 1 1
6 Checking the Skids . . . . . . . . . . . . . . . . . . . . . . . . . . . . . . . . . . . . . . . . 12
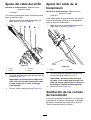
7 Adjusting the Auger Cable . . . . . . . . . . . . . . . . . . . . . . . . . . . . . . 12
Product Overview . . . . . . . . . . . . . . . . . . . . . . . . . . . . . . . . . . . . . . . . . . . . . . . . . . . 13
Specications . . . . . . . . . . . . . . . . . . . . . . . . . . . . . . . . . . . . . . . . . . . . . . . . . . 14
Attachments/Accessories . . . . . . . . . . . . . . . . . . . . . . . . . . . . . . . . . 14
Before Operation . . . . . . . . . . . . . . . . . . . . . . . . . . . . . . . . . . . . . . . . . . . . . . . . . 14
Installing the Battery Pack . . . . . . . . . . . . . . . . . . . . . . . . . . . . . . . . 14
T urning On the Headlight . . . . . . . . . . . . . . . . . . . . . . . . . . . . . . . . . . 15
During Operation . . . . . . . . . . . . . . . . . . . . . . . . . . . . . . . . . . . . . . . . . . . . . . . . . 15
Starting the Machine . . . . . . . . . . . . . . . . . . . . . . . . . . . . . . . . . . . . . . . . . 15
Activating ECO Mode . . . . . . . . . . . . . . . . . . . . . . . . . . . . . . . . . . . . . . . 15
Charging the Battery Pack . . . . . . . . . . . . . . . . . . . . . . . . . . . . . . . . 16
Engaging the Auger . . . . . . . . . . . . . . . . . . . . . . . . . . . . . . . . . . . . . . . . . . 17
Disengaging the Auger . . . . . . . . . . . . . . . . . . . . . . . . . . . . . . . . . . . . . 17
Self-Propelling the Machine . . . . . . . . . . . . . . . . . . . . . . . . . . . . . . 17
Shutting Of f the Machine . . . . . . . . . . . . . . . . . . . . . . . . . . . . . . . . . . 17
Operating the Quick Stick . . . . . . . . . . . . . . . . . . . . . . . . . . . . . . . . . 18
Clearing a Clogged Discharge Chute . . . . . . . . . . . . . . . . 18
Operating T ips . . . . . . . . . . . . . . . . . . . . . . . . . . . . . . . . . . . . . . . . . . . . . . . . . 18
After Operation . . . . . . . . . . . . . . . . . . . . . . . . . . . . . . . . . . . . . . . . . . . . . . . . . . . . 18
Shutting Of f the Machine . . . . . . . . . . . . . . . . . . . . . . . . . . . . . . . . . . 18
Removing the Battery Pack from the
Machine . . . . . . . . . . . . . . . . . . . . . . . . . . . . . . . . . . . . . . . . . . . . . . . . . . . . . . . . 19
Preventing Freeze-up after Use . . . . . . . . . . . . . . . . . . . . . . . . 19
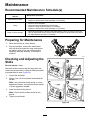
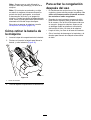
Maintenance . . . . . . . . . . . . . . . . . . . . . . . . . . . . . . . . . . . . . . . . . . . . . . . . . . . . . . . . . . . 20
Recommended Maintenance Schedule(s) . . . . . . . . . . . 20
Preparing for Maintenance . . . . . . . . . . . . . . . . . . . . . . . . . . . . . . . 20
Checking and Adjusting the Skids . . . . . . . . . . . . . . . . . . . . . 20
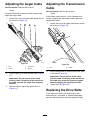
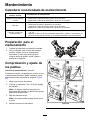
Adjusting the Auger Cable . . . . . . . . . . . . . . . . . . . . . . . . . . . . . . . . 21
Adjusting the T ransmission Cable . . . . . . . . . . . . . . . . . . . . . 21
Replacing the Drive Belts . . . . . . . . . . . . . . . . . . . . . . . . . . . . . . . . . . 21
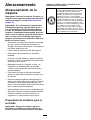
Storage . . . . . . . . . . . . . . . . . . . . . . . . . . . . . . . . . . . . . . . . . . . . . . . . . . . . . . . . . . . . . . . . . . . 22
Storing the Machine . . . . . . . . . . . . . . . . . . . . . . . . . . . . . . . . . . . . . . . . . . 22
T roubleshooting . . . . . . . . . . . . . . . . . . . . . . . . . . . . . . . . . . . . . . . . . . . . . . . . . . . . . . 23
Safety
IMPORT ANT SAFETY
INSTRUCTIONS
W ARNING
When using an electric machine, always
read and follow basic safety warnings and
instructions to reduce the risk of re, electric
shock, or injury , including the following:
Read All Instructions
I. T raining
1. The operator of the machine is responsible for
any accidents or hazards occurring to others or
their property .
2. Read and understand the contents of this
Operator ’ s Manual before you start the machine.
Ensure that everyone using this machine knows
how to use it, knows how to shut it of f quickly ,
and understands the warnings.
3. Do not allow children to use or play with the
machine, battery pack, or the battery charger;
local regulations may restrict the age of the
operator .
4. Do not allow children or untrained people to
operate or service this device. Allow only people
who are responsible, trained, familiar with the
instructions, and physically capable to operate
or service the device.
5. Before using the machine, battery pack, and
battery charger , read all the instructions and
cautionary markings on these products.
6. Become familiar with the controls and proper
use of the machine, battery pack, and battery
charger .
3

II. Preparation
1. Keep bystanders and children out of the
operating area.
2. Never allow children to operate the machine.
3. Do not operate the machine without all guards
and other safety devices in place and functioning
properly on the machine.
4. Inspect the area where you will use the machine
and remove all objects that could interfere with
the operation of the machine or that the machine
could throw .
5. Use only the battery pack specied by T oro.
Using other accessories and attachments may
increase the risk of injury and re.
6. Plugging the battery charger into an outlet that
is not 120 V can cause a re or electric shock.
Do not plug the battery charger into an outlet
other than 120 V .
7. Do not use a damaged or modied battery
pack or battery charger , which may exhibit
unpredictable behavior that results in re,
explosion, or risk of injury .
8. If the supply cord to the battery charger is
damaged, contact an Authorized Service Dealer
to replace it.
9. Charge the battery pack with only the battery
charger specied by T oro. A charger suitable for
1 type of battery pack may create a risk of re
when used with another battery pack.
10. Charge the battery pack in a well-ventilated area
only .
1 1. Follow all charging instructions and do
not charge the battery pack outside of the
temperature range specied in the instructions.
Otherwise, you may damage the battery pack
and increase the risk of re.
12. Dress properly—W ear appropriate clothing,
including eye protection; long pants; substantial,
slip-resistant rubber boots; and hearing
protection. T ie back long hair and do not wear
loose clothing or loose jewelry that can get
caught in moving parts.
III. Operation
1. Contact with the moving rotor will cause serious
injury . Keep your hands and feet away from all
moving parts of the machine. Keep clear of any
discharge opening.
2. Stay behind the handles and away from the
discharge opening while operating the machine.
3. Using this machine for purposes other than its
intended use could prove dangerous to you and
bystanders.
4. Prevent unintentional starting—Ensure that the
electric-start key is removed from the key switch
before connecting the battery pack and handling
the machine.
5. Use your full attention while operating the
machine. Do not engage in any activity that
causes distractions; otherwise, injury or property
damage may occur .
6. Disengage all clutches and shift into neutral
before starting the machine.
7. Shut of f the machine, remove the electric-start
key , remove the battery pack from the machine,
and wait for all movement to stop before
adjusting, servicing, cleaning, or storing the
machine.
8. Remove the battery pack and electric-start
key from the machine whenever you leave it
unattended or before changing accessories.
9. Do not force the machine—Allow the machine to
do the job better and safer at the rate for which it
was designed.
10. Stay alert—W atch what you are doing and use
common sense when operating the machine.
Do not use the machine while ill, tired, or under
the inuence of alcohol or drugs.
1 1. Operate the machine only in good visibility and
appropriate weather conditions.
12. Use extreme caution when reversing or pulling
the machine toward you.
13. Keep proper footing and balance at all times,
especially on slopes. Use extreme caution when
changing directions on slopes. Do not operate
the machine on exceedingly steep slopes. W alk,
never run with the machine.
14. When not actively clearing snow , disengage
power to the auger .
15. Do not direct the discharge material toward
anyone. A void discharging material against a
wall or obstruction; material may ricochet toward
you. Shut of f the machine when crossing gravel
surfaces.
16. Exercise extreme caution when operating the
machine on walks or roads. Stay alert for hidden
hazards or traf c.
17. If the machine strikes an object or starts to
vibrate, immediately shut of f the machine,
remove the key , remove the battery pack, and
wait for all movement to stop before examining
the machine for damage. Make all necessary
repairs before resuming operation.
18. Shut of f the machine whenever you leave the
operating position for any reason.
4

19. Shut of f the machine and remove the key before
unclogging the machine and always use a stick
or a cleanout tool to remove the clog.
20. Shut of f the machine, remove the electric-start
key , and remove the battery pack(s) before
loading the machine for hauling.
21. Never operate the machine at high transport
speeds on slippery surfaces.
22. Under abusive conditions, the battery pack may
eject liquid; avoid contact. If you accidently
come into contact with the liquid, ush with
water . If the liquid contacts your eyes, seek
medical help. Liquid ejected from the battery
pack may cause irritation or burns.
23. Do not expose a battery pack or tool to re or
excessive temperature. Exposure to re or
temperature above 130°C (265°F) may cause
explosion.
24. CAUTION—A mistreated battery pack may
present a risk of re, explosion, or chemical
burn.
•Do not disassemble the battery pack.
•Replace the battery pack with a genuine
T oro battery pack only; using another type of
battery pack may cause a re or risk of injury .
•Keep battery packs out of the reach of
children and in the original packaging until
you are ready to use them.
IV . Maintenance and Storage
1. Shut of f the machine, wait for all moving parts to
stop, remove the electric-start key , and remove
the battery pack(s) from the machine before
adjusting, servicing, cleaning, or storing the
machine.
2. Do not attempt to repair the machine except as
indicated in the instructions. Have an Authorized
Service Dealer perform service on the machine
using identical replacement parts.
3. W ear gloves and eye protection when servicing
the machine.
4. When servicing the rotor , be aware that the rotor
can still move even though the power source
is of f.
5. For best performance, use only genuine T oro
replacement parts and accessories. Other
replacement parts and accessories could be
dangerous, and such use could void the product
warranty .
6. Maintain the machine—Keep handles dry , clean,
and free from oil and grease. Keep guards
in place and in working order . Use identical
replacement parts only .
7. Check all fasteners at frequent intervals for
proper tightness to ensure that the machine is in
safe working condition.
8. Check the machine for damaged parts. Check
for misaligned and binding moving parts, broken
parts, mounting, and any other condition that
may af fect its operation. Unless indicated in the
instructions, have an Authorized Service Dealer
repair or replace a damaged guard or part.
9. When the battery pack is not in use, keep it
away from metal objects such as paper clips,
coins, keys, nails, and screws that can make a
connection from 1 terminal to another . Shorting
the battery terminals may cause burns or a re.
10. When you are not using the machine, store it
indoors in a dry , secure place out of the reach
of children.
1 1. When storing the machine for more than 30
days, refer to Storage ( page 22 ) for important
information.
SA VE THESE
INSTRUCTIONS
5

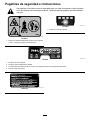
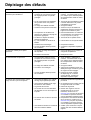
Safety and Instructional Decals
Safety decals and instructions are easily visible to the operator and are located near any area
of potential danger . Replace any decal that is damaged or missing.
decal121-6817
121-6817
1. Cutting/dismemberment hazard of hand or foot, impeller
and auger—keep bystanders away .
decal137-9461
137-9461
1. Battery charge status
decal137-9463
137-9463
1. The battery pack is charging.
2. The battery pack is fully charged.
3. The battery pack is over or under the appropriate temperature range.
4. Battery pack charging fault
decal145-3133
145-3133
6

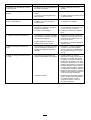
decal145-1479
145-1479
1. Read the Operator ’ s
Manual .
3. Keep away from open re
or ames.
2. Call2Recycle
®
battery
recycling program
4. Do not expose to rain.
decal145-8260
145-8260
1. Read the Operator ’ s
Manual .
3. Do not expose to rain.
2. Keep away from open re
or ames.
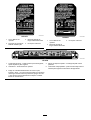
decal147-9404
147-9404
1. Auger drive—release the lever to disengage; squeeze the
lever to engage.
4. Thrown object hazard—keep bystanders away .
2. W arning—read the Operator ’ s Manual . 5. Self-propel drive—push down on the handle to engage the
self-propel drive.
3. Cutting/dismemberment hazard of hands or feet, impeller
and auger—keep away from moving parts; keep all guards
and shields in place; shut of f the engine and remove the key
before leaving the machine or performing maintenance.
7

decal147-9420
147-9420
decal147-9438
147-9438
1. Cutting/dismemberment hazard of hands or feet, impeller
and auger—do not place your hand in the chute; remove
the key before performing maintenance.
8

Setup
Important: The battery pack is not fully charged when you purchase it. Before using the machine for
the rst time, refer to Charging the Battery Pack ( page 16 ) .
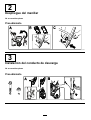
1
Mounting the Battery Charger (Optional)
Parts needed for this procedure:
2
Mounting hardware (not included)
Procedure
If desired, mount the battery charger securely on a wall using the wall-mount key holes on the back of the
charger .
Mount it indoors (such as a garage or other dry place), near a power outlet, and out of the reach of children.
Refer to Figure 3 for assistance in mounting the charger .
Slide the charger over the appropriately positioned hardware to secure the charger in place (hardware not
included).
g290534
Figure 3
9

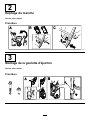
2
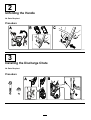
Unfolding the Handle
No Parts Required
Procedure
g431 137
3
Installing the Discharge Chute
No Parts Required
Procedure
g431 165
10

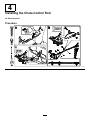
4
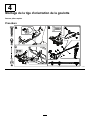
Installing the Chute-Control Rod
No Parts Required
Procedure
g431 182
1 1

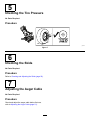
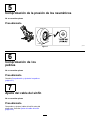
5
Checking the T ire Pressure
No Parts Required
Procedure
g431445
Figure 7
6
Checking the Skids
No Parts Required
Procedure
Refer to Checking and Adjusting the Skids ( page 20 ) .
7
Adjusting the Auger Cable
No Parts Required
Procedure
Check and adjust the auger cable before rst use;
refer to Adjusting the Auger Cable ( page 21 ) .
12

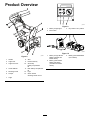
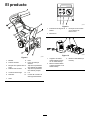
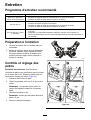
Product Overview
g430951
Figure 8
1. Handle
8. Skid
2. Auger lever 9. Electric-start key
3. Auger-lever lock
10. Secondary
battery-compartment
lid
4. Chute deector
1 1. Main battery-compartment
lid
5. Discharge chute 12. Light
6. Scraper 13. Quick Stick®
discharge-chute control
7. Auger
g347780
Figure 9
1. Battery charge lights
3. Key switch in O FF position
2. ECO button
g360884
Figure 10
1. Battery charger Model
88602 (included with
Model 39915)
3. Battery pack Model 88625
(not included)
2. Battery packs Model
88650 and 66810
(included with Model
39915)
13

Specications
Model W eight Length W idth Height
54 kg 132 cm 63.5 cm 109 cm
39915
(1 19 lb) (52
inches)
(25
inches)
(43
inches)
Battery Pack
Model 88650 66810
5 Ah 10 AhBattery pack
capacity
270 Wh 540 Wh
Battery manufacturer rating = 60V maximum and 54V nominal.
Actual voltage varies with load.
Battery Charger
Model 88602
T ype
60V MAX Lithium-Ion Battery Charger
Input
120V AC 50/60Hz Max 2.0A
Output 60V MAX DC 2.0A
Appropriate T emperature Ranges
Charge/store the battery pack
at
5°C (41°F) to 40°C (104°F)*
Use the battery pack at
-30°C (-22°F) to 49°C (120°F)*
Use the machine at
-30°C (-22°F) to 49°C (120°F)*
*Charging time will increase if you do not charge the
battery within this range.
Store the machine, battery pack, and battery charger
in an enclosed clean, dry area.
Attachments/Accessories
A selection of T oro approved attachments and
accessories is available for use with the machine
to enhance and expand its capabilities. Contact
your Authorized Service Dealer or authorized T oro
distributor or go to www .T oro.com for a list of all
approved attachments and accessories.
T o ensure optimum performance and continued safety
certication of the machine, use only genuine T oro
replacement parts and accessories. Replacement
parts and accessories made by other manufacturers
could be dangerous.
Operation
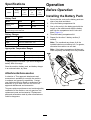
Before Operation
Installing the Battery Pack
1. Ensure that the vents on the battery packs are
clear of any dust and debris.
2. Lift up the battery-compartment lid.
3. Line up the cavity in the battery pack with the
tongue on the machine and slide the battery
pack into the compartment until it locks into
place ( Figure 1 1 ).
4. Close the battery-compartment lid.
5. Repeat for the other 2 battery cavities (if
needed).
Note: The combined amp hours of all the
installed batteries must add up to 6.0 or greater ,
otherwise the machine can not start.
Note: If the battery-compartment lid does not
close completely , the battery is not fully installed.
g431026
Figure 1 1
14

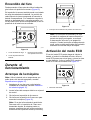
T urning On the Headlight
Y ou can turn on the power to the headlight before
operating the machine; turn the key to the A CCESSORY
position ( Figure 12 ).
In the A CCESSORY position, you can also view the
state of charge of each installed battery . The position
of each set of lights corresponds to the related battery
cavity . If the battery state of charge is too low and
needs to be charged, or if there is no battery in the
corresponding cavity , the battery presence light does
not turn on.
g348182
Figure 12
1. State-of-charge lights
3. Key switch in the
ACCESSORY position
2. Battery presence lights
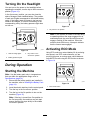
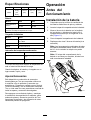
During Operation
Starting the Machine
Note: Use the battery pack only in temperatures
that are within the appropriate range; refer to
Specications ( page 14 ) .
1. Ensure that the battery pack(s) are installed in
the machine; refer to Installing the Battery Pack
( page 14 ) .
2. Insert the electric-start key into the control panel.
3. T urn the key to the A CCESSORY position.
4. T urn the key to the O Nposition to turn on the
machine ( Figure 13 ).
Note: If the key is turned from O FF position to
the O Ntoo quickly , the machine may not start;
ensure that the key stops briey in the middle
ACCESSORY position.
g347864
Figure 13
1. Key switch in O Nposition
Note: If the machine is turned on and left idling
or operating without the auger engaged for an
extended period, the motor shutof f timeout will
engage, shutting of f the machine. When the
machine shuts of f this way , it beeps to indicate
that the timeout was engaged.
Activating ECO Mode
Using ECO mode may extend battery life by reducing
rotor speed; use ECO mode whenever you are
moving light snow , or moving snow a short distance.
Activate ECO mode using the ECO button as shown
in Figure 14 .
g347866
Figure 14
1. ECO mode button
15

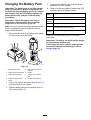
Charging the Battery Pack
Important: The battery pack is not fully charged
when you purchase it. Before using the tool for
the rst time, place the battery pack in the charger
and charge it until the LED display indicates the
battery pack is fully charged. Read all safety
precautions.
Important: Charge the battery pack only in
temperatures that are within the appropriate
range; refer to Specications ( page 14 ) .
Note: At any time, press the battery-charge-indicator
button on the battery pack to display the current
charge (LED indicators).
1. Ensure that the vents on the battery and charger
are clear of any dust and debris.
g290533
Figure 15
1. Battery pack cavity
5. LED indicators (current
charge)
2. Battery pack venting areas 6. Handle
3. Battery pack terminals
7. Charger LED indicator
light
4. Battery-charge-indicator
button
8. Charger venting areas
2. Line up the cavity in the battery pack ( Figure 15 )
with the tongue on the charger .
3. Slide the battery pack into the charger until it is
fully seated ( Figure 15 ).
4. T o remove the battery pack, slide the battery
backward out of the charger .
5. Refer to the following table to interpret the LED
indicator light on the battery charger .
Indicator
light
Indicates
Of f
No battery pack inserted
Green
blinking
Battery pack is charging
Green
Battery pack is charged
Red
Battery pack and/or battery charger is over or under
the appropriate temperature range
Red
blinking
Battery pack charging fault*
*Refer to T roubleshooting ( page 23 ) for more
information.
Important: The battery can be left on the charger
for short periods between uses.
If the battery will not be used for longer periods,
remove the battery from the charger; refer to
Storage ( page 22 ) .
16

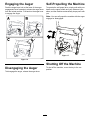
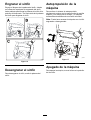
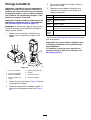
Engaging the Auger
Push the auger-lever lock at the base of the auger
engagement lever forwards to release the auger lever
from the locked position. Pull back on the auger lever
to engage the auger .
g431086
Figure 16
Disengaging the Auger
T o disengage the auger , release the auger lever .
Self-Propelling the Machine
T o operate the self-propel drive, simply walk with your
hands on the upper handle and your elbows at your
sides, and the machine automatically keeps pace with
you.
Note: Y ou can self-propel the machine with the auger
engaged or disengaged.
g431087
Figure 17
Shutting Off the Machine
T o shut of f the machine, move the key to the OFF
position.
17

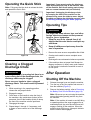
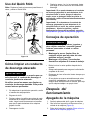
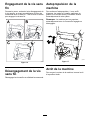
Operating the Quick Stick
Note: Fully press the blue knob to release the latch
and operate the Quick Stick.
g431092
Figure 18
Clearing a Clogged
Discharge Chute
W ARNING
If the auger/impeller is running but there is no
snow coming out of the discharge chute, the
discharge chute may be clogged.
Never use your hands to clear a clogged
discharge chute. This could result in personal
injury .
1. While remaining in the operating position,
release the self-propel handle.
2. Engage the auger .
3. Push down on the handle to raise the front of
the machine a few centimeters (inches) of f the
pavement, then lift the handles quickly to bump
the front of the machine onto the pavement.
4. Disengage the auger .
5. Repeat steps 1 through 4, if necessary , until
a stream of snow comes out of the discharge
chute.
Important: If you cannot unclog the discharge
chute by bumping the front of the machine, shut
off the machine, wait for all moving parts to stop,
and use a snow-cleanout tool (not included).
Important: Unclogging the discharge chute
by bumping the front of the machine on the
pavement may cause the skids to move. Adjust
the skids and tighten the skid bolts securely; refer
to Checking and Adjusting the Skids ( page 20 ) .
Operating T ips
W ARNING
The auger can throw stones, toys, and other
foreign objects and cause serious personal
injury to you or bystanders.
• Keep the area to be cleared free of all
objects that the rotor blades could pick up
and throw .
• Keep all children and pets away from the
area of operation.
•Remove the snow as soon as possible after it falls.
•Overlap each swath to ensure complete snow
removal.
•Discharge the snow downwind whenever possible.
•If the machine does not propel itself forward on
slippery surfaces or in heavy snow , push forward
on the handle, but allow the machine to work at
its own pace.
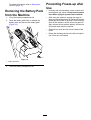
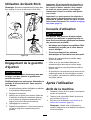
After Operation
Shutting Off the Machine
1. Release the auger lever and stop the machine.
2. T urn the key to the O FF position and remove it
from the machine ( Figure 9 ).
3. Remove the battery pack(s); refer to Removing
the Battery Pack from the Machine ( page 19 ) .
Note: Whenever you are not using the machine,
remove the battery pack(s) and the key from
the machine.
Note: If the machine is turned on and left idling
or operating without the auger engaged for an
extended period, the motor shutof f timeout will
engage, shutting of f the machine. When the
machine shuts of f this way , it beeps to indicate
that the timeout was engaged.
18
La page est en cours de chargement...
La page est en cours de chargement...
La page est en cours de chargement...
La page est en cours de chargement...
La page est en cours de chargement...
La page est en cours de chargement...
La page est en cours de chargement...
La page est en cours de chargement...
La page est en cours de chargement...
La page est en cours de chargement...
La page est en cours de chargement...
La page est en cours de chargement...
La page est en cours de chargement...
La page est en cours de chargement...
La page est en cours de chargement...
La page est en cours de chargement...
La page est en cours de chargement...
La page est en cours de chargement...
La page est en cours de chargement...
La page est en cours de chargement...
La page est en cours de chargement...
La page est en cours de chargement...
La page est en cours de chargement...
La page est en cours de chargement...
La page est en cours de chargement...
La page est en cours de chargement...
La page est en cours de chargement...
La page est en cours de chargement...
La page est en cours de chargement...
La page est en cours de chargement...
La page est en cours de chargement...
La page est en cours de chargement...
La page est en cours de chargement...
La page est en cours de chargement...
La page est en cours de chargement...
La page est en cours de chargement...
La page est en cours de chargement...
La page est en cours de chargement...
La page est en cours de chargement...
La page est en cours de chargement...
La page est en cours de chargement...
La page est en cours de chargement...
La page est en cours de chargement...
La page est en cours de chargement...
La page est en cours de chargement...
La page est en cours de chargement...
La page est en cours de chargement...
La page est en cours de chargement...
La page est en cours de chargement...
La page est en cours de chargement...
La page est en cours de chargement...
La page est en cours de chargement...
La page est en cours de chargement...
La page est en cours de chargement...
La page est en cours de chargement...
La page est en cours de chargement...
La page est en cours de chargement...
La page est en cours de chargement...
La page est en cours de chargement...
La page est en cours de chargement...
La page est en cours de chargement...
La page est en cours de chargement...
La page est en cours de chargement...
La page est en cours de chargement...
-
 1
1
-
 2
2
-
 3
3
-
 4
4
-
 5
5
-
 6
6
-
 7
7
-
 8
8
-
 9
9
-
 10
10
-
 11
11
-
 12
12
-
 13
13
-
 14
14
-
 15
15
-
 16
16
-
 17
17
-
 18
18
-
 19
19
-
 20
20
-
 21
21
-
 22
22
-
 23
23
-
 24
24
-
 25
25
-
 26
26
-
 27
27
-
 28
28
-
 29
29
-
 30
30
-
 31
31
-
 32
32
-
 33
33
-
 34
34
-
 35
35
-
 36
36
-
 37
37
-
 38
38
-
 39
39
-
 40
40
-
 41
41
-
 42
42
-
 43
43
-
 44
44
-
 45
45
-
 46
46
-
 47
47
-
 48
48
-
 49
49
-
 50
50
-
 51
51
-
 52
52
-
 53
53
-
 54
54
-
 55
55
-
 56
56
-
 57
57
-
 58
58
-
 59
59
-
 60
60
-
 61
61
-
 62
62
-
 63
63
-
 64
64
-
 65
65
-
 66
66
-
 67
67
-
 68
68
-
 69
69
-
 70
70
-
 71
71
-
 72
72
-
 73
73
-
 74
74
-
 75
75
-
 76
76
-
 77
77
-
 78
78
-
 79
79
-
 80
80
-
 81
81
-
 82
82
-
 83
83
-
 84
84


