
English
Deutch
Français
Nederlands
Español
Italiano
Svenska
Dansk
Norsk
Suomi
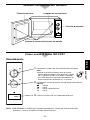
Operating Instructions.... Microwave Oven .................... For Commercial Use
Bedienungsanleitung..... Mikrowellengerät ............ Für Gewerbliche Nutzung
Mode d’emploi ...............Four à Micro-ondes ......... Pour Usage Professionnel
Gebruiksaanwijzing .........Magnetronoven........... Voor Professioneel Gebruik
Manual de Instrucciones ...
Horno Microondas................
Para Uso Commercial
Istruzioni ........................ Forno a Microonde ................Per Uso Professionale
Bruksanvisning ................Mikrovågsugn .......... För Yrkesmässig Användning
Brugsanvisning .............. Mikrobølgeovne.................... Til Professionelt Brug
Bruksanvisning .............. Mikrobølge Ovn ... For Profesjonell Bruk/Storkjøkken
Käyttöohjeet .................... Mikroaaltouuni............................ Ammattikäyttöön
NE-1027/NE-1037
Please read these instructions completely before operating this oven.
Vor Gebrauch des Gerätes bitte die Bedienungsanleitung ausführlich durchlesen.
Veuillez lire ces instructions entièrement avant d’utiliser cet appareil.
Leest U s.v.p. eerst deze handleiding in zijn geheel door, voordat U de oven in gebruik neemt.
Por favor lea estas instrucciones antes de hacer funcionar este horno.
Prima di utilizzare l’apparecchio, leggete attentamente queste istruzioni.
Läs instruktionerna noga innan du använder ugnen.
Læs venligst denne brugsanvisning grundigt, før du bruger ovnen.
Les hele bruksanvisningen før du tar ovnen i bruk.
Lue käyttöohjeet huolellisesti läpi, ennenkuin alat käyttää mikroaaltouunia.
0
5
10
15
20
25
30
1
2
3
4
6
7
8
9
(Min)
x2 1 2 3
x
2
1
2
3
4
5
6
7
8
9
0

- 2 -
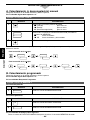
This product is an equipment that fulfills the European standard for EMC disturbances
(EMC = Electromagnetic Compatibility) EN 55011. According to this standard this product is an
equipment of group 2, class B and is within required limits. Group 2 means that radio-frequency energy is
intentionally generated in the form of electromagnetic radiation for warming and cooking of food. Class B
means that this product may be used in normal household areas.
Bei diesem Produkt handelt es sich um ein Gerät, das die europäische Norm für EMV-Funkstörungen
(EMV = Elektromagnetische Verträglichkeit), EN 55011, erfüllt. Gemäß dieser Norm ist dieses Produkt
ein Gerät der Gruppe 2, Klasse B und hält alle Grenzwerte ein. Gruppe 2 bedeutet, dass in diesem Gerät
Hochfrequenz-Energie für das Erwärmen oder Garen von Lebensmitteln absichtlich als
elektromagnetische Strahlung erzeugt wird. Klasse B sagt aus, dass dieses Produkt in einem normalen
Wohnbereich betrieben werden darf.
Ce produit est un matériel qui répond aux normes européennes sur les perturbations électromagnétiques
EMC (EMC = compatibilité électromagnétique) EN 55011. Selon cette norme, ce produit est classé
Groupe 2, classe B et reste dans les limites requises. La classification groupe 2 signifie que l’énergie à
fréquence radio est intentionnellement émise sous forme d’une radiation éléctromagnétique afin de
réchauffer ou de cuire des aliments. Classe B signifie que ce produit peut être utilisé dans un
environnement domestique usuel.
Dit produkt voldoet aan de Europese standaard (EN 55011) voor EMC interferentie ’s
(EMC = Elektromagnetische Compabiliteit) Overeenkomstig deze standaard behoord dit produkt tot de
groep 2 apparatuur, klasse B en voldoet deze aan alle normeringseisen. Groep 2 houdt in dat de
Frequentie energie wordt opgewekt in de vorm van elektromagnetische straling bedoeld voor het
verwarmen en koken van voedsel. Groep B informeerd dat dit produkt toegepast kan worden voor
normaal huishoudelijk gebruik.
Este producto es un equipo que cumple con el standard EMC (EMC = Compatibilidad Electromagnética)
EN 55011. De acuerdo con este standard este producto es un equipo del grupo 2 clase B y se encuentra
dentro de los límites exigidos. Grupo 2 significa que la energía de radio frecuencia es generada en forma
de radiación electromagnética para calentar o cocinar alimentos. Clase B significa que este producto
debe de ser usado en áreas domésticas.
Questo prodotto è conforme agli attuali standard Europei per la Compatibilità Elettromagnetica, in
ottemperanza alle norme EN 55011. Secondo gli standard menzionati questo prodotto rientra nel gruppo
2, classe B, all’interno dei limiti richiesti. Gruppo 2; significa che la radio frequenza è generata sotto
forma di emissione elettromagnetica adatta allo scopo di riscaldare o cuocere i cibi. Classe B: significa
che questo prodotto può essere utilizzato nel normale ambito casalingo.
Denna produkt uppfyller de europeiska standard EN 55011 för EMC bestämmelser
(EMC = Elektromagnetisk kompabilitet). Enligt denna standard är denna produkt en apparat i grupp 2,
klass B och uppfyller kraven för detta. Grupp 2 betyder att radio-frekvent energi produceras i form av
elektromagnetiska vågor, för uppvärmning av mat. Klass B betyder att denna produkt kan användas i det
normala hushållet.
Dette produkt opfylder den europæiske standard EN 55011 for EMC forstyrelser
(EMC = Elektromagnetisk Compatibilitet). I henhold til denne standard er dette produkt et apparat i
gruppe 2, klasse B og opfylder kravene for dette. Gruppe 2 betyder, at radio-frekevent energi danes i
form af elektromagnestiske bølger, med henblik på opvarmning af føde. Klasse B betyder, at dette
produkt, må anvendes i almindelige husholdninger.
Dette produktet opfyller den europeiske standard EN 55011 for EMC forstyrrelser
(EMC = Elektromagnetisk kompatibilitet). I henhold til denne standard er dette produkt et apparat i gruppe
2, klasse B og opfyller kravene for dette. Gruppe 2 betyr at radio-frekvent energi dannes i form av
elektromagnetiske bølger, med henblikk på oppvarming av mat. Klasse B betyr at dette produkt kan
benyttes i almindelige husholdninger.
Tämä on laite, joka täyttää Eurooppalaisen EMC-standardin (EMC = Elektromagneettinen
yhteensopivuus) EN 55011. Tämän standardin mukaan laite kuuluu ryhmään 2, luokkaan B ja täyttää
vaadittavat ehdot. Ryhmä 2 tarkoittaa, että radioaaltoenergia syntyy elektromagneettisen säteilyn
muodossa ruoan lämmittämiseksi tai kypsentämiseksii. Luokka B tarkoittaa, että tätä laitetta voidaan
käyttää kotitalouksissa.

English
- 3 -
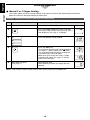
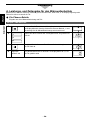
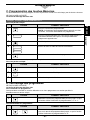
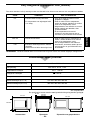
Table of Contents
Installation and Connection . . . . . . . . . . . . . . . . . . . . . . . . . . . . . . . . . . . . . . . . . . . 3, 4
Important Information . . . . . . . . . . . . . . . . . . . . . . . . . . . . . . . . . . . . . . . . . . . . . . . . 04
How Does the Microwave Work? . . . . . . . . . . . . . . . . . . . . . . . . . . . . . . . . . . . . . . . 05
NE-1027
Outline Diagram NE-1027 . . . . . . . . . . . . . . . . . . . . . . . . . . . . . . . . . . . . . . . . . . . . . 07
How to Operate . . . . . . . . . . . . . . . . . . . . . . . . . . . . . . . . . . . . . . . . . . . . . . . . . . . . . 07
NE-1037
Outline Diagram NE-1037 . . . . . . . . . . . . . . . . . . . . . . . . . . . . . . . . . . . . . . . . . . . . . 08
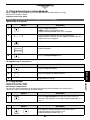
How to Operate
Before Operating . . . . . . . . . . . . . . . . . . . . . . . . . . . . . . . . . . . . . . . . . . . . . . . . . . 08
A. Manual Heating . . . . . . . . . . . . . . . . . . . . . . . . . . . . . . . . . . . . . . . . . . . . . . . . . 08
√ Manual Single Stage Heating . . . . . . . . . . . . . . . . . . . . . . . . . . . . . . . . . . . . 09
√ Manual 2 or 3 Stages Heating . . . . . . . . . . . . . . . . . . . . . . . . . . . . . . . . . . . 10
B. Programmed Heating . . . . . . . . . . . . . . . . . . . . . . . . . . . . . . . . . . . . . . . . . . . . 11
C. Programming
√ Programming Memory Pads for Single Stage Heating. . . . . . . . . . . . . . . . . 12
√ Programming Memory Pads for 2 or 3 Stages Heating . . . . . . . . . . . . . . . . 13
√ Programming the Double Quantity Pad . . . . . . . . . . . . . . . . . . . . . . . . . . . . 14
D. Program Lock
√ To Activate Program Lock . . . . . . . . . . . . . . . . . . . . . . . . . . . . . . . . . . . . . . 15
√ To Release Program Lock . . . . . . . . . . . . . . . . . . . . . . . . . . . . . . . . . . . . . . 15
E. To Read Program List . . . . . . . . . . . . . . . . . . . . . . . . . . . . . . . . . . . . . . . . . . . . 16
F. To Select Beep Tone Options . . . . . . . . . . . . . . . . . . . . . . . . . . . . . . . . . . . . . . 17
G. To Read the Cycle Counter . . . . . . . . . . . . . . . . . . . . . . . . . . . . . . . . . . . . . . . 17
Self Diagnostics Failure Code . . . . . . . . . . . . . . . . . . . . . . . . . . . . . . . . . . . . . . . . . . 18
Care of Your Microwave Oven . . . . . . . . . . . . . . . . . . . . . . . . . . . . . . . . . . . . . . . . . 18
Cooking/Defrosting Guide . . . . . . . . . . . . . . . . . . . . . . . . . . . . . . . . . . . . . . . . . . . . . 19
Technical Specification . . . . . . . . . . . . . . . . . . . . . . . . . . . . . . . . . . . . . . . . . . . . . . . 20

English
- 4 -
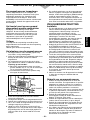
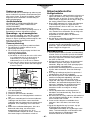
Installation and Connection
Examine your microwave oven
Unpack the oven, remove all packing material, and
examine the oven for any damage such as dents,
broken door latches or cracks in the door. If you find
any damage, notify your dealer immediately. Do not
install a damaged microwave oven.
Earthing instructions
IMPORTANT: THIS UNIT HAS TO BE PROPERLY
EARTHED FOR PERSONAL SAFETY.
If your AC outlet is not grounded, it is the personal
responsibility of the customer to have it replaced
with a properly grounded wall socket.
Operation voltage
The voltage has to be the same as specified on the
label on the oven. If a higher voltage than specified
is used, it may cause a fire or other damages.
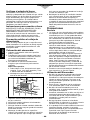
Placement of the Oven
1. Place the oven on a flat and stable surface.
2. When this oven is installed, it should be easy to
isolate the appliance from the electricity supply
by pulling out the plug operating a circuit beaker.
3. For proper operation, ensure a sufficient air
circulation for the oven.
Counter-top use:
a. Allow 15 cm of space on the top of the oven,
10 cm at back and 5 cm on both sides.
b. If one side of the oven is placed flush to a wall,
the other side or top must not be blocked.
Safety Instructions
Warning
1. The door seals and door seal areas should be
cleaned with a damp cloth.
The appliance should be inspected for damage to
the door seals and door seal areas and if these
areas are damaged the appliance should not be
operated until it has been repaired by a service
technician trained by the manufacturer.
2. Do not operate this appliance if it has a damaged
CORD OR PLUG, if it is not working properly, or
if it has been damaged or dropped. It is
dangerous for anyone other than a service
technician trained by the manufacturer to perfrom
repair service.
3. Do not attempt to tamper with or make any
adjustments or repairs to the door, control panel
housing, safety interlock switches or any other
part of the oven. Do not remove the outer panel
from oven.
Repairs should only be done by a qualified
service person.
If the supply cord is damaged, it must be
replased by the manufacturer or its service agent
or a similarly qualified person in order to avoid a
hazard.
4. When it becomes necessary to replace the oven
light, please consult your dealer.
Use of your oven
1. Do not use the oven for any reason other than
the preparation of food. This oven is spacifically
designed to heat or cook food. Do not use this
oven to heat chemicals or other non-food
products.
2. Before use, check that utensils/containers are
suitable for use in microwave ovens.
3. Do not attempt to use this microwave oven to dry
newspaper, clothing or any other materials.
They may catch on fire.
4. When the oven is not being used, do not store
any objects other than oven accessories inside
the oven in case it is accidentally turned on.
5. The appliance shall not be operated by
MICROWAVE WITHOUT FOOD IN THE OVEN.
Operation in this manner may damage the
appliance.
6. If smoke or a fire occurs in the oven, press the
STOP/RESET Pad or turn the TIMER SELECT
DIAL back to zero position and leave the door
closed. Disconnect the power cord, or shut off
power at the fuse or the circuit breaker panel.
7. Only allow children to use the oven without
supervision when adequate instructions have
been given so that the child is able to use the
oven in a safe way and understands the hazards
of improper use.
4. Do not place this oven near an electric or gas
cooker range.
5. The feet should not be removed.
6. This oven is only for household usage. Do not
use outdoors.
7. Avoid using the microwave oven in high humidity.
8. The power cord should not touch the outside of
the oven. Keep the cord away from hot surfaces.
Do not let the cord hang over the edge of a table
or work top. Do not immerse the cord, plug or
oven in water.
9. Do not block the air vents on the top and back of
the oven. If these openings are blocked during
operation the oven may overheat. In this case the
oven is protected by a thermal safety device and
resumes operation only after cooling down.
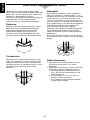
15 cm
5 cm
10 cm

English
- 5 -
Important Information
1) Cooking Times
≥Cooking times given in the cookbook are
approximate. The cooking time depends on the
condition, temperature and amount of food and on
the type of cooking ware.
≥Begin with the minimum cooking time to help
prevent overcooking. If the food is not sufficiently
cooked you can always cook it for a little longer.
N.B.: If the recommended cooking time are
exceeded the food will be spoiled and in
extreme circumstances could catch fire and
possibly damage the interior of the oven.
2) Small Quantities of Foods
≥Small quantities of food or
foods with low moisture
content can burn, dry out or
catch on fire if cooked too
long. If materials inside the
oven should ignite, keep the
oven door closed, turn the
oven off and remove the plug
from the socket.
3) Eggs
≥Do not cook eggs in their shells and whole hard-
boiled eggs by MICROWAVE. Pressure may build
up and the eggs will explode.
4) Piercing Skin
≥Food with non porous
skins, such as potatoes,
egg yolks and sausages
must be pierced before
cooking by MICROWAVE
to prevent bursting.
5) Meat Thermometer
≥Use a meat thermometer to check the degree of
cooking of roasts and poultry only when the meat
has been removed from the oven. Do not use a
conventional meat thermometer in the microwave
oven because it may cause sparking.
6) Liquids
≥When heating liquids, e.g.
soup, sauces and beverages
in your microwave oven,
overheating the liquid beyond
boiling point can occur
without evidence of bubbling.
This could result in a sudden
boil over of the hot liquid. To
prevent this possibility the
following steps should be
taken:
a) Avoid using straght-sided containers with
narrow necks.
b) Do not overheat.
c) Stir the liquid before placing the container in the
oven and again halfway through cooking time.
d) After heating, allow it to stand in the oven for a
short time, stirring again before carefully
removing the container.
≥Microwave heating of beverages can result in
delayed eruptive boiling, therefore care has to be
taken when handling the container.
7) Paper/Plastic
≥When heating food in plastic or paper containers,
check the oven frequently as these types of
containers ignite if overheated.
≥Do not use recycled paper products (ex. Kitchen
Roll) unless the paper product is labelled as safe
for microwave oven use. Recycled paper products
may contain impurities which may cause sparks
and/or fires when use.
≥Remove wire twist-ties from roasting bags before
placing bags in oven.
8) Utensils/Foil
≥Do not heat any closed cans or bottles because
they might explode.
≥Liguids or other foods must not be heated in
sealed containers since they are liable to explode.
≥Metal containers or dishes with metallic trim should
not be used during Microwave cooking. Sparking
will occur.
≥If you use any aluminum foil, meat spikes or metal
ware the distance between them and the oven
walls and door should be at least 2 cm to prevent
sparking.
9) Feeding Bottles/Baby Food Jars
≥The contents of feeding bottles and baby food jars
are to be stirred or shaken.
≥The temperature has to be checked before
consumption to avoid burns.

English
- 6 -
How Does the Microwave Work?
Microwaves are a from of high frequency radio
waves similar to those used by a radio including AM,
FM and CB. They are, however, much shorter than
radio waves; approximately 12 cm long.
Electricity is converted into microwave energy by the
magnetron tube. From the magnetron tube,
microwave energy is transmitted and absorbed.
Reflection
Microwaves are reflected by metal just as a ball is
bounsed off a wall. A combination of stationary
(interior walls) and rotating antenna, located
underneath the bottom shelf assure that the
microwaves are well distributed within the oven
cavity to produce even heating or cooking of foods.
Transmission
Microwaves pass through some materials such as
paper, glass and plastic much like sunlight shining
through a window. Because these substances do
not absorb or reflect the microwave energy, they are
ideal materials for microwave oven heating
containers.
Absorption
During heating, microwaves will be absorbed by
food. They penetrate to a depth of about 1- 5 cm
Microwave energy excites the molecules in the food
(especially water, fat and suger molecules), and
causes them to vibrate at a rate of 2,450,000,000
times per second. This vibration causes friction, and
heat is produced just as you will feel heat produced
if you vigorouslu rub your hands together. The
internal heating of larger foods is done by
conduction. The heat which is produced by friction
travels by conduction to the centre of the food.
Foods also continue to heat by conduction during
standing time.
Because microwaves dissipate, much like sunlight
as it reaches the Earth’s surface, they are not stored
in food.
Radio Interference
1. Operation of the microwave oven may sause
interference to your radio, TV or similar
equipment.
2. When there is interference, it may be redused or
eliminated by taking the following measures:
a. Clean the door and sealed surfaces of the
oven. (See Care of Your Microwave Oven
found on page 18.)
b. Place the radio, TV, etc. as far away as
possible, from the microwave.
c. Use a properly installed antenna, to obtain
srtonger signal reception.

English
- 7 -
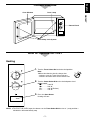
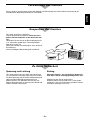
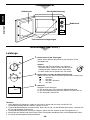
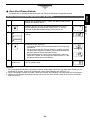
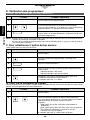
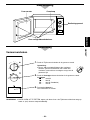
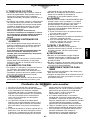
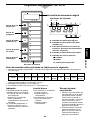
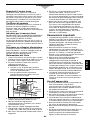
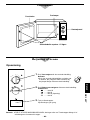
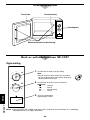
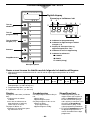
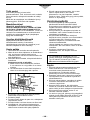
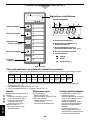
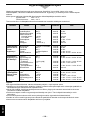
Outline Diagram
Oven Window Oven Lamp
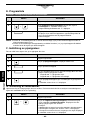
How to Operate NE-1027
1. Turn the Timer Select Dial to the desired position.
Note:
≥When selection the time for shorter than
≥4 minutes, turn the Timer Select Dial past
≥4 minutes and then return to the correct time.
2. Turn the Power Select Dial to the desired power level.
Power Level:
d . . . . . . 1000 W
a . . . . . . 500 W
b . . . . . . 340 W (Defrost)
c . . . . . . 100 W
3. Press the Start Button.
Heating will start.
Heating
NOTE: ≥TO STOP THE OVEN, open the door or set the Timer Select Dial back to “0” (zero) position—
microwaves will automatically stop.
NE-1027
0
5
10
15
20
25
30
1
2
3
4
6
7
8
9
(Min)
Control Panel
Door Safety Lock System
0
5
10
15
20
25
30
1
2
3
4
6
7
8
9
(Min)
0
5
10
15
20
25
30
1
2
3
4
6
7
8
9
(Min)

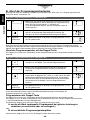
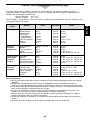
English
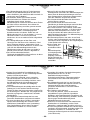
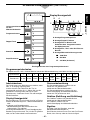
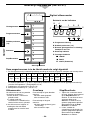
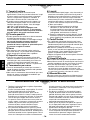
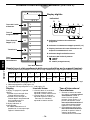
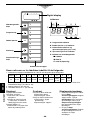
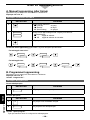
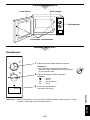
NE-1037
- 8 -
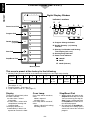
Power Level Pad
Program Pad
Double Quantity
(t2) Pad
Strat Pad
Stop/Reset Pad
Control Panel (NE-1037)
Digital Display Window
Indicator Locations
A–Program Change Indicator
B–Double Quantity (t2) Heating
Indicator
C–Memory Pad Number and Heating
Time Display (min. sec.)
D–Heating Stage Indicator
E– Power Level Indicator
d 1000 W
a 500 W
b 340 W (Defrost)
This oven is preset at the factory for the following
1. Memory Pads preset to 1000 W at the indicated heating times foe single stage heating.
The Double Quantity Pad (k2) preset to automatically double the programmed time of each Memory Pad.
(See pages 11, 14)
2. Program Unlock. (See page 15)
3. Cycle counter set to “0”. (See page 17)
Pad No.
Time
1
10 sec.
2
20 sec.
3
30 sec.
4
45 sec.
5
1 min.
6
1 min.
30 sec.
7
2 min.
8
2 min.
30 sec.
9
3 min.
0
1 min.
30 sec.
Display
The display will go blank (when
the door is closed):
≥at more than 1 minute
interruption.
≥at more than 1 minute after
completion of heating and
removing food.
The display will flash “0”.
≥continuously if door is not
opened to remove the food.
Oven Lamp
Oven lamp will be turned on,
when:
≥door is opened.
≥heating strats.
Oven lamp will be turned off,
when:
≥door is closed (no heating).
≥heating finishes.
Stop/Reset Pad
1. While heating, one touch on the
Stop/Reset Pad stops the oven.
You can restart by pressing the
Start Pad or a secong touch on
the Stop/Reset Pad will cancel
the selected program.
2. One touch on the Stop/Reset
Pad, before the heating cycle is
started, will cancel the selected
program.
x2 1 2 3
x
2
1
2
3
4
5
6
7
8
9
0
x2
123
BA
C
D
E
Memory Pads

English
NE-1037
- 9 -
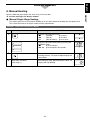
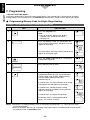
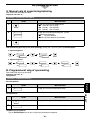
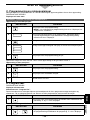
A. Manual Heating
Open the door and place food in the oven cavity. Close the door.
“0” must be showing in the display window.
√
Manual Single Stage Heating:
This feature gives the user maximum flexibility to set the oven to desired heating time and power level.
This is ideal for menus that require various heating requirements.
Example: To heat for 2 minutes at 1000 W
How to Operate
1.
2.
3.
4.
PAD
Beep tone will sound.
(See page 17)
INSTRUCTION
≥Select the desired power level.
d (1000 W) press once
a (500 W) press twice
b (340 W Defrost) press 3 times
≥Select the desired heating time by pressing the
MEMORY Pads.
d up to 30 minutes
ab up to 99 minutes 99 seconds
≥Press the Start Pad.
Heating will start. The time on digital display will
count down.
≥All heating will stop. When opening the door, the
display will stop blinking.
2
0
0
1
1
1

English
NE-1037
- 10 -
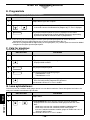
How to Operate
NOTE: ≥For 3 stages heating, repeat steps 3 and 4 above before pressing Start Pad.
√
Manual 2 or 3 Stages Heating:
This feature allows you to set to begin heating at one power level then shift automatically to a different
power level after the designated length of heating time.
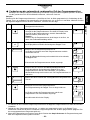
Example: To heat for 2 minutes at 340 W for 2nd stage heating
3.
4.
5.
6.
PAD
Beep tone will sound.
(See page 17)
INSTRUCTION
≥Follow steps 1 and 2 on page 8.
≥Press the Power Level Pad 3 times. Indicator
will change each time the pad is pressed. “b” is
now displayed. The stage “2” is blinking.
≥Press the Memory Pad 2, 0 and 0.
≥Press the Start Pad.
The total time for both stages will be displayed.
The stage “1” and the power level “d” blink.
The oven lamp will be turned on. Heating will
start and the time will count down.
≥When oven shifts to the next stage, a single
beep tone will sound. The stage “2” and the
power level “b” blink.
≥All heating will stop.
When opening the door, the display will stop
blinking.
2
0
0
12
12
12
2

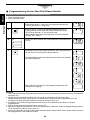
English
NE-1037
- 11 -
How to Operate
B. Programmed Heating:
Example: 1 stage; Memory Pad 9 to heat for 3 minutes at 1000 W
1.
2.
3.
PAD
Beep tone will sound.
(See page 17)
INSTRUCTION
≥Press the Memory Pad 9. In Program Lock Mode
the oven will start without pressing the Start Pad.
(See page 15)
≥Press the Start Pad.
Heating will start. The time on digital display will
count down.
≥All heating will stop. When opening the door, the
display will stop blinking.
1.
2.
3.
4.
PAD
Beep tone will sound.
(See page 17)
INSTRUCTION
≥Press Double Quantity Pad.
≥Press the Memory Pad 5. In Program Lock Mode
the oven will start without pressing the Stert Pad.
(See page 15)
≥Press the Start Pad.
Heating will start. The time on digital display will
count down.
≥All heating will stop. When opening the door, the
display will stop blinking.
Example: 2 stages; Memory Pad 3 to heat for 3 minutes at 1000 W and 2 minutes at 340 W
1.
2.
3.
PAD
Beep tone will sound.
(See page 17)
INSTRUCTION
≥Press the Memory Pad 3. In Program Lock Mode
the oven will start without pressing the Start Pad.
(See page 15)
≥Press the Start Pad.
The total time for both stages will be displayed.
The time on digital display will count down.
Heating will start.
≥When the oven shifts to the next stage, a single
beep tone will sound.
≥All heating will stop. When opening the door, the
display will stop blinking.
For Double Quantity Heating
The Double Quantity (k2) Pad is preset at the factory to automatically double the programmed time for double
quantity heating. (See page 13 for programming the Double Quantity Pad.)
Example: Memory Pad 5
9
1
1
3
12
2
12
x
2
5
x2
x2
1
x2
1

English
NE-1037
- 12 -
How to Operate
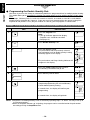
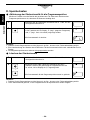
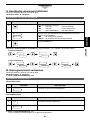
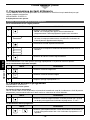
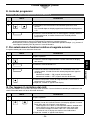
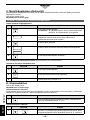
C. Programming
—DO NOT OPEN THE DOOR—
The display window MUST be blank before programming. If any indicator light is illuminated in the digital
display window: close the door, press the Stop/Reset Pad and wait 1 minute until the display goes blank.
√
Programming Memory Pads for Single Stage Heating:
Example: To program 30 seconds at 500 W for Memory Pad 5
1.
2.
3.
4.
5.
PAD INSTRUCTION
≥Press the Program Pad.
Note:
≥ If no “g” Indicator appeared on display,
“Program Lock” should be cancelled.
(See page 15.)
≥Press the Memory Pad 5. The pad number and
the previously selected time and power level will
appear in the display.
≥The pad number and Stage Heating Indicator will
appear in the display again.
≥Press the Power Level Pad twice. The Memory
Pad number will go out.
≥Press Memory Pads 3 and 0.
≥Press the Program Pad again. You have
completed programming the selected Memory
Pad for single stage heating. Double heating
time for multiple portion heating was
automatically set.
≥2 seconds later, the time and power level setting
you programmed will appear in the display.
≥2 seconds later, Double Quantity Heating
Indicator and then the double heating time will
appear in the display.
≥2 seconds later, the display will go blank.
The Memory Pad 5 is now programmed for
heating - 30 seconds at 500 W.
NOTE: ≥Program the remaining Memory Pads as desired by repeating steps 1–5. You may insert up to
10 memory programs.
NOTE: ≥When the Program indicator “g” is blinking, the program can be cancelled and/or the pad number
erased by pressing the Stop/Reset Pad.
5
3
0
1
1
1
1
1
1
x2
1
x2
1
1

English
NE-1037
- 13 -
How to Operate
√
Programming Memory Pads for 2 or 3 Stages Heating:
Example: To program for 2 minutes at 340 W for 2nd stage heating using Memory Pad 5
5.
6.
7.
PAD INSTRUCTION
≥Complete steps 1 to 4 on page 12.
≥Press the Power Level Pad 3 times. “b” is now
displayed.
≥Press the Memory Pads 2, 0 and 0.
≥Press the Program Pad again. You have
completed programming the selected Memory
Pad for 2 stages heating. Double heating time for
double quantity heating was automatically set.
≥2 seconds later, the display will confirm your
programming.
≥After all of your programming has been
completed, the display will go blank.
NOTE: ≥Program the remaining Memory Pads as desired by repeating the steps above.
DO NOT OPEN THE OVEN DOOR during programming.
NOTE: ≥For 3 stages heating, select a further power level and set the desired heating time between steps 6
and 7 above.
2
0
0
1
12
12
12
1
2
x2
12
x2
1
x2
2

English
NE-1037
- 14 -
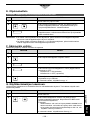
How to Operate
√
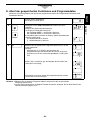
Programming the Double Quantity Pad:
Your oven is preset at the factory to automatically double the programmed time for multiple portion heating.
This model allows you to
customize the heating time and/or power level for multiple portions of your menu
items.
For example, if Memory Pad 2 is set for 20 seconds at 1000 W, 40 seconds at 1000 W is set for double
quantity heating automatically. However, if your own tests have determined that the correct heating time
required for two portions is less (only 30 seconds at 1000 W), you can program as shown below.
Example: To program 30 seconds at 1000 W on double quantity of Memory Pad 2 (display must be blank)
1.
2.
3.
4.
5.
6.
PAD INSTRUCTION
≥Press the Program Pad.
Note:
≥ If no “g” Indicator appeared on display,
“Program Lock” should be canselled.
(See page 15.)
≥Press Double Quantity Pad.
≥Press the Memory Pad 2.
The pad number and the previously selected
time and power level for double quantity heating
will briefly appear in the display.
≥The pad number and Stage Heating Indicator will
reappear in the display.
≥Press the Power Level Selector Pad once.
The Memory Pad number will go out.
≥Press Memory Pads 3 and 0.
≥Press the Program Pad again. You have
completed programming the selected Memory
Pad for double quantity heating.
≥2 seconds later, the display will confirm your
programming.
≥2 seconds later, the display will go blank.
NOTE: ≥Program the remaining Memory Pads as desired by repeating steps 1–6 above. You may insert up to
10 memory programs.
NOTE: ≥When the Program indicator “g” is blinking, the program can be cancelled and/or the pad number
erased by pressing the Stop/Reset Pad.
3
0
x
2
2
x2
x2
1
x2
1
x2
1
x2
1
x2
1
x2
1
x2
1

English
NE-1037
- 15 -
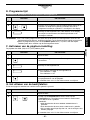
How to Operate
D. Program Lock
√
To Activate Program Lock:
This procedure locks the Memory Pads into their programmed heating times and power levels.
DO NOT OPEN THE DOOR.
1.
PAD INSTRUCTION
≥The display window must be blank.
≥Press and hold in the Program Pad (for
5 seconds) until the display shows “P”and “L”.
≥Program Lock feature is now activated.
NOTE: ≥In “Program Lock”
a. To activate preset programs, open door will display “0”.
b. The oven is started by pressing the desired Memory Pad. There is no need to press the Start Pad.
c. The interrupt feature is deactivated—Open the door cancels the remaining time of the program.
d. The oven cannot be programmed until the Program Lock is released.
√
To Pelease Program Lock:
This procedure releases “Program Lock” and activates all other features. The Oven reverts to a 2 touch
operating mode (Memory Pad plus Start Pad).
DO NOT OPEN THE DOOR.
1.
PAD INSTRUCTION
≥The display window must be blank.
≥Press the Stop/Reset Pad.
While pressing this pad, press the Program Pad
(for 5 seconds) until the display shows “P”.
≥Program Lock feature is now released.
NOTE: ≥In “Program Unlock”
a. Repeat and interrupt features are operational.
b. Memory Pads can be programmed.
c. Beep Tone can be set On or Off.
+

English
NE-1037
- 16 -
How to Operate
E. To Read Program List:
Allows you to review all currently programmed pad number, heating time and power level for each stage.
1.
2.
3.
PAD INSTRUCTION
≥Open the door.
≥While pressing the Stop/Reset Pad, press the
Start Pad. The beep tone setting will be shown
in the display window.
Example:
Stage Indicator 1: Beep tone is ON.
Stage Indicator 2: Beep tone is OFF.
≥2 seconds later, the Program Lock setting will be
shown is the display window.
Program Lock: “PL”
Program Unlock: “P”
≥Press the Memory Pad you desire to read the
program.
Example:
The Memory Pad 5. The display window will
show; Program Memory Pad 5, first stage
heating time and power level currently
programmed on Memory Pad.
≥2 seconds later, the information of 2nd and 3rd
stage haeting will be displayed.
≥After all settings have been displayed, the pad
number and the Stage Heating Indicator will
appear in the display again.
NOTE: ≥If you want to go to another program, press the Memory Pad you desire in order to read the program,
while the information of Memory Pad is being displayed.
NOTE: ≥If you want to see the Double Quantity Heating (k2) program, press the Double Quantity Pad before
pressing the Memory Pad.
5
+
1
12
1
2
3
12

English
NE-1037
- 17 -
How to Operate
F. To Select Beep Tone Options:
The Beep Tone can be set, ON or OFF.
1.
2.
3.
4.
5.
PAD INSTRUCTION
≥Open the door.
≥Press the Program Pad. The display will not
change.
≥Press the Memory Pad 0.
≥Repeat pressing the Memory Pad 0. Select
“OFF” of Beep Tone.
Stage Indicator 1lON.
Stage Indicator 2lOFF.
≥Press the Program Pad again. You have
completed programming the beep tone.
≥2 seconds later, “0” will appear in the display.
G. To Read the Cycle Counter:
The oven can display the total number of times the oven has been operated cumulatively. This may be
used to analyze usage of the oven and traffic flow at the location.
1.
2.
PAD INSTRUCTION
≥Open the door.
≥While pressing Stop/Reset Pad, press Power
Level Pad. The display shows the total
cumulative number of times the oven has been
used.
Example:
≥9999 means the oven has been used
≥999900–999999 times.
≥0020 means the oven has been used
≥2000–2099 times.
≥If the total cumulative number of times is less
≥than 100 tiems, the display will not be
≥changed.
≥2 seconds later, “0” will appear in the displey
window.
0
0
1
2
2
+

English
- 18 -
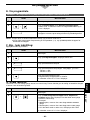
Self Diagnostics Failure Code
The oven monitors its operation and displays a Failure Code in the dispaly window when a problem occurs.
What to do when a failure code appears:
CODE
F01
F33–34
F44
CAUSE
* Overcooked food
* Temperature of exhausted air is too
high
* Defective sensor circuit.
* When a pad was pressed for more
then 2 minutes
* Defective pad or control circuit.
WHAT TO DO
* Press Stop/Reset Pad to stop beep.
* Unplug the oven and wait at least
30 minutes before reconnecting.
* Wait for the oven to cool down and
reset.
* If a flame is observed, do not open
the oven door.
* If normal operation does not resume,
call the service agent with the
information of failure code.
* Unplug the oven and wait more than
10 seconds before reconnecting.
* If normal operation does not resume,
call the service agent with the
information of failure code.
NOTE: ≥Above codes shown in the display do not indicate all the possible failures on the unit.
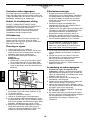
Care of Your Microwave Oven
1. Unplug the oven before cleaning.
2. Keep the inside of the oven clean. when food
spatters or spilled liquids adhere to the oven
walls, wipe with a damp paper towel. Mild
detergent may be used if the oven gets very dirty.
The use of harsh detergent or abrasives is not
recommended.
3. The outside oven surfaces should be cleaned
with a damp paper towel. To prevent damage to
the operating parts inside the oven, water should
not be allowed to seep into the ventilation
openings.
4. If the Control Panel becomes dirty, clean it with a
soft, dry cloth. Do not use harsh detergents or
abrasives on the Control Panel. When cleaning
the Control Panel, leave the oven door open to
prevent the oven from accidentally turning on.
After cleaning, press the STOP/RESET Pad to
clear the display window or turn the TIMER
SELECT DIAL back to zero “0” position.
5. If steam accumulates inside or around the
outside of the oven door, wipe with a soft paper
towel.
This may occur when the microwave oven is
operated under high humidity conditions and in
no way indicates malfunction of the unit.
6. Clean off the grease and dust on bottom surfaces
often. Use warm detergent solution.
7. This oven should only be serviced by qualified
person. For maintenance and repair of the oven
contact the nearest authorized dealer.

English
- 19 -
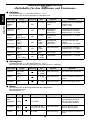
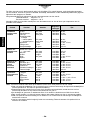
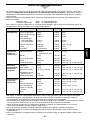
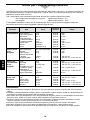
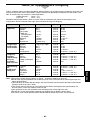
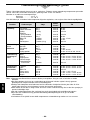
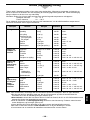
Cooking/Defrosting Guide
The times given in the chart below are a guideline only. Many factors eg starting temperature of the food can
affect the final heating time required. The cooking and defrosting times must be adjusted when necessary.
All times are tested using foods at starting temperatures as below;
Chilled foods. . . . . . Approx. i5 ˚C
Frozen foods . . . . . Approx. j18 ˚C
Always check for the correct core temperature with a temperature probe to comply with current Government
Food Hygiene Regulations.
Function
Defrosting
Cooking from
Chilled Raw
Food
Cooking and/
or Reheating
from Frozen
Reheating
from Cooked
Chilled
Food
Fish Fillets
Minced Beef
Whole Chicken
Composite Dish
Multi portion
Single portion
Apple Pie
Gateau
Bread Rolls
Scrambled Egg
Broccolli
Fish Fillets
Bacon
Chicken Portions
Peas
Cooked Rice
Cooked Sausages
Cooked Wings of
Fire
Cooked Boxed
Cheeseburger
Chocolate Fudge
Cake
Lasagne
Chilli
Apple Pie
Pepper Sauce
Baked Beans
Soup
Weight
500 g
500 g
1.36 kg
1.36 kg
275 g
1 portion
1 portion
1 portion 50 g
2 eggsi2 tbsp. milk
500 g
500 g
2 rashers
500 g
500 g
167 g
k3 (50 g each)
k7 pieces
75 g
1 portion
325 g
325 g
1 portion
100 ml
100 ml
125 ml
Power
Level
340 W
340 W
340 W
340 W
340 W
340 W
340 W
340 W
1000 W
1000 W
1000 W
1000 W
1000 W
1000 W
1000 W
1000 W
1000 W
1000 W
340 W
1000 W
1000 W
1000 W
1000 W
1000 W
1000 W
Time
8 min.
5 min.
25 min.
20 min.
8 min.
1 min. 15 sec.
2 min.
30 sec.
45 sec.
6 min.
4 min.
1 min. 30 sec.
5 min. 30 sec. –6 min. 30 sec.
8 min.
2 min. 20 sec. –2 min. 45 sec.
1 min. 20 sec. –1 min. 45 sec.
2 min. –2 min. 20 sec.
1 min. 30 sec. –1 min. 45 sec.
30 sec.
3 min. 45 sec. –4 min. 15 sec.
3 min. 30 sec. –4 min.
30 sec.
1 min. –1 min. 15 sec.
1 min. 15 sec. –1 min. 30 sec.
1 min. 30 sec. –1 min. 45 sec.
HINTS: •Do not cook/reheat/defrost directly onto the base of the oven—use a suitable container.
•When defrosting multi portions of foods, turn over and break apart halfway through defrost time to
allow better penetration of microwave energy.
•Solid/dense foods should not be cooked from frozen as they will be overcooked round the edges
before the centre has reached the required temperature.
•Cover dishes where appropriate during cooking/reheating. This will retain moisture and prevent
splashing/spillages.
•Loosen lids/pierce clingfilm before cooking/reheating covered foods.
•Stir or shake foods halfway through cooking/defrosting time to distribute the heat evenly.
•Allow a Stand Time before food temperature is checked and/or offered for consumption.

English
- 20 -
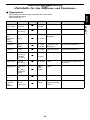
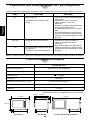
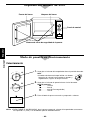
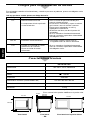
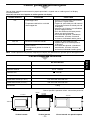
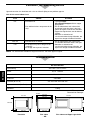
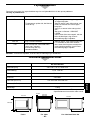
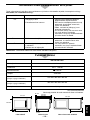
Technical Specification
Power Source
Required Power
Output
Frequency
Outer Dimensions
(WkDkH)
Cavity Dimensions
(WkDkH)
Net Weight
Shipping Weight
Memory
NE-1027 NE-1037
230–240 V, 50 Hz, single phase
6.6 A 1490 W
d 1000 W* d 1000 W*
a 0500 W* a 0500 W*
b 0340 W* b 0340 W*
c 0100 W*
2450 MHz
510 mmk360 mmk306 mm
330 mmk330 mmk200 mm
17.8 kg
19.5 kg
————
10 Memory Pads with Double Quantity (
k
2) Pad
*IEC Test Procedure
Specifications subject to change without notice.
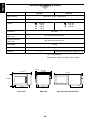
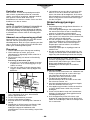
Front View Side View Side View with Opened Door
510 mm
370 mm
743 mm
290 mm
225 mm
36 mm
70 mm
360 mm
332 mm
383 mm
61 mm
306 mm
La page est en cours de chargement...
La page est en cours de chargement...
La page est en cours de chargement...
La page est en cours de chargement...
La page est en cours de chargement...
La page est en cours de chargement...
La page est en cours de chargement...
La page est en cours de chargement...
La page est en cours de chargement...
La page est en cours de chargement...
La page est en cours de chargement...
La page est en cours de chargement...
La page est en cours de chargement...
La page est en cours de chargement...
La page est en cours de chargement...
La page est en cours de chargement...
La page est en cours de chargement...
La page est en cours de chargement...
La page est en cours de chargement...
La page est en cours de chargement...
La page est en cours de chargement...
La page est en cours de chargement...
La page est en cours de chargement...
La page est en cours de chargement...
La page est en cours de chargement...
La page est en cours de chargement...
La page est en cours de chargement...
La page est en cours de chargement...
La page est en cours de chargement...
La page est en cours de chargement...
La page est en cours de chargement...
La page est en cours de chargement...
La page est en cours de chargement...
La page est en cours de chargement...
La page est en cours de chargement...
La page est en cours de chargement...
La page est en cours de chargement...
La page est en cours de chargement...
La page est en cours de chargement...
La page est en cours de chargement...
La page est en cours de chargement...
La page est en cours de chargement...
La page est en cours de chargement...
La page est en cours de chargement...
La page est en cours de chargement...
La page est en cours de chargement...
La page est en cours de chargement...
La page est en cours de chargement...
La page est en cours de chargement...
La page est en cours de chargement...
La page est en cours de chargement...
La page est en cours de chargement...
La page est en cours de chargement...
La page est en cours de chargement...
La page est en cours de chargement...
La page est en cours de chargement...
La page est en cours de chargement...
La page est en cours de chargement...
La page est en cours de chargement...
La page est en cours de chargement...
La page est en cours de chargement...
La page est en cours de chargement...
La page est en cours de chargement...
La page est en cours de chargement...
La page est en cours de chargement...
La page est en cours de chargement...
La page est en cours de chargement...
La page est en cours de chargement...
La page est en cours de chargement...
La page est en cours de chargement...
La page est en cours de chargement...
La page est en cours de chargement...
La page est en cours de chargement...
La page est en cours de chargement...
La page est en cours de chargement...
La page est en cours de chargement...
La page est en cours de chargement...
La page est en cours de chargement...
La page est en cours de chargement...
La page est en cours de chargement...
La page est en cours de chargement...
La page est en cours de chargement...
La page est en cours de chargement...
La page est en cours de chargement...
La page est en cours de chargement...
La page est en cours de chargement...
La page est en cours de chargement...
La page est en cours de chargement...
La page est en cours de chargement...
La page est en cours de chargement...
La page est en cours de chargement...
La page est en cours de chargement...
La page est en cours de chargement...
La page est en cours de chargement...
La page est en cours de chargement...
La page est en cours de chargement...
-
 1
1
-
 2
2
-
 3
3
-
 4
4
-
 5
5
-
 6
6
-
 7
7
-
 8
8
-
 9
9
-
 10
10
-
 11
11
-
 12
12
-
 13
13
-
 14
14
-
 15
15
-
 16
16
-
 17
17
-
 18
18
-
 19
19
-
 20
20
-
 21
21
-
 22
22
-
 23
23
-
 24
24
-
 25
25
-
 26
26
-
 27
27
-
 28
28
-
 29
29
-
 30
30
-
 31
31
-
 32
32
-
 33
33
-
 34
34
-
 35
35
-
 36
36
-
 37
37
-
 38
38
-
 39
39
-
 40
40
-
 41
41
-
 42
42
-
 43
43
-
 44
44
-
 45
45
-
 46
46
-
 47
47
-
 48
48
-
 49
49
-
 50
50
-
 51
51
-
 52
52
-
 53
53
-
 54
54
-
 55
55
-
 56
56
-
 57
57
-
 58
58
-
 59
59
-
 60
60
-
 61
61
-
 62
62
-
 63
63
-
 64
64
-
 65
65
-
 66
66
-
 67
67
-
 68
68
-
 69
69
-
 70
70
-
 71
71
-
 72
72
-
 73
73
-
 74
74
-
 75
75
-
 76
76
-
 77
77
-
 78
78
-
 79
79
-
 80
80
-
 81
81
-
 82
82
-
 83
83
-
 84
84
-
 85
85
-
 86
86
-
 87
87
-
 88
88
-
 89
89
-
 90
90
-
 91
91
-
 92
92
-
 93
93
-
 94
94
-
 95
95
-
 96
96
-
 97
97
-
 98
98
-
 99
99
-
 100
100
-
 101
101
-
 102
102
-
 103
103
-
 104
104
-
 105
105
-
 106
106
-
 107
107
-
 108
108
-
 109
109
-
 110
110
-
 111
111
-
 112
112
-
 113
113
-
 114
114
-
 115
115
-
 116
116


Panasonic ne 1037 Le manuel du propriétaire
- Catégorie
- Micro-ondes
- Taper
- Le manuel du propriétaire
dans d''autres langues
- italiano: Panasonic ne 1037 Manuale del proprietario
- English: Panasonic ne 1037 Owner's manual
- español: Panasonic ne 1037 El manual del propietario
- Deutsch: Panasonic ne 1037 Bedienungsanleitung
- Nederlands: Panasonic ne 1037 de handleiding
- dansk: Panasonic ne 1037 Brugervejledning
- svenska: Panasonic ne 1037 Bruksanvisning
- suomi: Panasonic ne 1037 Omistajan opas