Somfy Sonesse 30 RS485 Manuel utilisateur

Taper
Manuel utilisateur
www.somfy.com
Sonesse
®
30 RS485
Ref :5057808B
DIGITAL TECHNOLOGY SOMFY
1Copyright © 2010 Somfy SAS. All rights reserved - V1 - 01/2011
Installation instructions page 2
SOMFY hereby declares that this product complies with the essential requirements and other relevant provisions of
Directive 1999/5/EC. A Declaration of Conformity is available at the web address www.somfy.com/CE. Suitable for
use in EU, CH and NO
EN
Notice d’installation page 10
Par la présente, Somfy déclare que l’appareil est conforme aux exigences essentielles et aux autres dispositions
pertinentes de la directive 1999/5/CE. Une déclaration de conformité est mise à disposition à l’adresse internet www.
somfy.com/ce. Utilisable en UE CH et NO.
FR
Guía de instalación página 18
Por la presente, Somfy declara que el aparato cumple las exigencias esenciales y el resto de disposiciones pertinen-
tes de la directiva 1999/5/CE. Podrá encontrar una declaración de conformidad en la página web www.somfy.com/ce.
Aplicable para la UE, Suiza y Noruega.
ES
Gebrauchsanleitung Seite 26
Hiermit erklärt SOMFY, dass sich dieses Produkt in Übereinstimmung mit den grundlegenden Anforderungen und

Internetadresse www.somfy.com/ce verfügbar.
Verwendbar in der EU, der Schweiz und Norwegen.
DE
Guia de instalação página 34
Pelo presente documento, a Somfy declara que o aparelho está conforme às exigências fundamentais e às outras
disposições pertinentes da directiva 1999/5/CE. Encontra-se disponível, no sítio web www.somfy.com/ce, uma decla-
ração de conformidade.
Utilizável na UE, Suíça e Noruega.
PT
ZH
42
 
1999 /5/EC
www.somfy.com/CE
AR
2 Copyright © 2011 Somfy SAS. All rights reserved - V1 - 01/2011
SAFETY

these instructions are intended.



being installed, and inform his customers of the operating and maintenance conditions for the product.

with the instructions given herein will invalidate the warranty, and Somfy refuses to accept liability.
COMPATIBLE BLINDS & CONTROLS
Roller blinds
-
ted behavior. Use of one controller at a time is recommended.
GENERAL SAFETY INSTRUCTIONS
Never immerse the
motor in liquid!
Never drill holes in the
motor!
Avoid impacts!
Do not drop it!
ST OP
Setting Tool Centralis IB Wall Switch
Dry Contact ControlsRS485 Controls
PROG
3Copyright © 2010 Somfy SAS. All rights reserved - V1 - 01/2011
INSTALLATION
Remove Network ID
labels before installing
the crown.
Motor preparation
1) Fit the crown (a) and drive wheel (b)
to the motor.
2) Measure the length (L) between
the middle of the drive wheel and the
head end.
Tube preparation
Cut the tube to the required length.
Deburr the tube and remove the
debris.
Motor/tube assembly
1) Slide the motor into the tube.
2) Fix the tube to the motor with self-
tapping screws or steel pop rivets
depending on the dimension (L).
Mounting the motorized tube on the
brackets
If necessary, screw the bracket inter-
face on the motor head.
Mount the motorized tube on the end
bracket (C ).
Mount the motorized tube on the
motor bracket (D).
L
1
2
a
b
1
2
c
d
4 Copyright © 2011 Somfy SAS. All rights reserved - V1 - 01/2011
Wiring
1) Connect the power cable to the



3) If you want to use the Dry
contact features of the motor,
connect the Dry contact cable

cable).
Do not apply any
voltage to Dry Contact
connector.

a) Setting Tool or 4 wires switch
1 UP (White/Blue)

3 DOWN (White/Orange)

b) Centralis IB
1 UP or DOWN (White/Blue or White/
Orange)
2 UP or DOWN (White/Blue or White/
Orange)
3 GND (Orange)
c) Wall Switch
1 UP or DOWN (White/Blue or White/
Orange)
2 UP or DOWN (White/Blue or White/
Orange)
3 GND (Orange)
5) Correspondence
1
2
3
4
1
3
4
2
1
2
3
1
2
3
2
3
ST OP
ST OP
ST OP
5
a
b
c
1
5Copyright © 2010 Somfy SAS. All rights reserved - V1 - 01/2011
COMMISSIONING
1) RS485 :
See page 58
2) DRY CONTACT
Checking the direction of rotation
Press the setting tool UP button:
a) If the shade is raised, the direction
of rotation is correct. Move to the sec-
tion entitled «Adjusting the end limits».
b) If the shade is lowered, the direction
of rotation is incorrect. Move to the
next step.

until the shade jogs: the direction of

Press the setting tool UP button to
check the direction of rotation.
Adjusting the end limits

1) Press and hold the UP button to
move the shade to the desired up
position.

DOWN buttons and release them once
the shade begins to move.


reaches the desired down position.
If necessary adjust the down position,
using the UP or DOWN buttons.

UP buttons and release them when
the shade begins to move.


its upper limit.


jogs.

a
b
1 2
3
5
6 Copyright © 2011 Somfy SAS. All rights reserved - V1 - 01/2011
USE
MY position
1) Recording MY position

shade to the desired position with the
UP and DOWN buttons then press

once.
2) Changing the MY position

new desired MY position with the UP
and DOWN buttons then press the

once.
3) Delete the MY position


until the shade jogs once.
1
2
3
7Copyright © 2010 Somfy SAS. All rights reserved - V1 - 01/2011
With the setting tool, it is possible
to cancel and exit the speed or limit
adjustment mode by simultaneously


cancelled with inactivity of 2 minutes.
Adjusting the rolling speed

until the shade jogs twice.
-
matically in 10 second cycles.

press the UP button to increase the
speed or DOWN button to decrease
the speed.


shade jogs.
UP, DOWN and MY


DOWN button.

button.
-

x2
10s
10s
1
2
3
1
2
3
8 Copyright © 2011 Somfy SAS. All rights reserved - V1 - 01/2011
End limit re-adjustement

1) Press the UP button, to move the
shade to the limit to be readjusted.
2) Press and hold the DOWN and

shade jogs.
3) Press and hold the UP or DOWN
button to move the shade to the new
desired position.


jogs.

1) Press the DOWN button, to move
the shade to the limit to be readjusted.

buttons simultaneously until the shade
jogs.
3) Press and hold the UP or DOWN
button to move the shade to the new
desired position.


jogs.
Modifying the direction of rotation

and hold all the three buttons simulta-
neously until the shade jogs twice.
Erasing the memory of the motor.
Press and hold all the three buttons
simultaneously until the shade jogs 3
times.
All the settings are erased.
1
2
3
1
2
3
x2
x3
9Copyright © 2010 Somfy SAS. All rights reserved - V1 - 01/2011
Technical data
Troubleshooting
The motor doesn’t work:
Verify:




The equipment stops too soon:





Voltage
Operating temperature
Protection rating
Torque
Adjustable Speed
24V
0°C / 60 °C
IP30
2 Nm

Speed
(By default)
28 rpm
10 Copyright © 2011 Somfy SAS. All rights reserved - V1 - 01/2011
SECURITE ET INFORMATIONS IMPORTANTES

auquel cette notice est destinée.



pays d’installation, et informer ses clients des conditions d’utilisation et de maintenance du produit.


APPLICATIONS et COMMANDES COMPATIBLES
Store rouleau


CONSIGNES GENERALES DE SECURITE
Ne jamais immerger le
moteur !
Ne jamais percer le
Moteur !
Éviter les chocs !
Éviter les chutes !
ST OP
Outil de
réglage
Centralis IB Contacteur
mural
Commandes Dry ContactCommandes RS485
PROG
11Copyright © 2010 Somfy SAS. All rights reserved - V1 - 01/2011
INSTALLATION
Enlevez l’étiquettes

d’installer la couronne
Préparation du moteur
1) Monter la couronne (a) et la roue
(b) sur le moteur.
2) Mesurer la longueur (L) entre la tête
du moteur et l’extrémité de la roue.
Préparation du tube
Couper le tube à la longueur désirée..
Ébavurer le tube et éliminer les
copeaux.
Assemblage moteur / tube
d’enroulement
1) Glisser le moteur dans le tube
d’enroulement.
2) Fixer le tube d’enroulement sur la

acier suivant la longueur (L).
Monter le tube motorisé sur les
supports
Si nécessaire, visser les supports
moteurs sur la tête moteur.
Monter le tube motorisé sur le support
embout.(C ).
Monter le tube motorisé sur le support
moteur.(D).
L
1
2
a
b
1
2
c
d
12 Copyright © 2011 Somfy SAS. All rights reserved - V1 - 01/2011
Câblage
1) Connecter le câble d’alimentation

-

3) Connecter le câble de réglage au

Le moteur ne peut pas être

traversant le câble de l’outil
de réglage.

a) Outil de réglage




b) Centralis IB
1 
Bleu ou Blanc/Orange)
2 
Bleu ou Blanc/Orange)
3 COMMUN (Orange)
c) Wall Switch
1 
Bleu ou Blanc/Orange)
2 
Bleu ou Blanc/Orange)
3 COMMUN (Orange)
5) Correspondance
1
2
3
4
1
3
4
2
1
2
3
1
2
3
2
3
ST OP
ST OP
ST OP
5
a
b
c
1
13Copyright © 2010 Somfy SAS. All rights reserved - V1 - 01/2011
a
b
1 2
3
5
MISE EN SERVICE
1) RS485 :
page 58
2) CONTACT SEC
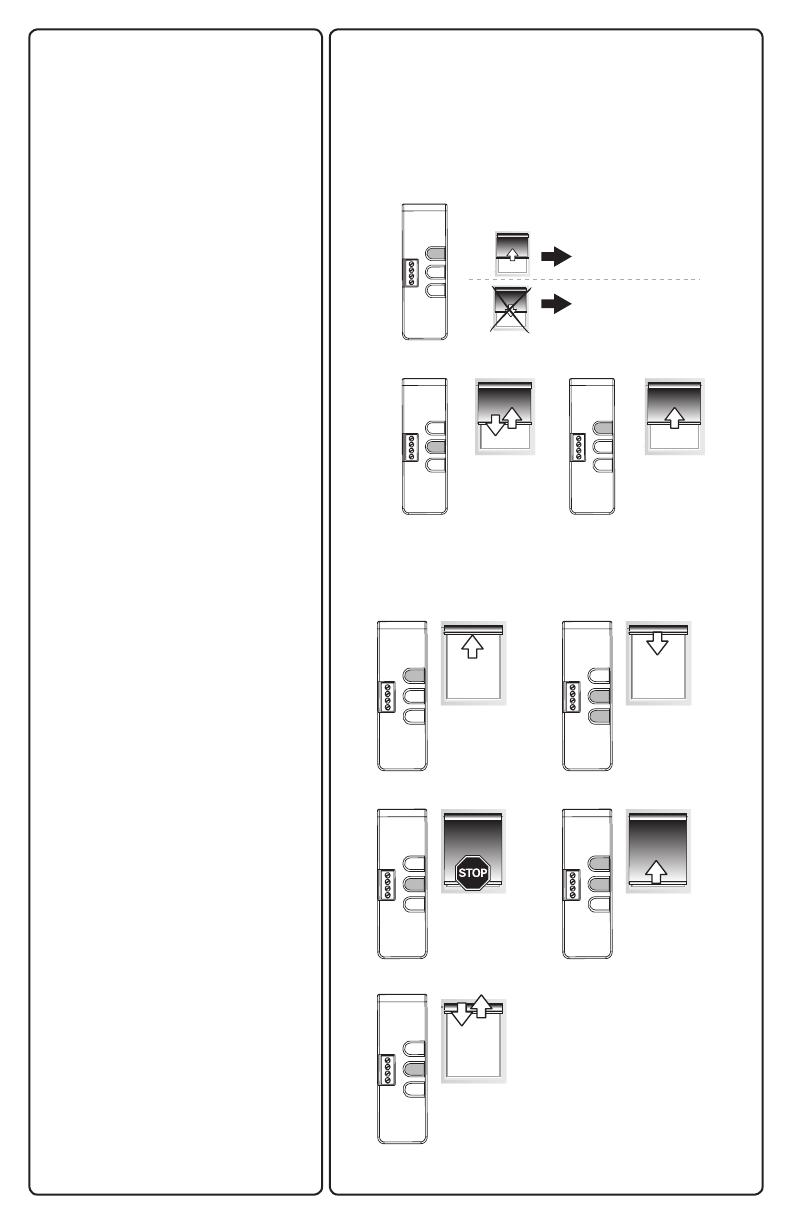
Contrôle du sens de rotation
Appuyer sur la touche Montée de
l’outil de réglage
a) Si le store monte,le sens de rotation
est correct :passer au paragraphe

b) Si le store descend, le sens de
rotation est incorrect : passer à l’étape
suivante.

l’outil de réglage jusqu’au va et- vient
du moteur : le sens de rotation est

Appuyer sur la touche Montée de

de rotation.


réglées dans n’importe quel ordre..
1) Monter le store en position haute
souhaitée en appuyant sur la touche
Montée.
2) Appuyer simultanéement sur les
touches Stop et Descente jusqu’au
mouvement du store.

3) Appuyer sur la touche Stop quand
le store atteint la position basse
souhaitée.
Si besoin, ajuster la position du store
avec les touches Montée et Descente.

touches Stop et Montée jusqu’au
mouvement du store.

Appuyer sur le bouton « Montée »
Le store monte et s’arrête en position
haute.
-

l’outil de réglage jusqu’au va et- vient

enregistrées.
14 Copyright © 2011 Somfy SAS. All rights reserved - V1 - 01/2011
1
2
3
Utilisation
Position MY
1) Enregistrer une position MY
Pour enregistrer une position My,
mettre le store dans la position my
souhaitée en appuyant sur la touche
Montée ou Descente
Appuyer sur la touche Stop jusqu’au
va-et-vient du store.
La position my est enregistrée.


le store dans la nouvelle position my
souhaitée en appuyant sur la touche
Montée ou Descente
Appuyer sur la touche Stop jusqu’au
va-et-vient du store.
La nouvelle position my est enregis-
trée.
3) Supprimer la position MY
Pour supprimer la position My,
appuyer sur la touche Stop. Le store
se met en mouvement et s’arrête en
position my.
Appuyer de nouveau sur la touche
Stop jusqu’au va-et-vient du store.
La position My est supprimée.
15Copyright © 2010 Somfy SAS. All rights reserved - V1 - 01/2011
x2
10s
10s
1
2
3
1
2
3
Avec l’outil de réglage il est possible
de sortir du mode de réglage de la

appuyant simultanéement sur les bou-
tons Montée, Stop et Descente.
Sans action sur l’outil de réglage
durant 2 minutes, on sort automatique-
ment de ces modes.
Réglage de la vitesse d’enroule-
ment
1) Appuyer sur la touche Stop jusqu’au
double va-et-vient du store.
Le store monte et descent automa-
tiquement avec des cycles de 10
secondes.
2) Durant le mouvement du store,
appuyer sur le bouton Montée pour
augmenter la vitesse et Descente pour
diminuer la vitesse.

sur le bouton Stop jusqu’au va-et-vient
du store.
MONTE, DESCENTE ET MY

course à l’autre,appuyer sur les tou-
ches Montée ou Descente.
2) Pour stopper le store, appuyer sur
la touche Stop.
3) Pour déplacer le store en position
My,appuyer sur la touche Stop.
16 Copyright © 2011 Somfy SAS. All rights reserved - V1 - 01/2011
1
2
3
1
2
3
x2
x3
MODIFICATION DES FINS DE
COURSE

1) Appuyer sur le bouton Montée pour

réajuster.
2) Appuyer en même temps sur les
touches Stop et Descente jusqu’au
va-et-vient du store.
3) Ajuster la position haute du store
avec les touches Montée ou Des-
cente.


jusqu’au va-et-vient du store.
FIN DE COURSE BAS
1) Appuyer sur le bouton Descente

à réajuster.
2) Appuyer en même temps sur les
touches Stop et Montée jusqu’au va-
et-vient du store.
3) Ajuster la position basse du store
avec les touches Montée ou Des-
cente.


jusqu’au va-et-vient du store.

Pour inverser le sens de rotation, ap-
puyer simultanéement sur les boutons
Montée, Stop et Descente jusqu’au
double va-et-vient du store.

Appuyer simultanément sur les
boutons Montée, Stop et Descente
jusqu’au triple va-et-vient du store.

17Copyright © 2010 Somfy SAS. All rights reserved - V1 - 01/2011
CARACTERISTIQUES TECHNIQUES
Dépannage
Le moteur ne fonctionne pas:





L’équipement s’arrête trop tôt:





Tension
Température d’utilisa-
tion
Indice de protection
Couple
Vitesse ajustable
24V
0°C / 60 °C
IP30
2 Nm

Vitesse
(Par défaut)
28 rpm
18 Copyright © 2011 Somfy SAS. All rights reserved - V1 - 01/2011
SEGURIDAD

vivienda y motorización, a quien va dirigida esta guía.



deberá informar a sus clientes sobre las condiciones de uso y mantenimiento del producto.


responsabilidad y que la garantía quede anulada.
PERSIANAS y CONTROL COMPATIBLES
Persianas enrollables
-

controlador a la vez.
NORMAS GENERALES DE SEGURIDAD
No sumerja el motor en
ningún tipo de líquido.
No taladre el motor.
Evite los golpes.
Evite las caídas.
ST OP
Herramienta
de ajuste
Centralis IB Interruptor de
pared
Dry Contact ControlsRS485 Controls
PROG
  • Page 1 1
  • Page 2 2
  • Page 3 3
  • Page 4 4
  • Page 5 5
  • Page 6 6
  • Page 7 7
  • Page 8 8
  • Page 9 9
  • Page 10 10
  • Page 11 11
  • Page 12 12
  • Page 13 13
  • Page 14 14
  • Page 15 15
  • Page 16 16
  • Page 17 17
  • Page 18 18
  • Page 19 19
  • Page 20 20
  • Page 21 21
  • Page 22 22
  • Page 23 23
  • Page 24 24
  • Page 25 25
  • Page 26 26
  • Page 27 27
  • Page 28 28
  • Page 29 29
  • Page 30 30
  • Page 31 31
  • Page 32 32
  • Page 33 33
  • Page 34 34
  • Page 35 35
  • Page 36 36
  • Page 37 37
  • Page 38 38
  • Page 39 39
  • Page 40 40
  • Page 41 41
  • Page 42 42
  • Page 43 43
  • Page 44 44
  • Page 45 45
  • Page 46 46
  • Page 47 47
  • Page 48 48
  • Page 49 49
  • Page 50 50
  • Page 51 51
  • Page 52 52
  • Page 53 53
  • Page 54 54
  • Page 55 55
  • Page 56 56
  • Page 57 57
  • Page 58 58
  • Page 59 59
  • Page 60 60
  • Page 61 61
  • Page 62 62
  • Page 63 63
  • Page 64 64

Somfy Sonesse 30 RS485 Manuel utilisateur

Taper
Manuel utilisateur