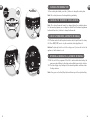
Moulinex 1520012814-IFU Manuel utilisateur
- Taper
- Manuel utilisateur

FR
EN
DE
ES
NL
IT

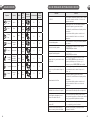
• Description 2
• Changement de position 5
• Présentation du produit 7
• Préparation 7
• Installation et branchements 7
• Présentation des programmes 9
• A. Utilisation d’un programme automatique 11
• B. Utilisation du programme manuel 13
• C. Modification du temps en cours de cuisson 15
• D. Modification du thermostat en cours de cuisson 15
• E. Fin d’un programme (automatique ou manuel) 15
• F. Prolonger un cycle de cuisson (automatique ou manuel) 15
• Entretien et Nettoyage 17
• Guide de cuisson 18
• Guide de dépannage 19
TABLE DES MATIÈRES
FR ......................................................................1
EN ....................................................................20
DE ....................................................................39
NL ....................................................................58
ES ....................................................................77
IT .....................................................................96
Veuillez lire attentivement le livret “Consignes
de sécurité et d’utilisation“ avant la première
utilisation.
Please read the "Use & Safety instructions" booklet
carefully before first use.
Bitte lesen Sie die Broschüre „Gebrauchs- und
Sicherheitshinweise“ vor dem ersten Gebrauch
sorgfältig durch.
Neem vóór het eerste gebruik het boekje met de
veiligheids- en gebruiksinstructies aandachtig
door.
Lee atentamente el folleto "Instrucciones de
seguridad y de uso" antes de utilizar el aparato
por primera vez.
Leggere con attenzione il libretto "Norme di
sicurezza e d'uso" prima del primo utilizzo.
1
FR

1
11
12
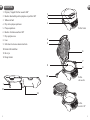
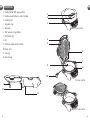
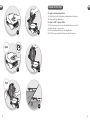
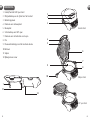
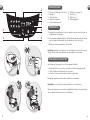
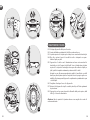
DESCRIPTION
1
2
3
4
5
9
10
6
7
8
Position fermée
Position
semi-ouverte
Position
ouverte à 180°
1 Poignée / Support Position ouverte 180°
2 Bouton déverrouillage de la poignée en position 180°
3 Tableau de bord
4 Clips de la plaque supérieure
5 Plaque supérieure
6 Bouton charnière ouverture 180°
7 Clips poignée cuve
8 Cuve
9 Indicateur de niveau volume maximum
10 Cordon d’alimentation
11 Bac à jus
12 Range Cordon
32
FRFR

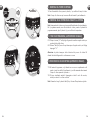
1.1
2.2
1.2
2.1
2.3 2.4
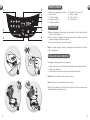
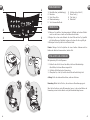
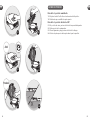
Pour ouvrir en position semi - ouverte
1.1 Attraper la poignée de Cook'in One positionnée au dessus de l'appareil
1.2 Ouvrir jusqu'à stabilisation de la partie supérieure
Pour ouvrir en position ouverte à 180°
2.1 En position fermée, appuyer sur le bouton poignée.
2.2 Ouvrir en position semi - ouverte.
2.3 Refermer légèrement puis appuyer sur le bouton charnière.
2.4 Faire basculer la partie supérieure jusqu’à ce que le support touche le sol.
CHANGEMENT DE POSITION
Appuyer
Appuyer
54
FRFR

CLIC
CLIC
3.1 3.2
3.3 3.3
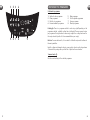
1
2
3
8
4
9
7
6
5
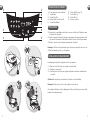
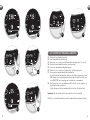
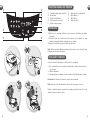
PRÉSENTATION DU PRODUIT
1 Ecran des menus (selon modèles)
2 Touche Menu
3 Touche Start/Stop
4 Indicateur de zone de chauffe
5 Touche Mode Manuel
6 Touche Grill (Cf page 13)
7 Touche Moins (-)
8 Touche Plus (+)
9 Ecran de controle
PRÉPARATION
1. Enlever tous les emballages autocollants ou accessoires divers à l’intérieur comme
à l’extérieur de l’appareil.
2. Avant la première utilisation, nettoyer soigneusement la plaque supérieure et la
cuve avec de l’eau chaude et du liquide vaisselle, rincer et sécher soigneusement.
3. Clipser la cuve ainsi que la plaque supérieure dans le produit.
Remarque : Utiliser une éponge humide pour nettoyer les plaques de cuisson et un
chiffon doux humide pour le corp de l'appareil.
INSTALLATION ET BRANCHEMENTS
Le démarrage de l’appareil s’applique à tous les programmes
3.1. Déposer votre Cook’in One sur un plan de travail stable.
3.2. Brancher votre appareil
3.3. Vérifier que la cuve ainsi que la plaque supérieure soient bien installées dans
le produit.
Attention: Ne chauffez pas sans aliment, à l'exception du préchauffage
Remarque: Choisissez la position la plus adaptée à votre cuisson
A la première utilisation, un léger dégagement d'odeur et de fumée peut se produire
pendant les premières minutes
76
FRFR

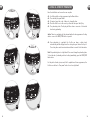
1
5 8 976
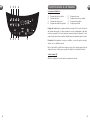
2 3 4 PRÉSENTATION DES PROGRAMMES
8 Programmes automatiques :
1 Programme Quiche & Gâteaux
2 Programme Pizza
3 Programme Pâtes & Riz
4 Programme Sandwich Gourmand
5 Programme Viandes
6 Programme Poissons & Légumes
7 Programme Surgelés
8 Programme Plancha
Astuce de cuisson : Il existe un programme adapté à chaque typologie de recette. Selon
le programme choisi, un temps de cuisson est indiqué par défaut. Il existe plusieurs
recettes par programme. De ce fait, il peut être nécessaire d’ajuster le temps de cuisson
en fonction de la recette choisie (voir liste des temps préconisés par recette).
Attention : Pour garantir le résultat, il est indispensable de suivre la recette et de
respecter les proportions.
La cuisson de liquide doit toujours être réalisée en mode ouvert afin d’éviter un
important dégagement de vapeur à l’ouverture ainsi qu’un éventuel écoulement de
liquide sur le plan de travail.
1 mode manuel (9)
En fonction de la recette choisie, utiliser la position adéquate.
98
FRFR

4.1 4.2
4.3 4.4
4.6
4.5
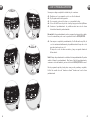
A. UTILISATION D’UN PROGRAMME AUTOMATIQUE
Une fois que l'installation et les branchements sont réalisés.
4.1. Faire défiler les programmes de cuisson à l’aide de la touche Menu.
4.2. Le pictogramme choisi clignote.
4.3. Appuyer sur les touches + et – pour modifier le temps de cuisson si besoin.
4.4. Mettre le Cook’in One dans la bonne position puis appuyer sur Start/Stop.
4.5. La préchauffe démarre. L'écran affiche alors une succession de barres
horizontales pendant la préchauffe.
Attention : Pour les programmes pizzas et quiche & gâteaux, il n'y a pas de
préchauffe. La cuisson démarre dès que l'on appuie sur la touche START/STOP.
4.6. A la fin de la préchauffe le Cook'in One bipe, la cuisson démarre
automatiquement et l'écran affiche le temps de cuisson que vous avez
sélectionné en étape 4.3.
Le temps de cuisson est décompté par minute puis par seconde pour la dernière
minute.
Remarque : Le temps de préchauffe est défini par défaut. Vous ne pouvez pas
modifier le temps de préchauffe. Pour forcer la fin de la préchauffe et démarrer
immédiatement la cuisson, appuyer 2 fois sur le bouton START/STOP.
Pour les programmes Quiche & Gâteaux, Pizza, Viandes, Poisson & Légumes et
Surgelés, sans action de votre part le Cook'in One se met en mode maintient au
chaud pendant 1 heure
1110
FRFR

5.1 5.2
5.3 5.4
5.5 5.6
5.7 5.8
B. UTILISATION DU PROGRAMME MANUEL
5.1. Appuyer sur la touche mode manuel.
5.2. Un thermostat par défaut clignote.
5.3. Appuyer sur les touches +/- pour modifier le thermostat (Min 01, Max 10).
5.4. Appuyer sur la touche mode manuel pour valider.
5.5. Un temps de cuisson prédéfini clignote.
5.6. Appuyer sur les touches +/- pour modifier le temps de cuisson si besoin.
5.7. La cuve de l’appareil va par défaut toujours chauffer. Si vous voulez faire
fonctionner la plaque supérieure , appuyer sur la touche Grill. Une rangée de
LED rouge va apparaitre sur l'indicateur de chauffe central du Cook'in One.
Appuyer sur la touche START/STOP pour valider et démarrer le préchauffage.
5.8. A la fin de la préchauffe, le Cook’in One bipe la cuisson démarre automatiquement.
L’écran indique le temps de cuisson que vous avez sélectionné en étape 5.6.
Remarque : Choisissez la position la plus adaptée à votre cuisson.
Sans action de votre part, le Cook'in One se met en mode maintient au chaud pendant
1 heure
1312
FRFR

6.1 6.2
7.1 7.2
C. MODIFICATION DU TEMPS EN COURS DE CUISSON
1. Une fois la cuisson lancée appuyer sur les touches +/- pour modifier le temps de
cuisson.
Remarque : Le temps de cuisson n'est pas modifiable pendant la phase de préchauffe.
D. MODIFICATION DU THERMOSTAT EN COURS DE CUISSON
Remarque : Le thermostat de cuisson n'est pas modifiable pendant la phase de
préchauffe et en mode automatique. Pour le programme manuel, une fois la cuisson
lancée, appuyer sur la touche mode manuel puis sur les touches +/- pour modifier
le thermostat.
E. FIN D’UN PROGRAMME (AUTOMATIQUE OU MANUEL)
6.1 Le temps arrive à 00 et le produit sonne pour signaler la fin de cuisson.
6.2 Appuyer 1 fois sur touche START/STOP pour mettre fin à la sonnerie, l’afficheur
00 clignote.
Attention: Les plaques restent chaudes à la fin de cuisson. Si vous laissez dans
l'appareil, les aliments continuent de cuire.
F. PROLONGER UN CYCLE DE CUISSON (AUTOMATIQUE OU MANUEL)
7.1 A la fin du programme lors du démarrage du maintien au chaud, dans le cas où
votre recette ne serait pas assez cuite, il est possible de rajouter du temps de
cuisson en appuyant directement sur la touche + .
7.2 L’affichage du temps devient fixe et le décompte par minute commence. La
cuisson continue.
Remarque : En appuyant longtemps sur la touche START/STOP, vous reviendrez à la
configuration de départ.
1514
FRFR

2H
8.1 8.2
8.4
8.3
8.5 8.6
8.88.7
ENTRETIEN ET NETTOYAGE
8.1 Débrancher l’appareil.
8.2 Laisser refroidir le Cook’in One pendant au moins 2 heures.
8.3 La plaque supérieure et la cuve de cuisson peuvent aller au lave-vaisselle.
8.4 Après utilisation, vider le bac à jus et le rincer à l’eau ou au liquide vaisselle.
8.5 L’appareil et son cordon ne doivent jamais être mis au lave-vaisselle, ni sous l’eau ou
tout autre liquide. Si vous ne voulez pas mettre la plaque supérieure et la cuve au
lave-vaisselle, utiliser de l’eau chaude et du liquide vaisselle pour les laver, puis rincer
abondement pour enlever tout résidu.
Les essuyer soigneusement. Ne pas utiliser de tampon à récurer métallique, de laine
d’acier ou de produits de nettoyage abrasifs pour nettoyer la plaque supérieure et la
cuve. Utiliser uniquement des tampons de nettoyage en nylon ou non métalliques.
Ne jamais immerger l’appareil en partie ou dans sa totalité dans l’eau ou dans un autre
liquide.
8.6 Nous vous conseillons d'enrouler le cordon sous l'appareil.
8.7 Toujours s’assurer que l’appareil est propre et sec avant de le ranger. Nettoyer
régulièrement l’extérieur de l’appareil.
8.8 L'appareil ne doit pas être porté par la partie supérieur ou le support (1) ni par
le cordon de l’appareil.
Attention: Toute réparation doit être effectuée par un centre de service agréé.
1716
FRFR

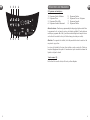
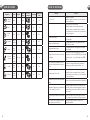
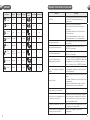
GUIDE DE CUISSON
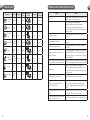
GUIDE DE DÉPANNAGE
Problème Solution
E1 ou H1 ou E2
Défaillance de l’appareil:
Débrancher l’appareil et contacter votre service clientèle ou
un centre de réparation.
E3
Vérifier que la cuve est bien installé.
Débrancher l’appareil et attendre quelques minutes.
Rebrancher ensuite votre appareil et mettre en marche.
Si le problème persiste, contacter votre service clientèle ou
un centre de réparation.
Le temps affiché clignote Si le temps affiché est correct, appuyer sur touche START/
STOP pour valider.
Le thermostat affichée clignote Si le thermostat affiché est correct, appuyer sur touche
START/STOP pour valider.
Le programme allumé clignote Si le programme affiché est correct, appuyer sur touche START/
STOP pour valider.
Le temps est arrivé à 00 mais la cuisson n’est
pas suffisante
En fin de cuisson, après avoir éteint le bip sonore en
appuyant une fois sur touche START/STOP, ajouter du temps
à l’aide des touches – et + puis valider par touche START/
STOP.
Après avoir lancé un programme de cuisson,
il n’est pas possible de modifier le temps de
cuisson
Attendre la fin de la préchauffe après le lancement du
programme pour modifier le temps à l’aide de – et +.
Dysfonctionnement des touches
Débrancher l’appareil et attendre quelques minutes.
Rebrancher ensuite votre appareil et mettre en marche.
Si le problème persiste, contacter votre service clientèle ou
un centre de réparation.
Le résultat de cuisson n'est pas comforme aux
attentes. Respecter les recettes Moulinex disponibles sur l'application.
Ecoulement de liquide sur le plan de travail et/
ou sur le contour du Cook'in One.
La cuisson de liquide doit toujours etre réalisée en mode
ouvert afin d'éviter un important dégagement de vapeur à
l'ouverture ainsi qu'un éventuel écoulement de liquide sur le
plan de travail.
Le produit n'est pas stable en position ouverte
à 180°.
Vérifier si la poignée est en position support, ouverture
180° (cf page 4) et que celle-ci touche le plan de travail.
Il y a un espace entre la plaque supérieure et
la cuve quand le produit est fermé.
Vérifier que la plaque supérieure et la cuve soient
correctement intallées.
Programmes Recettes Quantité Temps de
cuisson
Position
recommandée Préchauffage Maintient au
chaud
1. Quiche &
Gâteaux Quiche 1 50 min Non Oui
2. Pizza Pizza 1 25min Non Oui
3. Pâtes &
Riz Pâte 250g 7-10 min Oui Non
4. Sandwich Sandwich
Gourmand 2 10-15 min Oui Non
5. Viandes Steack
haché 47-8 min Oui Oui
6. Poisson &
Légumes
Légumes
sautés
facon
asiatique
200-400g 20min Oui Oui
7. Surgelés Steack
hachés 2-4 8min Oui Oui
8. Plancha Brochette
de poulet 4-8 20 min Oui Non
1918
FRFR

TABLE OF CONTENTS
• Description 21
• Change of position 24
• Product overview 26
• Preparation 26
• Installation and connection 26
• Overview of the programmes 28
• A. Using an automatic programme 30
• B. Using the manual programme 32
• C. Changing the cooking time 34
• D. Changing the thermostat during cooking 34
• E. End of a programme (automatic or manual) 34
• F. Extending a cooking cycle (automatic or manual) 34
• Maintenance and cleaning 36
• Cooking guide 37
• Troubleshooting guide 38
20
EN

1
11
12
Closed position
Semi-open position
180° open position
1
2
3
4
5
9
10
6
7
8
1 Handle/Holder 180° open position
2 Handle unlock button on side of handle
3 Control panel
4 Top plate clips
5 Top plate
6 180° opening hinge button
7 Pot handle clips
8 Pot
9 Maximum volume level indicator
10 Power cord
11 Juice jug
12 Cord storage
DESCRIPTION
2221
ENEN

1.1
2.2
1.2
2.1
2.3 2.4
To open to semi-open position
1.1 Catch the Cook'in One handle positioned above the device.
1.2 Open until top stabilization.
To open to 180° open position
2.1 In the closed position, press the handle button to unlock it.
2.2 Open in semi - open position.
2.3 Close slightly and then press the hinge button.
2.4 Tilt the upper part until the base touches the surface.
CHANGE OF POSITION
Open
Push
2423
ENEN

CLIC
CLIC
3.1 3.2
3.3 3.3
1
2
3
8
4
9
7
6
5
PRODUCT OVERVIEW
1 Menu screen (depending on model)
2 Menu button
3 Start/Stop button
4 Heat zone indicator
5 Manual mode button
6 Grill button (see page 32)
7 Minus (-) button
8 Plus (+) button
9 Control panel
PREPARATION
1. Remove all packaging, stickers and other accessories from both the interior and
exterior of the appliance.
2. Prior to first use, thoroughly clean the top plate and the pot with hot water and
washing-up liquid; carefully rinse and dry.
3. Clip the pot and the top plate into the product.
Note: Use a damp sponge to clean the cooking plates and a soft, damp cloth for the
body of the appliance.
INSTALLATION AND CONNECTION
The appliance start-up applies to all programmes
3.1. Place your Cook'in one on a flat, stable, heat resistant work surface away from water.
3.2. Plug in your appliance
3.3. Check that the pot and the top plate are installed in the product.
Caution: Do not heat without food, except for preheat.
Note: Choose the position best suited to your cooking
When using the appliance for the first time, a slight odour and/or smoke may be
emitted during the first minutes of use
2625
ENEN

1
5 8 976
2 3 4 OVERVIEW OF THE PROGRAMMES
8 Automatic programme
1 Quiche & cakes programme
2 Pizza programme
3 Pasta & rice programme
4 Gourmet sandwich programme
5 Meat programme
6 Fish & vegetable programme
7 Frozen programme
8 Plancha programme
Cooking tip: There is a programme suited to each recipe style Depending on the
programme selected, a default cooking time is indicated. There are several recipes
per programme. It may therefore be necessary to adjust the cooking time based on
the recipe selected (see the list of recommended times per recipe).
Caution: To ensure best results, it is essential to follow the recipe and to adhere to
the exact quantities.
Liquid's cooking must always be done in open mode in order to avoid a large release
of steam at the opening and a possible flow of liquid on the work surface.
1 manual mode (9)
Use the correct setting for the selected programme.
2827
ENEN

4.1 4.2
4.3 4.4
4.6
4.5
A. USING AN AUTOMATIC PROGRAMME
Once the installation and connections are complete.
4.1. Scroll through the cooking programs using the Menu button.
4.2. The selected pictogram flashes.
4.3. If required, press the + and – buttons to change the time.
4.4. Place the Cook'in one in the correct position and then press Start/Stop.
4.5. The preheating starts. The display will then show a succession of horizontal
bars during preheating.
Caution:
There is no preheating for the pizza and quiche & cakes programmes. Cooking
starts as soon as the START/STOP button is pressed.
4.6. Once preheating is completed, the Cook'in one beeps, cooking starts
automatically and the display shows the cooking time you selected in step 4.3.
The cooking time counts down in minutes and then in seconds for the last minute.
Note: The preheating time is set by default. You cannot change the preheating time.
To force the end of preheating and start cooking immediately, press the START/STOP
button twice.
For the quiche & cakes, pizza, meat, fish & vegetable and frozen programmes, the
Cook'in one switches to "keep warm" mode for one hour by default.
3029
ENEN

5.1 5.2
5.3 5.4
5.5 5.6
5.7 5.8
B. USING THE MANUAL PROGRAMME
5.1. Press the manual mode button.
5.2. A default thermostat flashes.
5.3. Press the +/- keys to change the thermostat (min. 01, max. 10).
5.4. Press the manual mode button to confirm.
5.5. A predefined cooking time flashes.
5.6. Press the + and – buttons to change the time, if required.
5.7. The pot of the appliance will always heat up by default.
If you want to use the top plate, press the Grill button. A row of red LEDs will
light up on the Cook'in One central heat indicator. Press the START/STOP button
to confirm and start preheating.
5.8. At the end of preheating, the Cook'in one beeps and cooking starts automatically.
The display shows the cooking time you selected in step 5.6.
Note: Choose the setting best suited to your cooking.
The Cook'in one goes into "keep warm" mode for one hour by default.
3231
ENEN

6.1 6.2
7.1 7.2
C. CHANGING THE COOKING TIME
1. Once cooking has started, press the +/- buttons to change the cooking time.
Note: The cooking time cannot be changed during preheating.
D. CHANGING THE THERMOSTAT DURING COOKING
Note: The cooking thermostat cannot be changed during the preheating phase.
For the manual programme, once cooking has started. Press the manual programme
button and then the +/- buttons to change the thermostat.
D. END OF A PROGRAMME (AUTOMATIC OR MANUAL)
6.1
The time reaches 00 and the product sounds an alert to signal the end of cooking.
6.2 Press START/STOP once to stop the sound alert; the display flashes 00.
Caution:
The plates stay hot at the end of the cooking process. If you leave the
food in the
appliance, it will continue to cook.
F. EXTENDING A COOKING CYCLE (AUTOMATIC OR MANUAL)
7.1 At the end of the programme if the dish is undercooked when starting the
warm-up mode, additional cooking time can be added by pressing the + button.
7.2 The time display stops flashing and the minute-by-minute countdown starts.
Cooking continues.
Note: A long press on the Start/Stop button will return you to the original setting.
3433
ENEN

2H
8.1 8.2
8.4
8.3
8.5 8.6
8.88.7
MAINTENANCE AND CLEANING
8.1 Unplug the appliance.
8.2 Allow the Cook'in One to cool completely for at least two hours.
8.3 The top plate and the cooking pot are dishwasher-safe.
8.4 After use, empty the juice jug and rinse with water or washing-up liquid.
8.5 The appliance and its power cord must never be put in the dishwasher, nor under
water or in any other liquid. If you do not wish to put the top plate and the pot in the
dishwasher, use hot water and washing-up liquid to wash them, then rinse thoroughly
to remove all residues.
Dry them thoroughly. Do not use any metal scouring pads, steel wool or abrasive cleaning
products to clean the top plate and pot. Only use nylon or non-metallic cleaning pads.
Never immerse the appliance wholly or partly in water or in any other liquid.
8.6
We recommend winding the cord under the appliance.
8.7
Always ensure that the appliance is clean and dry prior to storage. Clean the outside of
the appliance regularly.
8.8
The appliance must not be carried by the top part or the holder (1) or by the power cord.
Caution: All repairs must be carried out by an authorised service centre.
3635
ENEN
La page est en cours de chargement...
La page est en cours de chargement...
La page est en cours de chargement...
La page est en cours de chargement...
La page est en cours de chargement...
La page est en cours de chargement...
La page est en cours de chargement...
La page est en cours de chargement...
La page est en cours de chargement...
La page est en cours de chargement...
La page est en cours de chargement...
La page est en cours de chargement...
La page est en cours de chargement...
La page est en cours de chargement...
La page est en cours de chargement...
La page est en cours de chargement...
La page est en cours de chargement...
La page est en cours de chargement...
La page est en cours de chargement...
La page est en cours de chargement...
La page est en cours de chargement...
La page est en cours de chargement...
La page est en cours de chargement...
La page est en cours de chargement...
La page est en cours de chargement...
La page est en cours de chargement...
La page est en cours de chargement...
La page est en cours de chargement...
La page est en cours de chargement...
La page est en cours de chargement...
La page est en cours de chargement...
La page est en cours de chargement...
La page est en cours de chargement...
La page est en cours de chargement...
La page est en cours de chargement...
La page est en cours de chargement...
La page est en cours de chargement...
La page est en cours de chargement...
La page est en cours de chargement...
La page est en cours de chargement...
La page est en cours de chargement...
La page est en cours de chargement...
-
 1
1
-
 2
2
-
 3
3
-
 4
4
-
 5
5
-
 6
6
-
 7
7
-
 8
8
-
 9
9
-
 10
10
-
 11
11
-
 12
12
-
 13
13
-
 14
14
-
 15
15
-
 16
16
-
 17
17
-
 18
18
-
 19
19
-
 20
20
-
 21
21
-
 22
22
-
 23
23
-
 24
24
-
 25
25
-
 26
26
-
 27
27
-
 28
28
-
 29
29
-
 30
30
-
 31
31
-
 32
32
-
 33
33
-
 34
34
-
 35
35
-
 36
36
-
 37
37
-
 38
38
-
 39
39
-
 40
40
-
 41
41
-
 42
42
-
 43
43
-
 44
44
-
 45
45
-
 46
46
-
 47
47
-
 48
48
-
 49
49
-
 50
50
-
 51
51
-
 52
52
-
 53
53
-
 54
54
-
 55
55
-
 56
56
-
 57
57
-
 58
58
-
 59
59
-
 60
60
-
 61
61
-
 62
62


Moulinex 1520012814-IFU Manuel utilisateur
- Taper
- Manuel utilisateur
dans d''autres langues
- italiano: Moulinex 1520012814-IFU Manuale utente
- español: Moulinex 1520012814-IFU Manual de usuario
- Deutsch: Moulinex 1520012814-IFU Benutzerhandbuch
- Nederlands: Moulinex 1520012814-IFU Handleiding
- eesti: Moulinex 1520012814-IFU Kasutusjuhend
Autres documents
-
Whirlpool AXMT 6434/IXAXMT 6534/IXAXMT 6634/IX Le manuel du propriétaire
-
-
-
Whirlpool WOD52ES4MB00 Le manuel du propriétaire
-
HOTPOINT/ARISTON OK 89E D.20 X/HA Mode d'emploi
-
-
Indesit OK 89E D.20 X/HA Mode d'emploi
-