
Moxi behind-the-ear (BTE)
hearing aid guide
Guide de l’instrument auditif
contour d’oreille (BTE) Moxi
A Sonova brand

Thank you
Thank you for choosing Unitron hearing aids.
At Unitron, we care deeply about people with
hearing loss. We work closely with hearing
healthcare professionals to make advanced,
purpose-driven solutions available to everyone.
Because hearing matters.
This user guide applies to the following models:
Year of introduction: 2017
T Moxi
™
Dura Pro
T Moxi
™
Dura 800
T Moxi
™
Dura 700
T Moxi
™
Dura 600
T Moxi
™
Dura 500
T Moxi
™
Fit Pro
T Moxi
™
Fit 800
T Moxi
™
Fit 700
T Moxi
™
Fit 600
T Moxi
™
Fit 500
T Moxi
™
Kiss Pro
T Moxi
™
Kiss 800
T Moxi
™
Kiss 700
T Moxi
™
Kiss 600
T Moxi
™
Kiss 500
T Moxi
™
Now Pro
T Moxi
™
Now 800
T Moxi
™
Now 700
T Moxi
™
Now 600
T Moxi
™
Now 500
Merci
Merci d’avoir choisi les instruments auditifs d’Unitron.
Chez Unitron, nous nous dévouons entièrement
aux personnes sourant de perte auditive. Nous
travaillons en étroite collaboration avec des
audioprothésistes an de proposer des solutions
de pointe, adaptées aux besoins de tous.
Parce que l’audition, c’est essentiel.
Ce guide d’utilisation s’applique aux modèles
suivants:
Année de lancement : 2017
T Moxi
MC
Dura Pro
T Moxi
MC
Dura 800
T Moxi
MC
Dura 700
T Moxi
MC
Dura 600
T Moxi
MC
Dura 500
T Moxi
MC
Fit Pro
T Moxi
MC
Fit 800
T Moxi
MC
Fit 700
T Moxi
MC
Fit 600
T Moxi
MC
Fit 500
T Moxi
MC
Kiss Pro
T Moxi
MC
Kiss 800
T Moxi
MC
Kiss 700
T Moxi
MC
Kiss 600
T Moxi
MC
Kiss 500
T Moxi
MC
Now Pro
T Moxi
MC
Now 800
T Moxi
MC
Now 700
T Moxi
MC
Now 600
T Moxi
MC
Now 500

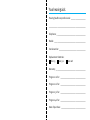
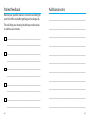
Your hearing aids
Hearing healthcare professional: ___________________
________________________________________________
Telephone: ______________________________________
Model: _________________________________________
Serial number: ___________________________________
Replacement batteries:
Size 13 Size 312 Size 10A
Warranty: _______________________________________
Program 1 is for: _________________________________
Program 2 is for: _________________________________
Program 3 is for: _________________________________
Program 4 is for: _________________________________
Date of purchase: ________________________________

Vos instruments auditifs
Audioprothésiste: ________________________________
________________________________________________
Téléphone: ________________________________________
Modèle: ________________________________________
Numéro de série: __________________________________
Piles de remplacement:
Taille 13 Taille 312 Taille 10A
Garantie: _______________________________________
Le programme 1 correspond à: _____________________
Le programme 2 correspond à: ____________________
Le programme 3 correspond à: ____________________
Le programme 4 correspond à: ____________________
Date d’achat: ______________________________________
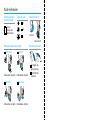
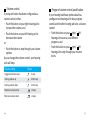
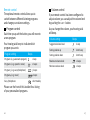
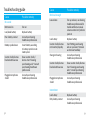
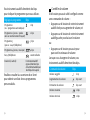
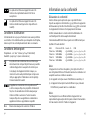
Quick reference
2 beeps
every
30 minutes
Changing batteries
Push button
Moxi Dura Moxi Fit
Moxi Kiss Moxi Now
switching
programs
volume control
Battery indicator
Battery indicator
Battery indicatorBattery indicator
O
On
Low battery
warning
Battery size On/O
10
312
13

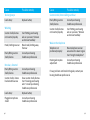
Aide-mémoire
2 bips
toutes les
30 minutes
Remplacement des piles
Bouton-poussoir
Moxi Dura Moxi Fit
Moxi Kiss Moxi Now
Changer de
programme
Contrôle du
volume
Indicateur de pile Indicateur de pile
Indicateur de pileIndicateur de pile
Désactivé
Activé
Avertissement
de pile faible
Type de pile Marche/arrêt
10
312
13

Table des matièresTable of contents
Your hearing aids at a glance ....................................................... 2
Warnings ...................................................................................... 7
SoundCore™ technology............................................................12
Putting your hearing aids on your ears .......................................13
Turning your hearingaids onando .......................................... 15
Battery information ................................................................... 16
Tinnitus masker ..........................................................................19
Operating instructions ............................................................... 22
Using the telephone ...................................................................30
Protecting your hearing aids ...................................................... 33
Cleaning your hearing aids ........................................................ 34
Accessories ................................................................................ 36
Assistive listening devices ......................................................... 37
Troubleshooting guide ...............................................................38
Information and explanation of symbols .................................. 42
Compliance information ............................................................44
Patient feedback ........................................................................46
Additional notes ......................................................................... 47
Aperçu de vos instruments auditifs ...........................................48
Avertissements .......................................................................... 53
Technologie SoundCore
MC
......................................................... 57
Mise en place des instruments auditifs sur vos oreilles ...........60
Mise en marche et en arrêt de vos instruments auditifs ..........62
Information sur la pile ................................................................ 63
Masqueur d’acouphènes ..........................................................66
Instructions d’utilisation ...........................................................69
Utilisation du téléphone ............................................................ 77
Protection de vos instruments auditifs .....................................80
Nettoyage de vos instruments auditifs ..................................... 81
Accessoires ................................................................................ 83
Aides de suppléance à l’audition ...............................................85
Guide de dépannage ..................................................................86
Information et explications sur lessymboles ........................... 91
Information sur la conformité .................................................... 93
Commentaires du client ............................................................. 95
Remarques supplémentaires ....................................................96

2 3
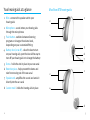
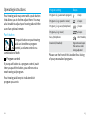
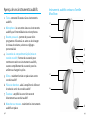
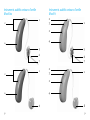
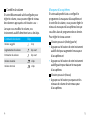
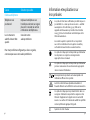
Your hearing aids at a glance
1 Wire - connects the speaker unit to your
hearingaids
2 Microphone - sound enters your hearing aids
through the microphones
3 Push button - switches between listening
programs or changes the volume level,
depending on your customized tting
4 Battery door (on & o) - close the door to turn
on your hearing aid, open the door all the way to
turn o your hearing aid or to change the battery
5 Dome - holds the wire in place in your ear canal
6 Retention piece - helps prevent the dome and
wire from moving out of the ear canal
7 Speaker unit - amplies the sound and sends it
directly into the ear canal
8 Custom mold - holds the hearing aids in place
Moxi Now BTE hearing aids
2
2
4
4
5
1
1
6
8
7

4 5
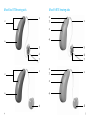
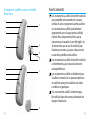
Moxi Kiss BTE hearing aids
2
2
4
4
5
1
1
6
8
7
Moxi Fit BTE hearing aids
2
2
3
4
5
1
6
7
2
2
3
4
8
1

6 7
2
2
2
2
3
3
4
4
5
1
6
8
7
1
Moxi Dura BTE hearing aids
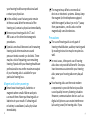
Warnings
The intended use of hearing aids is to
amplify and transmit sound to the ears and
hereby compensate for impaired hearing.
The hearing aids (specially programmed for
each hearing loss) must only be used by the
intended person. They should not be used
by any other person as they could damage
hearing.
Hearing aids should only be used as
directed by your physician or hearing
healthcare professional.
Hearing aids will not restore normal
hearing and will not prevent or improve a
hearing impairment resulting from organic
conditions.
Do not use your hearing aids in explosion
hazard areas.
Allergic reactions to hearing aids are unlikely.
However, if you experience itching, redness,
soreness, inflammation or a burning
sensation in or around your ears, inform

8 9
your hearing healthcare professional and
contact your physician.
In the unlikely case that any parts remain
in the ear canal aer the removal of the
hearing aid, contact a physician immediately.
Remove your hearing aids for CT and
MRI scans or for other electromagnetic
procedures.
Special care should be exercised in wearing
hearing aids when maximum sound
pressure levels exceed 132 decibels. There
may be a risk of impairing your remaining
hearing. Speak with your hearing healthcare
professional to ensure the maximum output
of your hearing aids is suitable for your
particular hearing loss.
Magnet and battery warnings
Never leave hearing aids, batteries or
magnets where small children and pets
can reach them. Never put hearing aids or
batteries in your mouth. If a hearing aid
or battery is swallowed, call a physician
immediately.
The magnet may aect some medical
devices or electronic systems. Always keep
the magnet (or the telephone equipped
with the magnet) at least 30 cm (12”) away
from pacemakers, credit cards or other
magnetically sensitive devices.
Precautions
The use of hearing aids is only part of
hearing rehabilitation; auditory training and
lip reading instruction may be required as
well.
In most cases, infrequent use of hearing
aids does not provide full benet. Once you
have become accustomed to your hearing
aids, wear your hearing aids every day all
day.
Your hearing aids use the most modern
components to provide the best possible
sound quality in every listening situation.
However, communication devices such as
digital cell phones can create interference
(a buzzing sound) in hearing aids. If you

10 11
experience interference from a cell phone
being used close by, you can minimize this
interference in a number of ways. Switch
your hearing aids to another program, turn
your head in a dierent direction or locate
the cell phone and move away from it.
Too high distortion during dialing or
phoning may mean that the phone handset
is stressed by the magnet. To avoid any
damage, please move the magnet to
another place on the telephone receiver.
Note to hearing healthcare professional
Domes should never be tted on patients
with perforated eardrums, exposed middle
ear cavities, or surgically altered ear
canals. In the case of such a condition, we
recommend to use a customized earmold.
Labeling
The serial number and year of manufacture are
located inside the battery door.
Cell phone compatibility rating
Some hearing aid users have reported a buzzing
sound in their hearing aids when they are using
cell phones, indicating that the cell phone and
hearing aid may not be compatible. According
to the ANSI C63.19 standard (ANSI C63.19-
2011 American National Standard Methods of
Measurement of Compatibility Between Wireless
Communications Devices and Hearing Aids), the
compatibility of a particular hearing aid and cell
phone can be predicted by adding the rating for
the hearing aid immunity to the rating for the
cell phone emissions. For example, the sum of
the hearing aid rating of 4 (M4) and a telephone
rating of 3 (M3) would result in a combined
rating of 7. Any combined rating that equals at
least 5 would provide “normal use”; a combined
rating of 6 or greater would indicate “excellent
performance.”
The immunity of this hearing aid is at least M4/
T4*. The equipment performance measurements,
categories and system classications are based
upon the best information available but cannot
guarantee that all users will be satised.

12 13
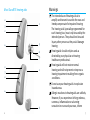
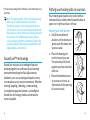
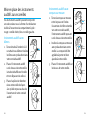
Putting your hearing aids on your ears
Your hearing aids may be color-coded with an
indicator that is visible when the battery door is
open: red = right ear; blue = le ear.
Hearing aids with domes
1. Hold the wire where it
attaches to the dome and
gently push the dome into
your ear canal.
2. Place the hearing aid
over the top of your ear.
The wire should lie flush
against your head and not
stick out.
3. Place the retention piece
in your ear so it rests at
the bottom of the opening
of your ear canal.
1.
3.
2.
*The immunity rating of the T Moxi Kiss and T Moxi Now is at
least M4.
Note: The performance of the individual hearing
aids may vary with individual cell phones.
Therefore, please try this hearing aid with your
cell phone or, if you are purchasing a new phone,
please be sure to try it with your hearing aid prior
to purchase. For additional guidance, please
ask your hearing healthcare professional for the
booklet entitled “Hearing aid compatibility with
digital wireless cell phones.”
SoundCore™ technology
SoundCore includes four intelligent features
working together to understand your listening
environment making the fluid adjustments
needed so you can actively participate in every
conversation across every environment. Whether
sharing, laughing, debating, commiserating,
or simply being a great listener, our intelligent
SoundCore technology makes conversations
more enjoyable.

14 15
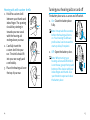
Hearing aids with custom shells
1. Hold the custom shell
between your thumb and
index nger. The opening
should be pointing in
towards your ear canal
with the hearing aid
resting above your ear.
2. Carefully insert the
custom shell into your
ear. The shell should t
into your ear snugly and
comfortably.
3. Place the hearing aid over
the top of your ear.
1.
2.
3.
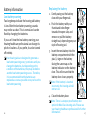
Turning your hearingaids onando
The battery door acts as an on and o switch.
1. On: Close the battery door
fully.
Note: It may take ve seconds
before the hearing aid turns
on. Your hearing healthcare
professional can increase the
start up delay if required.
2. O: Open the battery door.
Note: When turning your
hearing aid on and o while it
is on the ear, grasp the top and
bottom of the device with your
index nger and thumb. Use
your thumb to open and close
the battery door.
1.
2.

16 17
Battery information
Low battery warning
Two long beeps indicate the hearing aid battery
is low. Aer the low battery warning, sounds
may not be as clear. This is normal and can be
xed by changing the batteries.
If you can’t hear the low battery warning, your
hearing healthcare professional can change its
pitch or loudness. If you prefer, it can be turned
o entirely.
Your hearing aids are designed to generate a
low battery warning every 30 minutes until you
change the batteries, but depending on the
condition of the batteries, they may die before
another low battery warning occurs. Therefore,
it is recommended that the batteries are
replaced as soon as possible once you hear the
low battery warning.
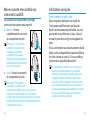
Replacing the battery
1. Gently swing out the battery
door with your ngernail.
2. Push the battery with your
thumb and index nger
towards the open side, and
remove or pull the battery
straight out, depending on your
style of hearing aid.
3. Insert the new battery into the
battery compartment with the
plus (+) sign on the battery
facing the same way as the
battery indicator on the battery
door. This will ensure that the
battery door closes properly.
Note: If the battery is inserted
incorrectly, the hearing aid will
not turn on.
4. Close the battery door.
Note: There is a tamper-proof battery door
option for MoxiDura hearing aids. Please see
your hearing healthcare professional for further
information.
1.
2.
3.
4.

18 19
Caring for batteries
• Always discard batteries in a safe and
environmentally friendly way.
• To prolong battery life, remember to turn your
hearing aids o when not in use, especially
when asleep.
• Remove the batteries and keep the battery
door open while hearing aids are not being
worn, especially when asleep. This will allow
internal moisture to evaporate.
Tinnitus masker
Tinnitus masker uses broadband noise to
provide temporary relief of tinnitus.
Tinnitus masker warnings
The tinnitus masker is a broadband sound
generator. It provides a means of sound
enrichment therapy that can be used as
part of a personalized tinnitus management
program to provide temporary relief from
tinnitus.
The underlying principle of sound
enrichment is to provide supplementary
noise stimulation which can help defocus
your attention from your tinnitus and avoid
negative reactions. Sound enrichment,
coupled with instructional counseling, is an
established approach to managing tinnitus.
Air conduction hearing aids with the
tinnitus masker are to be tted by a hearing
healthcare professional familiar with the
diagnosis and management of tinnitus.

20 21
Should you develop any side eects
while using the tinnitus masker, such as
headaches, nausea, dizziness or heart
palpitations or experience a decrease
in auditory function such as decreased
loudness tolerance, worsening of tinnitus, or
speech not as clear, you should discontinue
use of the device and seek medical
attention.
The volume of the tinnitus masker can be
set to a level which could lead to permanent
hearing damage when used for a prolonged
period of time. Should the tinnitus masker
be set to such a level in your hearing aid,
your hearing healthcare professional will
advise you of the maximum amount of time
per day you should use the tinnitus masker.
The tinnitus masker should never be used at
uncomfortable levels.
Important information
The tinnitus masker generates sounds that are
used as part of your personalized temporary
tinnitus management program to provide
relief from tinnitus. It should always be
used as prescribed by a hearing healthcare
professional who is familiar with the diagnosis
and treatment of tinnitus.
Good health practice requires that a person
reporting tinnitus have a medical evaluation by
a licensed ear physician before using a sound
generator. The purpose of such an evaluation
is to ensure that medically treatable conditions,
which may be causing tinnitus, are identied
and treated prior to using a sound generator.
The tinnitus masker is intended for adults 18
years of age or older who have both hearing
loss and tinnitus.

22 23
Operating instructions
Your hearing aids may come with a push button
that allows you to further adjust them. You may
also be able to adjust your hearing aids with the
use of an optional remote.
Push button
The push button on your hearing
aids can be either a program
control, a volume control or a
combination of both.
Program control
If your push button is a program control, each
time you push the button, you will move to a
new hearing aid program.
Your hearing aids beep to indicate which
program you are in.
Program setting Beeps
Program 1 (e.g. automatic program) 1 beep
Program 2 (e.g. speech in noise)
2 beeps
Program 3 (e.g. easy-t/telephone)
3 beeps
Program 4 (e.g. music)
4 beeps
Easy-t/telephone
short melody
DuoLink (if enabled) Opposite ear beeps
the same as side
being adjusted
Please see the front of this booklet for a listing
of your personalized programs.

24 25
Volume control
If your push button has been congured as a
volume control, either:
• Push the button on your right hearing aid to
increase the volume, and
• Push the button on your le hearing aid to
decrease the volume
or:
• Push the button to step through your volume
options
As you change the volume control, your hearing
aids will beep.
Volume setting Beeps
Suggested volume level 1 beep
Turning volume up
short beep
Turning volume down
short beep
Maximum volume level
2 beeps
Minimum volume level
2 beeps
Program/volume control push button
If your hearing healthcare professional has
congured one hearing aid to be a program
control and the other hearing aid to be a volume
control:
• Push the button on your right / le
hearing aid to access your dierent
programs, and
• Push the button on your right / le
hearing aid to step through your volume
levels

26 27
Remote control
The optional remote control allows you to
switch between dierent listening programs
and change your volume settings.
Program control
Each time you push the button, you will move to
a new program.
Your hearing aids beep to indicate which
program you are in.
Program setting Beeps
Program 1 (e.g. automatic program) 1 beep
Program 2 (e.g. speech in noise)
2 beeps
Program 3 (e.g. easy-t/telephone)
3 beeps
Program 4 (e.g. music)
4 beeps
Easy-t/telephone
short melody
Please see the front of this booklet for a listing
of your personalized programs.
Volume control
If your remote control has been congured to
adjust volume, you can adjust the volume level
by pushing the + or – button.
As you change the volume, your hearing aids
will beep.
Volume setting Beeps
Suggested volume level 1 beep
Turning volume up
short beep
Turning volume down
short beep
Maximum volume level
2 beeps
Minimum volume level
2 beeps

28 29
Tinnitus masker
If your hearing healthcare professional has
congured both a tinnitus masker program and
a volume control, you can adjust the tinnitus
masker level while you are in the tinnitus
masker program. To adjust the noise level,
either:
Push button (right/le)
• Push the button on your right hearing aid
to increase the tinnitus masker, and
• Push the button on your le hearing aid to
decrease the tinnitus masker
Push button (steps)
• Push the button to step through your
tinnitus masker volume levels
Remote control
• Push the + button on your remote control
to increase the tinnitus masker, and
• Push the – button on your remote control
to decrease the tinnitus masker
As you change the level, your hearing aids will
beep.
DuoLink
If DuoLink is enabled, when you change the
volume or program settings on one hearing aid,
the other one changes as well.
For example, if your push button is congured
as a program control and DuoLink is enabled,
when you push the button on one hearing aid,
the program will change on both hearing aids.
La page est en cours de chargement...
La page est en cours de chargement...
La page est en cours de chargement...
La page est en cours de chargement...
La page est en cours de chargement...
La page est en cours de chargement...
La page est en cours de chargement...
La page est en cours de chargement...
La page est en cours de chargement...
La page est en cours de chargement...
La page est en cours de chargement...
La page est en cours de chargement...
La page est en cours de chargement...
La page est en cours de chargement...
La page est en cours de chargement...
La page est en cours de chargement...
La page est en cours de chargement...
La page est en cours de chargement...
La page est en cours de chargement...
La page est en cours de chargement...
La page est en cours de chargement...
La page est en cours de chargement...
La page est en cours de chargement...
La page est en cours de chargement...
La page est en cours de chargement...
La page est en cours de chargement...
La page est en cours de chargement...
La page est en cours de chargement...
La page est en cours de chargement...
La page est en cours de chargement...
La page est en cours de chargement...
La page est en cours de chargement...
La page est en cours de chargement...
La page est en cours de chargement...
La page est en cours de chargement...
-
 1
1
-
 2
2
-
 3
3
-
 4
4
-
 5
5
-
 6
6
-
 7
7
-
 8
8
-
 9
9
-
 10
10
-
 11
11
-
 12
12
-
 13
13
-
 14
14
-
 15
15
-
 16
16
-
 17
17
-
 18
18
-
 19
19
-
 20
20
-
 21
21
-
 22
22
-
 23
23
-
 24
24
-
 25
25
-
 26
26
-
 27
27
-
 28
28
-
 29
29
-
 30
30
-
 31
31
-
 32
32
-
 33
33
-
 34
34
-
 35
35
-
 36
36
-
 37
37
-
 38
38
-
 39
39
-
 40
40
-
 41
41
-
 42
42
-
 43
43
-
 44
44
-
 45
45
-
 46
46
-
 47
47
-
 48
48
-
 49
49
-
 50
50
-
 51
51
-
 52
52
-
 53
53
-
 54
54
-
 55
55


Unitron Moxi Fit Mode d'emploi
- Taper
- Mode d'emploi
dans d''autres langues
- English: Unitron Moxi Fit User guide
Documents connexes
-
Unitron Moxi Jump R Mode d'emploi
-
Unitron Insera - Full shell Mode d'emploi
-
Unitron Max SP Mode d'emploi
-
Unitron Moxi B-312 Mode d'emploi
-
Unitron Moxi B-R Mode d'emploi
-
Unitron Moxi Fit Mode d'emploi
-
Unitron Moxi Jump R T Mode d'emploi
-
-
-