Home Decorators Collection 14700 Mode d'emploi
- Taper
- Mode d'emploi

INSTRUCTION MANUAL
1
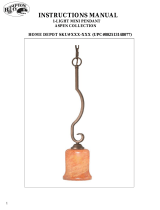
6-LIGHT CHANDELIER
FAIRVIEW COLLECTION
HOME DEPOT SKU# 517-639 (UPC# 802513147001)
HERITAGE BRONZE FINISH

2
Thank you for purchasing this Home Decorators Collection interior
Chandelier. This product has been manufactured with the highest
standards of safety and quality.
FEATURES:
1. Easy to install.
2. Six light chandelier with Heritage Bronze Finish and 6-Water Glass
Shades.
3. For energy savings this fixture has been engineered to safely use a Self
Ballasted Compact Fluorescent Bulb in place of an incandescent bulb.
QUESTIONS, PROBLEMS, MISSING PARTS:
Before returning to your local Home Depot, please call our Customer
Service Team at 1-877-527-0313 or visit www.homedepot.com. Please
reference your SKU 517-639 or UPC (802513147001)

3
CAUTION:
1. Before starting installation of this fixture or removal of a previous
fixture, disconnect the power by turning off the circuit breaker or by
removing the fuse at the fuse box.
2. CONSULT A QUALIFIED ELECTRICIAN IF YOU HAVE ANY
ELECTRICAL QUESTIONS. If you haveany non-electrical
questions about this fixture, please call our Customer Service Team at
1-877-527-0313 or visit www.homedepot.com
. Please reference your
SKU (517-639 ) or UPC (802513147001).
3. KEEP your receipt and these Instructions for Proof of Purchase.
TOOLS REQUIRED FOR INSTALLATION AND ASSEMBLY
(not included):
Phillips
screwdriver
Flathead
screwdriver
Safety
goggles
Wire
cutters
Wire
strippers
Electrical
tape
Light Bulb
(Maximum 60watt Medium
Base Incandescence Bulb
or CFL equivalent)

4
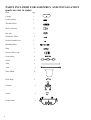
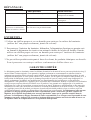
PARTS INCLUDED FOR ASSEMBLY AND INSTALLATION
(parts are not to scale):
ytQstraP
1yponaC
Locker washer 1
Threaded Tube 1
Wire Connector 3
1tuNxeH
Outlet Box Screw 2
Green Ground Screw 1
Mounting Strip 1
1gniR
Screw Collar Loop 1
6gniRtekcoS
1niahC
1ebuT
3mrA
6edahSssalG
3gniRkooH
1nmuloC
1lainiF
1ydoBerutxiF

5
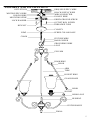
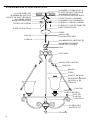
ASSEMBLY AND INSTALLATION:
GROUND SUPPLY WIRE
OUTLET BOX SCREW
GREEN GROUND SCREW
GLOSSY WIRE
WIRE CONNECTOR
OUTLET BOX
LOCK WASHER
MOUNTING STRIP
ROUGH WIRE
CHAIN
RING
HEX NUT
THREADED TUBE
CANOPY
SCREW COLLAR LOOP
BLACK SUPPLY WIRE
WHITE SUPPLY WIRE
BARE COPPER
GROUNDING WIRE
LOOP
FIXTURE WIRE
COLUMN
HOOK RING
HOOK
HOOK
ARM
SOCKET RING
GLASS SHADE
SOCKET
TUBE
HOOK LOOP
BUSHING
FIXTURE BODY
FINIAL

6
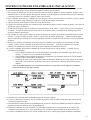
ASSEMBLY AND INSTALLATION INSTRUCTIONS:
1. Shut down the main electrical supply from the fuse box or circuit breaker in your house or building.
2. Fasten the mounting strip onto the outlet box using 2 outlet box screws.
3. Thread the threaded tube into center hole of mounting strip about 4 complete turns. Lock in place with
lock washer and hex nut. The threaded tube should extend long enough to protrude through the canopy
when it is mounted. Adjust as necessary.
4. Guide fixture wire and bare copper grounding wire through the tube, column and loop, and tighten the
tube onto column, then insert the tube into the bushing of fixture body.
5. Tighten the finial onto the bottom of fixture body.
6. Hang three hook rings onto the column, then hook three arms between the hook rings and hook loops of
the fixture body.
7. Using a pair of pliers, twist open one chain link at the end of chain links. Hook it to the loop and close the
chain link. Place a piece of cloth between the jaws of pliers and the chain link to prevent scratching the
finish.
8. Tighten the screw collar loop to the threaded tube on the mounting strip. Place the ring and canopy over
the chain on the fixture. Using pliers, twist open the chain link at the other end of the chain. Hook the
whole fixture to the screw collar loop on the ceiling and close the chain link
9. Weave the fixture wires and bare copper ground wire up through the chain links, ring, canopy, screw
collar loop and the threaded tube in the mounting strip and then into outlet box. Position both the supply
wires and the fixture wires outside of the outlet box to facilitate connection.
10. Connect the wire from the fixture to the power supply wire from outlet box. Cover with wire connectors.
A. Twist together glossy / live wire from the fixture with black wire from outlet box. Cover with wire
connector.
B. Twist together rough / neutral wire from the fixture with white wire from outlet box. Cover with wire
connector.
C. The bare copper grounding wire from the fixture must loop one turn under the head of green screw
on mounting strip before it is connected to the grounding conductor of the supply circuit.
Note: The Glossy/Live wire has the text printed on it; the Rough/Neutral wire has the ridge on it.
11. Carefully position all wiring inside outlet box.
12. Place the canopy all the way to the ceiling and tighten the ring onto the screw collar loop until the canopy
is firmly held against the ceiling.
13. Unscrew the socket rings from sockets. Set glass shades onto each socket and secure using socket rings.
14. Install the bulbs (not included). Use 60-watt Maximum standard type A bulbs or MAX 13W UL
LISTED CFL bulb. .
15. Turn on the electrical power in your house or building to activate the chandelier.

7
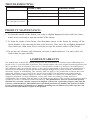
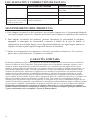
TROUBLESHOOTING:
Possible Cause Corrective Action
.nosiylppusrewoperusekaM.1.ffosirewoP.1
.hctiwsecalperrotseT.2.hctiwsytluaF.2
Lights will not turn on.
3. Faulty wire connection. 3. Check wiring.
Fuse blows or circuit breaker
trips when light is turned on.
1. Crossed wires or power wire is grounding
out.
1. Check wire connections.
PRODUCT MAINTENANCE:
1. To clean the outside of the fixture, use a dry or slightly dampened clean cloth (use clean
water, never a solvent) to wipe the surface of the fixture.
2. To clean the inside of the fixture, first disconnect power to the fixture by turning off the
circuit breaker or by removing the fuse at the fuse box. Next, use a dry or slightly dampened
clean cloth (use clean water, never a solvent) to wipe the interior surface of the fixture.
3. Do not use any cleaners with chemicals, solvents or harsh abrasives. Use only a dry soft
cloth to dust or wipe carefully.
LIMITED WARRANTY
The manufacturer warrants this lighting fixture to be free from defects in materials and workmanship for a
period of five (5) years from date of purchase. This warranty applies only to the original consumer purchaser and
only to products used in normal use and service. If this product is found to be defective, the manufacturer’s
only obligation, and your exclusive remedy, is the repair or replacement of the product at the manufacturer’s
discretion, provided that the product has not been damaged through misuse, abuse, accident, modifications,
alterations, neglect or mishandling. This warranty shall not apply to any product that is found to have been
improperly installed, set-up, or used in any way not in accordance with the instructions supplied with the
product. This warranty shall not apply to a failure of the product as a result of an accident, misuse, abuse,
negligence, alteration, or faulty installation, or any other failure not relating to faulty material or
workmanship. This warranty shall not apply to the finish on any portion of the product, such as surface and/or
weathering, as this is considered normal wear and tear. The manufacturer does not warrant and specially
disclaims any warranty, whether expressed or implied, of fitness for a particular purpose, other than the
warranty contained herein. The manufacturer specifically disclaims any liability and shall not be liable
for any consequential or incidental loss or damage, including but not limited to any labor/expense costs
involved in the replacement or repair of said product.

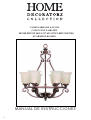
MANUAL DE INSTRUCCIONES
8
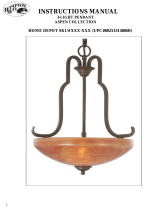
CANDELABRO DE 6-LUCES
COLECCIÓN FAIRVIEW
HOME DEPOT SKU# 517-639 (UPC# 802513147001)
ACABADO LEGADO

9
Gracias por comprar esta Lámpara-Candelabro para interiores de Home
Decorators Collection. Este producto ha sido manufacturado teniendo
en cuenta los estándares más altos de calidad y seguridad.
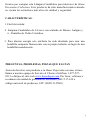
CARACTERÍSTICAS:
1. Fácil de instalar.
2. Lámpara-Candelabro de 6-Luces con acabado en Bronce Antiguo y
6 - Pantallas de Vidrio Cristalino.
3. Para ahorrar energía este artefacto ha sido diseñado para usar una
bombilla compacta fluorescente con su propio balastro en lugar de una
bombilla incandescente.
PREGUNTAS, PROBLEMAS, PIEZAS QUE FALTAN
Antes de devolver este producto a su Home Depot más cercano, sírvase
llamar a nuestro equipo de Servicio al Cliente al teléfono 1-877-527-
0313 o diríjase al sitio web www.homedepot.com
. Por favor, refiérase a
su número de unidad de guardado de inventario, SKU 517-639 o
código universal de productos, UPC (802513147001)

10
PRECAUCIÓN:
1. Antes de comenzar la instalación de este artefacto o de desmontar un
artefacto, desconecte la fuente de electricidad apagando el interruptor
de electricidad o sacando el fusible de la caja de fusibles.
2. CONSULTE A UN ELECTRICISTA CALIFICADO SI USTED
TIENE CUALQUIER PREGUNTA RELACIONADA CON LA
ELECTRICIDAD. Si usted tiene cualquier otra pregunta que no esté
relacionada con la electricidad, sírvase llamar a nuestro equipo de
Servicio al Cliente al teléfono 1-877-527-0313 o diríjase al sitio web
www.homedepot.com
. Por favor, refiérase a su número de unidad
de guardado de inventario, SKU 517-639 o código universal de
productos, UPC (802513147001).
3. GUARDE su recibo y estas Instrucciones como Prueba de Compra.
HERRAMIENTAS NECESARIAS PARA LA INSTALACIÓN Y EL
ENSAMBLAJE
(no están incluidas):
Bombilla base Candelabro
(Máx.60vatiosBombilla
Incandescente Equivalente a
CFL)
Destornillado
r
Phillips
Destornillado
r
de cabeza plana
Alicate de corte
Alicate
p
elacable
Tape eléctrico
Espejuelos de
segurida
d

11
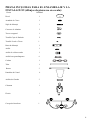
PIEZAS INCLUIDAS PARA EL ENSAMBLAJE Y LA
INSTALACIÓN (dibujos de piezas no en escala):
daditnaCsazeiP
1lesoD
1erreiCedalednarA
1ejatnoMedelpiN
Conector de Alambre 3
1lanogaxeacreuT
Tornillo Caja de Embutir 2
Tornillo Verde a Tierra 1
1ejatnoMedarraB
1ollinA
Anillo de collar roscado 1
Anillo base portalámparas 6
1anedaC
1obuT
3sozarB
6latsirCedsallatnaP
3ohcnaGedsollinA
1anmuloC
1nórolF
Cuerpo del Artefacto 1

12
ENSAMBLAJE E INSTALACIÓN:
COLUMNA
ANILLOS DE GANCHO
GANCHO
GANCHO
BRAZO
ANILLO DE BASE
DE PORTALAPARAS
PANTALLA DE
CRISTAL
BASE DE
TUBO
OJAL DE
GANCHO
CASQUILLO
CUERPO DEL
ARTEFACTO
FLORON
ALAMBRE A TIERRA DE LA
TORNILLO CAJA DE EMBUTIR
TORNILLO VERDE A TIERRA
ALAMBRE CON CORRIENTE
CONECTOR DE ALAMBRE
CAJA DE EMBUTIR
TUERCA DE CIERRE
BARRA DE MONTAJE
ALAMBRE APERO
CADENA
ANILLO
TUERCA EXAGONAL
NIPLE DE MONTAJE
DOSEL
ANILLO DEL
COLLAR ROSCADO
ALAMBRE NEGRO DE
ALAMBRE BLANCO DE
ALAMBRE DE COBRE
OJAL
ALAMBRE DEL ARTEFACTO
FUENTE DE ELECTRICIDAD
FUENTE DE ELECTRICIDAD
FUENTE DE ELECTRICIDAD
DESNUDO A TIERRA
PORTALAPARAS

13
INSTRUCCIONES DE ENSAMBLAJE E INSTALACIÓN:
1. Desconecte el suministro eléctrico principal de su casa o edificio desde la caja de fusibles o disyuntor de circuito.
2. Fije la barra de montaje a la caja de embutir usando 2 tornillos caja de embutir.
3. Pase el niple de montaje por el orificio central de la barra de montaje dándole 4 vueltas completas. Asegure con la
arandela de freno y tuerca exagonal. Este niple de montaje se puede alargar lo suficiente como para que sobresalga
a través del dosel al ser montado. (Ajústelo como sea necesario).
4. Guíe el alambre del artefacto y el alambre de cobre desnudo a tierra a través del tubo, la columna y el ojal, y apriete
el tubo a la columna, luego introduzca el tubo en el casquillo del cuerpo del artefacto.
5. Apriete el florón contra la parte inferior del cuerpo del artefacto.
6. Cuelgue tres anillos de gancho en la columna, luego enganche tres brazos entre los anillos de gancho y los ojales de
gancho del cuerpo del artefacto.
7. Usando un alicate plano, abra un eslabón en el extremo inferior de la cadena. Fíjelo al ojal y cierre el eslabón de
la cadena
. Coloque un pedazo de tela entre la boca de un alicate plano y el eslabón de la cadena para prevenir
rayones al esmalte del artefacto.
8. Fije el anillo de collar roscado al niple de montaje en la barra de montaje, enroscando firmemente hasta que quede
cerrado. Coloque el anillo de collar roscado y el dosel sobre la cadena del artefacto. Usando un alicate plano,
abra el eslabón al otro extremo de la cadena. Enganche el artefacto al collar roscado del techo y cierre el eslabón de
la cadena.
9. Entreteja los alambres del artefacto hacia arriba entre los eslabones de la cadena, a través del anillo de collar
roscado y páselos a través del niple de montaje en la barra de montaje. Coloque los alambres de la caja de
embutir y los alambres del artefacto fuera de la caja de embutir para facilitar la conexión.
10. Conecte el alambre del artefacto al alambre de corriente eléctrica de la caja de embutir. Cúbralos con los
conectadores de alambres.
A. Una el alambre brillante/con corriente del artefacto retorciéndolo con el alambre negro de la caja de
embutir. Cúbralos con los conectadores de alambres.
B. Una el alambre áspero/neutral del artefacto retorciéndolo con el alambre blanco de la caja de embutir.
Cúbralos con los conectadores de alambres.
C. El alambre de cobre a tierra del artefacto debe ser enrollado, dándosele una vuelta, debajo de la cabeza
del tornillo verde en la barra de montaje, antes de ser conectado al conductor de tierra de la caja de
embutir.
Nota: El alambre brillante/con corriente del artefacto es el que tiene el texto impreso; el alambre
áspero/neutral es el que tiene reborde.
11. Introduzca con cuidado todos los alambres dentro de la caja de embutir.
12. Levante el dosel hacia el techo y asegure el anillo del collar roscado al collar roscado hasta que el dosel quede
firmemente fijado del techo.
13. Desentornille los anillos de base de portalámparas de las bases. Coloque las pantallas de
cristal
en cada base y
asegúrelas usando los anillos de base de portalámparas.
14. Instale las bombillas (no están incluidas). Use bombillas estándar tipo A con un máximo de 60 vatios o una
bombilla con un máximo de 13 vatios aprobada por UL, certificada como bombilla de luz fluorescente CFL.
15. Conecte el suministro eléctrico en la caja de fusibles de su casa o edificio para prender la lámpara-candelabro.

14
LOCALIZACIÓN Y CORRECCIÓN DE FALLOS:
Causa Posible del Problema
Acción para Corregir el Problema
1. La fuente de electricidad está apagada. 1. Asegúrese de prender la fuente de
electricidad.
2. El
“switch”
o enchufe está malogrado. 2. Pruebe o reemplace el enchufe.
Luces no prenden.
3.
Falla en la conexión de los cables
. 3. Revisar los cables.
Se explota un fusible o el
interruptor del circuito falla
cuando se prende la luz.
1.
Cables cruzados o la electricidad que llega
al cable se disminuye
.
1. Revisar las conexiones de los
cables.
MANTENIMIENTO DEL PRODUCTO:
1.
Para limpiar la superficie del artefacto, use un paño limpio seco o ligeramente húmedo
(use agua limpia, nunca use líquidos solventes) para limpiar la superficie del artefacto.
2.
Para limpiar el interior del artefacto, primero desconecte la electricidad al artefacto,
apagando el interruptor de electricidad o sacando el fusible de la caja de fusible. A
continuación, use un paño limpio seco o ligeramente húmedo (use agua limpia, nunca use
líquidos solventes) para limpiar la superficie interior del artefacto.
3.
Nunca use detergentes con químicos, solventes o productos abrasivos. Use solo un
paño suave para despolvar y limpiar con cuidado
.
GARANTÍA LIMITADA
El fabricante garantiza que por 5 años a partir de la fecha de su compra que este artefacto de luz está libre de
defectos de mano de obra y materiales. Esta garantía aplica solo al consumidor/comprador original y solo a
productos usados, mantenidos bajo condiciones normales. Si se comprueba que hay algún defecto en este
producto, la única obligación del fabricante y su remedio exclusivo es el reparo o reemplazo del producto a la
discreción del fabricante siempre y cuando el producto no se haya sido maltratado debido al mal uso, abuso,
accidente, modificaciones, alteraciones, negligencia o uso anormal. Esta garantía no será aplicada a ningún
producto que haya sido instalado, ensamblado erróneamente o utilizado en cualquier forma que no esté de
acuerdo a las instrucciones provistas con el producto. Esta garantía no será aplicada a un fallo del producto
como resultado de un accidente, mal uso, abuso, negligencia alteración, o instalación incorrecta, o cualquier otro
fallo no relacionado con material defectuoso o mano de obra. Esta garantía no será aplicada al acabado o
cualquier parte del producto, tales como la superficie o el desgaste ya que esto es considerado desgaste por uso
normal. El fabricante no garantiza y especialmente se descarga de responsabilidad en cuanto a cualquier garantía,
ya sea expresa o implícita, o dedicada para un propósito específico que no sea el de la garantía aquí contenida.
El fabricante específicamente se descarga de cualquier obligación y no será responsable por cualquier
pérdida o daño consecuente o adicional, que incluye pero no se limita a cualquier gasto por mano de obra
o gastos relacionados con el reemplazo o reparo de dicho producto.

DIRECTIVES D’ASSEMBLAGE
15
ET D’INSTALLATION
COLLECTION FAIRVIEW
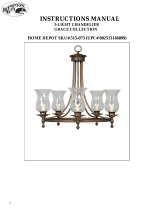
LUSTRE À 6-LUMIÈRES
HOME DEPOT SKU# 517-639 (UPC# 802513147001)
FINI BRONZE DU PATRIMOINE

16
Merci d’avoir acheté ce lustre de la collection Home Decorators. Ce
produit a été fabriqué en respectant les plus hautes normes de
qualité et de sécurité.
PARTICULARITÉS :
1. Facile à installer.
2. Lustre à cinq lumières au fini bronze du patrimoine avec 6-abat-jour
en verre soluble.
3. Ce lustre économise l’énergie grâce à une conception qui permet
l’utilisation en toute sécurité d’une ampoule fluocompacte à ballast
électronique intégré au lieu d’une ampoule incandescente.
QUESTIONS, PROBLÈMES, PIÈCES MANQUANTES :
Avant de retourner ce produit à votre succursale Home Dépôt, veuillez
téléphoner un de nos conseillers en service à la clientèle au numéro
1-877-527-0313 ou visitez le site www.homedepot.com. Veuillez avoir
en main la référence suivante: SKU 517-639 ou UPC (802513147001)

17
MISE EN GARDE :
1. Avant de procéder à l’installation de ce luminaire ou d’enlever
l’ancien luminaire, débrancher l’alimentation électrique en fermant le
disjoncteur de circuit ou en retirant le fusible de la boîte de fusibles.
2. POUR TOUTE QUESTION EN MATIÈRE D’ÉLECTRICITÉ,
CONSULTER UN PROFESSIONNEL EN ÉLECTRICITÉ. Si vous
avez des questions à propos de ce luminaire et qui ne touchent pas
l’électricité, veuillez téléphoner un de nos conseillers en service à la
clientèle au numéro 1-877-527-0313 ou visitez le site
www.homedepot.com
. Veuillez avoir en main la référence suivante :
SKU 517-639 ou UPC (802513147001)
3. GARDER votre reçu et ces directives d’assemblage et d’installation
comme preuve d’achat.
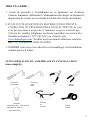
OUTILS REQUIS POUR L’ASSEMBLAGE ET L’INSTALLATION
(non compris) :
Tournevis
cruciforme
Tournevis
à tête
plate
Lunettes
de
sécurité
Coupe
fil Outil à
dénuder
Ruban
isolant
Ampoule
(incandescente à culot moyen
maximum de 60W ou
l’équivalent CFL)

18
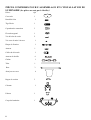
PIÈCES COMPRISES POUR L’ASSEMBLAGE ET L’INSTALLATION DU
LUMINAIRE
(les pièces ne sont pas à échelle)
:
étQsecèiP
1elcrevuoC
1nierfellednoR
1eételifegiT
Capuchon de connexion 3
Écrou hexagonal 1
Vis de boîte de sortie 2
Vis verte de mise à la terre 1
Plaque de fixation 1
1uaennA
Collier de la boucle 1
Anneau de douille 6
1enîahC
1obuT
3sarB
Abat-jour en verre 6
Bague de crochet 3
1ennoloC
1uaetîaF
Corps du luminaire 1

19
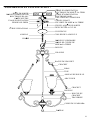
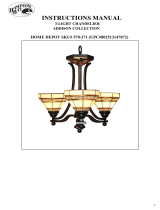
ASSEMBLAGE ET INSTALLATION :
COLONNE
BAGUE DE CROCHET
CROCHET
CROCHET
BRAS
ANNEAU DE DOUILLE
ABAT-JOUR
DOUILLE
TIGE
BOUCLE DU
CROCHET
TRAVERSEE
CORPS DU LUMINAIR
E
FAITEAU
CABLE D'ALIMENTATION
VIS DE LA BOITE DE SORTIE
VIS VERTE DE MISE A LA TERRE
CABLE LUISANT
CAPUCHON DE CONNEXION
BOITE DE SORTIE
RONDELLE FREIN
PLAQUE DE FIXATION
CABLE NEUTRE
CHAINE
ANNEAU
ECROU HEXAGONAL
TIGE FILETEE A G1/2 PO
COUVERCLE
COLLIER DE LA BOUCLE
CABLE D'ALIMENTATION
CABLE D'ALIMENTATION
CABLE DE CUIVRE DE
BOUCLE
CABLE DU LUMINAIRE
ELECTRIQUE BLANC
ELECTRIQUE DE MISE A LA TER
R
ELECTRIQUE NOIR
MISE A LA TERRE

20
DIRECTIVES D’ASSEMBLAGE ET D’INSTALLATION :
1. Fermer l’alimentation électrique principale à partir de la boîte à fusibles ou du disjoncteur de circuit de votre
domicile ou de votre édifice.
2. Fixer la plaque de fixation à la boîte de sortie avec les deux (2) vis de boîte de sortie.
3. Visser la tige filetée dans le trou au centre de la plaque de fixation, effectuer environ 4 tours complets. Fixer avec
une rondelle frein et un écrou hexagonal. La tige filetée devrait dépasser du couvercle lorsqu’il est monté. (Ajuster
au besoin)
4. Passer le câble du luminiare et le câble de cuivre de mise à la terre dans la tige, la colonne et lal boucle, et resserrer
la tige à la colonne. Insérer la tige dans la traversée située sur le corps du luminaire .
5. Resserrer le fâiteau à la partie inférieure du corps du luminaire.
6. Accrocher trois bagues de crochet à la colonne, accrocher ensuite les trois bras entre les bagues de crochet et les
boucles de crochet du corps du luminaire.
7. À l’aide de pince, tordre le dernier maillon de chaîne pour l’ouvrir. Pour éviter d’égratigner le fini du maillon,
placer un chiffon entre les mâchoires de la pince et les maillons de la chaîne. Accrocher le maillon à l’anneau et
refermer le maillon de la chaîne. Placer un chiffon entre les mâchoires de la pince et le maillon de la chaîne afin de
ne pas égratigner le fini.
8. Serrer le collier de la boucle à la tige filetée située sur la plaque de fixation. Placer l’anneau et le couvercle par-
dessus la chaîne du luminaire. À l’aide de pince, tordre le dernier maillon à l’autre extrémité de la chaîne et ouvrir.
Accrocher le luminaire au collier de la boucle fixé au plafond et refermer le maillon de la chaîne.
9. Passer les câbles du luminaire et le câble de cuivre de mise à la terre par les maillons de la chaîne, l’anneau, le
couvercle, le collier de la boucle et la tige filetée fixée à la plaque de fixation et ensuite dans la boîte de sortie.
Positionner les câbles de la boîte de sortie et ceux du luminaire à l’extérieur de la boîte de sortie pour faciliter le
branchement.
10. Connecter le câble du luminaire au câble d’alimentation électrique de la boîte de sortie. Recouvrir avec des
capuchons de connexion.
A. Torsader le câble luisant / sous tension du luminaire avec le câble noir de la boîte de sortie. Recouvrir d’un
capuchon de connexion.
B. Torsader le câble rêche / neutre provenant du
luminaire avec le câble blanc de la boîte de sortie. Recouvrir
d’un capuchon de connexion.
C. Le câble de cuivre de mise à la terre en cuivre du luminaire doit faire faire une boucle sous la tête de la vis
verte située sur la plaque de fixation avant de le raccorder au conducteur de terre du circuit d’alimentation.
Note : Le câble luisant (sous tension) se distingue par du texte imprimé; le câble rêche/neutre est strié.
11. Placer soigneusement tous les câbles à l’intérieur de la boîte de sortie.
12. Pousser le couvercle jusqu’au plafond et serrer l’anneau au collier de la boucle jusqu’à ce que le couvercle soit
solidement appuyé au plafond.
13. Dévisser les anneaux de douille des douilles. Poser les abat-jour sur chaque douille et fixer avec les anneaux de
douille.
14. Installer les ampoules (non incluses). Requiert des ampoules conformes de Type A, maximum de 60 W ou des
ampoules fluocompactes classées UL, maximum de 13 W.
15. Rétablir l’alimentation électrique du domicile ou de l’édifice pour allumer votre luminaire.
La page est en cours de chargement...
-
 1
1
-
 2
2
-
 3
3
-
 4
4
-
 5
5
-
 6
6
-
 7
7
-
 8
8
-
 9
9
-
 10
10
-
 11
11
-
 12
12
-
 13
13
-
 14
14
-
 15
15
-
 16
16
-
 17
17
-
 18
18
-
 19
19
-
 20
20
-
 21
21


Home Decorators Collection 14700 Mode d'emploi
- Taper
- Mode d'emploi
dans d''autres langues
Documents connexes
Autres documents
-
 Hampton Bay 14694 Guide d'installation
-
 Hampton Bay 14696 Guide d'installation
-
 Hampton Bay 14807 Mode d'emploi
-
 Hampton Bay 14806 Guide d'installation
-
 Hampton Bay 14689 Mode d'emploi
-
 Hampton Bay 14690 Mode d'emploi
-
 Hampton Bay 14787 Mode d'emploi
-
none 14688 Guide d'installation
-
 Hampton Bay 14791 Guide d'installation
-
 Hampton Bay 14789 Guide d'installation


