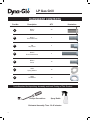
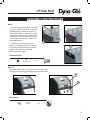
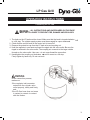
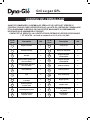
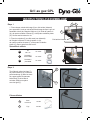
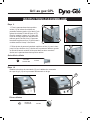
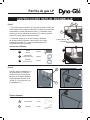
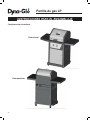
Dyna-Glo DGP350NP Manuel utilisateur
- Catégorie
- Barbecues
- Taper
- Manuel utilisateur
Ce manuel convient également à

Questions, problems, missing parts? Before returning to your retailer,
call our customer service department at 1-877-447-4768
03:4 – .m.a 03:8 p.m. CST, Monday – Friday
or email us at [email protected]
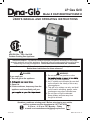
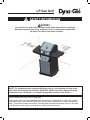
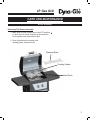
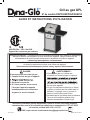
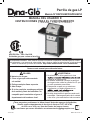
USER’S MANUAL AND OPERATING INSTRUCTIONS
70-10-001 REV: 002-01-25-11
LP Gas Grill
Model # DGP350NP/DGP350NP-D
ANS Z21.58a – CSA 1.6a-2008
Outdoor Cooking Gas Appliance
WARNING:
1. Do not store or use gasoline or other
of this or any other appliance.
2. An LP cylinder not connected for use shall
not be stored in the vicinity of this or any
other appliance.
3. This grill is for outdoor use only, and shall
not be used in a building, garage, under
overhangs or any other enclosed area.
4. Do not leave a lit grill unattended.
Keep children and pets away from
the grill at all times.
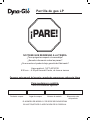
DANGER:
If you smell gas:
1. Shut off gas to the appliance.
3. Open Lid.
4. If odor continues, keep away from the
appliance and immediately call your
Assembler/Installer: This manual contains important information necessary for the proper
assembly and safe use of this appliance. Read and follow all warnings and instructions before
assembling and using this appliance. Leave these instructions with the consumer.
Consumer/User: Follow all warnings and instructions when using this appliance.
Retain these instructions for future reference.

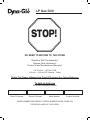
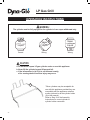
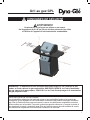
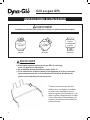
STOP!
Questions With The Assembly?
Require Parts Information?
Product Under Manufacturers Warranty?
Call Toll Free : 1-877-447-4768
8:30 a.m. – 4:30 pm CST, Monday – Friday
Fill in the information below:
Model NumberDate of Purchase Product Serial No.
MODEL NUMBER AND PRODUCT SERIAL NUMBER CAN BE FOUND ON
THE RATING LABEL OF YOUR GRILL.
1
Place of Purchase

Safety Information .............................................................................................. 2 - 3
Package Contents ............................................................................................. 4 - 5
Illustrated Parts List .......................................................................................... 6 - 7
Hardware Contents .................................................................................................... 8
Preparation ................................................................................................................. 8
Assembly Instructions ......................................................................................... 9 - 20
Operation Instructions ........................................................................................ 21 - 25
Care and Maintenance ........................................................................................ 26 - 30
Troubleshooting ............................................................................................................ . 31
Replacements Parts List .................................................................................... 32 - 33
Warranty ...................................................................................................................... 34
1

2 3
SAFETY INFORMATION
1. DO NOT store or use gasoline or any other ammable vapors and liquids within 25 feet (8 m)
of this or any other appliance.
2. An LP Cylinder not connected for use should be stored a minimum of 10 feet (3 m) away from
this or any other appliance.
3. This grill is for use with propane gas only (propane gas cylinder not included).
4. Never attempt to attach this grill to the self-contained propane system of a boat, camper trailer,
motor home or house.
5. Never use charcoal or lighter uid with the grill.
6. Do not use gasoline, kerosene or alcohol for lighting. The LP gas supply cylinder used with
this appliance must be:
(a) Constructed and marked in accordance with the Specications for LP-Gas Cylinders of the U.S.
Department of Transportation (D.O.T.) or the National Standard of Canada, CAN/CSA-B339, Cylinders,
Spheres and Tubes for Transportation of Dangerous Goods; and Commission, as applicable; and
(b) Provided with a listed overlling prevention device.
(c) Provided with a cylinder connection device compatible with the connector for outdoor cooking
appliances. This grill is not intended to be used in or installed on recreational vehicles and/or boats.
7. Do not attempt to move the grill while it is lit or when it is hot. The casters should be locked when
not moving the grill.
8. Do not use the grill unless it is completely assembled and all parts are securely fastened and tightened.
9. Keep all combustible items and surfaces at least 36 inches (91.44 cm) away from the grill at all times.
10. Do not use in an explosive atmosphere. Keep grill area clear and free from combustible materials,
gasoline and other ammable vapors and liquids.
11. Do not touch metal parts of grill until it has completely cooled (about 45 minutes) to avoid burns,
unless you are wearing protective gear (pot holders, gloves, BBQ mittens, etc…).
12. Do not alter this grill in any manner.
13. Clean and inspect the hose before each use. If there is evidence of abrasion, wear, cuts, or leaks,
the hose must be replaced prior to operating the appliance. The replacement hose assembly will be
that which is specied by GHP Group, listed in the repair parts list in this manual.
14. Move gas hoses as far away as possible from hot surfaces and dripping hot grease.
15. Never keep a lled container in a hot car or car trunk. Heat will cause the gas pressure to increase,
which may open the relief valve and allow gas to escape.
16. Keep the grill’s valve compartment, burners and circulating air passages clean. Inspect the
grill before each use. Do not obstruct the ow of gas or ventilation air.
17. The use of alcohol, prescription or non-prescription drugs may impair the operator’s ability
to properly assemble or safely operate the grill.
18. Always open grill lid slowly and carefully as heat and steam trapped within the grill can burn you severely.
19.
20. Do not place this grill on any type of tabletop surface. The grill should be placed on a at and level surface.
21. Do not use the grill in high winds.
Please read and understand this entire manual before attempting to assemble, operate or install
the product. If you have any questions regarding the product, please call customer service at
1-877-447-4768, 8:30 a.m. – 4:30 pm CST, Monday – Friday

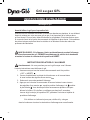
SAFETY INFORMATION
2
3
CALIFORNIA PROPOSITION 65 WARNING:
Fuels used in gas or oil red appliances and the products of combustion of such fuels, contain
chemicals known to the State of California to cause cancer, birth defects or other reproductive
harm. This product contains chemicals, including lead and lead compounds, known to the state
of California to cause cancer, birth defects or other reproductive harm.
36 in.
(914.4mm)
36 in.
(914.4mm)

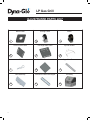
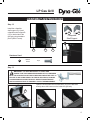
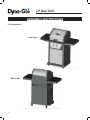
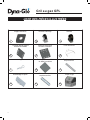
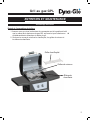
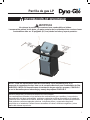
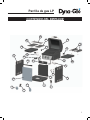
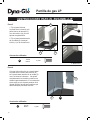
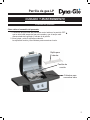
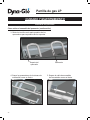
Part No. Description Qty Part No. Description Qty
1 Bottom Shelf 1 12 Grill Body 1
2 Locking Caster 2 13 Control Knob 2
3 Caster 2 14 Collapsible Shelf Support A 2
4 Cart Left Side Panel 1 15 Collapsible Shelf Support B 2
5 Cart Right Side Panel 1 16 Heat Tent 2
6 Cylinder Holder 1 17 Cooking Grate 2
7 Pin 2 18 Warming Rack 1
8 Cart Rear Panel 1 19 Left Shelf 1
9 Upper Front Door Brace 1 20 Right Shelf 1
10 Door Assembly 1 21 Grease Cup Clip 1
11 Upper Swivel Rear Panel 1 22 Grease Cup 1
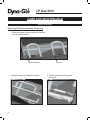
PACKAGE CONTENTS
4 5

PACKAGE CONTENTS
4
5

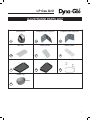
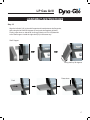
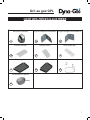
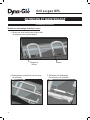
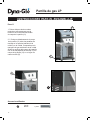
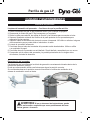
ILLUSTRATED PARTS LIST
6 7
Bottom Shelf Locking Caster
Cart Right Side Panel
Cart Rear Panel Down
Cart Swivel Rear Panel Upper
Cart Left Side Panel
Pin
Door Assembly
Caster
Cylinder Holder
Upper Door Brace
Grill Body

ILLUSTRATED PARTS LIST
6
7
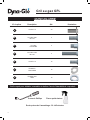
Control Knob
Heat Tent
Left Shelf
Grease Cup
Collapsible Shelf Support B
Warming Rack
Grease Cup Clip
Collapsible Shelf Support A
Cooking Grate
Right Shelf

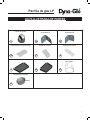
HARDWARE CONTENTS
M4x10
Flat Head Screw
4
M6
Step Screw
4
M5x12
S cr e w
16
6MM
Spring Washer
16
M6x12
S cr e w
30
6MM
Flat Washer
16
M6x25
Round Head Screw
4
Tools Required for Unpacking, Assembly and Leak Testing of This Product:
8 9

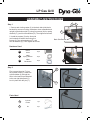
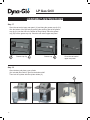
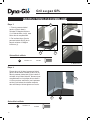
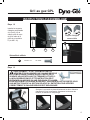
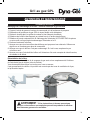
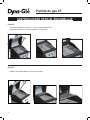
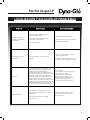
ASSEMBLY INSTRUCTIONS
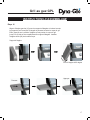
1. Secure each locking caster (2) to the back side (side that is
beveled for access to locking mechanism when assembled and
upright) of the bottom shelf (1) using four screws (A) four spring
washers (F) ) and four at washers (G). Then tighten all screws.
First, remove the pins (7) from
the cylinder holder (6). Insert the
cylinder holder (6) through the
holes in the bracket pre-attached
to the cart right side panel (5).
Lock in place with the pins (7).
Back Side Beveled
M6x12
S cr e w
6MM
Spring Washer
16 pc
16 pc
2. Install the casters (3) to the front side
(not beveled) of bottom shelf using four
screws (A) four spring washers (F) ) and
four at washers (G). Then tighten all screws.
6
5
7
Cylinder
Holder
Pin
1 pc
2 pc
8
9
6MM
Flat Washer
16 pc
Back Side Beveled

A: M6x12 Screw
Qty: 4pcs
A
4
1
5
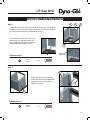
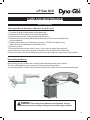
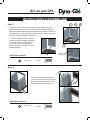
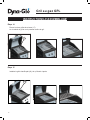
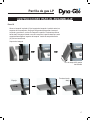
ASSEMBLY INSTRUCTIONS
10 11
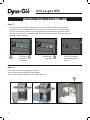
1. Attach the cart left side panel
(4) to the bottom shelf (1) with
two screws (A), but do not
fully tighten.
2. Attach the cart right side
panel (5) to the bottom shelf (1)
in the same way.
Install two screws (A) into the cart left side
panel and two screws (A) into the cart right
side panel (5) as illustrated at right. Do not
fully tighten screws (keep approximately 4
to 6mm from fully installed) as the cart rear
panel (8) has key hole slots that need to slide
onto these screws.
M6x12
S cr e w
4 pc
M6x12
S cr e w
4 pc

ASSEMBLY INSTRUCTIONS
1. Align the key holes in the cart rear panel (8) with the 4 screws just
installed into the cart left and right side panels. Push cart rear panel
(8) onto screws and down to meet bottom shelf (1).
Secure the upper door brace (9)
to the cart left and right side panels
using four screws (A), and then
tighten the screws.
2. Secure the cart rear panel (8) to the
bottom shelf (1) with two screws (A).
Next, tighten the 4 screws on the cart
left and right side panels (4 and 5).
M6x12
S cr e w
2 pc
M6x12
S cr e w
4 pc
A: M6x12 Screw
Qty: 4pcs
4
5
9
A
10
11
Tighten
Screw (A).

ASSEMBLY INSTRUCTIONS
12 13
Install the door assembly (10) to the cart left side panel (4)
with four at head screws (B) and tighten.
M4x10
S cr e w
4 pc
When not in use put the match holder
into the hole of door inner as shown below.

ASSEMBLY INSTRUCTIONS
Install the control knobs (13) onto the control panel of the
grill body (12) by gently pushing them onto the valve stem.
Control
Knob
2 pc
12
13
1. Secure the cart swivel upper rear panel
(11) to the cart left side panel (4) and cart
right side panel (5) with two screws (C).
Then install another 2 screws (C) into the
upper mounting holes of the left and right
side panels. These will secure the cart
swivel upper rear panel (11) when it is in
the closed position.
2. Rotate the cart swivel rear panel
upper (11) upwards until the two screws
(C) on the cart left and right side panels
snap into the two slots on the cart
swivel rear panel upper.
M6
Step Screw
4 pc

ASSEMBLY INSTRUCTIONS
14 15
2. Carefully place the grill body (12) over
the mounting tabs on the cart side panels
and onto the cart. Make sure the gas hose
is inside the cart. Align the holes in the grill
body with the holes in the mounting tabs.
Fasten the grill body (12) in place
with four screws (D).
M6x25
S cr e w
4 pc
1. First, lock the back
two casters to ensure the
cart doesn’t move while
installing the grill body (12).

14
15
ASSEMBLY INSTRUCTIONS
Install the collapsible
shelf support A (14) and
collapsible shelf support B
(15) on both sides of the
grill body using hardware
part E (M5x12 screw).
M5x12
S cr e w
16 pc
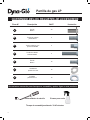
Open the lid and place the two heat tents (16) on the brackets
directly above the burners on the inside the grill body.
15: Collapsible
Shelf Support B
Qty: 2 pcs
A
B
Collapsible
Shelf Support

ASSEMBLY INSTRUCTIONS
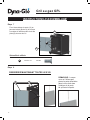
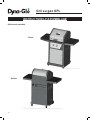
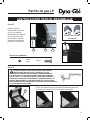
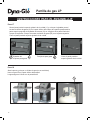
Place two cooking grates (17) on the grill body brace and grill rear panel.
Install the warming rack (18) as illustrated below.
16 17

ASSEMBLY INSTRUCTIONS
Align the left shelf (19) to the shelf support and insert between shelf supports,
then swing the left shelf 90 degrees up and push shelf against grill body.
Finally, press down on side shelf close to grill body until it is fully fastened
to the shelf support. Install the right shelf (20) in the same way.
Shelf Support
Swing shelf up 90 degrees
Push
Press down
16
17

ASSEMBLY INSTRUCTIONS
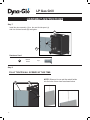
Open the cart swivel upper rear panel (11) and hang the grease cup clip (21)
onto the bottom of the grill body by pushing the small top part of the grease
cup clip (21) into the hole in the bottom of the grill body. Place the grease
cup (22) into the grease cup clip. Close the cart swivel upper rear panel.
Grease cup clip Grease cup Close the cart swivel
upper rear panel.
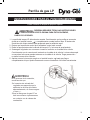
Open the door and place a gas cylinder
(not included) lled with LP gas into the bottom shelf.
Then lock the cylinder with the cylinder holder (6).
18 19
La page est en cours de chargement...
La page est en cours de chargement...
La page est en cours de chargement...
La page est en cours de chargement...
La page est en cours de chargement...
La page est en cours de chargement...
La page est en cours de chargement...
La page est en cours de chargement...
La page est en cours de chargement...
La page est en cours de chargement...
La page est en cours de chargement...
La page est en cours de chargement...
La page est en cours de chargement...
La page est en cours de chargement...
La page est en cours de chargement...
La page est en cours de chargement...
La page est en cours de chargement...
La page est en cours de chargement...
La page est en cours de chargement...
La page est en cours de chargement...
La page est en cours de chargement...
La page est en cours de chargement...
La page est en cours de chargement...
La page est en cours de chargement...
La page est en cours de chargement...
La page est en cours de chargement...
La page est en cours de chargement...
La page est en cours de chargement...
La page est en cours de chargement...
La page est en cours de chargement...
La page est en cours de chargement...
La page est en cours de chargement...
La page est en cours de chargement...
La page est en cours de chargement...
La page est en cours de chargement...
La page est en cours de chargement...
La page est en cours de chargement...
La page est en cours de chargement...
La page est en cours de chargement...
La page est en cours de chargement...
La page est en cours de chargement...
La page est en cours de chargement...
La page est en cours de chargement...
La page est en cours de chargement...
La page est en cours de chargement...
La page est en cours de chargement...
La page est en cours de chargement...
La page est en cours de chargement...
La page est en cours de chargement...
La page est en cours de chargement...
La page est en cours de chargement...
La page est en cours de chargement...
La page est en cours de chargement...
La page est en cours de chargement...
La page est en cours de chargement...
La page est en cours de chargement...
La page est en cours de chargement...
La page est en cours de chargement...
La page est en cours de chargement...
La page est en cours de chargement...
La page est en cours de chargement...
La page est en cours de chargement...
La page est en cours de chargement...
La page est en cours de chargement...
La page est en cours de chargement...
La page est en cours de chargement...
La page est en cours de chargement...
La page est en cours de chargement...
La page est en cours de chargement...
La page est en cours de chargement...
La page est en cours de chargement...
La page est en cours de chargement...
La page est en cours de chargement...
La page est en cours de chargement...
La page est en cours de chargement...
La page est en cours de chargement...
La page est en cours de chargement...
La page est en cours de chargement...
La page est en cours de chargement...
La page est en cours de chargement...
La page est en cours de chargement...
La page est en cours de chargement...
La page est en cours de chargement...
La page est en cours de chargement...
La page est en cours de chargement...
La page est en cours de chargement...
La page est en cours de chargement...
La page est en cours de chargement...
-
 1
1
-
 2
2
-
 3
3
-
 4
4
-
 5
5
-
 6
6
-
 7
7
-
 8
8
-
 9
9
-
 10
10
-
 11
11
-
 12
12
-
 13
13
-
 14
14
-
 15
15
-
 16
16
-
 17
17
-
 18
18
-
 19
19
-
 20
20
-
 21
21
-
 22
22
-
 23
23
-
 24
24
-
 25
25
-
 26
26
-
 27
27
-
 28
28
-
 29
29
-
 30
30
-
 31
31
-
 32
32
-
 33
33
-
 34
34
-
 35
35
-
 36
36
-
 37
37
-
 38
38
-
 39
39
-
 40
40
-
 41
41
-
 42
42
-
 43
43
-
 44
44
-
 45
45
-
 46
46
-
 47
47
-
 48
48
-
 49
49
-
 50
50
-
 51
51
-
 52
52
-
 53
53
-
 54
54
-
 55
55
-
 56
56
-
 57
57
-
 58
58
-
 59
59
-
 60
60
-
 61
61
-
 62
62
-
 63
63
-
 64
64
-
 65
65
-
 66
66
-
 67
67
-
 68
68
-
 69
69
-
 70
70
-
 71
71
-
 72
72
-
 73
73
-
 74
74
-
 75
75
-
 76
76
-
 77
77
-
 78
78
-
 79
79
-
 80
80
-
 81
81
-
 82
82
-
 83
83
-
 84
84
-
 85
85
-
 86
86
-
 87
87
-
 88
88
-
 89
89
-
 90
90
-
 91
91
-
 92
92
-
 93
93
-
 94
94
-
 95
95
-
 96
96
-
 97
97
-
 98
98
-
 99
99
-
 100
100
-
 101
101
-
 102
102
-
 103
103
-
 104
104
-
 105
105
-
 106
106
-
 107
107
-
 108
108


Dyna-Glo DGP350NP Manuel utilisateur
- Catégorie
- Barbecues
- Taper
- Manuel utilisateur
- Ce manuel convient également à
dans d''autres langues
- español: Dyna-Glo DGP350NP Manual de usuario

