LG A341 Le manuel du propriétaire
- Catégorie
- Téléphones portables
- Taper
- Le manuel du propriétaire

ENGLISH
FRANÇAIS
User Guide
LG-A341
MFL67889301 (1.0)Printed in China www.lg.com

Some of the content in this user guide may be dierent from your phone
depending on the software of the phone or your service provider. Features
and specications might be subject to change without prior notice.

ENGLISH
User Guide
LG-A341

Index
Getting to Know Your Phone .......................1
Setup ............................................................2
Customizing Your Phone ............................6
Calling and Voicemail ..................................7
Address Book ...............................................8
Text and Picture Messaging .....................10
Camera ........................................................ 11
Multitasking................................................ 12
Bluetooth® Pairing ..................................... 12
Games ......................................................... 13
Browser ....................................................... 13
Tools and Applications .............................. 14
PC Suite ..................................................... 16
Phone Software update ............................ 18
1.
2.
3.
4.
5.
6.
7.
8.
9.
10.
11.
12.
13.
14.
15.
16.
Safety .......................................................... 19
LIMITED WARRANTY STATEMENT ...... 46
NOTE:
• Always use genuine LG accessories. Failure to do this
may void your warranty.
• Accessories may vary in different regions.
* Some of the contents of this manual may not apply to
your phone. This depends on your phone’s software and
your service provider.

1
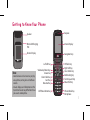
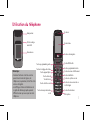
Getting to Know Your Phone
Speaker
Micro USB Charging
Port
External Display
Note:
• Some features and service may vary by
area, phone, carrier, plan and software
version.
• Screen displays and illustrations on this
Quick Start Guide may differ from those
you see on actual phone.
Earpiece
Internal Display
Navigation Keys
OK/Tools Key
Right Soft Key
Clear & Back Key
Multitasking Key
Text to Speech Key
Power/End Key
Vibrate Mode Key
Microphone
Left Soft Key
Volume Up/Down Keys
Camera Key
Alarm Clock Key
Send Key
Voicemail Key
Shift/Voice Memo Key

2
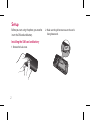
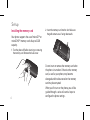
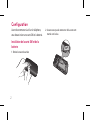
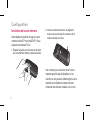
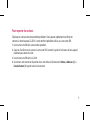
Before you start using the phone, you need to
insert the SIM card and battery.
Installing the SIM card and battery
1 Remove the back cover.
2 Make sure the gold contact area on the card is
facing downwards.
Setup

3
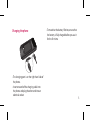
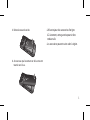
3 Insert the battery.
4 Replace the back cover.
• Always use genuine LG accessories. Failure to
do this may invalidate your warranty.
• Accessories may vary in different regions.

4
Installing the memory card
Your phone supports the use of microSD
TM
or
microSDHC
TM
memory cards of up to 32GB
capacity.
1 Turn the phone off before inserting or removing
the memory card. Remove the back cover.
2 Insert the memory card into the slot. Make sure
the gold contact area is facing downwards.
Do not insert or remove the memory card when
the phone is turned on. Otherwise the memory
card, as well as your phone, may become
damaged and the data stored on the memory
card may be corrupted.
When you first turn on the phone, you will be
guided through a series of essential steps to
configure the phone settings.
Setup

5
Charging the phone
• The charging port is on the right hand side of
the phone.
• Insert one end of the charging cable into
the phone and plug the other end into an
electrical socket.
• To maximise the battery lifetime, ensure that
the battery is fully charged before you use it
for the first time.

6
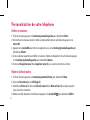
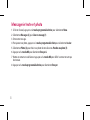
Set Shortcut
1 From the home screen, press the Left Soft Key for Go To.
2 To assign a new shortcut, highlight an unassigned slot and press the OK Key.
3 Press the OK Key to select an application and then press the Left Soft Key for Assign.
4 To remove or change a shortcut, highlight a slot and press the Left Soft Key for Options.
5 Choose Change Menu (1) or Remove Menu (3) and follow the on-screen instructions.
Adjust Font
1 From the home screen, press the Right Soft Key for Menu.
2 Select Settings (#) and choose Display (3).
3 Select Fonts (2) and choose either Dial Digit (1) or Menu & Lists (2). Steps may vary slightly from this
point.
4 Highlight a font size and press the OK Key for Set.
Customizing Your Phone

7
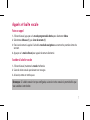
Make a Call
1 From the home screen, press the Right Soft Key for Menu.
2 Select Address Book (1) and choose Contact List (1).
3 Select the name of the contact you wish to call using the Navigation Key or by typing the first few letters
of the contact’s name.
4 Press the Send Key to place a call to the selected contact.
Access Voicemail
1 From the home screen, press and hold the 1 Key.
2 Follow voice prompts to listen to messages.
3 Enter a passcode, if applicable.
Note: If voicemail is not set up, follow the voice prompts when first accessing voicemail.
Calling and Voicemail

8
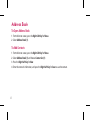
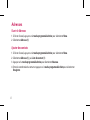
Address Book
To Open Address Book
1 From the home screen, press the Right Soft Key for Menu.
2 Select Address Book (1).
To Add Contacts
1 From the home screen, press the Right Soft Key for Menu.
2 Select Address Book (1) and choose Contact List (1).
3 Press the Right Soft Key for New.
4 Enter the contact’s information, and press the Right Soft Key for Save to save the contact.

9
To Import Contacts
Move contacts from your previous handset. You can quickly move your contacts to your new
LG-A341 if your previous handset also uses a SIM card.
1 Insert your SIM card into your previous handset.
2 Copy or Move all contacts to your SIM card. Consult the user guide of your previous device for assistance.
3 Insert your SIM card into the LG-A341.
4 Your contacts are now available in your Address Book! Select Menu, Address Book (1), Contact List (1) to
view your list of contacts.

10
1 From the home screen, press the Right Soft Key for Menu.
2 Select Messaging (2) and choose Create Message (1).
3 Enter your message.
4 To add a picture, press the Right Soft Key for Insert.
5 Select Picture (2) to choose a photo from your album, or select Take New Picture (5).
6 Press the OK Key for Send To.
7 Highlight a contact and press the OK Key to select the contact as a recipient.
8 Press the Right Soft Key for Send.
Text and Picture Messaging

11
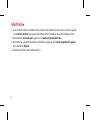
Take a Picture
1 From the home screen, press the Camera Key.
2 Press the Left Soft Key to access camera settings such as Image Size, Colour Effects, White balance, Night
Mode, Timer and Image Quality, and more. Press the Right Soft Key for Close to close the camera settings.
3 Press the OK Key or the Camera Key to take a picture.
Send a Picture
1 After taking a picture, press left on the Navigation Key to highlight Send and press the OK Key.
2 Press the OK Key for Message.
3 Enter a message and press the OK Key for Send To.
4 Highlight a contact and press the OK Key to select the contact as a recipient.
5 Press the Right Soft Key for Send.
Camera

12
1 If you’re involved in one task and want to switch to or launch another, press the Multitasking Key. You can
then select the home screen or another open task.
2 To access the Main Menu, press the Right Soft Key.
3 To end a task, highlight the desired task and press the Left Soft Key for Options.
4 Select Close Selected (1).
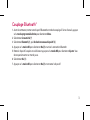
1 Before you begin, place your Bluetooth device into pairing mode. From the home screen, press the Right
Soft Key for Menu.
2 Select Connectivity(*).
3 Select Bluetooth (1) and choose Search New Device (3).
4 Press the OK Key for Yes (1) to enable Bluetooth.
5 Highlight the device you wish to pair with and press the OK Key for Add. You may need to enter a
passcode.
6 Select Yes (1).
7 Press the OK Key for Yes (1) to connect to the device.
Multitasking
Bluetooth® Pairing

13
Access Games
1 From the home screen, press the Right Soft Key for Menu and press the OK Key for Games(7).
2 From here, you may access games or select the Get New Games to make a purchase.
Games
1 From the home screen, press the Right Soft Key for Menu.
2 Select Browser (5).
3 Select Options by left soft key -> Enter URL (4) -> Type the web address and pressed OK Key to connect.
4 While browsing, you can access a list of favorite sites by selecting Options, choosing Bookmarks (6) and
selecting View Bookmarks (2).
5 To add a site to the list, select This page(1) -> press Save by right soft key.
Note: Data charges may apply for Internet usage.
Browser

14
Tools and Applications
Text to Speech
1 From the home screen, press the Text to Speech Key to enable TTS Mode.
2 When you receive a new message, you’ll be asked if you’d like to listen to it. Say “Yes.”
3 Your phone will read aloud the sender’s name or number and the message. You will then be asked if you’d
like to listen to your message again.
4 To disable Text to Speech, return to the home screen at any time and press the Text to Speech Key.
Senior Mode
Allows you to turn on/off the senior mode. This enhances high frequencies to reduce the effects of
hearing loss.
1 From the home screen, press the Right Soft Key for Menu.
2 Select Settings (#) and choose Call (4).
3 Select Senior Mode (5) and choose On.

15
Noise Cancellation
Allows you to enable or disable the Noise Cancellation function to minimize unwanted sounds.
1 From the home screen, press the Right Soft Key for Menu.
2 Select Settings (#) and choose Call (4).
3 Select Noise Cancellation (#) and choose On.

16
Synchronize your phone with your PC
You can synchronize your phone with your PC to make sure all your important details and dates
match, but also to backup your files to put your mind at ease.
Backing up and restoring your phone’s information
1 Connect the USB cable to your phone and your PC.
2 Select the PC suite from the popup menu in your phone. And run PC Suite Program in your PC.
3 Click the “Phone Backup & Restore” in PC suite (Tools > Phone Backup & Restore), and select Backup or
Restore.
4 Mark the contents you would like to back up or restore. Select the location you would like to backup
information to, or restore information from. Now Select Back Up or Restore and Click OK.
5 Your information will be Backed up or Restored.
PC Suite
La page est en cours de chargement...
La page est en cours de chargement...
La page est en cours de chargement...
La page est en cours de chargement...
La page est en cours de chargement...
La page est en cours de chargement...
La page est en cours de chargement...
La page est en cours de chargement...
La page est en cours de chargement...
La page est en cours de chargement...
La page est en cours de chargement...
La page est en cours de chargement...
La page est en cours de chargement...
La page est en cours de chargement...
La page est en cours de chargement...
La page est en cours de chargement...
La page est en cours de chargement...
La page est en cours de chargement...
La page est en cours de chargement...
La page est en cours de chargement...
La page est en cours de chargement...
La page est en cours de chargement...
La page est en cours de chargement...
La page est en cours de chargement...
La page est en cours de chargement...
La page est en cours de chargement...
La page est en cours de chargement...
La page est en cours de chargement...
La page est en cours de chargement...
La page est en cours de chargement...
La page est en cours de chargement...
La page est en cours de chargement...
La page est en cours de chargement...
La page est en cours de chargement...
La page est en cours de chargement...
La page est en cours de chargement...
La page est en cours de chargement...
La page est en cours de chargement...
La page est en cours de chargement...
La page est en cours de chargement...
La page est en cours de chargement...
La page est en cours de chargement...
La page est en cours de chargement...
La page est en cours de chargement...
La page est en cours de chargement...
La page est en cours de chargement...
La page est en cours de chargement...
La page est en cours de chargement...
La page est en cours de chargement...
La page est en cours de chargement...
La page est en cours de chargement...
La page est en cours de chargement...
La page est en cours de chargement...
La page est en cours de chargement...
La page est en cours de chargement...
La page est en cours de chargement...
La page est en cours de chargement...
La page est en cours de chargement...
La page est en cours de chargement...
La page est en cours de chargement...
La page est en cours de chargement...
La page est en cours de chargement...
La page est en cours de chargement...
La page est en cours de chargement...
La page est en cours de chargement...
La page est en cours de chargement...
La page est en cours de chargement...
La page est en cours de chargement...
La page est en cours de chargement...
La page est en cours de chargement...
La page est en cours de chargement...
La page est en cours de chargement...
La page est en cours de chargement...
La page est en cours de chargement...
La page est en cours de chargement...
La page est en cours de chargement...
La page est en cours de chargement...
La page est en cours de chargement...
La page est en cours de chargement...
La page est en cours de chargement...
La page est en cours de chargement...
La page est en cours de chargement...
La page est en cours de chargement...
La page est en cours de chargement...
La page est en cours de chargement...
La page est en cours de chargement...
La page est en cours de chargement...
La page est en cours de chargement...
La page est en cours de chargement...
La page est en cours de chargement...
La page est en cours de chargement...
La page est en cours de chargement...
La page est en cours de chargement...
La page est en cours de chargement...
-
 1
1
-
 2
2
-
 3
3
-
 4
4
-
 5
5
-
 6
6
-
 7
7
-
 8
8
-
 9
9
-
 10
10
-
 11
11
-
 12
12
-
 13
13
-
 14
14
-
 15
15
-
 16
16
-
 17
17
-
 18
18
-
 19
19
-
 20
20
-
 21
21
-
 22
22
-
 23
23
-
 24
24
-
 25
25
-
 26
26
-
 27
27
-
 28
28
-
 29
29
-
 30
30
-
 31
31
-
 32
32
-
 33
33
-
 34
34
-
 35
35
-
 36
36
-
 37
37
-
 38
38
-
 39
39
-
 40
40
-
 41
41
-
 42
42
-
 43
43
-
 44
44
-
 45
45
-
 46
46
-
 47
47
-
 48
48
-
 49
49
-
 50
50
-
 51
51
-
 52
52
-
 53
53
-
 54
54
-
 55
55
-
 56
56
-
 57
57
-
 58
58
-
 59
59
-
 60
60
-
 61
61
-
 62
62
-
 63
63
-
 64
64
-
 65
65
-
 66
66
-
 67
67
-
 68
68
-
 69
69
-
 70
70
-
 71
71
-
 72
72
-
 73
73
-
 74
74
-
 75
75
-
 76
76
-
 77
77
-
 78
78
-
 79
79
-
 80
80
-
 81
81
-
 82
82
-
 83
83
-
 84
84
-
 85
85
-
 86
86
-
 87
87
-
 88
88
-
 89
89
-
 90
90
-
 91
91
-
 92
92
-
 93
93
-
 94
94
-
 95
95
-
 96
96
-
 97
97
-
 98
98
-
 99
99
-
 100
100
-
 101
101
-
 102
102
-
 103
103
-
 104
104
-
 105
105
-
 106
106
-
 107
107
-
 108
108
-
 109
109
-
 110
110
-
 111
111
-
 112
112
-
 113
113
-
 114
114


LG A341 Le manuel du propriétaire
- Catégorie
- Téléphones portables
- Taper
- Le manuel du propriétaire
dans d''autres langues
- English: LG A341 Owner's manual
Documents connexes
-
 LG Série LGP705G Manuel utilisateur
-
LG LGP705G Manuel utilisateur
-
-
-
LG LGP970G.ATLSWW Le manuel du propriétaire
-
LG LGC800G.ABWADG Manuel utilisateur
-
-
-
LG LGD803 Guide de démarrage rapide
-
