ROOMS TO GO 21210264 Assembly Instructions
- Taper
- Assembly Instructions

BC1121026

2 |

3 |

4 |
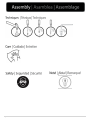
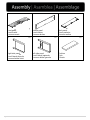
A x1
Front panel
Panel frontal
Panneau avant
B x1
Bottom panel
Panel inferior
Panneau du bas
C x1
Back panel
Panel posterior
Panneau arrière
D x1
Right side panel
Panel lateral derecho
Panneau latéral droit
E x1
Left side panel
Panel lateral izquierdo
Panneau latéral gauche
F x1
Cushion
Cojin
Coussin
x1
A x2
B x1
C
x1
F
x1
D x1
E
x1
A x2
B x1
C
x1
F
x1
D x1
E
x1
A x2
B x1
C
x1
F
x1
D x1
E
x1
A x2
B x1
C
x1
F
x1
D x1
E
x1
A x2
B x1
C
x1
F
x1
D x1
E
x1
A x2
B x1
C
x1
F
x1
D x1
E

5 |
1 x28
Bolt
Tornillo
Boulon
1/4”*1-1/2”
2 x28
Flat washer
Arandela plana
Rondelle plate
ø1/4”*1
3 x8
Wood dowel
Taco de madera
Cheville en bois
∅5/16”x1-1/4”L
4 x29
Screw
Tornillo
Vis
ø1/8”x 1/2”L
5 x3
Hinge
Bisagra
Charnière
6 x1
Left arm hinge
Bisagra del brazo izquierdo
Charnière bras gauche
7 x1
Right arm hinge
Bisagra del brazo derecho
Charnière bras droit
8 x1
Allen wrench
Llave Allen
Clé Allen
4mm

6 |
x12
x12
8 x1
(1)
8
8
1
1
1
1
1
1

7 |
x12
x12
2 x8
D
D11
1
2
x16
x16

8 |
(1)
Lay trunk on a clean, padded surface like carpet or a
blanket, then slightly lift the lid to attach the hinges.
Coloque el tronco sobre una superficie limpia y acolchada,
como una alfombra o una manta, luego levante ligeramente
la tapa para sujetar las bisagras.
Posez le coffre sur une surface propre et rembourrée
comme un tapis ou une couverture, puis soulevez
légèrement le couvercle pour attacher les charnières.

9 |
(1)

10 |

11 |

12 |
-
 1
1
-
 2
2
-
 3
3
-
 4
4
-
 5
5
-
 6
6
-
 7
7
-
 8
8
-
 9
9
-
 10
10
-
 11
11
-
 12
12


