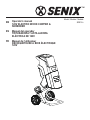
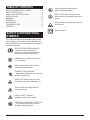
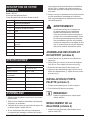
Senix SDE15-L 120v Electric Wood Chipper and Shredder Manuel utilisateur
- Catégorie
- Outils électroportatifs
- Taper
- Manuel utilisateur

TM
EN
ES
FR
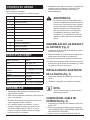
Model / Modelo / Modèle:
SDE15-L
Operator’s manual
120V ELECTRIC WOOD CHIPPER &
SHREDDER
Manual del operador
TRITURADORA Y ASTILLADORA
ELÉCTRICA DE 120V
Manuel de l’utilisateur
DÉCHIQUETEUSE À BOIS ÉLECTRIQUE
120V

EN - 2 WWW.SENIXTOOLS.COM
EN
For customer service please nd all information on www.senixtools.com or call 800-261-3981
CAUTION: BEFORE USING THIS PRODUCT, READ THIS MANUAL AND FOLLOW ALL ITS SAFETY RULES
AND OPERATING INSTRUCTIONS.
ORIGINAL INSTRUCTIONS
ES
Toda la información relacionada con el servicio al cliente la puede encontrar en www.senixtools.com o llaman-
do al 800-261-3981
PRECAUCIÓN: ANTES DE USAR ESTA HERRAMIENTA, LEA ESTE MANUAL Y SIGA TODAS LAS MEDI-
DAS DE SEGURIDAD E INSTRUCCIONES DE USO.
INSTRUCCIONES ORIGINALES
FR
Pour le service d’assistance à la clientèle, veuillez trouver toutes les informations sur www.senixtools.com ou
appeler le 800-261-3981.
ATTENTION : AVANT D’UTILISER CE PRODUIT, LISEZ CE MANUEL ET SUIVEZ TOUTES LES RÈGLES DE
SÉCURITÉ ET LES CONSIGNES D’UTILISATION.
INSTRUCTIONS ORIGINALES

3 - EN
WWW.SENIXTOOLS.COM
1
2
3
4
5
6
7
8
9
10
11
12
A
F
B
G
C
D
E
A
B
1
23

EN - 4 WWW.SENIXTOOLS.COM
A
B
A
B
SOLUTION
1.
damaged.
2.
A
B
4
67
5
CB
AD

5 - EN
WWW.SENIXTOOLS.COM
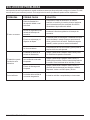
TABLE OF CONTENTS
SAFETY & INTERNATIONAL SYMBOLS ..........................5
SAFETY INSTRUCTIONS ..................................................6
KNOW YOUR UNITAPPLICATIONS ................................10
SPECIFICATIONS* ..........................................................10
ASSEMBLY ......................................................................10
OPERATION .....................................................................11
MAINTENANCE ...............................................................11
TROUBLESHOOTING .....................................................13
WARRANTY .....................................................................14
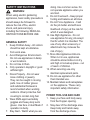
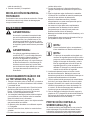
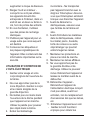
SAFETY & INTERNATIONAL
SYMBOLS
The following table depicts and describes safety symbols
that may appear on this product. Read, understand, and
follow all instructions on the machine before attempting to
assemble and operate.
READ THE OPERATOR'S MANUAL(S)
– Read, understand, and follow all
instructions in the user manual(s) before
attempting to assemble and operate.
WARNING! Do not expose the unit to rain
or wet conditions.
Wear protective gloves when using the
machine and handling debris.
DANGER! ROTATING BLADES
– Keep hands and feet away from openings
while the unit is running.
SWITCH OFF! Remove plug from outlet
immediately if the cord is damaged or cut.
WEAR EYE AND HEARING PROTECTION
– For protection against injury, wear ear
defenders and safety goggles.
Keep bystanders a safe distance away from
the work area.
Thrown objects and rotating blade can
cause severe injury.
Wear foot protection when using the
machine and handling debris.
SWITCH OFF! Remove plug from outlet
before cleaning or conducting maintenance
checks.
SAFETY ALERT – Indicates a
precaution, a warning, or a danger.
Double insulation.

EN - 6 WWW.SENIXTOOLS.COM
SAFETY INSTRUCTIONS
WARNING:
When using electric gardening
appliances, basic safety precautions
should always be followed to
reduce the risk of fire, electric
shock, and personal injury,
including the following. READ ALL
INSTRUCTIONS BEFORE USE.
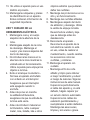
GENERAL SAFETY
1. Keep Children Away - All visitors
should be kept at a distance
from work area.
2. Avoid Dangerous Environment -
Do not use appliances in damp
or wet locations.
3. Do not Use In Rain.
4. Only operate in daylight or good
articial light.
5. Dress Properly - Do not wear
loose clothing or jewelry.
They can be caught in moving
parts. Use of rubber gloves
and substantial footwear is
recommended when working
outdoors. Wear protective hair
covering to contain long hair.
6. Wear ANSI-approved safety
goggles and heavy-duty work
gloves. Use face or dust Mask if
operation is dusty.
7. Stay Alert - Watch what you are
doing. Use common sense. Do
not operate appliance when you
are tired.
8. Do not Overreach - Keep proper
footing and balance at all times.
9. Do not Force Appliance - It will
do the job better and with less
likelihood of injury at the rate for
which it was designed.
10. Use Right Appliance - Do not
use appliance for any job except
that for which it is intended. The
use of any other accessory or
attachment may increase the
risk of injury;
11. Store Idle Appliances Indoors-
When not in use, appliances
should be stored indoors in dry,
and high or locked-up place - out
of reach of children.
12. When servicing use only
identical replacement parts.
13. Do not use appliance for other
than intended use.
14. Maintain labels and nameplates
on the appliance. These carry
important safety information.
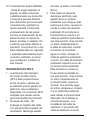
POWER TOOL USE AND CARE
1. Keep your face and body away
from the Hopper opening.
2. Stay clear of the discharge area.
Keep body and hands away
from the discharge chute.

7 - EN
WWW.SENIXTOOLS.COM
3. Do not put your hands into the
hopper opening while the unit is
running. Use the paddle to push
objects into the hopper.
4. Avoid Unintentional Starting - Do
not carry plugged-in appliance
with nger on switch. Be sure
switch is off when plugging in.
5. Before Starting the Chipper/
Shredder, make sure that the
hopper inlet is empty.
6. Before feeding material into the
shredder, remove any metal,
rocks, bottles, cans or other
foreign objects that may damage
blades.
7. Keep guards in place and in
working order.
8. Keep blades sharp.
9. Keep clear of intake and
discharge chute. Use included
push stick. Unplug unit and allow
it to stop before unclogging.
10. Disconnect Appliance -
Disconnect the appliance from
the power supply when not in
use, before servicing, when
changing accessories such as
blades, and the like.
11. Maintain Appliance With Care
- Keep cutting edge sharp and
clean for best performance
and to reduce the risk of injury.
Follow instructions in this
manual. Inspect appliance cord
periodically, and if damaged,
have it repaired by an authorized
service facility. Inspect extension
cords periodically and replace
if damaged. Keep handles dry,
clean, and free from oil and
grease.
12. Check Damaged Parts - Before
further use of the appliance,
a guard or other part that is
damaged should be carefully
checked to determine that
it will operate properly and
perform its intended function.
Check for alignment of moving
parts, binding of moving parts,
breakage of parts, mounting,
and any other condition that
may affect its operation. A guard
or other part that is damaged
should be properly repaired
or replaced by a qualied
technician unless indicated
elsewhere in this manual.
ELECTRIC SAFETY
1. Ground Fault Circuit Interrupter
(GFCI) protection should be
provided on the circuit(s)
or outlet(s) to be used for
the gardening appliance.
Receptacles are available
having built-in GFCI protection

EN - 8 WWW.SENIXTOOLS.COM
and may be used for this
measure of safety.
2. Do not Abuse Cord - Do not
carry appliance by cord or yank
it to disconnect from receptacle.
Keep cord from heat, oil, and
sharp edges.
3. To reduce the risk of electric
shock, this appliance has a
polarized plug (one blade is
wider than the other) and will
require the use of a polarized
extension cord. The appliance
plug will t into a polarized
extension cord only one way. If
the plug does not t fully into the
extension cord, reverse the plug.
If the plug still does not t, obtain
a correct polarized extension
cord. A polarized extension
cord will require the use of a
polarized wall outlet. This plug
will t into the polarized wall
outlet only one way. If the plug
does not t fully into the wall
outlet, reverse the plug. If the
plug still does not t, contact
a qualied electrician to install
the proper wall outlet. Do not
change the equipment plug,
extension cord receptacle, or
extension cord plug in any way.
This design is referred to as
double-insulated, indicated by
.
4. To reduce the risk of electric
shock, use only with an
extension cord intended for
outdoor use, such as an
extension cord of cord type
SW-A, SOW-A, STW-A,
STOW-A, SJW-A, SJOW-A,
SJTW-A. or SJTOW-A. Make
sure your extension cord is in
good condition. When using an
extension cord, be sure to use
one heavy enough to carry the
current your product will draw.
An undersized extension cord
will cause a drop in line voltage
resulting in loss of power and
overheating.
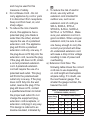
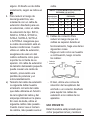
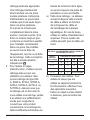
a) Extension Cord Size: The
following table shows the correct
cord size to use depending
on cord length and nameplate
ampere rating. If in doubt, use
the next heavier gauge. The
smaller the gauge number, the
heavier the cord.
TABLE A – MINIMUM WIRE GAUGE FOR
EXTENSION CORDS (120 VOLT)
Ampere Rating
(at full load)
EXTENSION CORD LENGTH
25′ 50′ 100′ 150′
0 – 6 18 16 16 14
6 – 10 18 16 14 12
10 – 12 16 16 14 12
12 – 16 14 12 Not recommended

9 - EN
WWW.SENIXTOOLS.COM
product, but must be supplied by the
operator.
WARNING:
SAVE THESE INSTRUCTIONS FOR
FURTHER USE.
b) Connecting Cords:To reduce the
risk of the cords pulling apart
during operation, do one of the
following.
- Make a knot as shown below then
connect the cords:
- Or, use a plug-receptacle retaining
strap or connector designed to hold
extension cords to appliance cords.
INTENDED USE
This shredder is intended to cut up
small branches and yard waste for
domestic use. Using the machine
for any other purpose for which it is
not designed may result in serious
injuries, machine damage.
The warnings, precautions,
and instructions discussed in
this instruction manual cannot
cover all possible conditions and
situations that may occur. It must
be understood by the operator that
common sense and caution are
factors which cannot be built into this

EN - 10 WWW.SENIXTOOLS.COM
KNOW YOUR UNITAPPLICATIONS
Model: SDE15-L
As a wood chipper &shredder:
• Cutting up small branches and yard waste.
1 Hopper
2 Reset Button
3 Discharge Chute
4Carbon Brush Cover
5 Wheel
6 Feeding Chute
7Handle
8 Hopper Lock Knob
9 On/Off Switch with Safety Key
10 Power Plug
11 Paddle Holder
12 Collection Bag
SPECIFICATIONS*
Model Number SDE15-L
Motor 120V, 60Hz, 15A
Maximum Speed 4000 RPM
Recommended Material
Diameter 0 to 1 inches (0 to 25.4 mm)
Maximum Material Diameter 1-1/2 inches (38 mm)
Cutterhead Size 7 inches
Weight 30.3 pounds
Product Dimensions 17.1 x 12.8 x 25.6 inches
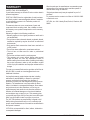
ASSEMBLY
1. Unpack all parts and lay them on a at, stable surface:
2. Remove all packing materials and shipping devices, if
applicable.
3. The scope of delivery varies depending on the country
and purchased variant: Model of SDE15-L.
4. If you nd that parts are missing or show damage do not
use the product but contact customer service at 800-
261-3981. Using an incomplete or damaged product
represents a hazard to people and property.
5. Ensure that you have all the accessories and tools
needed for assembly and operation. This also includes
suitable personal protective equipment.
WARNING:
Do not plug in or turn on the tool until it is fully
assembled according to the instructions. Wear
eye protection and protective gloves for this
assembly work. Follow the assembly instructions
step-by-step.Read through and become
familiarized with the following procedures of
handling and adjusting your tool. Failure to
follow the safety instructions may result in
serious personal injury.
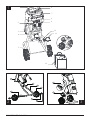
ASSEMBLING THE WHEELS &
STAND (Fig. 2)
1. Insert the wheel axle (A) through the bottom holes of the
stand (B).
2. Slide the wheels (C) onto both ends of the wheel axle.
Secure each wheel with a nut (D).
3. Snap the wheel covers (E) into each wheel.
4. Insert the two ends of the stand assembly into the
bottom of the shredder housing (F). Align the holes and
secure with screws (G).
INSTALLING THE PADDLE
HOLDER (Fig. 3)
1. Clip the paddle holder (A) onto one side of the stand.
2. Clip the paddle (B) into the paddle holder.
NOTE:
Place the paddle back into the paddle holder
every time after using.
CONNECTING THE EXTENSION
CORD (Fig. 4)
1. Make sure the power switch is in the OFF position.
2. Select the correct extension cord according to
"GUIDELINES AND RECOMMENDATIONS FOR
EXTENSION CORDS".
3. Make a knot with the power cord (B) and the extension
cord (A).
4. Connect the plug and receptacle.
COLLECTING SHREDDED
MATERIAL
Your shredder comes with a collection bag. Place the
collection bag under the discharge chute to collect
shredded material.

11 - EN
WWW.SENIXTOOLS.COM
OPERATION
WARNING:
Do not plug in or turn on the tool until it is fully
assembled according to the instructions. Read
through and become familiarized with the
following procedures of handling and adjusting
your tool. Failure to follow the safety instructions
may result in serious personal injury.
WARNING:
Wear ANSI Z87.1-approved safety glasses,
work-appropriate clothing, work gloves, and
dust mask. Read through the safety section. Do
not allow any part of the body or your clothing
near the feeding chute or the discharge chute.
Never reach under the hopper until the shredder
has come to a complete stop and has been
disconnected from the power supply.
BASIC SHREDDING OPERATION
(Fig. 5)
1. Place the shredder on a dry, level ground in the upright
position. Do not operate the shredder if it is tilted or lying
on its side.
2. Check to make sure that the hopper is empty. Close
the hopper tightly by turning the hopper lock knob (A)
clockwise. The shredder will not run if the hopper is open
or not fully closed.
3. Inappropriate materials may damage the machine and
cutting blades. Examine all materials before feeding
them into the shredder:
• Remove pieces of metal, rocks or other foreign objects
that may damage the blades.
• Do not feed wooden sticks with a diameter larger than
1.5 inch.
• Before shredding roots, remove any remaining soil and
stones.
• Do not shred soft, damp material such as kitchen waste.
4. Connect the shredder to the power source and turn the
power switch to ON (B).
5. Follow the rules below when feeding materials:
• Only insert as much material as needed to prevent
blockage of the feeding chute.
• Feed wilted and damp materials alternately with dry
branches to prevent cutting blades from blocking up.
• Branches with leaves must be completely processed
before new material is fed. Make sure that the chopped
material can fall freely from the discharge chute.
• Maintain the working speed of the shredder and do not
overload it.
• Keep a few dry branches to be shredded at the end, as
they will help clean your shredder.
NOTE:
For optimal performance, we recommend
shredding materials with diameters less than 1".
NOTE:
The power switch is equipped with a safety key
to prevent children from accidentally starting the
machine. Turn off the power switch and remove
the safety key to engage the childsafety lock and
prevent unwanted start-ups. The switch cannot
be turned on when the safety key is removed.
6. Slowly insert the branch into the hopper through the
feeding chute. Keep hold of the branch at a safe distance
from the feeding chute until it is automatically drawn into
the shredder.
7. Use the included paddle to push the material inside the
hopper, but be careful not to shred the paddle.
8. Only switch off the shredder after all of the shredding
materials have passed through the discharge chute.
Otherwise, the discharge chute may jam the next time
the shredder is turned on.
9. When all shredding work is complete, switch the
machine to OFF and unplug the power cord. Wait for the
blades to come to a complete stop before leaving the
work area.
OVERLOAD PROTECTION (Fig. 6)
Your electric shredder is equipped with overload protection.
If the shredder is clogged during shredding, the overload
protection will cut the power automatically to protect your
shredder. Wait at least 1 minute for the motor to cool down
before restarting the unit.
To restart the shredder:
1. Press the reset button (A).
2. Turn the power switch ON (B).
3. If the shredder will not start, it might be jammed inside.
Turn the shredder OFF and unplug the power cord. Wait
for the blades to come to a complete stop. Clear the
clogged materials.
MAINTENANCE
WARNING:
To avoid accidents, turn OFF and unplug the
tool from the electrical outlet before cleaning,
adjusting, or performing any maintenance work.

EN - 12 WWW.SENIXTOOLS.COM
WARNING:
Only perform maintenance listed in this manual,
any other service should be performed by
authorized services.
ROUTINE INSPECTION
Before each use, inspect the general condition of the tool. If
any of these following conditions exist, do not use until parts
are replaced or the tool is properly repaired.
Check for:
• Loose hardware,
• Misalignment or binding of moving parts,
• Damaged cord/electrical wiring,
• Cracked or broken parts, and
• Any other condition that may affect its safe operation.
CLEANING & STORAGE
1. Keep the ventilation openings free from dust and debris
to prevent the motor from overheating.
2. Use a vacuum or low-pressure compressed air to
remove dust and debris from the tool surfaces, motor
housing and work area.
3. Wipe the tool surfaces clean with a soft cloth or brush.
Make sure water does not get into the tool.
WARNING:
Most plastics are susceptible to damage from
various types of commercial solvents. Do not
use any solvents or cleaning products that
could damage the plastic parts. Some of these
include but are not limited to: gasoline, carbon
tetrachloride, chlorinated cleaning solvents, and
household detergents that contain ammonia.
To clean the inside of the unit, turn the hopper locking knob
counterclockwise, and open the hopper. Clean the cutting
blades and the discharge area. Remove wood sticks or
objects that may clog the blades. Check the blades for
damage and replace if they show signs of wear. Replace
the hopper and lock the hopper locking knob by turning it
clockwise.
4. Store the tool in a clean and dry place away from the
reach of children. Store in temperatures between 41°
to 86°F.
5. Cover the tool in order to protect it from dust and
moisture. It is preferable to store it in its original
packaging with the instruction manual and all
accessories.
PRODUCT DISPOSAL
Used power tools should not be disposed of together
with household waste. This product contains electronic
components that should be recycled. Please take this
product to your local recycling facility for responsible
disposal and to minimize its environmental impact. Please
recycle the packaging and electronic components where
facilities exist.
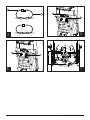
REPLACING CUTTING BLADES
(Fig. 7)
The shredder comes with two cutting blades preinstalled
that can be reversed or replaced to keep the cutting edges
sharp. The two blades should always be reversed or
replaced as a matched set.
It is recommended to replace/reverse the blades when
the wood sticks can not be automatically drawn into the
shredder after entering the hopper. One set of sharp edges
can cut approximately 400 lbs of materials, depending on
the hardness and quality of the sticks. When the cutting
capacity is reached, make sure to replace/ reverse the
shredder blades to maintain optimal performance.
WARNING:
Wear protective gloves to protect your hands.
Cutting blades have sharp edges on both sides
and are fragile. Handle the blades carefully to
avoid personal injury or damage to the blades.
1. Turn off and unplug the machine. Wait for the blades to
come to a complete stop.
2. Fully unscrew the hopper lock knob until it springs out.
Open the hopper to access the cutting head (A).
3. Clean out all chips or foreign matter sticking to the
cutting head and blades (B) using a soft brush.
4. Rotate the cutting head to the conguration shown in.
To prevent the cutting head from rotating during blade
change, insert a screwdriver through the blade guard
hole (C) and the slot in the cutting head (Fig. 7).
5. Unscrew the two hex bolts (D) on the top blade. Turn the
cutting head 180 degrees to remove the other blade.
6. The blades may be reversed when one of the cutting
edges becomes dull or chipped. Reverse the direction of
the original blades, or install two new blades. Make sure
to reverse or replace both blades at the same time so
they are balanced with one another. Align the slots on the
blade with the grooves on the cutting head.
7. Secure each blade with two hex bolts, rmly tighten them
with a hex wrench. Close the hopper and fully tighten the
hopper locking knob.

13 - EN
WWW.SENIXTOOLS.COM
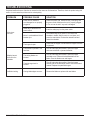
TROUBLESHOOTING
Suspected malfunctions are often due to causes that the users can x themselves. Therefore, check the product using this
section. In most cases the problem can be solved quickly.
PROBLEM POSSIBLE CAUSE SOLUTION
Motor does
not start.
Power cord or extension
cord damaged or not properly
plugged in.
Check the power cord, extension cord, power plug, and
the power outlet. Make sure the tool is properly plugged
in. Do not use the tool if any cord is damaged.
Safety key is removed from
power switch. Insert the safety key into the power switch.
Motor is overloaded and circuit
breaker trips.
The material may be too much or too hard for the
shredder to handle. Wait for motor to cool down, and
press the reset button. Reduce the material load and
restart the shredder.
The hopper is open. Check that the hopper is closed and the hopper lock knob
is tightened.
Material cannot
be fed into the
shredder.
The material is jammed in the
feed inlet.
Turn off and unplug the machine. Open the hopper
and remove blocked or jammed materials.
The cutting blades are
blocked.
Turn off and unplug the machine. Open the hopper
and blade cover. Remove blocked material from the
blade. Close the blade cover and hopper.
The discharge chute is
blocked.
Turn off and unplug the machine. Open the hopper
and the plate of the discharge chute to clear the blocked
material. Replace the plate and hopper.
Inefcient cutting. Cutting blade edges are worn. Reverse the blades or replace with new blades.

EN - 14 WWW.SENIXTOOLS.COM
WARRANTY
LIMITED TWO-YEAR WARRANTY
2-year limited warranty on all Senix E series outdoor electric
powered equipment.
FOR TWO YEARS from the original date of retail purchase
this Senix product is warranted against defects in materials
or workmanship on power tools. Defective product will
receive free repair.*
This warranty does not cover normal wear of parts and
components such as cutting chain, line or blades nor does
this warranty cover product transportation cost for warranty
or service.
Warranty is subject to the following conditions:
• Warranty applies to the original purchaser at retail and is
not transferrable*
• The tool has not been misused, abused, neglected, altered,
modied or repaired by anyone other than an authorized
servicecenter
• Only genuine Senix accessories have been used with or
on this product
• The tool has been subjected to normal wear and tear
• The tool has not been used for trade or professional
purposes
• The tool has not been used for rental purposes
• This warranty only covers defects arising under normal
usage and does not cover any malfunction, failure or
defect resulting from misuse, abuse (including overloading
the product, exposure to water or rain) accidents, neglect
or lack of proper installation and improper maintenance or
storage.
To locate your nearest Senix service provider call toll free at
800-261-3981 or email us at [email protected].
Additional Limitations
Any implied warranty granted under state law, including
warranties of merchantability or tness for a particular
purpose, are limited to three years from the date of
purchase on power tools and chargers and seven years on
batteries. The manufacturer is not responsible for direct,
indirect, incidental or consequential damages. Some states
and provinces do not allow limitations on how long an
implied warranty lasts and/or do not allow the exclusion or
limitation of incidental damages, so the above limitations
and exclusions may not apply to you. This warranty gives
you specic legal rights, and you may also have other rights
which vary from state to state or province to province.
The YAT USA declines any responsibility in regard to civil
liability arising from abusive use or not in conformity with
proper use and maintenance of the machine as described in
the operator’s manual.
YAT USA is not responsible for direct, indirect, incidental or
consequential damages.
After the purchase, the manufacturer recommends proper
maintenance of the machine and to read the operator’s
manual before using the machine.
*Original purchase receipt may be required for proof of
purchase
For customer service contact us toll free at 1-800-261-3981
or Senixtools.com.
YAT USA, Inc. 6441 Hendry Road, Suite A, Charlotte, NC
28269

15 - ES
WWW.SENIXTOOLS.COM
ÍNDICE
SEGURIDAD Y SÍMBOLOS INTERNACIONALES ...........15
MEDIDAS DE SEGURIDAD IMPORTANTES ...................16
CONOZCA SU UNIDADAPPLICATIONS ..........................21
ESPECIFICACIONES* ......................................................21
ENSAMBLAJE ...................................................................21
OPERACIÓN .....................................................................22
MANTENIMIENTO ............................................................23
SOLUCIÓN DE PROBLEMAS ..........................................25
GARANTÍA ........................................................................26
SEGURIDAD Y SÍMBOLOS
INTERNACIONALES
La siguiente tabla representa y describe los símbolos de
seguridad que pueden aparecer en este producto. Lea,
entienda y siga todas las instrucciones de la máquina antes
de intentar ensamblarla y operarla.
LEA EL(LOS) MANUAL(ES) DEL OPERADOR
Lea, comprenda y siga todas las instrucciones
del (los) manual(es) del usuario antes de
intentar ensamblar y operar.
¡ADVERTENCIA! No exponga la unidad a
la lluvia o a condiciones húmedas.
Use guantes de protección cuando utilice la
máquina y manipule los escombros.
¡PELIGRO! CUCHILLAS GIRATORIAS.
Mantenga sus manos y pies alejados de
las aberturas mientras la unidad esté en
funcionamiento.
¡INTERRUPTOR APAGADO! Retire el
enchufe de la clavija inmediatamente si el
cable está dañado o cortado.
USAR PROTECCIÓN OCULAR Y
AUDITIVA
Para protegerse de las lesiones, utilice
protectores auditivos y gafas de seguridad
Mantenga a los transeúntes a una distancia
segura de la zona de trabajo.
Los objetos arrojados y la cuchilla giratoria
pueden causar lesiones graves.
Use calzado de protección cuando utilice la
máquina y manipule los escombros.
¡INTERRUPTOR APAGADO! Retire el
enchufe de la clavija antes de limpiar
o realizar las comprobaciones de
mantenimiento.
ALERTA DE SEGURIDAD - Indica una
precaución, una advertencia o un peligro.
Doble aislamiento.

ES - 16 WWW.SENIXTOOLS.COM
MEDIDAS DE SEGURIDAD
IMPORTANTES
ADVERTENCIA:
Cuando se utilicen aparatos
eléctricos de jardinería, deben
seguirse siempre las precauciones
básicas de seguridad para reducir
el riesgo de incendio, descarga
eléctrica y lesiones personales,
incluyendo las siguientes. LEA
TODAS LAS INSTRUCCIONES
ANTES DE USAR
SEGURIDAD GENERAL
1. Mantenga a los niños alejados
- Todos los visitantes deben
mantenerse alejados del área de
trabajo.
2. Evite los ambientes peligrosos
- No utilice los aparatos en
lugares húmedos o mojados.
3. No usar en la lluvia.
4. Opere sólo a la luz del día o con
una buena luz articial.
5. Vístase correctamente - No
use ropa suelta o joyas. Estas
pueden quedar atrapadas en las
piezas móviles. Se recomienda
el uso de guantes de goma
y calzado resistente cuando
se trabaje al aire libre. Use
protección para contener el pelo
largo.
6. Use gafas de seguridad
aprobadas por ANSI y guantes
de trabajo resistentes. Use
una protección facial o una
mascarilla de polvo si la
operación es polvorienta.
7. Manténgase alerta - Vigile lo que
esté haciendo. Use el sentido
común. No opere el aparato si
se siente fatigado.
8. No se estire para alcanzarlo -
Mantenga su posición de pie y
su equilibrio en todo momento.
9. No aplique la fuerza - Hará
mejor su trabajo y con menos
probabilidades de lesiones a la
velocidad para la que ha sido
diseñado.
10. Utilice el aparato correcto - No
utilice el aparato para ningún
trabajo que no sea para el
que está destinado. El uso
de cualquier otro accesorio o
aditamento puede aumentar el
riesgo de lesiones.
11. Guarde los aparatos inactivos
en el interior - Cuando no se
utilicen, los aparatos deben
guardarse en el interior, en un
lugar seco y alto o bajo llave,
fuera del alcance de los niños.
12. Cuando realice el
mantenimiento, use sólo piezas
de repuesto idénticas.

17 - ES
WWW.SENIXTOOLS.COM
13. No utilice el aparato para un uso
distinto al previsto.
14. Mantenga las etiquetas y placas
de identicación en el aparato.
Estas contienen información de
seguridad importante.
USO Y CUIDADO DE LA
HERRAMIENTA ELÉCTRICA
1. Mantenga la cara y el cuerpo
alejados de la abertura de la
tolva.
2. Manténgase alejado de la zona
de descarga. Mantenga el
cuerpo y las manos alejados del
ducto de descarga.
3. No introduzca las manos en la
abertura de la tolva mientras la
unidad esté en funcionamiento.
Utilice la paleta para empujar los
objetos a la tolva.
4. Evite el arranque involuntario -
No lleve el aparato enchufado
con el dedo en el interruptor.
Asegúrese que el interruptor
esté apagado cuando lo
enchufe.
5. Antes de poner en marcha
la astilladora/trituradora,
asegúrese de que la entrada de
la tolva esté vacía.
6. Antes de introducir material en
la trituradora, retire cualquier
metal, roca, botella, lata u otros
objetos extraños que pudieran
dañar las cuchillas.
7. Mantenga las protecciones en su
sitio y en funcionamiento.
8. Mantenga las cuchillas aladas.
9. Manténgase alejado del ducto
de admisión y descarga. Utilice
la varilla de empuje incluida.
Desenchufe la unidad y deje
que se detenga antes de
desatascarla.
10. Desconecte el aparato -
Desconecte el aparato de la
red eléctrica cuando no esté
en uso, antes de realizar el
mantenimiento, cuando cambie
los accesorios como las
cuchillas, y similares.
11. Mantenga el aparato con
cuidado
- Mantenga el lo de corte
alado y limpio para obtener
el mejor rendimiento y reducir
el riesgo de lesiones. Siga las
instrucciones de este manual.
Inspeccione periódicamente
el cable del aparato y, si está
dañado, hágalo reparar por
un servicio técnico autorizado.
Inspeccione los cables de
extensión periódicamente y
reemplácelos si están dañados.
Mantenga las asas secas,
limpias y sin aceite o grasa.

ES - 18 WWW.SENIXTOOLS.COM
12. Compruebe las piezas dañadas
- Antes de seguir utilizando el
aparato, se debe comprobar
cuidadosamente una protección
u otra pieza que esté dañada
para determinar que funcionará
correctamente y realizará su
función prevista. Compruebe
el alineamiento de las piezas
móviles, el atascamiento de las
piezas móviles, la ruptura de
piezas, montaje o cualquier otra
condición que pueda afectar su
operación. Una protección u otra
pieza dañada debe ser reparada
o sustituida adecuadamente por
un técnico calicado, a menos
que se indique lo contrario en
este manual.
SEGURIDAD ELÉCTRICA
1. La protección del interruptor
de circuito de falla a tierra
(GFCI) debe proporcionarse
en los circuitos o salidas que
se utilizarán para el aparato de
jardinería. Hay receptáculos
disponibles con protección GFCI
integrada que pueden usarse
para esta medida de protección.
2. No abuse del cable - No
sostenga el cargador del cable
ni lo jale para desconectarlo del
receptáculo. Mantenga alejado
del calor, el aceite y los bordes
losos.
3. Para reducir el riesgo de
descargas eléctricas, este
aparato tiene un enchufe
polarizado (una clavija es más
ancha que la otra) y requiere el
uso de un cable de extensión
polarizado. El enchufe de la
herramienta se conecta a un
cable de extensión polarizado en
una sola posición. Si el enchufe
no entra completamente en
el cable de extensión, invierta
el enchufe. Si el enchufe
sigue sin entrar, obtenga un
cable de extensión polarizado
correcto. Un cable de extensión
polarizado requerirá el uso de
un tomacorriente polarizado.
Este enchufe se conecta al
tomacorriente polarizado en
una sola posición. Si el enchufe
no entra completamente en
el tomacorriente, invierta el
enchufe. Si el enchufe sigue
sin entrar, póngase en contacto
con un electricista calicado
para instalar el tomacorriente
adecuado. No modique el
enchufe del equipo, ni el
receptáculo del cable de
extensión, ni el enchufe del
cable de extensión en modo

19 - ES
WWW.SENIXTOOLS.COM
cable.
TABLA A - CALIBRE MÍNIMO PARA CABLES DE
EXTENSIÓN (120 VOLTIOS)
Amperaje (con
carga completa)
LONGITUD DEL CABLE DE
EXTENSIÓN
25' 50' 100' 150'
0 - 6 18 16 16 14
6 - 10 18 16 14 12
10 - 12 16 16 14 12
12 - 16 14 12 No recomendado
b) Cables de conexión Para
reducir el riesgo de que los
cables se separen durante el
funcionamiento, haga una de las
siguientes cosas.
- Haga un nudo como se muestra
a continuación, luego conecte
los cables:
Cable de
extensión
Cable del
aparato
- O bien, utilice una correa de
retención del receptáculo del
enchufe o un conector diseñado
para sujetar los cables de
extensión a los cables de los
aparatos.
USO PREVISTO
Esta trituradora está pensada para
cortar pequeñas ramas y residuos
alguno. El diseño es de doble
aislamiento, según se indica en
.
4. Para reducir el riesgo de
descarga eléctrica, use
solamente con un cable de
extensión diseñado para uso
en exteriores, como un cable
de extensión de tipo: SW-A,
SOW-A, STW-A, STOW-A,
SJW-A, SJOW-A, SJTW-A.
o SJTOW-A. Asegúrese que
su cable de extensión esté en
buenas condiciones. Cuando
utilice un cable de extensión,
asegúrese de usar uno del
calibre suciente como para
soportar la corriente de su
aparato. Un cable de extensión
de tamaño demasiado pequeño
puede causar una caída de
tensión, provocando una
pérdida de potencia y un
sobrecalentamiento.
a) Tamaño del cable de extensión:
La siguiente tabla muestra
el tamaño correcto del cable
que debe utilizarse en función
de la longitud del cable y del
amperaje indicado en la placa.
En caso de duda, utilice el
siguiente calibre más pesado.
Cuanto menor sea el número
de calibre, más pesado será el

ES - 20 WWW.SENIXTOOLS.COM
de jardín para uso doméstico. El uso
de la máquina para cualquier otro
fin para el que no ha sido diseñada
puede provocar lesiones graves y
daños a la máquina.
Las advertencias, precauciones e
instrucciones comentadas en este
manual de instrucciones no pueden
cubrir todas las posibles condiciones
y situaciones que pueden darse.
El operador debe entender que
el sentido común y la precaución
son factores que no se pueden
incorporar a este producto, sino que
él los debe poner en práctica.
ADVERTENCIA:
CONSERVE ESTAS
INSTRUCCIONES PARA USO
FUTURO.
La page est en cours de chargement...
La page est en cours de chargement...
La page est en cours de chargement...
La page est en cours de chargement...
La page est en cours de chargement...
La page est en cours de chargement...
La page est en cours de chargement...
La page est en cours de chargement...
La page est en cours de chargement...
La page est en cours de chargement...
La page est en cours de chargement...
La page est en cours de chargement...
La page est en cours de chargement...
La page est en cours de chargement...
La page est en cours de chargement...
La page est en cours de chargement...
La page est en cours de chargement...
La page est en cours de chargement...
La page est en cours de chargement...
La page est en cours de chargement...
-
 1
1
-
 2
2
-
 3
3
-
 4
4
-
 5
5
-
 6
6
-
 7
7
-
 8
8
-
 9
9
-
 10
10
-
 11
11
-
 12
12
-
 13
13
-
 14
14
-
 15
15
-
 16
16
-
 17
17
-
 18
18
-
 19
19
-
 20
20
-
 21
21
-
 22
22
-
 23
23
-
 24
24
-
 25
25
-
 26
26
-
 27
27
-
 28
28
-
 29
29
-
 30
30
-
 31
31
-
 32
32
-
 33
33
-
 34
34
-
 35
35
-
 36
36
-
 37
37
-
 38
38
-
 39
39
-
 40
40


Senix SDE15-L 120v Electric Wood Chipper and Shredder Manuel utilisateur
- Catégorie
- Outils électroportatifs
- Taper
- Manuel utilisateur