
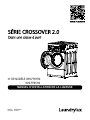
W A S H E R I N S T A L L A T I O N M A N U A L
MODEL NO. WHLFP817M
WHLFP817MI
DOC. NO. 0020506871C
EDITION 23.2018

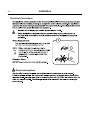
ATTENTION INSTALLER
Four transportation bolts are installed in the rear of the machine,
to protect the suspension and tub assembly from damage during
shipment. REMOVE ALL FOUR BOLTS AND PLASTIC TUBES
THROUGH WHICH THE BOLTS PASS BEFORE OPERATING THE
MACHINE!! See instructions later in this manual.

Installation Manual
WHLFP817M
WHLFP817MI
WARNING: ALL OPERATING AND MAINTENANCE PROCEDURES SHOWN IN THIS MANUAL
MUST BE FOLLOWED AT THE FREQUENCY SPECIFIED FOR PROPER OPERATION OF
YOUR MACHINE.
PLEASE ENTER THE FOLLOWING INFORMATION AS IT APPEARS ON THE MACHINE(S)
DATA PLATE(S).
KEEP THIS MANUAL IN A SECURE PLACE FOR FUTURE REFERENCE.
MACHINE MODEL
MACHINE SERIAL NUMBER(S)
ELECTRICAL CHARACTERISTICS: VOLTS, PHASE, HZ.
244824

Intentionally blank

IMPORTANT SAFETY INSTRUCTIONS
IMPORTANTES MESURES DE SECURITE
WARNING -
AVERTISSEMENT -
EVERY DAY FOR PROPER OPERATION TO PREVENT INJURY OR DAMAGE. IF THE DOOR LOCK FAILS TO
OPERATE PROPERLY, PLACE THE MACHINE OUT OF ORDER UNTIL THE PROBLEM IS CORRECTED.
SERRURE DE PORTE TOUS LES JOURS AFIN DE EVITER DES DOMMAGES OU DES RISQUES PERSONNELLES.
PROBLEME SOIT CORRIGÉ.
MANUFACTURED BY HAIER EXCLUSIVELY FOR LAUNDRYLUX

NOTICE TO: OWNERS, OPERATORS AND DEALERS
IMPROPER INSTALLATION AND INADEQUATE MAINTENANCE, POOR HOUSEKEEPING AND WILLFUL NEGLECT OR
BYPASSING OF SAFETY DEVICES MAY RESULT IN SERIOUS ACCIDENTS OR INJURY. TO ASSURE THE SAFETY
OF CUSTOMERS AND/OR OPERATORS OF YOUR MACHINE, THE FOLLOWING MAINTENANCE CHECKS MUST BE
PERFORMED ON A DAILY BASIS.
UNE INSTALLATION INCORRECTE ET UN ENTRETIEN INADÉQUAT, DE MÊME QUE LA NÉGLIGENCE OU LA
NEUTRALISATION DÉLIBÉRÉES DES DISPOSITIFS DE SÉCURITÉ, PEUVENT ÊTRE CAUSES DE BLESSURES OU
MACHINE, IL EST INDISPENSABLE DE PROCÉDER CHAQUE JOUR
1.
2.
THE MACHINE MUST NOT START
must
out of order
3. DO NOT UNDER ANY CIRCUMSTANCES ATTEMPT TO BYPASS OR REWIRE ANY OF THE MACHINE
SAFETY DEVICES AS THIS CAN RESULT IN SERIOUS ACCIDENTS.
5. WARNING: DO NOT OPERATE MACHINE(S) WITH SAFETY DEVICES BYPASSED, REWIRED OR
AVERTISSEMENT: NE PAS FAIRE FONCTIONNER LA (LES) MACHINE(S) AVEC UN DISPOSITIF

NOTICE TO INSTALLER
Improper installation of this machine:
Location Requirements
Additional Requirements

Contents
..................................................................................................1:1
........................................................................................................2:1
.....................................................................................3:1
........................................................................................4:1
......................................................5:1
...............................................................................................6:1
...................................................................................7:1
The manufacturer reserves the right to make changes to design, material
Safety Instructions
• The machine is designed for water washing only.
• The machine must not be used by children.
Licensed personnel are necessary for all electric power wiring and
plumbing.
• The door interlock must be checked daily for proper operation and
must not be bypassed.
• All leaks, due to faulty gaskets etc., must be repaired immediately.
• All service personnel must be fully familiar with the operating manual
before attempting any repair or maintenance of the machine.
• The machine must not be sprayed with water.
Consignes de sécurité
• La machine ne peut être utilisée par des enfants.
électricien diplômé.
neutralisé.
réparée sans délai.
• Tous les membres du personnel d’entretien doivent être parfaitement
familiarisés avec le manuel d’entretien avant d’entreprendre une
réparation ou un entretien de la machine.
court-circuit.

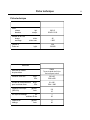
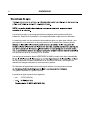
Technical Data
1:1
Technical Data
Innerdrum
volume litres/ft
3
diameter mm/inch
98/3.5
554/21 13/16
Drum speed
wash rpm
extraction max rpm
45
1000
G-factor
Weight, net kg/lbs
306
136/300
Connections
Water valves
connection
DN20
3/4" Garden Hose via included hoses
Rec. water pressure psi
kPa
30-90
200-600
Functioning limits psi
for water valve kPa
8-145
50-1000
Capacity at 45 psi
(300 kPa) gallon/min
liter/min
2.6
10
Drain hose inch
outer Ø mm
1
25
Draining gallon/min
capacity liter/min
5
20

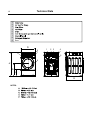
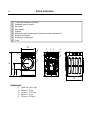
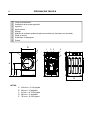
Technical Data
1:2
1
2
3
4
5
6
7
8
9 Door
A
B
C
D
E
1
2
3
4
5
6
7
9
8
NOTES:

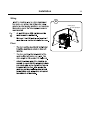
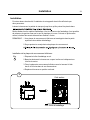
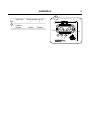
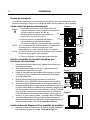
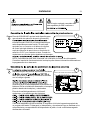
Installation
2:1
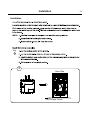
Installation
Fig.
1
Package Carton
Back Side
1

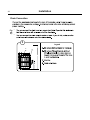
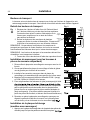
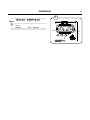
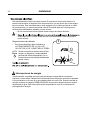
Installation
2:2
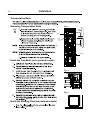
Transportation Bolts
Removing Transportation Bolts
Install the Coin Meter (coin operated models)
See Fig. 3
Install the Blocking Piate (non metered models)
See Fig. 4
Fig.
2
Brace
Cap
Bolt
Sleeve
Sleeve
Bolt
Screws
Fig. 2
Fig. 4
Fig. 3

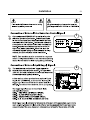
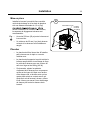
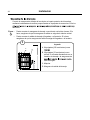
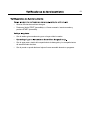
Installation
2:3
Siting
•
•
Floor
•
•
•
Fig.
4
Water supply
Drain standpipe
4

Installation
3:1
Water Connections
•
•

Installation
3:2
1 2
Fig.
1
2
1
1

Installation
4:1
Drain Connection
•
•
1
A
B
C
D
Legend
Fig.
1

Installation
5:1
2.
Fig.
1
Fig.
2
2
CN1CN2CN3CN4CN5
CN17 CN18
CN22CN23
Liquid supply signals connector.
1

Installation
5:2
Electrical Connections
•
•
•
120 VOLT, 60 HZ GROUNDED OUTLET.
Power Interruptions
Fig.
1
1

Function Checks
6:1
Function Checks
•
•
Check:
•
•
•
•

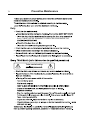
Preventive Maintenance
7:1
Daily
force. IT MUST NOT BE POSSIBLE TO OPEN THE DOOR WHILE THE
To be carried out by
La page est en cours de chargement...
La page est en cours de chargement...
La page est en cours de chargement...
La page est en cours de chargement...
La page est en cours de chargement...
La page est en cours de chargement...
La page est en cours de chargement...
La page est en cours de chargement...
La page est en cours de chargement...
La page est en cours de chargement...
La page est en cours de chargement...
La page est en cours de chargement...
La page est en cours de chargement...
La page est en cours de chargement...
La page est en cours de chargement...
La page est en cours de chargement...
La page est en cours de chargement...
La page est en cours de chargement...
La page est en cours de chargement...
La page est en cours de chargement...
La page est en cours de chargement...
La page est en cours de chargement...
La page est en cours de chargement...
La page est en cours de chargement...
La page est en cours de chargement...
La page est en cours de chargement...
La page est en cours de chargement...
La page est en cours de chargement...
La page est en cours de chargement...
La page est en cours de chargement...
La page est en cours de chargement...
La page est en cours de chargement...
La page est en cours de chargement...
La page est en cours de chargement...
La page est en cours de chargement...
La page est en cours de chargement...
La page est en cours de chargement...
La page est en cours de chargement...
La page est en cours de chargement...
La page est en cours de chargement...
La page est en cours de chargement...
La page est en cours de chargement...
La page est en cours de chargement...
La page est en cours de chargement...
-
 1
1
-
 2
2
-
 3
3
-
 4
4
-
 5
5
-
 6
6
-
 7
7
-
 8
8
-
 9
9
-
 10
10
-
 11
11
-
 12
12
-
 13
13
-
 14
14
-
 15
15
-
 16
16
-
 17
17
-
 18
18
-
 19
19
-
 20
20
-
 21
21
-
 22
22
-
 23
23
-
 24
24
-
 25
25
-
 26
26
-
 27
27
-
 28
28
-
 29
29
-
 30
30
-
 31
31
-
 32
32
-
 33
33
-
 34
34
-
 35
35
-
 36
36
-
 37
37
-
 38
38
-
 39
39
-
 40
40
-
 41
41
-
 42
42
-
 43
43
-
 44
44
-
 45
45
-
 46
46
-
 47
47
-
 48
48
-
 49
49
-
 50
50
-
 51
51
-
 52
52
-
 53
53
-
 54
54
-
 55
55
-
 56
56
-
 57
57
-
 58
58
-
 59
59
-
 60
60
-
 61
61
-
 62
62
-
 63
63
-
 64
64


Crossover 2.0 WHLFP817MI Guide d'installation
- Taper
- Guide d'installation
- Ce manuel convient également à
dans d''autres langues
Autres documents
-
LG 41683 Le manuel du propriétaire
-
Haier HWF5300AW Manuel utilisateur
-
-
-
Kenmore 796.41393 Le manuel du propriétaire
-
LG WD-13330TD Manuel utilisateur
-
-
Maytag MHWC7500YW0 Le manuel du propriétaire
-