Beautyrest SmartMotion Base 2.0 Le manuel du propriétaire
- Taper
- Le manuel du propriétaire


Disclaimers ................................................................................1-2
Parts List ...................................................................................3
Base Overview ..............................................................................4
Quick Reference Guide .......................................................................5
Installation Guide .........................................................................6-7
Remote Control ...........................................................................8-9
Headboard Bracket Installation Guide ........................................................10
Magnet and USB ............................................................................11
Emergency Power Down Box ................................................................ 12
Pair Remote ...............................................................................13
Setting Up Two Bases .......................................................................14
Syncing Two Bases .........................................................................15
Troubleshooting ...........................................................................16
Notes ..................................................................................... 17
Español ................................................................................ 18-22
Français ................................................................................23-27
table of contents

1
disclaimers
Important Safety Information
Read all instructions before using your adjustable base. Save these instructions.
SAFETY
TO REDUCE THE RISK OF SHOCK, BURNS, FIRE OR INJURY:
• Keep the power cord away from heated surfaces. Never operate the base when
the air openings are blocked. Keep air openings free of lint, hair and the like. Do
not drop or insert any object into any opening.
• Discontinue use of the bed base and contact a qualified service center if: it has a
damaged cord or plug, if it is not working properly, or it has been dropped into
water.
• Only use this bed base for its intended use as described in this manual.
• Do not use accessories/attachments that are not recommended by the
manufacturer.
• Unauthorized modification or failure to use a wall outlet or surge protector could
void the electrical portion of your warranty.
PETS AND CHILDREN:
Immediately dispose of all packing materials as it may pose a smothering risk to small
children and pets. To avoid injury, do not allow children and small pets to play on or
under the bed. Children should not operate the bed base without adult supervision.
PACEMAKERS:
Some products contain Neodymium MAGNETS which may interfere with devices
such as pacemakers, ICD’s and any other device sensitive to magnetic fields. It is
STRONGLY recommended that owners of such medical devices consult their physician
prior to using products that contain Neodymium MAGNETS. It is also possible that
some pacemakers may falsely interpret the optional massage feature vibrations as
movement/exercise. This is a common occurrence with any product that creates a
vibrating movement and may not aect the pacemaker. Please consult your physician
before using the massage feature.
IN-HOME USE AND HOSPITAL STANDARDS:
Ergomotion adjustable bed bases are designed solely for in-home use. This base was
not designed as a hospital bed and is not designed to meet hospital standards. Do not
use this base with TENT TYPE oxygen therapy equipment or near explosive gases.
ADDITIONAL SAFETY FEATURES
Casters (optional leg accessory) are equipped with locking wheels to prevent unwanted
movement. Even when locked and unable to roll, it is possible for the casters to slide.
Free release head and foot motors are designed to lower the mattress by retracting
only with gravity, never pulling downwards, which minimizes pinch points.
ACOUSTICS
LIFTING/LOWERING MECHANISMS
The lift/lower feature will emit a minimal humming sound during operation. This is
normal. During operation, the lift arm wheels make contact with the platform support
of the base. This contact may result in metal on metal or metal on plastic contact.
This applies slight tension on the moving components and resonance is reduced to a
minimum level. If excessive noise or vibration is experienced, reverse the movement
action (up or down) of the base with the remote control. This should realign the base’s
activating mechanisms to the proper operational position. In normal base operation,
the wheels which allow the bed to maintain its distance from the wall, will make contact
with the steel platform supports of the base creating a contact noise. When entering,
exiting or shifting weight on the base, this contact noise may be audible as the wheels
make contact. This is normal.
MATERIALS
Ergomotion adjustable bases are constructed from various materials including woods,
metals, plastics and fabrics. Tension, pressure or movement applied to the frame,
platform or shroud through general use may create an audible sound.
MASSAGE OPERATION AND LOCATION ENVIRONMENT
The massage feature will emit a tone during operation. This is normal. As the massage
intensity level is increased, the tone will intensify. The volume of this tone is directly
related to the location environment. For example, when demonstrated in a show room,
the surrounding environmental noise will cover some of the massage noise. However,
when installed in a home setting with wooden floors, carpeted or not, the massage
volume will be more noticeable. To minimize this resonance, place a piece of carpet, or
rubber caster cups, under each leg or caster of the base. It is possible to experience
vibration or noise from the exterior bed frame, headboard brackets, headboards or
footboards if mounting bolts are not firmly tightened.
Levels 1-6 of massage intensity represent the revolutions of the motor per minute.
Level 6 provides the maximum number of RPMs. However, this does not mean that the
feeling of vibration is the strongest. Depending on the mattress material, thickness,
and positioning of the user, the feeling of vibrations will dier. We encourage the user
to find the massage intensity setting that suits them best. It is important to understand
the physics of vibrations. Just as an engine may run rough during idle, as the RPMs
increase, the vibrations change concurrently.
TOLERANCE
All Ergomotion adjustable foundations,
depending on make and model, are
designed and manufactured to perform
and function within designated quality
control parameters. Bases are subject to
meticulous and rigorous inspections during
the quality control process to ensure bases
will operate within these standards during
normal operating use. Normal operating
use is defined as the following: Adjustable
foundation is to be operated with a
mattress and load. Testing procedures
require lifetime cycle tests with up to 120kg
distributed load. The angle (designated “a”
in figure 1) between the back section and the flat section for various configurations of
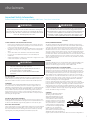
WARNING
• Keep bed in a flat position when not in use.
• Stay clear of moving parts while in motion.
• Before adjusting, make sure children and pets are clear of
moving parts and are not under bed base.
• Do not allow children to operate bed base without adult
supervision
WARNING
For optimal safety and operation, plug bed base into a surge protector
(not included). The bed base should only be plugged directly into a
grounded wall outlet or surge protector (strongly recommended). Improper
connection of the equipment can result in the risk of electrical shock,
electrical file or faulty operation of this bed base. If the plug does not fit
your outlet, contact a qualified Electrician to install a suitable outlet.
WARNING
Always unplug the base from the electrical outlet before servicing any
part of the base. To reduce risk of electric shock, unplug the base before
cleaning. To safely disconnect, ensure the base is in a flat position with all
motors o, and unplug from power source.
Adjustable
Bed Tolerance
Ergomotion Inc. | ph 1-888-550-3746 | fx 805-979-9399 | www.ergomotion.com
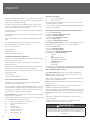
All Ergomotion adjustable foundations, depending on make and model, are designed and manufactured to perform and
function within designated quality control parameters. Bases are subject to meticulous and rigorous inspections during
the quality control process to ensure bases will operate within these standards during normal operating use.
Normal operating use is defined as the following:
-Adjustable foundation is to be operated with a mattress and load. Testing procedures require lifetime cycle
tests with up to 120kg distributed load.
The angle (designated “α” in figure 1) between the back section and the flat section for various configurations of the
mattress support platform shall be ± 3°, which translates to a tolerance of up to 1 ½”.
The angle (designated “β” in figure 1) between the flat section and foot section for various configurations of the mattress
support platform shall be ± 3°, which translates to a tolerance of up to ¾”.
Any adjustable foundation deemed to be within these allocated tolerances is considered to have met the manufacturer’s
quality control standards.
(α°)
(β°)
When operating a "paired" split base setup there may be a time latency up to 1.5 seconds between each bases articulation.
Blake Pettit
Quality Assurance Manager
Ph 805-979-3875
Fx 805-979-9399
www.ergomotion.com

2
disclaimers
the mattress support platform shall be ± 3°, which translates to a tolerance of up to 1
½”. The angle (designated “B” in figure 1) between the flat section and foot section for
various configurations of the mattress support platform shall be ± 3°, which translates
to a tolerance of up to ¾”.
Any adjustable foundation deemed to be within these allocated tolerances is
considered to have met the manufacturer’s quality control standards.
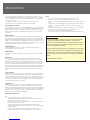
THAT “NEW PRODUCT” SMELL:
Some people notice a slight odor to their new adjustable base—this can come from our
material manufacturing process. This smell is normal and usually disappears before the
product reaches you. Sometimes, however, this smell may still be noticeable. It usually
disappears after a few weeks, providing adequate ventilation of the product and the
environment.
BREAK IN PERIOD:
You can speed up the break-in period by simply spending time in the adjustable bed
through activities such as reading, watching TV or playing with the kids or grandkids.
The extra movement will help the adjustable base respond to weight and temperature
changes. Some of the materials in our adjustable bases such as the woods, metals and
plastics used in the platform, frame and components are sensitive to moisture content
and temperature and may make sounds in colder environments.
PAIRED OPERATION:
When operating a “paired” split base setup there may be a time latency up to 1.5
seconds between each bases articulation.
WEAR AND TEAR:
Wear and tear is damage that naturally and inevitably occurs as a result of normal use
or aging.
FABRIC CARE:
To prolong the life of your fabric, protect from direct sunlight whenever possible.
For spot cleaning, wipe area with a light damp sponge or vacuum with a soft brush
attachment to remove particles. Keep at a minimum of 30cm (12 inches) away from
direct heat sources. For a deeper cleaning, blot liquid spills with a clean dry cloth. Wipe
with a clean cloth dampened with warm water. Do not wet excessively. A soft bristle
brush may be used to remove ingrained soil. Avoid scratching by gentle brushing. Wipe
with a clean cloth dampened with warm water to remove residues. Dry in shade away
from direct heat. If persistent marks remain visible after cleaning, seek professional
advice.
PRODUCT RATINGS:
The lift motors are not designed to operate continuously for more than [2] minutes in
an [18] minute time period or approximately 10% duty cycle. Attempting to circumvent
or exceed this rating will shorten the life expectancy of the product and may void the
warranty. The massage motors are not designed to operate continuously for more than
30 minutes at a time. Please allow the massaging system to rest for 30 minutes after
automatic massage shut o before restarting.
WEIGHT LIMITS:
This product is not rated to support weights exceeding 850 pounds. This product is
not rated to support weights in excess of 850 pounds inclusive of the mattress and
bedding. The base will structurally support this weight, provided it is evenly distributed
across the bed base. The adjustable base is not designed to support or lift this amount
in the head or foot sections alone. Exceeding this weight restriction could damage the
bed and/or cause injury and will void the warranty.
IMPORTANT DO’S AND DON’TS
DO:
• Plug your adjustable base into a power surge protector.
• Evenly distribute weight when sleeping in a split setup. Uneven distribution of
weight can cause the base to raise unevenly.
• Call Customer Service for any technical issues. Do not try to force the base down,
this can damage the motors or frame.
• Use mild soap and water to clean your adjustable base if staining occurs.
• Keep in mind that adjustable bases are recommended to be used with adjustable
friendly mattresses
• Lower to the flat (horizontal) position after use and in between presets.
• Register your warranty as soon as your adjustable base has been delivered.
DON’T
• Sit on corners/edges of base, this may warp the frame, struts or foam.
• Tilt the base on its side. This can damage the legs and/or leg screws.
• Stand or jump on the adjustable base at any time, this can damage the frame and
motors.
• Drag the base to move it. Dragging the base could damage the frame, strip the
nut/bolts or break the legs. Purchase castors if you plan on moving your base
routinely.
• Enter and exit the adjustable base with the head and/or foot in the articulated
position. Enter or exit your adjustable in the flat (horizontal) position.
• Tinker with or modify base. This will void the warranty.
• Press down on the head or foot while actuated can damage frame and motors.
FCC Compliance:
This device complies with part 15 of the FCC Rules. Operation
is subject to the following two conditions: (1) This device
may not cause harmful interference, and (2) this device must
accept any interference received, including interference that
may cause undesired operation.
To comply with the FCC RF exposure requirements, no change
to the antenna or the device is permitted. Any change to the
antenna or the device could result in the device exceeding the
RF exposure requirement and void user’s right to operate the
device.
Radio Frequency: 2.4 GHz

3
parts list
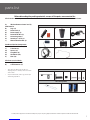
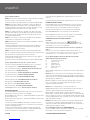
Actual product appearance and functionality may vary from photographs, illustrations and descriptions included in this manual.
A) Wireless Remote Control and (3)
AAA batteries
B) Legs (4)
C) Power Cord (1)
D) Power Supply (1)
E) Power Down Box (1)*
F) Connecting Strap*‡
G) SmartSync™ Cord (1) ‡
J) Mattress Retainer Bar (1)*
Headboard Bracket Components:
K) Headboard Bracket (2)
L) T-Bracket (2)
M) Spacers (2)
N) Long Bolts (8)
O) Short Bolts (10)
P) Nuts (18)
Misc Parts (not included):
Q) Surge Protector (1)
R) 9 Volt Batteries (2)
* These items are attached to the base for
shipping purposes. Carefully remove from base
and set aside.
‡ Only included in Twin, Twin Long, Queen Split
and Cal Kng Split bases.
Before discarding the packing materials, ensure all the parts are accounted for.
All electronics and components that need to be installed are located in boxes under the base or attached to the frame.
HEADBOARD BRACKET COMPONENTS
K) L) M) N) O) P)
MISC (NOT INCLUDED)
Q) R)
INCLUDED
A) B) C)
D) E)* F)*‡
G)‡ J)*


5
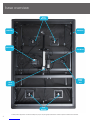
Not to scale. For illustration purposes only. Read all instructions before beginning installation.
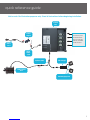
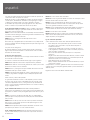
quick reference guide
Input
Power
Cord
Power
Cord
Power
Supply
Power Down
Box
Control
Box
Connection ports
to head and foot
motors (massage
and lift). Installed
under the base.
Splitter Cable
USB Charging Ports
USB Charger

6
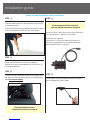
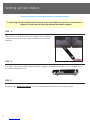
installation guide
To sync two bases with the SmartSync™
cord: see detailed instructions on page 14
Uncoil the Power Down Box from the frame and install
(2) 9 Volt batteries - optional, not included.
Place box on the ground.
Ensure that it is easily accessible when the base is
turned to its upright position. For power down box
operating instructions see page 12.
Place the bed base box in a desired location with the top
of the box facing up.
Remove the binding straps and packing materials, making
sure not to puncture the box with any sharp objects.
Remove the bed base from the box keeping the
bottom of the base facing upwards for easier access to
the beds components
STEP 1
To install headboard brackets:
See detailed instructions on page 10
To install the legs, thread the washer over the bolt of the
leg with the recessed side facing the leg, and tighten by
hand. Do not over tighten. Uncoil input cord (connected to control box’s power
port) and plug into Power Supply.
Always use two people when setting up the base
STEP 2
STEP 3
STEP 4
STEP 5

7
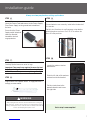
installation guide
Ensure batteries are correctly installed in the back of
the remote.
Quickly test functions to verify proper setup before
placing mattress on base. Press FLAT to return the
base to a flat position.
Uncoil the Power Cord and connect to the Power Supply.
Place Power Supply on the ground and extend from
the base.
Ensure that the Power
Supply and all attached
cords are directed
toward the desired
surge protector.
Carefully flip the base over on to its legs.
Important: Two people are required to move the bed
base. Do not drag across the floor. Do not rest frame
on its side, excessive pressure may damage the legs.
Plug the base into a power source. A surge protector is
strongly recommended.
STEP 7
Always use two people when setting up the base
STEP 6STEP 9
STEP 8
STEP 10
Basic setup is now complete!
WARNING
Always unplug the base from the electrical outlet before servicing any
part of the base. To reduce risk of electric shock, unplug the base before
cleaning. To safely disconnect, ensure the base is in a flat position with all
motors o, and unplug from power source.
Locate the mattress retainer
bar brackets.
Slide the left side of the mattress
retainer bar into the bracket.
Pull the retainer bar to the
opposite bracket and secure
the right side.

8
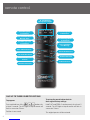
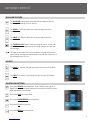
remote control
Lifts and Lowers Head
Zero-G Preset Position
Lifts and Lowers Foot
SNORE RELIEF Preset
Position
FLAT Preset Position
Relax Preset Position
TV Preset Position
10, 20, 30 Minute
Massage Timer Lights
Turn on Head and Foot
Massage Timer
Head Massage Up
(6 intensities)
Head Massage Down
(6 intensities)
Foot Massage Up
(6 intensities)
Foot Massage Down
(6 intensities)
Turn on Head and
Foot Massage
SAVE UP TO THREE FAVORITE POSITIONS
To program:
Press and hold one of the buttons for
at least 5 seconds. The LED lights at top of remote will
flash in succession 3 times.
Position is now saved.
To restore the preset buttons back to
their original factory settings:
Hold FLAT and ZERO-G simultaneously for at least 5
seconds. The LED lights at top of remote will flash in
succession 3 times.
The original presets will be restored.

9
remote control
The HEAD arrows lift and lower the head section of the base.
The FOOTarrows lift and lower the foot section of the base.
The MASSAGE button turns head and foot massage on and o.
Press to cycle through 3 levels and o.
The HEAD +/- buttons adjust the head massage intensities.
Levels 1-6.
The FOOT +/- buttons adjust the head massage intensities.
Levels 1-6.
The TIMER/ALL OFF button Starts massage at level 3. Select a 10,
20 or 30 minute massage interval. Pressing a fourth time will turn
o massage.
The light on the top of the remote indicates a 10, 20 or 30 minute
timer setting. Massage will automatically shut o after 10 minutes if
the massage timer isn’t set.
ADJUST
MASSAGE FEATURE
ONE TOUCH BUTTONS
One touch ZERO G preset position. Zero-G adjusts your legs to a
higher level than your heart helping to relieve pressure o the lower
back and promote circulation.
One touch FLAT preset position.
One touch SNORE RELIEF preset position.
One touch TV preset position.
One touch RELAX preset position.

10
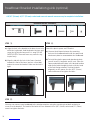
headboard bracket installation guide
(optional)
a.) Align the hole in the bracket to the brass sleeve into
which the leg threads. Hold the bracket in place and
screw the leg into the base until it is snug. DO NOT
OVERTIGHTEN. Too much force may cause the leg
to spin freely.
b) Align the tab with the hole in the frame (located
towards the foot of the base) and use a short bolt
and nut to secure the bracket. Make sure the bolt is
tight.
A 9/16” (14 mm) & 1/2” (13 mm) socket and crescent wrench are necessary to complete installation.
HEADBOARD BRACKET COMPONENTS
Headboard Bracket (2) T-Bracket (2) Spacer (2) Long Bolt (8) Short Bolt (10) Nut (18)
You may now connect your headboard to the attachment plates using the remaining short bolts and nuts to
secure it to the brackets. The heads of the bolts will face outward. Use a 9/16" (14mm) socket and 1/2" (13mm)
wrench to tighten the bolts.
Attach the plastic spacer and T-Bracket.
a.) Measure the distance between the mounting
holes on the headboard and install the spacer and
attachment plate to accommodate the headboard.
b.) To install the plastic spacer and attachment plate,
you will need (2) long bolts and (2) nuts. Place the
spacer and attachment plate in the desired location
and slip the bolts through the holes with the head
of the bolt facing outward. Position the bolts
diagonally on the spacer. Use the 9/16” (14 mm)
socket and wrench to tighten the bolts.
STEP 1STEP 2
STEP 3

11
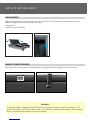
usb and remote station
MAGNETIC REMOTE HOLDER
USB charging connections are located on each side of the base, on the underside of the head section of the
platform. Charge two smart devices at the same time.
Voltage: 5V DC
Current: 2.5A (max 13 Watts)
Read and remove warning sticker located on top of the magnet before attaching the remote to the base.
WARNING:
This product contains Neodymium MAGNETS which may interfere with devices such as pacemakers, ICD’s
and any other device sensitive to magnetic fields. It is STRONGLY recommended that owners of such medical
devices consult their physician prior to using this product.
USB CHARGERS

12
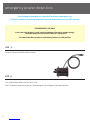
emergency power down box
Store the power down box in a convenient location for emergency use.
(2) 9 Volt batteries are required to operate the power down feature and are NOT included.
Locate the Power Down Box under the base.
FOR EMERGENCY USE ONLY.
In the event that the base is stuck in an articulated position during a power outage-
the Power Down Box will return the base to a flat position.
The Power Down Box can only be used to bring the base to a flat position.
Press and hold the button until the base is flat.
Note: The button can be pressed at any time during the loss of power to bring the base flat.
STEP 1
STEP 2

13
pair remote
The original remote that comes in the box is already paired to the bed base. No further action is required.
In the event that the remote is not paired with the base, follow the steps below.
If the Power Down Box is not available :
• Remove back cover of the remote, locate the rubber button in the center of the back.
• On the control box located underneath the bed, double click the RESET button, light will illuminate.
• Press and hold the back rubber button on the remote. The button will begin to flash then become a
continuous solid light and then turn o.
• Once the remote is paired, replace back cover of the remote and test base functionality.
Remove back cover from remote
control. Remove and replace
batteries.
Press and hold button on the back
of the remote. The light will begin
to flash then become a continuous
solid light and then turn o.
Both lights on the Power Down Box
and the Remote will be continuous,
then simultaneously turn o.
Replace back cover of the remote.
The remote is now paired with the
base.
Double click the button on the
Power Down Box (this will not
cause the base to move). The
light will illuminate.
STEP 1
STEP 2
STEP 3
STEP 4

14
STEP 3
setting up two bases
Connecting straps are secured to the base frame upon delivery.
With the bases in their desired location, slightly loosen both legs
to allow the strap to fit on the leg bolt, between the leg washer
and frame.
Slide side (a) of the connecting strap onto leg bolt. Swing the strap and connect side (b) to the leg bolt. Secure
the strap by shifting to the left.
Re-tighten legs. Do not over tighten. Use the remaining strap and repeat on other end of the base.
If a split setup is being installed, plastic connecting straps are provided (one per base) to secure the bases
together. Use both straps to secure the head and foot portions together.
a b
STEP 1
STEP 2

15
STEP 4
STEP 5
STEP 6
STEP 1
STEP 2
STEP 3
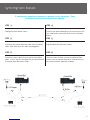
syncing two bases
Unplug base from power source.
Disconnect the power-down box cable from the splitter
cable. Make note where the cable was plugged in.
Connect the male end of the sync cord to each splitter
cable. Insert it into the same port that you disconnected
the power-down box from in Step 2
If simultaneous operation of two bases is desired, use the SmartSync™ Cord
to connect the electronics of both bases together.
Connect each power-down box male connection to the
sync cord female connection (Refer to the illustration
below).
Plug base back into the power source.
Check to ensure all cords are securely attached. Both
remotes will now operate both bases simultaneously (If
the remotes become unpaired, see page).

16
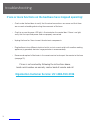
troubleshooting
If one or more functions on the bed base have stopped operating:
• Check under the bed base to verify that the wired connections are secure and that there
are no cords or bedding obstructing the movement of the base.
• Check to ensure the green LED light is illuminated on the control box. If there is no light,
verify that the input and power cords are properly connected.
• Unplug the base for 1 hour to reset the electronic components.
• Plug bed base into a dierent electrical outlet, or test current outlet with another working
appliance (a grounded, electrical surge protector is recommended).
• Remove and replace full batteries in the remote control and re-pair the remote to the base
(see page 13).
If issue is not resolved by following the instructions above,
locate serial number on warranty card or back of remote and call
Ergomotion Customer Service: US 1-888-550-3746

17
notes
________________________________________________________________________________
________________________________________________________________________________
________________________________________________________________________________
________________________________________________________________________________
________________________________________________________________________________
________________________________________________________________________________
________________________________________________________________________________
________________________________________________________________________________
________________________________________________________________________________
________________________________________________________________________________
________________________________________________________________________________
________________________________________________________________________________
________________________________________________________________________________
________________________________________________________________________________
________________________________________________________________________________
________________________________________________________________________________
________________________________________________________________________________
________________________________________________________________________________
________________________________________________________________________________
________________________________________________________________________________
________________________________________________________________________________
________________________________________________________________________________
________________________________________________________________________________
________________________________________________________________________________
________________________________________________________________________________
________________________________________________________________________________
________________________________________________________________________________

18
español
PG 1-2 Sobre las precauciones y el uso: Atención: Restricciones importantes
sobre la seguridad Lea todas las instrucciones antes de usar su base ajustable.
Guarde estas instrucciones.
SEGURIDAD
PARA REDUCIR EL RIESGO DE DESCARGA, QUEMADURAS, INCENDIO O
LESIONES:
Para una óptima seguridad y operación, conecte el enchufe de la cama
ajustable a un protector contra sobretensiones (no incluido). La base de la
cama sólo debe de estar conectado directamente a una toma de corriente o
protector contra sobretensiones (muy recomendable). Desenchufe siempre
la base de la toma eléctrica antes de reparar cualquier parte de la base. Para
reducir el riesgo de descarga eléctrica, desconecte la base antes de limpiarla.
Para desconectar de forma segura, asegúrese que la base está en una
posición plana con todos los motores apagados, y desenchufe la fuente de
energía. Mantenga el cable eléctrico alejado de superficies calientes. Nunca
opere la base cuando las aberturas de aire están bloqueadas. Mantenga
las aberturas libres de pelusas, cabellos y similares. No deje caer o inserte
ningún objeto en ninguna abertura. Suspenda el uso de la base y póngase en
contacto con el centro de servicio al cliente calificado si: el cable o el enchufe
están dañados, si no funciona correctamente o si le ha caído agua. Utilice
esta base ajustable para el uso destinado como se describe en este manual.
No utilice o agregue accesorios no recomendados por el fabricante. Se
requiere una estrecha supervisión cuando la base de la cama es utilizado por
o cerca de niños, convalecientes, personas con discapacidad o los animales
domésticos. La conexión incorrecta del equipo puede resultar en el riesgo de
descarga eléctrica, incendio eléctrico o fallas en el funcionamiento de esta
base ajustable. Si el enchufe no encaja en su toma de corriente, llame a un
electricista calificado para que instale una toma adecuada. La modificación
o el fracaso no autorizado a utilizar una toma de corriente o protector contra
sobretensiones pueden anular la parte eléctrica de la garantía.
MASCOTAS Y LOS NIÑOS:
Inmediatamente desechar los materiales de empaque, ya que puede
representar un riesgo de asfixia para los niños pequeños y las mascotas.
Para evitar lesiones, no se aconseja que los niños y los animales domésticos
pequeños jueguen encima o debajo de la cama. Los niños no deben funcionar
la base de la cama sin supervisión de un adulto.
MARCAPASOS:
Algunos productos contienen imanes de Neodimio que pueden interferir
con dispositivos como marcapasos, Cardioversor Desfibrilador implantable
o cualquier otro dispositivo sensible a los campos magnéticos. Fuertemente
se recomienda que los propietarios de este tipo de dispositivos médicos
consulten a su médico antes de usar productos que contienen imanes de
neodimio. También es posible que algunos marcapasos pueden interpretar
erróneamente las vibraciones opcionales de masaje de la base como el
movimiento / ejercicio. Esto es un caso común con cualquier producto que
crea un movimiento de vibración y puede no afectar el marcapasos. Por favor,
consulte a su médico antes de usar la función de masaje.
USO EN EL HOGAR Y NORMAS DE HOSPITAL:
Las bases ajustables de Ergomotion están diseñadas exclusivamente para el
uso en el hogar. Esta base no está diseñada como una cama de hospital y no
está diseñada para cumplir con las normas del hospital. No use esta base con
equipo de oxigenoterapia tipo tienda o cerca de gases explosivos.
CARACTERÍSTICAS DE SEGURIDAD ADICIONALES
Ruedas (accesorio opcional para los pies de la cama) están equipados con
bloqueo para evitar movimientos no deseados. Incluso cuando está bloqueado
y no puede rodar, es posible que las ruedas se deslicen. Motores de cabeza
y de pie con versión de liberación están diseñados para bajar el colchón
retrayendo únicamente con la gravedad, nunca tirando hacia abajo, lo que
minimiza los puntos de pellizco.
ACÚSTICOS
MECANISMOS DE ELEVACIÓN / DESCENSO
La función de elevación/descenso emitirá un zumbido mínimo durante el
funcionamiento. Esto es normal. Durante la operación, las ruedas de los brazos
de elevación hacen contacto con el soporte de la plataforma de la base.
Este contacto puede resultar en metal sobre metal o metal sobre plástico.
Esto aplica una ligera tensión sobre los componentes en movimiento y la
resonancia se reduce a un nivel mínimo. Si se experimenta ruido o vibraciones
excesivas, invertir la acción del movimiento (arriba o abajo) de la base con el
control remoto. Esto debe realinear los mecanismos de activación de la base a
la posición adecuada de funcionamiento. En una operación normal de la base,
las ruedas, que permiten distanciamiento de la cama a la pared, se pondrán
en contacto con los soportes de la plataforma de acero creando un ruido
al contacto. Al entrar, salir o cambiar el peso en la base, emitirá un ruido al
contacto, será el contacto de las ruedas con la base. Esto es normal.
MATERIALES
Las bases ajustables Ergomotion están hechas de diversos materiales como
maderas, metales, plásticos y telas. La tensión, presión o el movimiento
aplicados a la estructura, plataforma o cubierta a través del uso general puede
crear un sonido audible.
FUNCIONAMIENTO DE MASAJE Y UBICACIÓN
La función de masaje emitirá un tono durante la operación. Esto es normal. A
medida que aumenta el nivel de intensidad del masaje, el tono se intensificará.
El volumen de este tono está directamente relacionado con la ubicación.
Por ejemplo, cuando se demostró en una sala de ventas, el ruido ambiental
alrededor cubrirá algunos de los ruidos de masajes. Sin embargo, cuando se
instala en un hogar con pisos de madera, suelo con alfombra o no, el volumen
de masaje será más notable. Para minimizar esta resonancia, coloque un
pedazo de alfombra, o almohadilla redonda de goma, debajo de cada pie o
rueda de la base. Es posible experimentar vibración o ruido de la estructura
exterior de la cama, soportes de cabecera, cabeceras o tablero de pie, si los
tornillos de ajuste no están bien apretados.
Niveles 1-6 de la intensidad del masaje representan las revoluciones del
motor por minuto. Nivel 6 proporciona el número máximo de RPMs. Sin
embargo, esto no significa que la sensación de vibración es el más fuerte.
Dependiendo del material del colchón, el grosor, y el posicionamiento del
usuario, la sensación de vibraciones será diferente. Recomendamos a los
usuarios a encontrar el ajuste de intensidad del masaje que más les convenga.
Es importante entender la física de vibraciones. Al igual que un motor
puede funcionar en bruto durante el reposo, como el aumento de RPM, las
vibraciones cambian simultáneamente.
TOLERANCIA
Todas las bases ajustables Ergomotion, dependiendo de la marca y el
modelo, están diseñados y fabricados para realizar y funcionar dentro de
los parámetros de control de calidad designados. Las bases están sujetas a
inspecciones minuciosas y rigurosas durante el proceso de control de calidad
para asegurarse que las bases operen dentro de estas normas durante el
uso normal de funcionamiento. El uso normal de funcionamiento se define
como la siguiente: la base ajustable se va a operar con un colchón y la carga.
ADVERTENCIA
• Mantenga la cama en posición plana cuando no esté en uso.
• Manténgase alejado de las piezas móviles mientras está en
movimiento.
• Antes de ajustar , asegúrese de que los niños y las mascotas estén
alejadas de las partes móviles y no están bajo somier antes de ajustar.
• No permita que los niños operen base de la cama y sin supervisión de
un adulto.
La page charge ...
La page charge ...
La page charge ...
La page charge ...
La page charge ...
La page charge ...
La page charge ...
La page charge ...
La page charge ...
La page charge ...
-
 1
1
-
 2
2
-
 3
3
-
 4
4
-
 5
5
-
 6
6
-
 7
7
-
 8
8
-
 9
9
-
 10
10
-
 11
11
-
 12
12
-
 13
13
-
 14
14
-
 15
15
-
 16
16
-
 17
17
-
 18
18
-
 19
19
-
 20
20
-
 21
21
-
 22
22
-
 23
23
-
 24
24
-
 25
25
-
 26
26
-
 27
27
-
 28
28
-
 29
29
-
 30
30


