Fisher & Paykel WH2424F1 Mode d'emploi
- Catégorie
- Machines à laver
- Taper
- Mode d'emploi
Ce manuel convient également à

FRONT LOADING CLOTHES WASHER
WH2424F & WH2424P models
LAVEUSE À CHARGEMENT FRONTAL
Modèles WH2424F & WH2424P
INSTALLATION GUIDE / USER GUIDE
GUIDE D’INSTALLATION / GUIDE D’UTILISATION
US CA

English Page 1 – 52
Français
Page 55 – 106

1
CONTENTS
Introduction 3
Safety and warnings 4
Installation instructions 7
Before you do your first wash 17
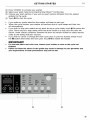
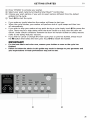
Getting started 18
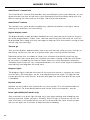
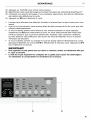
Washer controls 22
Safety features 23
Sorting and loading 24
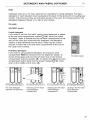
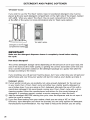
Detergent and fabric softener 26
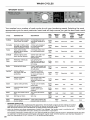
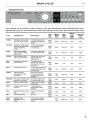
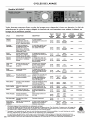
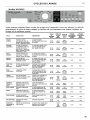
Wash cycles 30
Wash cycle options 32
Customizing wash cycles 36
Caring for your washer 37
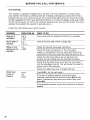
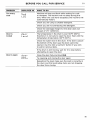
Before you call for service 40
Fault codes 42
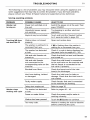
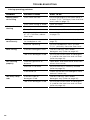
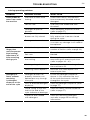
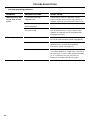
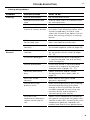
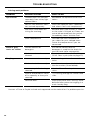
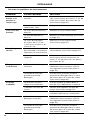
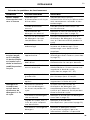
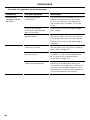
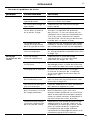
Troubleshooting 43
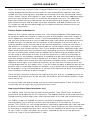
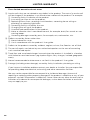
Limited warranty 49
IMPORTANT!
SAVE THESE INSTRUCTIONS
The models shown in this User guide may
not be available in all markets and are
subject to change at any time. For current
details about model and specification
availability in your country, please go to
our website www.fisherpaykel.com or
contact your local Fisher & Paykel dealer.
Registration
Register your product with us so we can
provide you with the best service possible.
To register your product visit our website:
www.fisherpaykel.com
EN


7
INSTALLATION INSTRUCTIONS
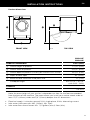
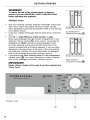
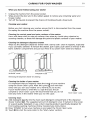
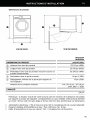
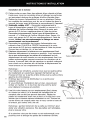
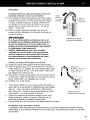
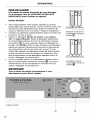
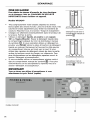
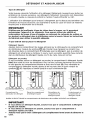
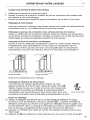
Product dimensions
WH2424F
WH2424P
PRODUCT DIMENSIONS inches (mm)
AOverall height of product 331/2” (850)
BOverall width of product 235/8” (600)
COverall depth of product (including dial and door whenclosed) 255/8” (645)
DDepth of door open 42” (1065)
EMinimum door clearance to adjacent wall 13” (330)
Standpipe height min. 311/2” – 471/4”
(min. 800–1200)
CAPACITY
2.4 cu ft
Note: the exact height of your washer is dependent on how far the feet are extended
from the base of the machine. The space where you install your washer needs to be at
least 13/5” (40mm) wider and 3/4” (20mm) deeper than its dimensions.
●Electrical supply: 2 wire plus ground, 120V, single phase, 60Hz, alternating current.
●Inlet water static pressure: Max. (120psi), Min. 10psi.
●Inlet water flow rate at faucet: Min. 11/2 gallons/min (6liters/min).
E
D
A
B
C
TOP VIEWWallFRONT VIEW
EN

8
INSTALLATION INSTRUCTIONS
Accessories
Please check you received the following accessories with your Fisher & Paykel washer.
You will find them inside the drum or attached to the packaging.
●2 x Inlet hoses
●1 x Drain hose guide
●1 x Installation instructions and User guide
●1 x Wrench
●1 x Installation leaflet (attached to the top of the washer)
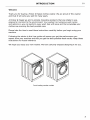
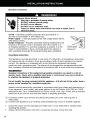
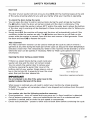
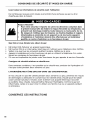
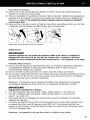
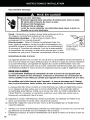
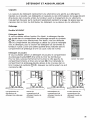
Unpacking
WARNING!
Recycle or destroy the carton and plastic bags after the washer is unpacked. Make
materials inaccessible to children. Children might use them for play. Cartons covered with
rugs, bedspreads or plastic sheets can become airtight chambers causing suffocation.
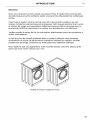
To ensure the best performance from your new washer please follow the instructions below.
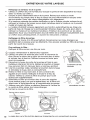
Removing the packaging:
1 Remove the outer packaging. Note: a small amount of water may be seen inside the
packaging and inside the washer. This is the result of factory testing and is normal.
2 Tilt the machine backwards and ‘walk’ it off the base one foot at a time. Not doing so
may cause damage to your floor and washer.
3 Remove all packaging and accessories from inside the drum. Note: DO NOT remove the
screw or clip holding the hose.
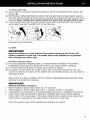
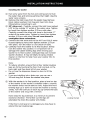
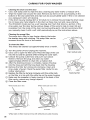
Removing the transit bolts
The clothes washer is fitted with 4 transit bolts at the rear to avoid damage during
transportation.
IMPORTANT!
The 4 transit bolts MUST be removed prior to operation of the machine. Failure to
remove these will result in damage to the machine.


12
INSTALLATION INSTRUCTIONS
If you have an uncontrolled water heating source (eg a wet back or solar heating
system) you should fit a tempering valve. This will ensure the hot water temperature
remains within safe limits.
Contact your registered plumber to select and install the tempering valve.
IMPORTANT!
●This appliance must be installed in accordance with the installation instructions before use.
●Provide accessibility to the plug or incorporate a switch in the fixed wiring in
accordance with the wiring rules to allow disconnection of the appliance from the
supply after installation.
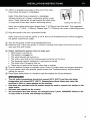
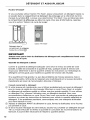
Water supply requirements
Hot and cold water faucets MUST be installed within 42” (107cm) of your washer’s
water inlet. The faucets MUST be 3/4” (1.9cm) garden hose-type so inlet hoses can be
connected. Water pressure MUST be between 10 and 120 pounds per square inch. Your
water department can advise you of your water pressure. The hot water temperature
should be set to deliver water at 120° to 140°F (48°–60°C) to provide proper
Automatic Temperature Control (ATC) performance.


15
INSTALLATION INSTRUCTIONS
IMPORTANT!
●If you are using an extension cord or a portable electrical outlet device (eg multi-
socket outlet box), ensure that it is positioned so that it does not come into contact
with water or moisture. FAILURE TO DO SO MAY RESULT IN DEATH OR ELECTRICAL
SHOCK.
●Do not touch or operate the machine with wet hands or with bare-feet.
●A damaged power cord must be replaced by a Fisher & Paykel trained and supported
service technician, in order to avoid a hazard. The appliance must not be operated
until it is repaired, as there is risk of electric shock.
●Do not operate this machine if it has been damaged during transport. Contact your
Fisher & Paykel dealer or Fisher & Paykel trained and supported service technician.
SPARE PARTS
Contact Customer Care 1.888.936.7872 or go on line to
www.fisherpaykel.com/customercare for spare parts information.
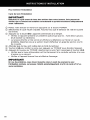
Drain Hose Extension
(Not suitable for attaching to a spigot).
Part No. 425627P
EN


17
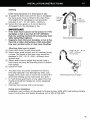
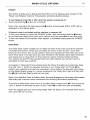
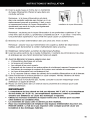
BEFORE YOU DO YOUR FIRST WASH
Before you start, it is a good idea to go through the following checklist:
1 Have the packaging and transit bolts been removed?
2 Is the drain hose threaded through the ‘Ubend’ (with no more than 3/4” (20mm)
extended) and hooked into your standpipe or tub, or attached to a spigot?
3 Is the hot hose connected to the hot valve (color-coded orange, if present)? Is the
cold hose connected to the cold valve (color-coded white)? Have the faucets been
turned on?
4 Is the machine correctly leveled, feet are locked and cabinet corners clear of the floor
and walls?
5 Has the power cord been connected to an appropriate power supply and the power
turned on?
6 Have you performed the installation test cycle?
7 We recommend you complete your first cycle with a half-load amount of detergent
and without a load in order to remove any residues remaining in the machine from the
manufacturing process.
IMPORTANT!
You must ensure all 4transit bolts have been removed from your washer before you
start using it. If the transit bolts are not removed, they will damage your washer and
YOUR LIMITED WARRANTY WILL BE COMPROMISED.
EN

La page est en cours de chargement...
La page est en cours de chargement...
La page est en cours de chargement...
La page est en cours de chargement...
La page est en cours de chargement...
La page est en cours de chargement...
La page est en cours de chargement...
La page est en cours de chargement...
La page est en cours de chargement...
La page est en cours de chargement...
La page est en cours de chargement...
La page est en cours de chargement...
La page est en cours de chargement...
La page est en cours de chargement...
La page est en cours de chargement...
La page est en cours de chargement...
La page est en cours de chargement...
La page est en cours de chargement...
La page est en cours de chargement...
La page est en cours de chargement...
La page est en cours de chargement...
La page est en cours de chargement...
La page est en cours de chargement...
La page est en cours de chargement...
La page est en cours de chargement...
La page est en cours de chargement...
La page est en cours de chargement...
La page est en cours de chargement...
La page est en cours de chargement...
La page est en cours de chargement...
La page est en cours de chargement...
La page est en cours de chargement...
La page est en cours de chargement...
La page est en cours de chargement...
La page est en cours de chargement...
La page est en cours de chargement...
La page est en cours de chargement...
La page est en cours de chargement...
La page est en cours de chargement...
La page est en cours de chargement...
La page est en cours de chargement...
La page est en cours de chargement...
La page est en cours de chargement...
La page est en cours de chargement...
La page est en cours de chargement...
La page est en cours de chargement...
La page est en cours de chargement...
La page est en cours de chargement...
La page est en cours de chargement...
La page est en cours de chargement...
La page est en cours de chargement...
La page est en cours de chargement...
La page est en cours de chargement...
La page est en cours de chargement...
La page est en cours de chargement...
La page est en cours de chargement...
La page est en cours de chargement...
La page est en cours de chargement...
La page est en cours de chargement...
La page est en cours de chargement...
La page est en cours de chargement...
La page est en cours de chargement...
La page est en cours de chargement...
La page est en cours de chargement...
La page est en cours de chargement...
La page est en cours de chargement...
La page est en cours de chargement...
La page est en cours de chargement...
La page est en cours de chargement...
La page est en cours de chargement...
La page est en cours de chargement...
La page est en cours de chargement...
La page est en cours de chargement...
La page est en cours de chargement...
La page est en cours de chargement...
La page est en cours de chargement...
La page est en cours de chargement...
La page est en cours de chargement...
La page est en cours de chargement...
La page est en cours de chargement...
La page est en cours de chargement...
La page est en cours de chargement...
La page est en cours de chargement...
La page est en cours de chargement...
La page est en cours de chargement...
La page est en cours de chargement...
La page est en cours de chargement...
La page est en cours de chargement...
La page est en cours de chargement...
La page est en cours de chargement...
La page est en cours de chargement...
La page est en cours de chargement...
-
 1
1
-
 2
2
-
 3
3
-
 4
4
-
 5
5
-
 6
6
-
 7
7
-
 8
8
-
 9
9
-
 10
10
-
 11
11
-
 12
12
-
 13
13
-
 14
14
-
 15
15
-
 16
16
-
 17
17
-
 18
18
-
 19
19
-
 20
20
-
 21
21
-
 22
22
-
 23
23
-
 24
24
-
 25
25
-
 26
26
-
 27
27
-
 28
28
-
 29
29
-
 30
30
-
 31
31
-
 32
32
-
 33
33
-
 34
34
-
 35
35
-
 36
36
-
 37
37
-
 38
38
-
 39
39
-
 40
40
-
 41
41
-
 42
42
-
 43
43
-
 44
44
-
 45
45
-
 46
46
-
 47
47
-
 48
48
-
 49
49
-
 50
50
-
 51
51
-
 52
52
-
 53
53
-
 54
54
-
 55
55
-
 56
56
-
 57
57
-
 58
58
-
 59
59
-
 60
60
-
 61
61
-
 62
62
-
 63
63
-
 64
64
-
 65
65
-
 66
66
-
 67
67
-
 68
68
-
 69
69
-
 70
70
-
 71
71
-
 72
72
-
 73
73
-
 74
74
-
 75
75
-
 76
76
-
 77
77
-
 78
78
-
 79
79
-
 80
80
-
 81
81
-
 82
82
-
 83
83
-
 84
84
-
 85
85
-
 86
86
-
 87
87
-
 88
88
-
 89
89
-
 90
90
-
 91
91
-
 92
92
-
 93
93
-
 94
94
-
 95
95
-
 96
96
-
 97
97
-
 98
98
-
 99
99
-
 100
100
-
 101
101
-
 102
102
-
 103
103
-
 104
104
-
 105
105
-
 106
106
-
 107
107
-
 108
108
-
 109
109
-
 110
110
-
 111
111
-
 112
112


Fisher & Paykel WH2424F1 Mode d'emploi
- Catégorie
- Machines à laver
- Taper
- Mode d'emploi
- Ce manuel convient également à
dans d''autres langues
- English: Fisher & Paykel WH2424F1 User guide