White-Westinghouse MKR62GWTWB Le manuel du propriétaire
- Catégorie
- Sèche-linge
- Taper
- Le manuel du propriétaire
Ce manuel convient également à

Use & Care
Guide
Dryer
MKR62GWTWB | MKR62FWTWB
XKR72GWTWB | XKR72FWTWB

2
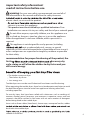
important safety information!
read all instructions before use
:
The clothes come out dryer.
The clothes dry faster.
Less energy use.
warning: for your own safety, we recommend you read all of
the information in this manual and follow the safety measures
electric shock, or misuse of the product.
solvents in or near this appliance.
• This product must be installed by a qualified technician. Poor
installation can cause risks to your safety and that of your material goods.
Do not allow anyone, especially children, use this appliance as a
toy, to climb on, hang on, stand on, play on, in or on the appliance.
When the appliance is used near children, adult supervision is
required.
This appliance is not designed for use by persons (including
erent or reduced physical, sensory, or mental
capacities or those who lack experience or knowledge of how to use it,
unless said persons are supervised or taught by someone responsible
for their safety.
recommendation: for proper functioning of the product, the
lint tr
ter every dry
cycle. doing so will allow the clothes to dry faster and you
will save in energy .
Tumble dryer must not be used if chemicals have been used for cleaning.
Do not dry Items that have been soiled with substances such as cooking oil,
acetone, alcohol, petrol, kerosene, spot removers, turpentine, waxes and wax
removers should be washed in hot water with an extra amount of detergent
before being dried in the tumble dryer.
Items such as foam rubber (latex foam), shower caps, waterproof textiles, rubber
be dried in the tumble dryer.
softener instructions.
When operating the tumble dryer, there has to be adequate ventilation to avoid
the back flow of gases into the room from appliances burning other fuels,
including open fires.

3
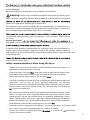
safety recommendations when using the dryer
• Never insert your hands or load or unload clothing when your dryer is in
operation or when the drum is turning.
• Clean the dryer’s lint trap
after each cycle in order for the dryer to per-
form better and avoid lint around the area where the dryer is installed.
Never operate the dryer without the lint trap
• Do not dry clothing or articles that are stained with combustible or explosive
substances (such as wax, oil, paint, gasoline, degreasers, dry cleaning
solvents, kerosene, etc.) applied on cleaning cloths, sackcloth, towels used in
beauty salons, restaurants, barber shops, etc., because they could catch on
or cause an explosion.
• The washing and drying process can reduce the retardant capacity of the
fabrics. To avoid this result, carefully follow the instructions found on the
manufacturer’s tag on the clothing item. For example, padded bras, tennis
shoes, rubber shoes, bath mats, rugs, bibs, rubber underpants for babies,
plastic balls, pillows, etc.) which could melt or burn. Some rubber materials,
when heated, under certain circumstances can cause
ensure that the items are left at a temperature that ensures that the items will
not be damaged.
Remove all objects from pockets such as lighters and matches.
warning: Never stop a tumble dryer before the end of the drying cycle
unless all items are quickly removed and spread out so that the heat is dissipated.
fumes from appliances burning gas or other fuels.
The appliance must not be installed behind a lockable door, a sliding door or a
door with a hinge on the opposite side to that of the tumble dryer, in such a way
that a full opening of the tumble dryer door is restricted.
intentionally not grounded and may present a risk of electric shock during
servicing.
Service personnel -
energized. Outlet thermistor (some models) and outlet thermostat installed in the
A clothes dryer produces combustible lint, the dryer must be connected to an
exhaust duct to the outdoors. Regularly inspect the outdoor exhaust opening
and remove any accumulation of lint around the outdoor exhaust opening and in the
surrounding area.
with the local wiring rules.
• Do not dry articles marked with the phrases “Dry away from heat” or“Do not tumble
dry” such as life jackets, sleeping bags, etc. made with Kapok.
• Do not dry articles or objects that have
as it could rub
onto
other
articles and cause irritation.

4
• To minimize the possibilit y of electric shock during maintenance or cleaning, disco-
nnect the appliance from the power source. note: moving the dial or cycle to the
position does not disconnect the appliance from the power.
• Never try to use this appliance if it is partially disassembled or if it has broken or
missing pieces, including a damaged power cord or plug.
• If you want to soften washed fabrics or reduce their static using an antistatic liquid
for fabric in the wash cycle, follow the manufacturer’s instructions for this kind
of product. These products are the responsibility of their manufacturer and
are not covered by this appliance’s warranty.
safety recommendations when not using your dryer for an extended
period of time
Disconnect the dryer from the power when your dryer will not be used for an extended
period, for instance during vacation or the hot season. To do so, we recommend that
you disconnec t the plug using both hands and never by pulling on the cord.
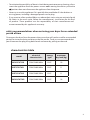
characteristics table
model
electrical
characteristics
energy
type
maximum
dry load (kg)
MKR62FWTWB 220V/240V/60Hz ELEC. 10
XKR72FWTWB 220V/240V/60Hz ELEC. 11
XKR72GWTWB 220V/240V/50Hz ELEC. 11
MKR62GWTWB 220V/240V/50Hz ELEC. 10

5
important: clean the lint filter every time you use the dryer.
a. temperature (Not all of the models have all of these characteristics)
high (cottons) Recommended for heavy cotton items such as jeans or comforters
medium (permanent press garments) Recommended for synthetic fabrics, items
marked with “permanent press”.
delicates In some models. For delicate articles of synthetic fabric and labeled as
tumble dry low.
just air (no heat) To
articles without using heat. Use the timed dry cycle.
The automatic cycles automatically detect the dryness level of the fabrics. Select Less Dry
if you want your garments to remain slightly damp at the end of the dry cycle. Select
More Dry if you want them to feel dryer. The timed cycles run for a specified period of time.
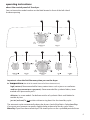
operating instructions
about the control panel of the dryer
You can locate the model number on the label located in front of the left side of
the door opening
B A
C
B E
C
D A

6
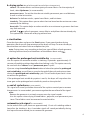
d. option for prolonged anti-wrinkle dry (in some models)
Use this option to minimize wrinkles in clothing. It provides approximately 15
minutes of tumbling without heat after the clothing is dry. This option can only
be used with the “cottons” and “permanent press” cycles.
If you are using the end of cycle alarm knob and select the option for prolonged
anti-wrinkle dry, you will hear a sound at the end of the cycle and various times
during the prolonged anti-wrinkle dry cycle. This will remind you that it is time
to remove the garments.
If the prolonged anti-wrinkle dry option is not lit, the dryer will stop when the
timer gets to the prolonged anti-wrinkle dry mark on the cycle dial.
e. end of cycle alarm (in some models)
This signal will sound just before the end of the cycle to remind you to remove
the garments. In some models, you cannot regulate the sound level of the signal.
note:
· Remove the garments in a timely manner once the signal sounds.
· Use this option when drying knitted fabrics, polyester, and permanent press
items. These fabrics must be removed to avoid wrinkles.
automatic cycle signal
At the end of each cycle, there are approximately 15 min. of tumbling without
heat after the clothing is dry. A reminder signal will sound periodically during
this lapse of time to remind you to remove the garments.
c. start button
Close the dryer door and press the Start button. If you open the door during
operation, the drum will stop rotating and the
dryer will stop. To restart the dryer,
close the door and select Start to complete the cycle.
note: Drying times vary according to load size, type of fabric of each garment,
clothing moisture level, and cleanliness of the exhaust ducts and
b. drying cycles (Not all of the models have all of these characteristics)
cottons For cotton fabrics and the majority of woven fabrics. For the majority of
loads, select Optimum. (in some models).
permanent press For articles that do not wrinkle, permanent press and delicates,
as well as some knit articles.
delicates For delicate articles, special care fabrics, and knit items.
timed dry This option allows you to select the time based on the moisture or water
content of the clothing.
dewrinkle This option helps to reduce wrinkles to a minimum in garments that have
very little moisture.
air fluff To
or refresh garments, woven fabrics and pillows that are already dry
This option adds 10 minutes of drying without heat.
(in some models)

7
loading and using the dryer
Always follow the manufacturer care tag for the fabric when you wash and dry clothing.
advice for sorting and loading clothing
As a general rule, if the clothing is appropriately sorted for the washer, it is
appropriately sorted for the dryer as well. Do not add fabric softener sheets once
the load of clothing has begun to warm. They can cause stains.
Do not overload the dryer. This will waste energy and cause wrinkles. Do not dry
the following articles: Articles made of fiberglass, wool, those covered in rubber,
plastics, with plastic trims or parts, or those filled with foam.
This function is activated only in the automatic cycles (COTTONS, PERMANENT
PRESS and DELICATES).
The Dryness Sensor provides greater accuracy in the drying process than in standard
machines, resulting in shorter dry times and better care of the garments.
While the clothing spins in the drum, it touches the Dryness Sensor.
The sensor stops the heat cycle as soon as the clothing has reached the dryness level;
it will stop regardless of the cycle and/or time selected, thereby saving energy.
ís
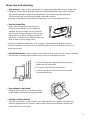
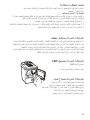
models with sensor dry
models with led lights
The drum light is LED.
It must be replaced by a qualified technician.
models with light bulb
Before replacing the bulb of the rotating drum,
make sure to disconnect the dryer from the power
outlet or to disconnect the dryer from your house’s
power distribution panel, removing the fuse or
breaking the electrical circuit.
Place your hand on the top of the dryer opening from inside the drum.
Remove the bulb and replace it with another of the same size.

8
dryer care and cleaning
the exterior. Clean or dust off splatters or cleaning compounds using a damp cloth.
The dryer control panel and the finishing can be damaged by some stain removers
and grime treatments. Apply these products to the cloth away from the dryer.
The cleaning cloth can then be washed and dried normally.
Damage to your dryer caused by these products is not covered by warranty.
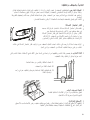
the lint trap filter
Clean the lint trap filter after every use.
Remove it by pulling it in a straight line
upward. Run your fingers across the filter.
You can get a waxy buildup on the lint trap
filter from using fabric softener sheets for
the dryer. To remove this buildup, clean the
filter screen in warm soapy water.
.
Let it dry completely and return it to its place. Do not operate the dryer without
the lint trap filter in its place. Have a qualified technician vacuum the lint from the
dryer once a year.
the exhaust duct. Inspect and clean the exhaust duct at least once a year to prevent
obstruction. A partially obstructed exhaust duct can lengthen dry time.
1. Turn off the power supply, disconnecting the
plug from the wall outlet.
2. Disconnect the duct from the dryer.
3. Vacuum the duct with the vacuum hose and
reconnect the duct.
the exhaust vent hood
Check with a mirror that the interior flaps
of the hood move freely during operation.
stainless steel surfaces
To clean the stainless steel surfaces, use a damp cloth with a gentle, non-abrasive
cleanser appropriate for stainless steel surfaces. Remove the cleaner residue and
then dry with a clean cloth.

9
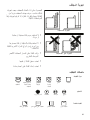
dryer ventilation
For better performance of your
dryer, it must be properly ventilated.
The dryer will waste more energy
and operate for longer amounts of
time if it is not ventilated according
Only use a metallic, rigid, or
Do not use a plastic duct or a
material.
Install the duct along the shortest
possible path to the outside.
Do not smash or fold the duct.
Avoid leaning the duct against
sharp objects.
Incorrect venting
Correct venting
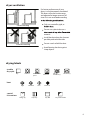
tumble
dry cycle
heat
special
instructions
Normal
Delicates
Dry
High Medium Low No Heat
Permanent
press
Hang dry Drip dry Dry flat Dry in the shade
Do not
tumble dry
Do not dry
drying labels

10
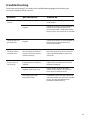
troubleshooting
Save time and money! First review this troubleshooting pages and maybe you
you won’t need to call for service.
problem possible causes what to do
The dryer won’t
turn on
The dryer does not
generate heat
The dryer shakes
or makes noise
Greasy stains on
the clothing
The dryer is disconnected
Blown fuse / circuit breaker
tripped
Blown fuse / circuit breaker
tripped
Some shaking and noise is
normal. The dryer may be
seated unevenly
Inappropiate use of fabric
softener
You are drying dirty articles
together with clean ones
The clothing was not
completely clean
Make sure the dryer plug is completely
in the outlet.
Check the fuse box or circuit breaker of
the house and replace the fuse or
restart the breakers. note: Most of the
electric dryers use two fuses or breakers.
Check the fuse box or circuit breaker of
the house and replace the fuse or
restart the breakers.
Move the dryer to an even surface, or
adjust the leveling feet as necessary
until even
Follow the instructions on the fabric
softener packaging
Only use your dryer to dry clean
articles. Dirty articles can stain your
clean ones or the dryer itself
Sometimes stains that you cannot see
when the clothes a
re wet show up after
drying. Use the appropiate wash
procedures before drying

11
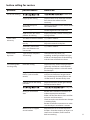
before calling for service
problem possible causes what to do
Lint on the clothing
There’s static
electricity
Inconsistent
dry times
The clothing takes
too long to dry
Inappropiate sorting
Static electricity can
attract lint
Overloading
Paper tissues, etc. in the
pockets of clothing
You didn’t use fabric softener
The clothing came out
too dry
Synthetics, permanent
press and mixtures can
cause static
Type of load, dampness
and venting
Incorrect sorting
Large loads of heavy
fabrics (such as beach
towels)
Controls put in the wrong
positions
Wrong or obstructed
duct
Blown fuses or tripped
circuit breaker
ore each load
Separate items that shed (like chenille)
from those that collect lint (like
corduroy)
See the suggestions in this section under
the subtitle Static
Divide large loads into small ones
Empty all pockets, before washing and
drying clothers
Try a fabric softener
Try a fabric softener
Adjust the controls to dry less
Try a fabric softener
The automatic dry times vary
according to the type of the load, type
of fabrics, the dampness of the clothing
and the state of the exhaust ducts
Separate heavy articles from light ones
(generally a load that is well sorted for
the washing machine is also well sorted
for the dryer)
Large
and heavy fabrics retain more
moisture and require a longer time to
dry. Divide large and heavy fabrics into
smaller loads to shorten the dry time
Adjust the controls to the right settings
for the load to be dried
ore every load
Review the installation instructions to
achieve appropiate ventilation
Make sure that the duct is clean and free
on kinks and obstructions
Check to make sure that the vent damper
is working freely
Review installation instructions to make
sure that dryer’s ventilation is correct
Replace the fuses or restart the circuit
breakers. Since the majority of dryers use
two fuses or breakers, make sure that
both are working.

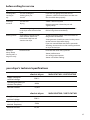
12
Select a shorter dry time
Remove garments when they are still
slightly damp
To avoid shrinking, follow care instructions on
the garment to the letter
Some garments should me ironed so they return
to their correct shape after drying
If you are worried about one item in particular
shrinking, do not wash it in the washing machine
or dry it on the dryer
Clean the filter after every cycle for:
- better performance
- less energy consumption
- better care of the clothing
If you are only going to dry one or two
garments, add a few more items to make sure
that it tumble dries properly
Remove garments when the cycle ends and
fold or hang them immediately
You are loading less
clothing than you
should
You are leaving the garments
in the dryer after the end of the
cycle
You are over
drying
Some fabrics naturally shrink
when washed. Others can
be washed safely but will
shrink in the dryer
Filter full of lint
problem possible causes what to do
Clothing takes
too long to
dry
Clothing is
wrinkled
Clothing shrinks
Clothing is
always damp.
Clothing takes a
long time to dry
Supply voltage or
nominal voltage
Operating frequency or
nominal frequency
Nominal current
electric dryer
220 V~
60 Hz
24 ,0 A
before calling for service
220 V~
50 Hz
24,0 A
your dryer’s technical specifications
electric dryer
Supply voltage or
nominal voltage
Operating frequency or
nominal frequency
Nominal current
MKR62FWTWB / XKR72FWTWB
MKR62GWTWB / XKR72GWTWB


14

15

16

17
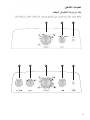
B A
C
B E
C
D A
ﻝﻱﻍﺵﺕﻝﺍ ﺕﺍﻡﻱﻝﻉﺕ
ﻑﻑﺝﻡﻝﺍ ﻱﻑ ﻡﻙﺡﺕﻝﺍ ﺓﺡﻭﻝ ﻥﻉ ﺓﺫﺏﻥ

18
.
10
Start
7

19
.
15
.
.
•
•
15
8

20
•
•
•
10
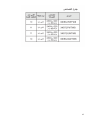
240220
60
SME26N5XNBBT0
11
240220
60
SME47N5XSBBT0
11
240220
60
SME47N8XSBBT0
11
240220
50
MO SME47N8XSBCT0
10
240220
50
MO SME26N5XNBCT0
12
240220
50
MO SME17R8XSBCT0
12
240220
60
SME17R8XSBBT0
12
240220
50
MO SME17R8XSGCT0
12
240220
60
SME17R8XSGBT0
15
ís
LED
.LED
16
La page est en cours de chargement...
La page est en cours de chargement...
La page est en cours de chargement...
La page est en cours de chargement...
La page est en cours de chargement...
La page est en cours de chargement...
La page est en cours de chargement...
La page est en cours de chargement...
La page est en cours de chargement...
La page est en cours de chargement...
La page est en cours de chargement...
La page est en cours de chargement...
La page est en cours de chargement...
La page est en cours de chargement...
-
 1
1
-
 2
2
-
 3
3
-
 4
4
-
 5
5
-
 6
6
-
 7
7
-
 8
8
-
 9
9
-
 10
10
-
 11
11
-
 12
12
-
 13
13
-
 14
14
-
 15
15
-
 16
16
-
 17
17
-
 18
18
-
 19
19
-
 20
20
-
 21
21
-
 22
22
-
 23
23
-
 24
24
-
 25
25
-
 26
26
-
 27
27
-
 28
28
-
 29
29
-
 30
30
-
 31
31
-
 32
32
-
 33
33
-
 34
34


White-Westinghouse MKR62GWTWB Le manuel du propriétaire
- Catégorie
- Sèche-linge
- Taper
- Le manuel du propriétaire
- Ce manuel convient également à