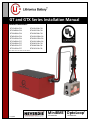
Lithionics Battery GT12V450A-F24 Manuel utilisateur
- Taper
- Manuel utilisateur

MiniBMS
OptoLoop
*Model Numbers
GT12V450A-F24 GTX12V420A-F24
GT12V600A-F24 GTX12V525A-F24
GT24V300A-F24 GTX12V630A-F24
GT48V150A-F24 GTX12V1050A-F41
GT51V150A-F24 GTX12V1155A-F41
GT12V600A-F27 GTX12V1260A-F41
GT24V300A-F27 GTX24V315A-F24
GT48V150A-F27 GTX24V630A-F41
GT51V150A-F27 GTX51V315A-F41
*See Table 1 and 2 for model number details
TECHNOLOGY
GT and GTX Series Installation Manual
R7 – 9/18/2021
®
TECHNOLOGY
®
®

1 GT and GTX Series Installation Manual
Important Safety Guidelines
This guide contains important safety instructions for the GT and GTX Series Battery System that must be followed during
installation procedures. Completely read this manual and become familiar with all system components before
attempting installation. Save this installation manual for future reference.
The following symbols and messages are used to identify potential hazards or to clarify the procedure.
The CAUTION symbol indicates a hazardous situation which, if not avoided, could result in moderate or minor injury.
The DANGER symbol indicates a hazardous situation which, if not avoided, will result in death or serious injury.
Safety Information
1. Before using the Battery System, read all instructions and cautionary markings on the unit, the BMS, and all
appropriate sections of this manual.
2. The information in this manual is intended for qualified personnel. Qualified personnel have training,
knowledge, and experience in:
• Selecting and using Personal Protective Equipment (PPE).
• Installing electrical equipment.
• Applying all applicable local and national installation codes.
• Analyzing and reducing the hazards involved in performing electrical work.
3. Use of accessories not recommended or sold by the manufacturer may result in a risk of fire, electric shock, or
injury to persons.
4. To avoid a risk of fire and electric shock, make sure that existing wiring is in good condition and that wire is not
undersized. Do not operate the battery system with damaged or substandard wiring.
5. Do not operate the battery system if it has been damaged in any way.
6. This unit does not have any user-serviceable parts. Do not disassemble the battery system except where noted
for connecting wiring and cabling. Attempting to service the unit yourself may result in a risk of electrical shock
or fire. Internal cells remain charged after all power is disconnected.
7. To reduce the chance of short-circuits, always use insulated tools when installing or working with this
equipment.
8. Remove personal metal items such as rings, bracelets, necklaces, and watches when working with electrical
equipment.

2 GT and GTX Series Installation Manual
If the system is operated outside of its limits and/or used in combination with non-original components without
authorization, the warranty is void.
Do not expose this unit to direct sunlight, external heat sources or submersion in any liquid. This product is
designed for closed compartment use only. Damage to any part of the battery system caused from direct sunlight,
external heat sources or submersion in any liquid will not be covered by the product warranty.
The Battery Module and BMS is tested to comply with UN DOT 38.3, the testing requirement for Lithium Batteries
per Part III; of the UN Recommendations on the TRANSPORT OF DANGEROUS GOODS (Manual of Tests and Criteria,
Fifth revised edition); [ST/SG/AC.10/11/Rev.5].
This Battery Module contains no mercury and is RoHS Compliant. Please consult your local municipal authority for
proper disposal.
HAZARD OF ELECTROLYTE VAPOR
• The battery module may emit a non-toxic pressurized electrolyte vapor if punctured.
• Electrolyte vapor may cause temporary minor breathing congestion.
• Electrolyte vapor can decrease visibility in closed compartments.
HAZARD OF ELECTRIC SHOCK, EXPLOSION, OR ARC FLASH
• Apply appropriate personal protective equipment (PPE) and follow safe electrical work
practices.
• Always turn OFF all equipment connected to the system in addition to turning OFF the
power switch provided on the system to isolate the batteries from other electrical
circuits, before performing any repairs or maintenance on the system.
• Do not operate the system if it has received a sharp blow, been dropped, has cracks or
openings in the enclosure.
• Do not disassemble any part of the system. Internal cells remain charged after all power
is disconnected.
• Do not operate the system with damaged or substandard wiring.
• Always use proper wire sizes to connect the system to inverters, chargers or other
equipment.
• Voltage is present at the connector and output terminals. Always ensure that the BMS
output terminals have the insulated protective boots in place.
• Always use crimped connections to connect to the output terminals.
• Always use a properly rated voltage sensing device to confirm all circuits are de-
energized.
HAZARD OF HEAVY EQUIPMENT
• Use two people to lift and mount the battery module.
• Always use proper lifting techniques during installation to prevent injury.
• Do not lift the battery module by its power or signal wires as they will become
damaged.

3 GT and GTX Series Installation Manual
Consignes de Sécurité Importantes
Ce guide contient des instructions de sécurité importantes pour le système de batterie des séries GT et GTX qui doivent
être suivies lors des procédures d'installation. Lisez entièrement ce manuel et familiarisez-vous avec tous les
composants du système avant de tenter l'installation. Conservez ce manuel d'installation pour référence future.
Les symboles et messages suivants sont utilisés pour identifier les dangers potentiels ou pour clarifier la
procédure.
Le mot ATTENTION indique une situation potentiellement dangereuse, laquelle, si elle n'est pas évitée, pourrait entraîner
des blessures mineures ou modérées.
Le mot DANGER indique une situation dangereuse imminente, laquelle, si elle n'est pas évitée, entraînera de graves
blessures, voire la mort.
Information sur la Sécurité
1. Avant d'utiliser le système de batterie, lisez toutes les instructions et les avertissements sur l'unité, le BMS et
toutes les sections appropriées de ce manuel.
2. Les informations contenues dans ce manuel sont destinées au personnel qualifié. Le personnel qualifié possède
une formation, des connaissances et une expérience en:
• Sélection et utilisation des équipements de protection individuelle (EPI).
• Installation d’équipements électriques.
• Appliquer tous les codes d'installation locaux et nationaux applicables.
• Analyser et réduire les risques liés à l'exécution des travaux électriques.
3. L'utilisation d'accessoires non recommandés ou vendus par le fabricant peut entraîner un risque d'incendie, de
choc électrique ou de blessures corporelles..
4. Pour éviter tout risque d'incendie et d'électrocution, assurez-vous que le câblage existant est en bon état et
que le fil n'est pas sous-dimensionné. Ne pas faire fonctionner le système de batterie avec un câblage
endommagé ou de qualité inférieure.
5. N'utilisez pas le système de batterie s'il a été endommagé de quelque manière que ce soit.
6. Cet appareil ne contient aucune pièce réparable par l'utilisateur. Ne démontez pas le système de batterie, sauf
indication contraire pour le câblage et le câblage. Tenter de réparer l'appareil vous-même peut entraîner un
risque d'électrocution ou d'incendie. Les cellules internes restent chargées une fois que toute l'alimentation est
coupée.
7. Pour réduire les risques de courts-circuits, utilisez toujours des outils isolés lors de l'installation ou de
l'utilisation de cet équipement.
8. Retirez les objets métalliques personnels tels que bagues, bracelets, colliers et montres lorsque vous travaillez
avec des équipements électriques.

4 GT and GTX Series Installation Manual
Si le système est utilisé en dehors de ses limites et / ou utilisé en combinaison avec des composants non originaux sans
autorisation, la garantie est nulle.
N'exposez pas cet appareil à la lumière directe du soleil, à des sources de chaleur externes ou à une immersion dans un
liquide. Ce produit est conçu pour une utilisation à compartiment fermé uniquement. Les dommages à toute partie du
système de batterie causés par la lumière directe du soleil, des sources de chaleur externes ou une submersion dans un
liquide ne seront pas couverts par la garantie du produit.
Le module de batterie et le BMS sont testés pour se conformer à UN DOT 38.3, l'exigence de test pour les batteries au
lithium selon la partie III; des Recommandations des Nations Unies sur le TRANSPORT DES MARCHANDISES DANGEREUSES
(Manuel d'épreuves et de critères, cinquième édition révisée); [ST/SG/AC.10/11/Rev.5].
Ce module de batterie ne contient pas de mercure et est conforme RoHS. Veuillez consulter les autorités municipales locales
pour une élimination appropriée.
RISQUE DE VAPEUR D'ÉLECTROLYTE
• Le module de batterie peut émettre une vapeur d'électrolyte sous pression non toxique s'il
est perforé.
• Les vapeurs d'électrolyte peuvent causer une congestion respiratoire mineure temporaire.
• La vapeur d'électrolyte peut diminuer la visibilité dans les compartiments fermés.
RISQUE DE CHOC ÉLECTRIQUE, D'EXPLOSION OU D'ARC ÉLECTRIQUE
• Appliquer un équipement de protection individuelle (EPI) approprié et suivre des pratiques de
travail électrique sûres.
• Éteignez toujours tous les équipements connectés au système en plus de désactiver
l'interrupteur d'alimentation fourni sur le système pour isoler les batteries des autres circuits
électriques, avant d'effectuer toute réparation ou maintenance sur le système.
• N'utilisez pas le système s'il a reçu un coup violent, s'il est tombé, s'il présente des fissures ou
des ouvertures dans le boîtier.
• Ne démontez aucune pièce du système. Les cellules internes restent chargées une fois que
toute l'alimentation est déconnectée.
• N'utilisez pas le système avec un câblage endommagé ou de qualité inférieure.
• Utilisez toujours des câbles de taille appropriée pour connecter le système aux onduleurs,
chargeurs ou autres équipements.
• Une tension est présente au niveau du connecteur et des bornes de sortie. Assurez-vous
toujours que les bornes de sortie BMS ont les bottes de protection isolées en place.
• Utilisez toujours des connexions serties pour vous connecter aux bornes de sortie.
• Utilisez toujours un dispositif de détection de tension correctement évalué pour confirmer
que tous les circuits sont hors tension.
RISQUE D'ÉQUIPEMENT LOURD
• Utilisez deux personnes pour soulever et monter le module de batterie.
• Utilisez toujours des techniques de levage appropriées lors de l'installation pour éviter les
blessures.
• Ne soulevez pas le module de batterie par ses fils d'alimentation ou de signal car ils seront
endommagés.

5 GT and GTX Series Installation Manual
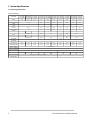
1. System Specifications
1.1 Operating Specifications
Table 1 GT Series
System Model:
GT12V-450A-
F24-CTRL300
External BMS
GT12V-525A-
F24-CTRL300
External BMS
GT12V-600A-
F24-CTRL300
External BMS
GT24V-300A-
F24-CTRL300
External BMS
GT48V-150A-
F24-CTRL300
External BMS
GT51V-150A-
F24-CTRL300
External BMS
GT12V-600A-
F27-CTRL300
Internal BMS
GT24V-300A-
F27-CTRL300
Internal BMS
GT48V-150A-
F27-CTRL300
Internal BMS
GT51V-150A-
F27-CTRL300
Internal BMS
Capacity 450Ah 525Ah 600Ah 300Ah 150Ah 150Ah 600Ah 300Ah 150Ah 150Ah
Nominal Voltage 25.6V 48.0V 51.2V 12.8V 25.6V 48.0V 51.2V
Recommended Charging
Voltage
28.8V 54.0V 57.6V 14.4V 28.8V 54.0V 57.6V
Maximum Charging
Voltage 29.2V 54.75V 58.4V 14.6V 29.2V 54.75V 58.4V
Overcharge Voltage
Protection
29.6V 55.5V 59.2V 14.8V 29.6V 55.5V 59.2V
Over-discharge Voltage
Protection
23.2V 43.5V 46.4V 11.6V 23.2V 43.5V 46.4V
Standard Charging Current 150A (C/3) 200A (C/3) 200A (C/3) 100A (C/3) 200A (C/3) 100A (C/3)
Maximum Charging
Current 288A
300A (BMS
Limit)
288A
End of Charging Current 15A (C/30) 20A (C/30) 20A (C/30) 10A (C/30) 20A (C/30) 10A (C/30)
Standard Discharging
Current/Load
288A
300A (BMS
Limit)
288A
Maximum Discharge
Current/Load
System Impedance at BMS
Power Terminals
2.03mΩ 1.77mΩ 2.11mΩ 1.92mΩ 5.39mΩ 5.11mΩ 2.11mΩ 1.92mΩ 5.39mΩ 5.11mΩ
Ibf Bolted Fault Current at
Nominal Voltage (N4)
6,305A 7,232A 6,066A 13,333A 8,905A 10,020A 6,066A 13,333A 8,905A 10,020A
Maximum Charging
Temperature Range (N1)
Maximum Discharging
Temperature Range (N1)
Module Dimensions
Module Weight (N2) 128lb (58.0kg) 150 (68.2kg) 160lb (72.5kg) 160lb (72.5kg) 152lb (68.9kg) 160lb (72.5kg) 178lb (80.7kg) 178lb (80.7kg) 170lb (77.1kg) 178lb (80.7kg)
BMS Case Dimensions (N3)
BMS Weight (N2)
300A (BMS Limit)
32 to 113°F (0 to 45°C)
12.8V
14.4V
14.6V
14.8V
300A (BMS Limit)
11.6V
50A (C/3)
50A (C/3)
144A
144A
5A (C/30)
5A (C/30)
300A (BMS Limit)
144A
144A
-4 to 131°F (-20 to 55°C)
7.7lb (3.5kg)
N/A
N/A
11.25" x 6.96" x 4.1" (286 x 177 x 104mm)
27.0" x 16.0" x 11.1" (686 x 406 x 282mm)
24.0" x 13.0" x 11.1" (610 x 330 x 282mm)

6 GT and GTX Series Installation Manual
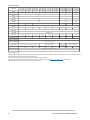
Table 2 GTX Series
System Model:
GTX12V420A-
F24-CTRL300
External BMS
GTX12V525A-
F24-CTRL300
External BMS
GTX12V630A-
F24-CTRL300
External BMS
GTX12V1050A-
F41-CTRL300
External BMS
GTX12V1155A-
F41-CTRL300
External BMS
GTX12V1260A-
F41-CTRL300
External BMS
GTX24V315A-
F24-CTRL300
External BMS
GTX24V630A-
F41-CTRL300
External BMS
GTX51V315A-
F41-CTRL300
External BMS
Capacity 420Ah 525Ah 630Ah 1,050Ah 1,155Ah 1,260Ah 315Ah 630Ah 315Ah
Nominal Voltage 51.2V
Recommended Charging
Voltage
57.6V
Maximum Charging
Voltage 58.4V
Overcharge Voltage
Protection
59.2V
Over-discharge Voltage
Protection:
46.4V
Standard Charging Current 210A (C/2) 262.5A (C/2) 157.5A (C/2) 300A (BMS Limit) 157.5A (C/2)
Maximum Charging
Current
End of Charging Current 21.0A (C/20) 26.25A (C/20) 31.5A (C/20) 52.5A (C/20) 57.75A (C/20) 63A (C/20) 15.75A (C/20) 31.5A (C/20) 15.75A (C/20)
Standard Discharging
Current/Load
Maximum Discharge
Current/Load
System Impedance at BMS
Power Terminals
2.83mΩ 2.77mΩ 2.31mΩ 3.94mΩ 3.57mΩ 3.28mΩ 2.83mΩ 3.91mΩ 5.66mΩ
Ibf Bolted Fault Current at
Nominal Voltage (N4)
3,689A 4,621A 5,541A 3,249A 3,585A 3,902A 9,046A 6,547A 9,046A
Maximum Charging
Temperature Range (N1)
Maximum Discharging
Temperature Range (N1)
Module Dimensions
24.0" x 13.0" x
11.1" (610 x 330
x 282mm)
Module Weight (N2) 134lb (60.8kg) 139lb (63.0kg) 144lb (65.3kg) 275lb (124.7kg) 285lb (129.3kg) 295lb (133.8kg) 144lb (65.3kg) 302lb (137.0kg) 302lb (1370.kg)
BMS Case Dimensions (N3)
BMS Weight (N2)
41.0" x 13.38" x 12.85"
(1041 x 340 x 326mm)
24.0" x 13.0" x 11.1" (610 x 330 x 282mm)
41.0" x 13.38" x 12.85"
(1041 x 340 x 326mm)
300A (BMS Limit)
300A (BMS Limit)
7.7lb (3.5kg)
12.8V
14.4V
14.8V
25.6V
11.6V
28.8V
29.6V
23.2V
14.6V
29.2V
11.25" x 6.96" x 4.1" (286 x 177 x 104mm)
300A (BMS Limit)
300A (BMS Limit)
32 to 131°F (0 to 55℃)
-4 to 131°F (-20 to 55℃)
Notes for Table 1 and 2:
(N1) Maximum charging and discharging rates apply depending upon the ambient temperature and duty cycle of the system. UL1973 tests of maximum
charge and discharge current were performed at 25°C/77°F.
(N2) Does not include 4/0 power cable’s weight as its length varies per application.
(N3) Does not include 4/0 power cable, main power connector, or terminals. Please see www.lithionicsbattery.com for dimensions.
(N4) "Bolted Fault Current" per NFPA-70E. See section 1.2 for details.

7 GT and GTX Series Installation Manual
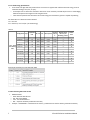
1.2 Arc Flash Energy Specifications
• An arc flash is the light and heat produced from an electric arc supplied with sufficient electrical energy to cause
substantial damage, harm, fire, or injury.
o An example of an arc flash event could be a direct short circuit caused by a metallic object such as a tool bridging
between the positive and negative of an energized circuit.
o Table 3 below quantifies the hazard level of arc flash energy that each battery system is capable of producing.
Per NFPA 70E D.5.1 "Maximum Power Method"
Iarc = 0.5 x Ibf
IEm = 0.01*Vsys* Iarc*Tarc/D2 (Arc Flash Energy)
Table 3
GT12V450 12.8 2.03 6305 3153 0.014 0.041 2 0
GT12V525 12.8 1.77 7232 3616 0.016 0.047 2 0
GT12V600 12.8 2.11 6066 3033 0.013 0.039 2 0
GT24V300 25.6 1.92 13333 6667 0.058 0.173 4 0
GT48V150 48 5.39 8905 4453 0.072 0.217 4 0
GT51V150 51.2 5.11 10020 5010 0.087 0.260 4 0
GTX12V420 12.8 3.47 3689 1844 0.008 0.024 1 0
GTX12V525 12.8 2.77 4621 2310 0.010 0.030 1 0
GTX12V630 12.8 2.31 5541 2771 0.012 0.036 2 0
GTX12V1050 12.8 3.94 3249 1624 0.007 0.021 1 0
GTX12V1155 12.8 3.57 3585 1793 0.008 0.023 1 0
GTX12V1260 12.8 3.28 3902 1951 0.008 0.025 1 0
GTX24V315 25.6 2.83 9046 4523 0.039 0.117 3 0
GTX24V630 25.6 3.91 6547 3274 0.028 0.085 3 0
GTX51V315 51.2 5.66 9046 4523 0.078 0.235 4 0
Tarc= 70mS
fuse clearing
time
Hazard
level
Distance where
IEm=1.2 (Arc
Boundary), inches.
3x IEm
cal/cm^
2
IEm cal/cm^2
Iarc
Ibf, calc.
Impedance
mΩ
Vsys
Configuration
Hazard/risk classification as per NFPA 70E-2000
1.3 Manufacturing Date Code Format
• MMDDYYYY001
o MM: Month of Manufacture
o DD: Day of that Month
o YYYY: Year of Manufacture
o 001: Sequence of Battery Produced on That Day
• Example: 01012020001 = manufactured on January 1, 2020 and it was the first battery produced on that day.

8 GT and GTX Series Installation Manual
2. System Installation
2.1 Short Circuit Protection
• The battery system must be protected by a DC fuse. The models listed in this document were evaluated and tested
by Underwriter Laboratories with external fuses as noted. UL Listed Class J or Class T Fuse, rated 350A (450A for GTX
Series). The fuse is to be provided downstream of the BMS before the load or supply in all cases. The fuse should be
used with a UL Listed fuse holder. The use of any other fuse or non-fuse voids the UL Listing of the models.
• Examples of approved:
o Fuse: Littelfuse JLLN-350 or Eaton DFJ-300
o Fuse holder: Littelfuse LFT30400 or Eaton JM60400-1CR-1
o Fuse placement must be directly after the positive power terminal on the BMS. (Fuse placement may be controlled
by other industry standards such as ABYC or RVIA.)
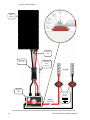
2.2 Disconnect Device Protection (only applies to GT51V150A and GTX51V315A systems)
• Per UL1973 Revision 2 Section 7.8.1.4, the GT51V150A and GTX51V315A systems must have 2 additional disconnect
devices, one located on the positive pole and one on the negative pole.
o The disconnect devices shall not require the use of special tools or equipment to be operated.
o Recommended disconnect device: Gigavac HBD41 Hermetic Battery Disconnect.
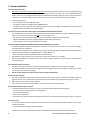
o Please see Figure 1 for the disconnect devices placement.
2.3 Battery Module and NeverDie BMS Unit Environment and Mounting orientation
• The Battery Module and BMS Unit should be mounted in an environment that does not receive direct sunlight,
pressurized water or road debris.
• To avoid power interruption, your installation may need to consider controlling the ambient operating temperature.
• Mount the Battery Module in an upright position, i.e. black lid faces up.
o Other orientations are NOT permitted and will void the warranty.
• The BMS Unit can be mounted in any orientation as long as all its features are accessible.
• Ensure that the BMS Unit is located in close proximity to the Battery Module so that all connectors can be mated in
the following steps.
2.4 Temperature Sensor Connector
• The temperature sensor cable and connector exiting the battery module must be connected to the BMS.
• Connect the two M8 circular connectors together by first aligning their pins and pressing them together, then rotate
the securing nuts until they stop snugly.
• Do not use the temperature probe from the inverter-charger manufacturer.
2.5 Main Power Connector
• The battery module has a large black female main power connector that must be inserted into the BMS’ male main
power connector. This is the connector with the large 4/0 red and black wires and single small gauge gray cable.
• Align the connectors and insert them together.
• Use 2 zip ties to bind the connectors together so that they may not separate during use.
2.6 NeverDie BMS Unit Power Terminals
• Connect the BMS Unit Power Terminals to your DC bus, both Positive (Red) and negative (Black).
o Use correctly sized wire conductors for the application.
o Torque to 80 INCH pounds
o Never stack ring terminals.
o Never place the stainless-steel washer between the Power Terminal and ring terminal lug (see Figure 1 on Page 7).
2.7 Pressure Vent
• It is recommended to install a ventilation hose onto the pressure vent barb when the Battery Module is in a location
with poor ventilation.
o The hose shall direct the gases to the atmosphere.

9 GT and GTX Series Installation Manual
2.8 BMS Unit I/O Connector
• Some systems have a rectangular I/O connector to extend the BMS Unit features remotely such as remote
Power/Reset switch, LED indicator, or serial datalogging. Be sure to connect the I/O connector if so equipped.
2.9 Initial Charge Cycle
• Initially the system must be FULLY charged once to calibrate the BMS Unit to the Battery Module. Please read and
follow the next section to perform this.

10 GT and GTX Series Installation Manual
3. System Operation
3.1 Powering the System On
• Short-press the Power switch for 1 second.
o The switch will illuminate once power is enabled.
o You may notice an audible “thunk” noise of the internal contactor switching on.
o Check that there is voltage at the Power Terminals with a voltmeter.
3.2 Powering the System Off
• Long-press the Power switch for 3 seconds.
o The switch will cease to illuminate once power is disabled.
o You may notice an audible “thunk” noise of the internal contactor switching off.
o Check that there is 0V at the output terminals with a voltmeter.
3.3 Charging
• The charging device(s) connected to the Lithium Battery System must be programmed as per Table 1.
• Charging may be performed at any time the system is powered On.
o NOTE – The Lithium Battery System will disconnect power if the voltage, amperage, or temperature limits are
exceeded during charging.
o Only use a Lithionics Battery approved charging source. Please contact Lithionics Battery for charger approval.
3.4 Initial Charging Cycle
• The initial charging cycle is required as it calibrates the NeverDie BMS to the Battery Module for accurate State of
Charge percentage (SoC) monitoring.
• During the initial charging cycle, the system must reach a voltage level that is equal to the Standard Full Charging
Voltage indicated in Table 1.
• Enable the charging device(s) so that they may complete a charge cycle. It is recommended to not have any discharge
loads active during the initial charging cycle, especially towards the end of charging.
3.5 Discharging
• Discharging may be performed at any time the system is powered On.
o NOTE - The Lithium Battery System will disconnect power if the voltage, amperage, or temperature limits are
exceeded during discharging.
• The NeverDie feature allows the system to have a “reserve” amount of energy left in the battery. Once the system is
discharged to 12.0V or 10% State of Charge (SoC), whichever comes first, power will be disabled to leave a “reserve”
amount of energy still left in the battery.
• To enable the remaining reserve energy of the system, short-press the Power switch for 1 second.
o NOTE - Once the reserve range is enabled the battery should be charged as soon as possible.
o WARNING - If the reserve energy is used and the battery module is left in a deeply discharged state without
immediate charging, the battery module will become permanently damaged.

11 GT and GTX Series Installation Manual
3.6 System Storage Procedure
• Storing your battery at the correct specifications is important as it keeps the battery in the healthiest state possible
for the fastest deployment when needed.
• If the Lithium Battery System will not be in use for greater than 2 weeks, it is recommended to enable system storage.
• Storage mode is simply a fully charged system in the Powered Off state.
• To enable System Storage:
o Perform a full charge cycle, ensure that the System voltage reaches the Standard Full Charging Voltage indicated in
Table 1.
o Power off the System, long-press the Power switch for 3 seconds. Check that the switch is no longer illuminated.
Check that there is 0V at the Power Terminals with a voltmeter.
Table 3
Storage
Temperature &
Humidity Range
< 1 Month
-4~95°F (-20~35°C), 45~75%RH
< 3 Months
14~86°F (-10~30°C), 45~75%RH
Long Term Storage
If the battery needs to be stored for > 3 months the voltage should be 13.2V for
a 12V battery (or 3.3V x number of cells in series) (~50%SOC) and stored at the
recommended storage specifications shown above. Additionally, the battery
needs at least one charge-discharge-recharge to 50% SOC cycle every six
months.
Self-discharge rate
≤3% per month
Storage conditions < 3 months:
1. Fully charge the battery.
2. Turn the battery OFF by the Power/Reset switch.
3. Store the battery in an environment according to the specifications shown above.
Storage conditions > 3 months:
1. Reduce the battery SOC to 3.3V/cell which is 50% ±10% SOC.
NOTE - See table 4 below for voltage calculation.
2. Turn the battery OFF via the Power/Reset switch.
3. Store the battery in an environment according to the specifications shown in table 3 above.
4. Every 6 months charge the battery to 100% SOC, then discharge the battery to LVC, then charge it to 50% ±10%
SOC.
Table 4
Battery
Voltage
Number of
Cells
~50% SOC
Voltage
12V
4
13.2
24V
8
26.4
48V
15
49.5
51V
16
52.8
NOTE – For further system installation and operation please refer to the Advanced Series User Guide available at:
http://www.lithionicsbattery.com/user-guides/

12 GT and GTX Series Installation Manual
Figure 1: System Example
NeverDie
BMS
Main Power
Connectors
Temperature
Sensor
Connectors
Battery
Module
Pressure
Vent
300A Fast
Acting Fuse
Disconnect
Devices
(See section 2.2 -
Only applies to
GT51V150A and
GTX51V315A
system)
-
 1
1
-
 2
2
-
 3
3
-
 4
4
-
 5
5
-
 6
6
-
 7
7
-
 8
8
-
 9
9
-
 10
10
-
 11
11
-
 12
12
-
 13
13


Lithionics Battery GT12V450A-F24 Manuel utilisateur
- Taper
- Manuel utilisateur
dans d''autres langues
Documents connexes

Autres documents
-
Victron energy BlueSolar PWM Charge Controller - LCD - USB 12V 24V 30A 48V 10A 20A 30A Le manuel du propriétaire
-
Victron energy BlueSolar PWM Charge Controller - LCD - USB 12V 24V 30A 48V 10A 20A 30A Le manuel du propriétaire
-
-
-
-
EcoFlow 5KWh LFP Battery Manuel utilisateur
-
 Go Power! Overlander Manuel utilisateur
