Kalia BF1486-110 Guide d'installation
- Catégorie
- Articles sanitaires
- Taper
- Guide d'installation
Ce manuel convient également à

Instructions d’installation - Garantie
Installation Instructions - Warranty
www.KaliaStyle.com
Conserver ce guide après l’installation car il contient des informations utiles pour le service et la garantie.
Keep these instructions after you have nished the installation, it contains useful information regarding service and warranty.
Numéro de série / Serial number
103623_RevB
BF1486
RUSTIKMC/TM
Robinet 4 morceaux pour baignoire
4-Piece Deckmount Tub Filler
01/22

2
103623_RevB
Merci d’avoir choisi un produit Kalia et de faire conance à
notre entreprise.
Kalia a une philosophie d’aaires basée sur des valeurs
fondamentales dont l’innovation et l’excellence ainsi qu’un
service personnalisé adapté aux exigences d’aujourd’hui et de
demain. Nous sommes convaincus que ce produit saura vous
plaire et surpassera vos exigences en termes de abilité et
durabilité. Nous sommes là pour vous!
Dans ce guide vous trouverez toute l’information nécessaire à
l’installation et au bon fonctionnement de votre produit Kalia.
Dans le but d’assurer une installation et une utilisation
optimales veuillez prendre quelques minutes pour étudier
ce guide.
En cas de problème d’installation ou de performance, veuillez
communiquer avec nous au numéro sans frais 1 877 GO KALIA
(1-877-465-2542) ou par courriel au [email protected].
Nous vous remercions encore une fois d’avoir choisi un
produit Kalia.
Merci d’avoir choisi Kalia!
Thank you for choosing a Kalia product and for placing your
trust in our company.
Kalia has a business philosophy based on solid core values
that are focused on providing innovation and excellence as
well as a personalized service designed to meet the changing
needs of today and tomorrow.
We are convinced that you will be fully satised with your
new Kalia product and that it will exceed your expectations
in terms of reliability and durability. At Kalia, we put our
expertise to work for you!
This guide contains all the information necessary for the
installation and proper use of your Kalia product. To ensure
the smooth installation and optimal use of your product, we
recommend to take a few moments to study the information
provided in this guide.
In the event that you should encounter a problem related to the
installation or the performance of this product, please contact
us at our toll-free line 1 877 GO KALIA (1-877-465-2542) or
by email at: [email protected].
Thank you once again for choosing Kalia.
Thank you for choosing Kalia!

3
103623_RevB
Renseignements importants
IMPORTANT
- Lire attentivement le présent guide avant l’installation.
- Assurez-vous d’avoir tous les outils et matériaux nécessaires
à l’installation.
- Avant l’installation, déballer le robinet et vérier que toutes
les pièces sont incluses et qu’elles sont en bon état (voir
schéma des pièces de rechange). Si un problème survient,
le signaler immédiatement au vendeur.
- Respecter tous les codes de plomberie et de bâtiment locaux.
ATTENTION
- Faire très attention lors de la connexion de tous les tuyaux
an d’éviter les noeuds, vous risqueriez de limiter le débit
d’eau et d’endommager le robinet.
REMARQUE:
- Cette installation nécessite des raccords d’alimentation de
1/2” (12.7mm).
- Avant de déballer le robinet, couvrir le drain du bain an
d’éviter de perdre des pièces.
- Vérier si les tubes d’arrivée d’eau et d’évacuation sont
endommagés. Remplacer si nécessaire.
- Lors de nouvelles installations, avant d’installer le robinet,
s’assurer d’avoir susamment d’espace de dégagement
pour une utilisation adéquate de la manette du robinet.
- Lors d’un remplacement de robinet, couper les alimentations
d’eau. Après avoir coupé l’alimentation d’eau, ouvrir le
robinet pour libérer la pression d’eau.
Kalia se réserve le droit d’apporter toute modication au
design du produit et ceci sans préavis. Utiliser le manuel
d’installation fourni dans l’emballage.
Kalia n’est pas responsable des problèmes causés par une
installation non conforme aux directives énoncées dans le
présent guide.
Bonne installation!
Important Information
IMPORTANT
- Read this guide before proceeding with the installation.
- Make sure you have all the tools and materials needed for
installation.
- Before installing, take the faucet out of the packaging and
make sure all the parts are included and that they are in
good shape (see the service parts diagram). If there is a
problem, report it immediately to the seller.
- Respect all local plumbing and building codes.
WARNING
- When connecting all the pipes, pay close attention so there
are no knots, this could limit water ow or maybe damage
the faucet.
COMMENT:
- The installation will require 1/2” (12.7 mm) connectors.
- Before taking the faucet out of the packaging, cover the
drain of the bath so any parts will be lost.
- Check to make sure the water intake and drainage pipes are
in good shape. Replace if necessary.
- For new constructions, before installing the faucet, make
sure there is sucient clearance to properly use the handle
of the faucet.
- When replacing a faucet, turn o the water. After turning o
the water, turn the faucet on to release the water pressure.
Kalia reserves the right to make any changes to the design of
the product, without notice. Use the installation instruction
supplied with the product.
Kalia is not responsible for problems caused by an installation
not executed in accordance with the directions given in this
installation guide.
Good installation!

4
103623_RevB
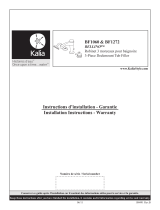
Schéma des pièces de rechange Service Parts Diagram
RUSTIKMC/TM BF1486
1
2
3
6
7
9
10
13
14
15
16
17
18
19
20
4
11
55
12
8
1
2
3
6
7
9
10
13
4
54
55
12
8
46
21
13
14
15
24
25
26
27
28
29
31
30
32
33
35
34
40
22
23
13
14
15
14
15
16
17
18
19
20
16
17
18
52
51
50
49
47
48
34
19
36
53
34
30
38
37
41
42
44
45
43
5
5
39
34

5
103623_RevB
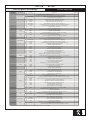
Liste des pièces de rechange Service Parts List
RUSTIKMC/TM BF1486
Assemblage /
Assembly
Sous-Assemblage /
Sub-Assembly
#Numéro de pièce /
Part Number
Description Qté / Qty
2
1
1
103626-XXX *
Capuchon de finition de la manette / Decorative handle cap
1
2
103627
Joint torique D11xD2 / O-ring D11xD2
1
-
3
103733
Vis pour manette M4x32 / Screw for handle M4x32
1
-
4
103656-XXX *
Manette 70mm (2 3/4'') / Handle 70mm (2 3/4'')
1
-
5
103657
Anneau de couleur gris / Gray color ring
1
-
6
103658-XXX *
Anneau de finition octogonal / Decorative octogonal ring
1
-
7
103734-XXX *
Corps décoratif en forme de cloche D48 / Decorative bell shaped body D48
1
-
-
8
103735
Tige de connexion pour cartouche / Connecting rod for cartridge
2
-
-
9
103736
Noyeau interne / Internal core
2
-
-
10
103661
Écrou de verrouillage / Locking nut
2
-1
-
11
103664
Cartouche chaud / Hot cartridge
1
-
55
103666
Joint torique D22xD2 du cartouche / Cartridge o-ring D22xD2
1
-1
-
54
103665
Cartouche froid / Cold cartridge
1
-
55
103666
Joint torique D22xD2 du cartouche / Cartridge o-ring D22xD2
1
-
-
12
103737
Anneau de montage / Mounting sleeve
2
-4
-
13
103738-XXX *
Garniture décorative filetée / Decorative threaded flange
1
-
14
103739-XXX *
Base de robinet et de poignées / Faucet and handle base
1
-
15
103740
Joint d'étanchéité à la base du robinet D55.5 / Spout base gasket D55.5
1
-
-
16
103669
Rondelle de caoutchouc / Rubber washer
3
-
-
17
103670
Rondelle de métal / Metal washer
3
-
-
18
103671
Écrou de montage M26 / Mounting nut M26
3
-
-
19
103672
Vis de serrage / Tightening screw
6
-
-
20
103673
Base de la cartouche / Cartridge base
2
-
-
21
103741-XXX *
Bec du robinet BF1486 / Faucet spout BF 1486
1
-
-
22
103639
Aérateur ajustable / Adjustable aerator
1
-
-
23
103647
Clé de serrage pour aérateur / Tightening key for aerator
1
-1
-
24
103742
Joint torique D32xD2.4 du corps de déviateur / Diverter body o-ring D32xD2.4
1
-
25
103743
Corps du déviateur / Diverter body
1
-
-
26
103744
Rondelle de caoutchouc / Rubber washer
1
-
-
27
103745
Rondelle de métal / Metal washer
1
-
-
28
103746
Écrou de montage M29 / Mounting nut M29
1
-
-
29
103747
Vis de serrage / Tightening screw
2
-1
-
30
103748
Joint torique D21.2xD2.4 / O-ring D21.2xD2.4
2
-
31
103749
Raccord en T / T connector
1
-
-
32
103750
Petit anneau de brass / Small brass ring
1
-
-
33
103751
Écrou de serrage / Tightening Nut
1
-1
-
34
101352
Joint de caoutchouc / Rubber gasket
1
-
35
103752
boyau flexible tressé / Flexible mesh hose
1
-
36
103753
Joint de caoutchouc / Rubber gasket
1
-1
-
37
103719-XXX *
Capuchon décoratif de tirette / Decorative pull rod cap
1
-
38
103755-XXX *
Anneau octogonal décoratif du déviateur / Octogonal decorative ring of diverter
1
-
39
103700
Joint de silicone pour tige décorative du déviateur / Silicone joint for decorative diverter rod
1
-
40
103676
Joint torique D13.2xD2.4 / O-ring D13.2xD2.4
1
-
41
103756
Tube interne du déviateur / Internal tube of diverter
1
-
42
103757
Joint à la base du déviateur / Diverter bottom joint
1
-
43
103758
Joint torique D12xD2 / O-ring D12xD2
1
-
44
103759
Ressort du déviateur / Diverter spring
1
-
45
103760-XXX *
Tirette du déviateur / Diverter pull-up rod
1
-
46
103761
Joint torique du déviateur D8xD3 / O-ring of diverter D8xD3
1
-1
-
47
-
Douchette / Hand shower
1
-
48
104191
Valve anti-retour restricteur de débit / Flow restrictor check valve
1
-1
-
34
101352
Joint de caoutchouc / Rubber gasket
1
-
49
103762
Boyau flexible en métal / Flexible metal hose
1
-1
-
50
103763
Joint torique D23xD2 / O-ring D23xD2
1
-
51
103764-XXX *
Support à douchette / Hand shower support
1
-
52
103765
Tube fileté / Threaded tube
1
-2
-
34
101352
Joint de caoutchouc / Rubber gasket
2
-
53
103766
Tuyau d'alimentation 400mm (15-3/4in) / Supply hose 400mm (15-3/4in)
1
* XXX signifie que la couleur du fini doit être spécifiée. / XXX means that the finish color must be specified.
103793
Assemblage tuyau d'alimentation / Supply hose assembly
103604-XXX *
Ensemble de douchette / Handshower assembly
103789
Assemblage boyau flexible en métal / Flexible metal hose assembly
103787-XXX *
Ensemble de support à douchette / Hand shower support assembly
103786
Assemblage raccord en T / T connector assembly
103788
Assemblage boyau flexible tressé / Flexible mesh hose assembly
103754
Système de déviateur / Diverter system
103663
Enseble cartouche froid / Cold cartridge assembly
103784-XXX *
Ensemble de base du robinet / Base of faucet assembly
103785
Asseblage du corp du déviateur / Diverter body assembly
103783-XXX *
Ensemble de manette / Handle assembly
103770-XXX *
Ensemble de capuchon de finition de la manette / Decorative handle cap assembly
103662
Ensemble de cartouche chaud / Hot cartridge assembly

6
103623_RevB
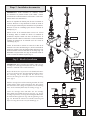
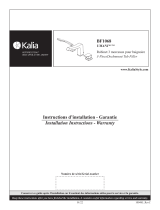
Step 1 - Spout Installation
IMPORTANT: Turn o hot and cold water supplies before
begining.
Unscrew the tightening nut and remove the T connector.
Unscrew the mounting nut M26 from the diverter body and
remove the metal washer and rubber washers.
Place a base of faucet and a decorative threaded ange
centered on the hole and insert the diverter body through that
hole (g. 1). Correctly align the diverter body and x it in
position by screwing the mounting nut M26 and washers on
the diverter body. Tighten the tightening screws (g. 1.1).
Install the T connector back on the diverter body and screw
the nut (g. 1).
Étape 1 - Installation du robinet
IMPORTANT: Couper l’alimentation en eau avant de débuter.
Dévisser l’écrou de serrage et retirer le raccord en T.
Dévisser l’ecrou de montage M26, puis retirer la rondelle de
métal et la rondelle de caoutchouc.
Déposer une base de robinet et une garniture décorative letée
centrée sur le trou et insérer le corps du déviateur dans le trou
prévu à cette n (g. 1). Aligner correctement le corps du
déviateur et xer en position en vissant l’ecrou de montage M26
et les rondelles. Resserrer l’écrou à l’aide des vis de serrage (g.
1.1).
Remettre le raccord en T sur le corps du déviateur et visser
l’écrou (g. 1).
Tournevis Phillips
Clé à molette
Pince multiprise
Phillips screwdriver
Adjustable wrench
Gripping pliers
Outils et matériaux nécessaires Necessary Tools and Materials
Fig. 1
Fig. 1.1

7
103623_RevB
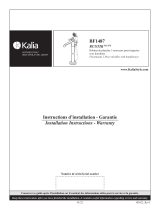
Step 2 - Handles Installation
IMPORTANT: Before installing the handles, make sure the
cartridges are in the o position (Hot side: turn the cartridge
clockwise • Cold side: Turn counterclockwise).
Remove the decorative cap to unscrew the handle and remove
it. Unscrew the decorative bell shaped body and then remove
the connecting rod for cartridge and the internal core.
Unscrew the locking nut to be able to unscrew the mounting
sleeve (g. 2).
Slide the cartridge base with the mounting nut M26, the metal
washer and the rubber washer through the hole. Put a faucet
base and its decorative ange on top and screw the mounting
sleeve to the maximum followed by the locking nut (g. 2).
Center the cartridge bases and make sure the cartridge
bases shafts point towards the faucet spout (g. 2.1). Fix the
cartridge in position by screwing the mounting nut M26 under
the bath and then tighten the ring with the tightening screws
(g. 2.2). Reinstall the internal core and the connecting rod
before screwing back on the rest of the handle (g. 2).
Étape 2 - Installation des manettes
IMPORTANT: Avant d’installer les manettes, mettre
les cartouches en position fermée (Côté chaud : tourner
l’extrémité de la cartouche dans le sens horaire • Côté froid :
tourner dans le sens anti-horaire).
Enlever le capuchon de nition pour dévisser la manette et
l’enlever. Dévisser le corps décoratif en forme de cloche et
enlever la tige de connexion pour cartouche et le noyau interne.
Dévisser l’écrou de verrouillage pour dévisser l’anneau de
montage (g. 2)
Glisser la base de la cartouche dans le trou avec l’écrou
de montage M26, la rondelle de métal et la rondelle de
caoutchouc. Déposer ensuite une base de robinet avec sa
garniture décorative letée sur le dessus et visser au maximum
l’anneau de montage sur la cartouche suivi de l’écrou de
verrouillage (g. 2).
Centrer la cartouche et orienter les sorties de la base de la
cartouche vers le bec du robinet (g. 2.1) Fixer la cartouche en
position en vissant l’écrou de montage M26 du dessous et en
resserrant ensuite l’écrou à l’aide des vis de serrage (g. 2.2)
Réinstaller le noyau interne et la tige de connexion avant de
visser le reste de la manette en place (g. 2).
Fig. 2.1
Fig. 2.2
Fig. 2

8
103623_RevB
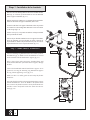
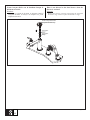
Step 3 - Hand Shower Installation
Unscrew mounting ring M26 and remove the washers from the
threaded tube (g. 3). Make sure the threaded tube is screwed
to the maximum with the hand shower support (g. 3.1).
Place a faucet base and its decorative threaded ange and
install the threaded tube of the hand shower support, through
the hole.
Center the threaded tube and the hand shower support. Fix in
position by screwing the mounting ring M26 and the tighten
the ring with the tightening screws (g. 3.2).
Make sure there is a rubber gasket at each end of the exible
metal hose.
Insert the exible metal hose through the hand shower support
and the threaded tube. Screw the handle to the exible metal
hose. Connect the exible metal hose to the exible mesh hose
and then connect the exible mesh hose under the diverter
body (g. 3.3).
Étape 3 - Installation de la douchette
Dévisser l’écrou de montage M26 et enlever les rondelles du tube
leté (g. 3). S’assurer que le tube leté est vissé au maximum
dans le support à douchette (g. 3.1).
Déposer une base de robinet avec sa garniture décorative letée.
Insérer le tube leté du support à douchette, dans le trou.
Centrer le tube leté et le support à douchette et xer en position
en vissant l’écrou de montage M26. Resserrer l’écrou à l’aide des
vis de serrage (g. 3.2).
Assurez-vous qu’il y a un joint de caoutchouc à chaque extrémité
du boyau exible en métal.
Passer le boyau exible en métal à travers le support à douchette.
Visser la douchette au boyau exible en métal. Connecter le
boyau exible en métal au boyau exible tressé puis raccorder le
boyau exible tressé sous le corps du déviateur (g. 3.3).
Fig. 3.2
Fig. 3.3
Fig. 3
Fig. 3.1

9
103623_RevB
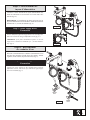
Step 5 - Water Supplies
Connection
Connect the water supplies to the cartridge bases with the
adjustable wrench ; hot on the left, cold on the right (supply
hoses not included) (g. 5).
Étape 5 - Raccordement
des conduites d’eau
Eectuer le branchement des conduites d’alimentation d’eau
aux bases des cartouches à l’aide d’une clé à molette ; chaude
à gauche, froide à droite (boyaux non inclus) (g. 5).
Step 4 - Water Supply hoses
Connection
Connect and rmly tighten the supply hoses to the cartridge base
and to the T connector using an adjustable wrench (g. 4.1).
COMMENT: if the faucet installation requires to coil the
supply hoses, maintain a minimum of 3” (76 mm) diameter
loop (g. 4).
Étape 4 - Raccordement des
tuyaux d’alimentation
Connecter et serrer fermement les tuyaux d’alimentation aux
bases des cartouches et au raccord en T à l’aide d’une clé à
molette (g. 4.1).
REMARQUE: si l’installation du robinet nécessite que les
tuyaux d’alimentation soient embobinés, maintenir une boucle
minimum de 3” (76 mm) de diamètre (g. 4).
Fig. 4
Fig. 4.1
Fig. 5
CHAUD
HOT
FROID
COLD

10
103623_RevB
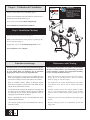
Step 6 - Installation Checkout
Turn on the water and look for leaks (g. 6).
Make sure the hand shower works properly by pulling on the
diverter pull-up rod (g. 6).
If applicable, refer to the Troubleshooting Guide section.
Your installation is now complete!
Etape 6 - Vérication de l’installation
Activer l’eau et vérier s’il y a des fuites (g. 6).
Vérier le fonctionnement de la douchette en soulevant et en
abaissant la tirette du déviateur (g. 6).
S’il y a lieu, voir la section Guide de dépannage.
Votre installation est maintenant complétée!
Entretien et nettoyage
Pour éviter les bris et vous assurer d’un fonctionnement optimal,
il est nécessaire de suivre ces recommandations lors de l’entretien
de votre produit Kalia. Les dommages par un traitement
inapproprié ne sont pas couverts par la garantie Kalia.
- Rincer à l’eau propre et essuyer avec un chion de coton
doux ou une éponge. Ne jamais utiliser de matériel abrasif tel
que brosse ou éponge à récurer pour nettoyer les surfaces.
- Pour les souillures tenaces, utiliser un détergent liquide
doux tel que le liquide à vaisselle et de l’eau chaude. Ne pas
utiliser de nettoyant abrasif et acide.
- Lire attentivement l’étiquette du produit de nettoyage an
de vérier qu’il soit adéquat. Toujours essayer la solution
de nettoyage sur une surface moins apparente avant de
l’appliquer sur la totalité de la surface.
- Rincer complètement avec de l’eau immédiatement après
l’application du nettoyant.
- Un nettoyage régulier prévient l’accumulation de saleté et
souillures tenaces.
Maintenance and Cleaning
To avoid damage and optimize your product, you must follow
the below recommendations when maintaining your Kalia
product. Damages resulting from inappropriate handling
are not covered by the Kalia warranty.
- Rinse with clean water and dry with a soft cotton cloth or
sponge. Do not use anything abrasive such as a scouring
brush or sponge to clean the surfaces.
- For tough stains, use a gentle liquid detergent such as dish
soap and hot water. Do not use an abrasive and acidic
cleaner.
- Carefully read the label on the cleaning product to make
sure it is safe and appropriate. Always try the cleaning
solution on a less visible surface before applying it to the
rest.
- Completely rinse with water immediately after applying the
cleaner.
- Regular cleaning prevents the accumulation of dirt and
tough stains.
IMPORTANT
Activer l’eau et vérifier s’il y a des
fuites au niveau des connexions.
S’il y a lieu, voir la section Guide
de dépannage.
/
Turn on the water and look for
leaks at the connections.
If
applicable, refer to the Trouble-
shooting section.
ENTRÉE D’EAU PRINCIPALE/
MAIN WATER VALVE
Ouvert
Open
Fig. 6

11
103623_RevB
Guide de dépannage Troubleshooting Guide
Before any operation, turn o the water and turn the
faucet on to release the pressure if required.
Water ow is low or non-existent.
Solutions:
- Make sure the water valve is fully opened.
- Make sure no hoses are pinched or twisted.
- Unscrew the aerator using the provided tool and rinse the
aerator (g. 7).
Aerator leaks or the jet coming from it is not uniform.
Solution:
- Unscrew the aerator using the provided tool and rinse the
aerator (g. 7).
Avant toute intervention, couper l’alimentation d’eau et
ouvrir le robinet pour libérer la pression si nécessaire.
Le débit de l’eau est faible ou inexistant.
Solutions:
-
Vérier si l’alimentation en eau est ouverte à pleine capacité.
- Vérier qu’aucun tuyau ne soit plié ou tordu.
- Dévisser l’aérateur à l’aide de la clé fournie et rincer
l’aérateur (g. 7).
L’aérateur fuit ou la diusion du jet qui s’en écoule
n’est pas uniforme.
Solution:
- Dévisser l’aérateur à l’aide de la clé fournie et rincer
l’aérateur (g. 7).
Water leaks under the handle or on counter.
Solutions:
- Tighten the retainer nut using adjustable wrench (g. 8.1).
- Clean the cartridge o-ring or replace the cartridge if
damaged (g. 8.2).
Water does not stop running completely.
Solution:
- Clean the cartridge o-ring or replace the cartridge if
damaged (g. 8.2).
Fuites d’eau sous la manette ou le comptoir.
Solutions:
-
Serrer la cartouche à l’aide d’une clé à molette (g. 8.1).
- Nettoyer le joint torique de la cartouche ou changer la
cartouche si elle est endommagée (g. 8.2).
L’eau ne cèsse complètement de couler.
Solution:
- Nettoyer le joint torique de la cartouche ou changer la
cartouche si elle est endommagée (g. 8.2).
Fig. 7
Fig. 8.1 Fig. 8.2

12
103623_RevB
Water is not directed to the hand shower when the
diverter is activated.
Solutions:
- Remove the diverter system by unscrewing the octogonal
decorative ring. Clean or replace the diverter o-rings.
L’eau n’est pas déviée vers la douchette lorsque le
déviateur est activé.
Solutions:
- Démonter le système de déviateur en dévissant l’anneau
octogonal décoratif et nettoyer ou remplacer les joints
toriques du déviateur.
Joint torique
O-ring
Joint torique
O-ring
Anneau octogonal décoratif
Octogonal decorative ring

13
103623_RevB
Notes

14
103623_RevB
GARANTIE LIMITÉE
Kalia inc. ore la garantie limitée expresse suivante sur ses produits. Cette garantie s’adresse uniquement au propriétaire/utilisateur
original pour un usage personnel domestique et elle débute à la date d’achat du produit. La garantie n’est pas transférable au
propriétaire subséquent. Des restrictions additionnelles s’appliquent aux utilisations commerciales.
GARANTIE À VIE LIMITÉE POUR LES ROBINETS KALIA
Kalia inc. garantit à vie ses robinets contre tout défaut de matériel ou de fabrication dans des conditions normales d’utilisation et
d’entretien tant et aussi longtemps que l’acheteur/propriétaire possède sa résidence.
Kalia inc. procédera, à sa discrétion, à la réparation ou au remplacement de pièces, ou de produits trouvés défectueux pour un
usage domestique normal pour lequel il a été conçu.
La présente garantie exclut tout dommage causé en tout ou en partie par des erreurs d’installation, abus d’usage, utilisation non-
conforme, négligence, accident, entretien non-conforme, produits abrasifs.
Kalia inc. n’est aucunement responsable pour tous frais de main-d’œuvre ou tous autres frais reliés à l’installation d’un produit, sa
réparation ou son remplacement ainsi que pour tout dommage ou incident, dépense, perte directe ou indirecte.
Dans tous les cas, Kalia inc., ne peut être tenue responsable de tout montant excédant le prix d’achat du produit qui a été déboursé
par le propriétaire/utilisateur, l’entrepreneur ou le constructeur.
RESTRICTIONS COMMERCIALES
En plus des conditions et restrictions mentionnées ci-dessus, la période de garantie relative à tout produit installé dans le cadre
d’une application commerciale est de un (1) an à compter de la date d’achat originale par le propriétaire/utilisateur, l’entrepreneur
ou le constructeur auprès d’un détaillant autorisé. Si le produit est utilisé en étalage, la période de garantie est d’un (1) an.
SERVICE
Pour se prévaloir du service en vertu de la présente garantie, veuillez communiquer avec Kalia inc., soit par l’entremise de votre
détaillant ou encore directement à nos bureaux à 1-877-GO-KALIA (1-877-465-2542) ou en écrivant à : service@KaliaStyle.
com ou à : Kalia inc., Service à la clientèle, 1355, 2ième Rue, Sainte-Marie (Qc) Canada G6E 1G9. Assurez-vous de pouvoir
fournir toute l’information nécessaire concernant votre de mande soit : description du problème et du produit, numéro de modèle,
la couleur, le numéro de série, le ni, la date de l’achat, le nom du détaillant en plus de votre facture originale. Pour toute autre
information ou pour connaître un réparateur près de chez vous, n’hésitez pas à nous contacter.
CETTE GARANTIE EST OFFERTE EXCLUSIVEMENT EN LIEU ET PLACE DE TOUTE AUTRE GARANTIE, Y
COMPRIS LES GARANTIES DE QUALITÉ MARCHANDE OU D’APTITUDE DE PRODUIT POUR UNE APPLICATION
PARTICULIÈRE.
Ceci est la garantie originale écrite de Kalia inc.
Garantie

15
103623_RevB
Warranty
LIMITED WARRANTY
Kalia Inc. oers the following express limited warranty on its products. This warranty extend only to the original owner/end-user
for personal household use and are eective as of the date of purchase. The warranty is not transferable to subsequent owners.
Additional limitations may apply for commercial use.
LIFETIME LIMITED WARRANTY ON KALIA FAUCETS
Kalia Inc. guarantees all aspects of its faucets to be free of defects in material and workmanship for normal residential use for as
long as the original consumer-purchaser owns his or her home. If a defect is found during normal residential use, Kalia Inc. may,
at its sole discretion, elect to repair or provide a replacement part or product.
Damage to a product caused by accident, misuse, or abuse is not covered under this warranty. Improper care and cleaning
shall have the eect of rendering this warranty void. Kalia Inc. is not responsible for labor, installation or other incidental or
consequential expenses. Under no circumstances shall the liability of Kalia Inc. exceed the purchase price paid for a faucet by the
owner/end-user, contractor or builder.
COMMERCIAL LIMITATIONS
In addition to the previously mentioned conditions and limitations, the warranty period for products installed for commercial
applications, or used in commercial ventures, shall cover a period of one (1) year from the initial date of purchase by the owner/
end-user, contractor or builder from an authorized dealer. If the product is sold by Kalia Inc. as a display item, a one (1) year
warranty applies.
WARRANTY SERVICE
If you wish to make a claim under this warranty, you may contact Kalia through your Dealer or directly at 1-877-GO-KALIA
(1-877-465-2542) or again by writing to: [email protected] or to : Kalia Inc., Attn: Customer Service Dept., 1355 2nd
Street, Sainte-Marie QC G6E 1G9 Canada. Be sure to provide all pertinent information related to your claim, including a
complete description of the problem you are experiencing, the product name, product model number, color, nish, and nally the
date and the location where the product was purchased. Also include the product’s serial number or original receipt. For more
information or to obtain the name and address of the service and repair centre nearest you, call 1-877-GO-KALIA.
EXCEPT AS SET FORTH HEREIN, KALIA INC. PROVIDES NO OTHER WARRANTIES, EITHER EXPRESS OR
IMPLIED, INCLUDING IMPLIED WARRANTIES OF FITNESS AND MERCHANTABILITY FOR A PARTICULAR
PURPOSE OR COMPLIANCE WITH ANY CODE.
This is the exclusive written warranty of Kalia Inc.

Imprimé en Chine/Printed in China 103623_RevB
-
 1
1
-
 2
2
-
 3
3
-
 4
4
-
 5
5
-
 6
6
-
 7
7
-
 8
8
-
 9
9
-
 10
10
-
 11
11
-
 12
12
-
 13
13
-
 14
14
-
 15
15
-
 16
16


Kalia BF1486-110 Guide d'installation
- Catégorie
- Articles sanitaires
- Taper
- Guide d'installation
- Ce manuel convient également à
dans d''autres langues
- English: Kalia BF1486-110 Installation guide
Documents connexes
-
 Kalia BF1485-110 Guide d'installation
-
 Kalia BF1220 Guide d'installation
-
 Kalia BF1481-110 Guide d'installation
-
 Kalia BELLINO BF1060 Mode d'emploi
-
 Kalia BF1068 Guide d'installation
-
 Kalia BF1287 Mode d'emploi
-
 Kalia BF1487-110 Mode d'emploi
-
 Kalia BF1915 Mode d'emploi
-
 Kalia BF1985 Guide d'installation
-
 Kalia BF1293 Guide d'installation


