Cafe CZS22MP2NS1 Le manuel du propriétaire
- Catégorie
- Frigos
- Taper
- Le manuel du propriétaire

Owner’s Manual

Pub No. 49-1000209 Rev. 0 02-19 GEA
Write the model and serial numbers here:
Model # _______________________________
Serial # _______________________________
Find these numbers on a label inside the
refrigerator compartment at the top on the right side
behind the controls.
Side by Side Refrigerators
Model: CZS22M
Contents
Safety Information ...............................3
Using the Refrigerator
Controls ......................................5
Water Filter - XWF ..............................6
Shelves and Bins ...............................7
Crispers and Pans ..............................8
Doors ........................................9
Automatic Icemaker ............................10
Ice and Water Dispenser ........................11
Care And Cleaning
The Outside ..................................12
The Inside ...................................12
Behind the Refrigerator .........................12
Preparing for Vacation ..........................13
Preparing to Move .............................13
Replacing the Light Bulbs .......................13
Installation Instructions
Preparing to Install the Refrigerator ................14
Moving the Refrigerator .........................15
Installing the Refrigerator ........................19
Installing the Water Line ........................23
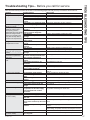
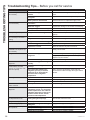
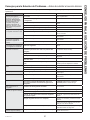
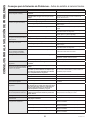
Troubleshooting Tips ...........................26
Limited Warranty ...............................29
Consumer Support
Water Filter Limited Warranty ....................30
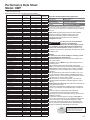
Performance Data Sheet ........................31
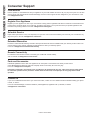
Consumer Support .............................32
Owner's Manual and Installation Instructions
ENGLISH/FRANÇAIS/ESPAÑOL
TM

49-1000209 Rev. 02
THANK YOU FOR MAKING CAFÉ A PART OF YOUR HOME.
We take pride in the craftsmanship, innovation and design that goes into every Café product, and
we think you will too. Among other things, registration of your appliance ensures that we can deliver
important product information and warranty details when you need them.
Register your Café appliance now online. Helpful websites are available in the Consumer Support
section of this Owner’s Manual. You may also mail in the pre-printed registration card included in the
packing material.
TM

49-1000209 Rev. 0 3
SAFETY INFORMATION
IMPORTANT SAFETY INFORMATION
READ ALL INSTRUCTIONS BEFORE USING THE APPLIANCE
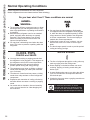
CAUTION
To reduce the risk of injury when using your refrigerator, follow these basic safety precautions.
Ŷ 'RQRWFOHDQJODVVVKHOYHVRUFRYHUVZLWKZDUP
water when they are cold. Glass shelves and
covers may break if exposed to sudden temperature
changes or impact, such as bumping or dropping.
Tempered glass is designed to shatter into many
small pieces if it breaks.
Ŷ .HHSILQJHUVRXWRIWKH³SLQFKSRLQW´DUHDV
clearances between the doors and between the
doors and cabinet are necessarily small. Be careful
closing doors when children are in the area.
Ŷ 'RQRWWRXFKWKHFROGVXUIDFHVLQWKHIUHH]HU
compartment when hands are damp or wet, skin
may stick to these extremely cold surfaces.
Ŷ 'RQRWUHIUHH]HIUR]HQIRRGVZKLFKKDYHWKDZHG
completely.
Ŷ ,QUHIULJHUDWRUVZLWKDXWRPDWLFLFHPDNHUVDYRLG
contact with the moving parts of the ejector
mechanism, or with the heating element that
releases the cubes. Do not place fingers or hands
on the automatic ice making mechanism while the
refrigerator is plugged in.
Ŷ Use a sturdy glass when dispensing ice (on models with
ice dispenser
READ AND SAVE THESE INSTRUCTIONS
WARNING
To reduce the risk of fire, explosion, electric shock, or injury when using your refrigerator, follow
these basic safety precautions:
Ŷ 7KLVUHIULJHUDWRUPXVWEHSURSHUO\LQVWDOOHG
and located in accordance with the Installation
Instructions before it is used.
Ŷ 8QSOXJWKHUHIULJHUDWRUEHIRUHPDNLQJUHSDLUVRU
cleaning.
NOTE: Power to the refrigerator cannot be
disconnected by any setting on the control panel.
NOTE: Repairs must be performed by a qualified
Service Professional.
Ŷ 5HSODFHDOOSDUWVDQGSDQHOVEHIRUHRSHUDWLQJ
Ŷ 'RQRWXVHDQH[WHQVLRQFRUG
Ŷ 'RQRWVWRUHRUXVHJDVROLQHRURWKHUIODPPDEOH
vapors and liquids in the vicinity of this or any other
appliance.
Ŷ 'RQRWVWRUHH[SORVLYHVXEVWDQFHVVXFKDVDHURVRO
cans with a flammable propellant in this appliance.
Ŷ 7RSUHYHQWVXIIRFDWLRQDQGHQWUDSPHQWKD]DUGV
WRFKLOGUHQUHPRYHWKHIUHVKIRRGDQGIUHH]HU
doors from any refrigerator before disposing of it or
discontinuing its use.
Ŷ 7RDYRLGVHULRXVLQMXU\RUGHDWKFKLOGUHQVKRXOGQRW
stand on, or play in or with the appliance.
Ŷ &KLOGUHQDQGSHUVRQVZLWKUHGXFHGSK\VLFDOVHQVRU\
or mental capabilities or lack of experience and
knowledge can use this appliance only if they are
supervised or have been given instructions on safe
XVHDQGXQGHUVWDQGWKHKD]DUGVLQYROYHG
Ŷ 7KLVDSSOLDQFHLVLQWHQGHGWREHXVHGLQKRXVHKROG
and similar applications such as: staff kitchen areas
LQVKRSVRIILFHVDQGRWKHUZRUNLQJHQYLURQPHQWV
IDUPKRXVHVE\FOLHQWVLQKRWHOVPRWHOVEHG
EUHDNIDVWDQGRWKHUUHVLGHQWLDOHQYLURQPHQWV
catering and similar non-retail applications.
Ŷ &RQQHFWWRSRWDEOHZDWHUVXSSO\RQO\$FROGZDWHU
supply is required for automatic icemaker operation.
The water pressure must be between 40 and 120 psi
(275-827 kilopascals).
Ŷ 'RQRWDSSO\KDUVKFOHDQHUVWRWKHUHIULJHUDWRU
Certain cleaners will damage plastic which may
cause parts such as the door or door handles to
detach unexpectedly. See the Care and Cleaning
section for detailed instructions.
INSTALLATION
WARNING
EXPLOSION HAZARD
.HHSIODPPDEOHPDWHULDOVDQGYDSRUVVXFKDVJDVROLQHDZD\IURPUHIULJHUDWRU)DLOXUHWRGRVRFDQUHVXOWLQILUH
explosion, or death.

49-1000209 Rev. 04
SAFETY INFORMATION
IMPORTANT SAFETY INFORMATION
READ ALL INSTRUCTIONS BEFORE USING THE APPLIANCE
PROPER DISPOSAL OF YOUR OLD REFRIGERATOR
Do not, under any circumstances, cut or remove the third (ground) prong from the power cord. For
personal safety, this appliance must be properly grounded.
The power cord of this appliance is equipped with a
3-prong (grounding) plug which mates with a standard
SURQJJURXQGLQJZDOORXWOHWWRPLQLPL]HWKH
SRVVLELOLW\RIHOHFWULFVKRFNKD]DUGIURPWKLVDSSOLDQFH
Have the wall outlet and circuit checked by a qualified
electrician to make sure the outlet is properly
grounded.
Where a standard 2-prong wall outlet is encountered, it
is your personal responsibility and obligation to have it
replaced with a properly grounded 3-prong wall outlet.
Do not use an adapter.
The refrigerator should always be plugged into its own
individual electrical outlet which has a voltage rating
that matches the rating plate.
$9ROW$&+]RUDPSIXVHGJURXQGHG
electrical supply is required. This provides the best
performance and also prevents overloading house
ZLULQJFLUFXLWVZKLFKFRXOGFDXVHDILUHKD]DUGIURP
overheated wires.
Never unplug your refrigerator by pulling on the power
cord. Always grip plug firmly and pull straight out from
the outlet.
Immediately discontinue use of a damaged supply
cord. If the supply cord is damaged, it must be
replaced by a qualified service professional with an
DXWKRUL]HGVHUYLFHSDUWIURPWKHPDQXIDFWXUHU
When moving the refrigerator away from the wall, be
careful not to roll over or damage the power cord.
CONNECTING ELECTRICITY
WARNING
ELECTRICAL SHOCK HAZARD
Plug into a grounded 3-prong outlet
Do not remove the ground prong
Do not use an adapter
Do not use an extension cord.
Failure to follow these instructions can result in death, fire, or electrical shock.
WARNING
SUFFOCATION AND ENTRAPMENT HAZARD
Failure to follow these disposal instructions can result in death or serious injury
IMPORTANT: Child entrapment and suffocation
are not problems of the past. Junked or abandoned
refrigerators are still dangerous even if they will sit
IRU³MXVWDIHZGD\V´,I\RXDUHJHWWLQJULGRI\RXUROG
refrigerator, please follow the instructions below to help
prevent accidents.
Before You Throw Away Your Old Appliance
Ŷ7DNHRIIWKHIUHVKIRRGDQGIUHH]HUGRRUV
Ŷ Leave the shelves in place so that children may not
easily climb inside.
Refrigerant and Foam Disposal:
Dispose of appliance in accordance with Federal and Local Regulations. Flammable insulation material used
requires special disposal of your appliance. Contact your local authorities for the environmentally safe disposal of
your appliance.

49-1000209 Rev. 0 5
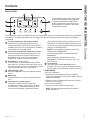
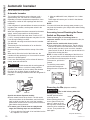
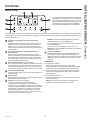
Controls
Freezer Compartment Temperature Control
$GMXVWIUHH]HUFRPSDUWPHQWWHPSHUDWXUH7KH
IUHH]HUWHPSHUDWXUHLVSUHVHWLQWKHIDFWRU\DW 0°F
(-17.8°C)$OORZKRXUVIRUWHPSHUDWXUHWRVWDELOL]H
to the preset recommended setting.
Fresh Food Compartment Temperature Control
Adjust fresh food compartment temperature. The
fresh food temperature is preset in the factory at
37°F (2.8°C). Allow 24 hours for temperature to
VWDELOL]HWRWKHSUHVHWUHFRPPHQGHGVHWWLQJ
Door Alarm (on some models)
To set the alarm, press this pad until the indicator
light comes on. This alarm will sound if either door is
open for more than 3 minutes. The light goes out and
the beeping stops when you close the door.
LED dispenser Light
Press the Light pad to turn your dispenser light on
and off.
Water Filter
Press and hold 3 seconds to reset the Water Filter
timer.
TurboCool
TM
(on some models)
TurboCool ™ rapidly cools the refrigerator
compartment in order to more quickly cool foods.
Use TurboCool ™ when adding a large amount
of food to the refrigerator compartment, putting
away foods after they have been sitting out at room
temperature or when putting away warm leftovers. It
can also be used if the refrigerator has been without
power for an extended period.
NOTES: The refrigerator temperature cannot be
changed during TurboCool™.
7KHIUHH]HUWHPSHUDWXUHLVQRWDIIHFWHGGXULQJ
TurboCool™.
When opening the refrigerator door during
TurboCool™, the fans will continue to run if they
have cycled on.
Lock Controls
Press and hold the Lock Controls pad for 3
seconds to lock out ice and water dispenser and all
other controls. Press and hold to unlock the controls.
COMPRESSOR
7RWXUQRႇFRPSUHVVRU
5DLVHWKHIUHH]HUWHPSHUDWXUHDERYHWKHKLJKHVW
VHWWLQJE\SUHVVLQJWKH)UHH]HUZDUPHUEXWWRQXQWLOWKH
display starts blinking.
2. Raise the Fresh Food temperature above the highest
setting until you see OFF.
To turn on the compressor:
3UHVV)UHVK)RRGRU)UHH]HUFROGHUEXWWRQ
NOTE: Compartment lights and the user interface
display will stay on.
Model CZS22M
The temperature controls can display both the SET temperature as well as the actual temperature in the refrigerator
DQGIUHH]HU7KHDFWXDOWHPSHUDWXUHPD\YDU\VOLJKWO\IURPWKH6(7WHPSHUDWXUHEDVHGRQXVDJHDQGRSHUDWLQJ
environment.
The temperature controls are preset in the
factory at 37°F (2.8°C) for the refrigerator
compartment and 0°F (-17.8°C) for the
IUHH]HUFRPSDUWPHQW$OORZKRXUVIRU
WKHWHPSHUDWXUHWRVWDELOL]HWRWKHSUHVHW
recommended settings.
USING THE REFRIGERATOR: Controls

49-1000209 Rev. 06
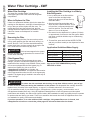
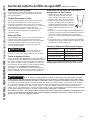
USING THE REFRIGERATOR: Water Filter Cartridge - XWF
Water Filter Cartridge - XWF
Water Filter Cartridge
The water filter cartridge holder is located in the
back upper-right corner of the fresh food refrigerator
compartment.
When to Replace the Filter
If there is a replacement indicator light for the water filter
cartridge on the dispenser, a red light will start blinking to
tell you that you need to replace the filter soon. For
models that don’t have the indicator light, the filter
cartridge should be replaced every six months, or earlier
if the flow of water to the dispenser or icemaker
decreases.
Removing the Filter
If you are replacing the filter, first remove the previous
one by gently grasping the filter and slowly turning it to
the left, about a ¼ turn. The filter should automatically
release itself when you have rotated it far enough to the
left. A small amount of water may drip down.
CAUTION
If air has been trapped in the system,
the filter cartridge may be ejected as it is removed. Use
caution when removing.
Filter Bypass Plug
To reduce the risk of property damage due to water
leakage, you MUST use the filter bypass plug when a
replacement filter cartridge is not available. Some models
do not come equipped with the filter bypass plug. To
obtain a free bypass plug, visit us on-line at
cafeappliances.com/service. In Canada, visit
cafeappliances.ca/service. The dispenser and icemaker
will not operate without either the filter or the bypass plug
installed. The bypass plug is installed in the same way as
DILOWHUFDUWULGJH´
Installing the Filter Cartridge in a Side by
Side Refrigerator
1. Line up the arrow on the filter with the
arrow on the filter cartridge holder.
Gently push the top of the new filter up
inside the holder.
2. Slowly turn the filter to the right until it
stops. DO NOT OVERTIGHTEN. As you
turn the filter, it will automatically raise
itself into position. The filter will move
about a ¼ turn or 90 degrees.
3. Run water from the dispenser for 2 gallons (7.6 liters)
or approximately 5 minutes to clear the system. Water
may spurt out and air bubbles may be visible during
this process.
4. To reset filter, press and hold the WATER FILTER
pad (only on select models) on the dispenser for three
seconds.
Service Flow 0.5 gpm (1.89 lpm)
Water Supply Potable Water
Water Pressure 25-120 psi (172-827 kPa)
Water Temperature 33°F-100°F (0.6°C-38°C)
Capacity 170 gallons (643.5 liters)
Sign-up for TEXT REMINDERS by texting
REPLACE to 70543.
WARNING
To reduce the risk associated with choking, do not allow children under 3 years of age
to have access to small parts during the installation of this product. The disposable filter cartridge should be
replaced every 6 months at the rated capacity, or sooner if a noticeable reduction in flow rate occurs.
For the maximum benefit of your filtration system, GE Appliances, a Haier company, recommends the use of
GE Appliances-branded filters only. Using GE Appliances-branded filters in Café refrigerators provides optimal
performance and reliability. Our filters meet rigorous industry NSF standards for safety and quality that are important
for products that are filtering your water. There is no assurance that brands other than GE Appliances filters meet
our standards for quality, performance and reliability.
If you have questions, or to order additional filter cartridges, visit gewaterfilters.com. In Canada, visit
cafeappliances.ca/service or consult the yellow pages for the nearest Camco Service Center.
Application Guidelines/Water Supply

49-1000209 Rev. 0 7
Not all features are on all models.
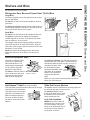
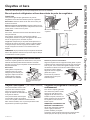
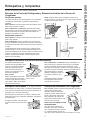
Refrigerator Door Bins and Freezer Door Tilt-Out Bins
Large Bins
7KHODUJHUUHIULJHUDWRUGRRUELQVDQGIUHH]HUWLOWRXWGRRU
bins are adjustable.
To remove: Lift the front of the bin straight up, then lift
up and out.
To replace or relocate: Engage the back side of the bin
in the molded supports of the door. Then push down on
the front of the bin. Bin will lock in place.
Small Bins
To remove: Lift the front of the bin straight up then out.
To replace: Position the bin above the rectangular
molded supports on the door. Then slide the bin down
onto the support to lock it in place.
The snugger helps prevent tipping, spilling or sliding of
small items stored on the door shelf. Place a finger on
either side of the snugger near the rear and move it back
and forth to fit your needs.
NOTE: Be careful when placing items in the top bin.
Make sure that items do not block or fall into the ice
chute.
Shelves and Bins
)UHH]HUWLOWRXWELQ Door bins
Ice Chute
Slide-Out Spillproof Shelf
The slide-out spillproof shelf
allows you to reach items
stored behind others. The
special edges are designed
to help prevent spills from
dripping to lower shelves.
To remove: Slide the shelf out
until it reaches the stop, then
press down on the tab and
slide the shelf straight out.
To replace or relocate: Line the shelf up with the
supports and slide it into place. The shelf can be
repositioned when the door is at 90° or more. To
reposition the shelf, slide
the shelf past the stops
and angle downward. Slide
shelf down to the desired
position, line up with the
supports and slide into
place.
Make sure you push the shelves all the way back in
before you close the door.
Press tab and pull shelf
forward to remove
QuickSpace™ Shelf (on some models)
This shelf splits in half and slides under itself for storage
of tall items on the shelf below.
This shelf can be removed and
replaced or relocated just like
Slide-Out Spillproof Shelves.
On some models, this shelf
can not be used in the lowest
position.
Slide-Out Freezer Shelves
To remove, slide the shelf back to the stop position, lift
the left side and slide out from the ribs.
To install the shelf, reverse
these steps. Make sure to push
the shelves all the way back in
before closing the door.
NOTE FOR DISPENSER
MODELS: In order to take full
advantage of the tilt-out ice bin
(on some models), only store
items on the shelf below the ice
bin that are no taller than the
lowest point on the bin.
USING THE REFRIGERATOR: Shelves and Bins

49-1000209 Rev. 08
Not all features are on all models.
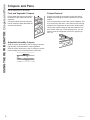
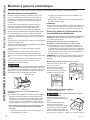
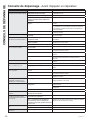
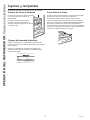
Fruit and Vegetable Crispers
Excess water that may accumulate in
the bottom of the drawers should be
wiped dry.
On some models, the bottom drawer
has full extension slides that allow full
access to the drawer.
Adjustable Humidity Crispers
Slide the control all the way to the HI setting to provide
high humidity recommended for most vegetables.
Slide the control all the way to the LO setting to provide
lower humidity levels recommended for most fruits.
Crisper Removal
Crispers can easily be removed by pulling the drawer
straight out and lifting the drawer up and over the stop
location.
If the door prevents you from taking out the drawers, first
try to remove the door bins. If this does not offer enough
clearance, the refrigerator will need to be rolled forward
until the door opens enough to slide the drawers out. In
some cases, when you roll the refrigerator out, you will
need to move the refrigerator to the left or right as you
roll it out.
Crispers and Pans
HI
LO
USING THE REFRIGERATOR: Crispers and Pans

49-1000209 Rev. 0 9
USING THE REFRIGERATOR: Doors
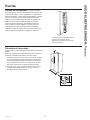
Door Alignment
If doors are uneven, adjust the refrigerator door.
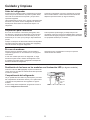
To remove the base grille, open the doors, remove the
screw at each end of the base grille and then pull the
grille straight out.
8VLQJD´VRFNHWZUHQFKWXUQWKHGRRUDGMXVWLQJ
VFUHZWRWKHULJKWWRUDLVHWKHGRRUWRWKHOHIWWR
lower it. (A nylon plug, imbedded in the threads of the
pin, prevents the pin from turning unless a wrench is
used.)
2. After one or two turns of the wrench, open and close
the refrigerator door and check the alignment at the
top of the doors.
Refrigerator Doors (on some models)
The refrigerator doors may feel different than the ones
you are used to. The special door opening/closing
feature makes sure the doors close all the way and are
securely sealed.
When opening and closing the door you will notice a stop
position. If the door is opened past this stop point, the
door will remain open to allow you to load and unload
food more easily. When the door is only partially open, it
will automatically close.
The resistance you feel at the stop position will be
reduced as the door is loaded with food.
Doors
When the door is only partially open,
it will automatically close.
Beyond this stop the door will stay open.
´6RFNHW:UHQFK
Raise

49-1000209 Rev. 010
Not all features are on all models.
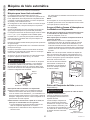
Automatic Icemaker
The icemaker will produce seven cubes per cycle—
approximately 100–130 cubes in a 24-hour period,
GHSHQGLQJRQIUHH]HUFRPSDUWPHQWWHPSHUDWXUHURRP
temperature, number of door openings and other use
conditions.
If the refrigerator is operated before the water connection
is made to the icemaker, set the power switch in the
OFF position.
When the refrigerator has been connected to the water
supply, set the power switch to the ON position.
The icemaker will fill with water when it cools to 15°F
(–10°C). A newly installed refrigerator may take 12 to 24
hours to begin making ice cubes.
<RXZLOOKHDUDEX]]LQJVRXQGHDFKWLPHWKHLFHPDNHU
fills with water.
Throw away the first few batches of ice to allow the
water line to clear.
Be sure nothing interferes with the sweep of the feeler
arm.
When the bin fills to the level of the feeler arm, the
icemaker will stop producing ice. It is normal for several
cubes to be joined together.
If ice is not used frequently, old ice cubes will become
cloudy, taste stale and shrink.
CAUTION
Avoid contact with the moving parts of
the ejector mechanism, or with the heating element
(located on the bottom of the ice maker) that releases
the cubes. Do not place fingers or hands on the
automatic ice making mechanism while the refrigerator is
plugged in.
Special note about dispenser models:
Ŷ6RPHPRGHOVKDYHDWLOWRXWLFHELQ7KHELQFDQEH
tilted out as shown in the illustrations, and it will hold
itself up while you take ice out or turn the icemaker
power switch on and off. Be sure to put the bin back in
place before closing the door.
ŶTo restore your ice level from an empty bucket
stage, the following steps are recommended:
1. 12 hours after the first batch of ice has fallen into the
bin, dispense 3 to 4 cubes.
2. After an additional 6 hours, dispense 3 to 4 cubes
again.
These steps will restore your ice level in the shortest
amount of time.
NOTE:
In homes with lower than average water pressure, you
may hear the icemaker cycle multiple times when making
one batch of ice.
Accessing Ice and Reaching the Power
Switch on Dispenser Models
There are two types of ice storage bins on
dispenser models. One has a shelf above the bin, the
other does not.
Special note for models with tilt-out ice bin:
Ŷ7KHVHPRGHOVKDYHDWLOWRXWLFHELQ7KHELQFDQEH
tilted out as shown in the illustrations, and it will hold
itself up while you take ice out or turn the icemaker
power switch on and off. Be sure to put the bin back in
place before closing the door.
NOTE: In order to take full advantage of the tilt-out ice
bin, only store items on the shelf below the ice bin that
are no taller than the lowest point on the bin.
To access ice, pull the bin
forward.
To reach the power switch,
pull the shelf straight out.
Always be sure to replace the
shelf.
Removing Ice Bin (dispenser models)
CAUTION
The ice bin is heavy when full.
Set the power switch to
the OFF position before
removing the bin.
When replacing the bin, be
sure to press it firmly into
place. If it does not go all
the way back, remove it and
rotate the drive mechanism
1/4 turn. Then push the bin
back again.
Automatic Icemaker
Icemaker
Feeler Arm
Power
Switch
USING THE REFRIGERATOR: Automatic Icemaker
Shelf
Ice Bin
Shelf
Rotate
Drive
Mechanism
Dispenser Models only

49-1000209 Rev. 0 11
USING THE REFRIGERATOR: Ice and Water Dispenser
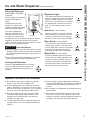
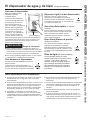
Using the Dispenser
Select CUBED, CRUSHED,
or WATER .
Press the glass gently against
the top of the dispenser
cradle.
The spill shelf is not self-
draining. To reduce water
spotting, the shelf and its grille
should be cleaned regularly.
If no water is dispensed
when the refrigerator is first
installed, there may be air in
the water line system. Press
the dispenser arm for at least two minutes to remove
trapped air from the water line and to fill the water
system. To flush out impurities in the water line, throw
away the first six glassfuls of water.
CAUTION
Laceration Hazard
Ŷ1HYHUSXWILQJHUVRUDQ\RWKHUREMHFWLQWRLFHFUXVKHU
discharge opening. Doing so can result in contacting
the ice crushing blades and lead to serious injury or
amputation
Ŷ8VHDVWXUG\JODVVZKHQGLVSHQVLQJLFH$GHOLFDWH
glass may break and result in personal injury.
Locking the Dispenser
Press the Lock Controls pad for 3 seconds
to lock the dispenser and control panel. To
unlock, press and hold the pad again for 3
seconds.
Dispenser Light
This pad turns the light in the dispenser on
and off. The light also comes on when the
dispenser cradle is pressed. For models
with a bulb, if the light burns out, it should
be replaced with a 6 watt 12V maximum
bulb. For LED models, contact Factory
Service.
Quick Ice (on some models)
When you need ice in a hurry, press this
pad to speed up ice production. This will
increase ice production for the following
48 hours or until you press the pad again.
Door Alarm (on some models)
To set the alarm, press this pad until the
indicator light comes on. This alarm will
sound if either door is open for more than
3 minutes. The light goes out and the
beeping stops when you close the door.
Water Filter (on some models)
The Filter Indicator Light will turn yellow
when the filter is nearing expiration., and
red when the filter is expired. After you
replace the water filter, press and hold
the Reset Filter pad for 3 seconds until
the light turns off to reset the timer.
Ice and Water Dispenser (on some models.)
Important Facts About Your Dispenser
Ŷ Do not add ice from trays or bags to the storage
drawer. It may not crush or dispense well.
Ŷ Avoid overfilling glass with ice and use of narrow
glasses. Backed-up ice can jam the chute or cause
WKHGRRULQWKHFKXWHWRIUHH]HVKXW,ILFHLVEORFNLQJ
the chute, poke it through with a wooden spoon.
Ŷ Beverages and foods should not be quick-chilled
in the ice storage drawer. Cans, bottles or food
packages in the storage drawer may cause the
icemaker or auger to jam.
Ŷ To keep dispensed ice from missing the glass, put
the glass close to, but not touching, the dispenser
opening.
Ŷ Some crushed ice may be dispensed even though
you selected CUBED ICE. This happens occasionally
when a few cubes accidentally get directed to the
crusher.
Ŷ After crushed ice is dispensed, some water may drip
from the chute.
Ŷ Sometimes a small mound of snow will form on the
door in the ice chute. This condition is normal and
usually occurs when you have dispensed crushed ice
repeatedly. The snow will eventually evaporate.
Spill Shelf

49-1000209 Rev. 012
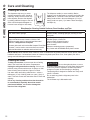
Care and Cleaning
Cleaning the Outside
The dispenser drip area, (on some
models) beneath the grille, should be
wiped dry. Water left in this area may
leave deposits. Remove the deposits
by adding undiluted vinegar to the well.
Soak until the deposits disappear or
become loose enough to rinse away.
The dispenser cradle (on some models). Before
cleaning, lock the dispenser by pressing and holding the
LOCK pad for 3 seconds. Clean with warm water and
baking soda solution—about a tablespoon (15 ml) of
baking soda to a quart (1 l) of water. Rinse thoroughly
and wipe dry.
Cleaning the Inside
To help prevent odors, leave an open box of baking
VRGDLQWKHIUHVKIRRGDQGIUHH]HUFRPSDUWPHQWV
Unplug the refrigerator before cleaning. If this is not
practical, wring excess moisture out of sponge or cloth
when cleaning around switches, lights or controls.
Use warm water and baking soda solution— about a
tablespoon (15 ml) of baking soda to a quart (1 liter) of
ZDWHU7KLVERWKFOHDQVDQGQHXWUDOL]HVRGRUV5LQVHDQG
wipe dry.
Use of any cleaning solution other than that which
is recommended, especially those that contain
petroleum distillates, can crack or damage the
interior of the refrigerator.
CAUTION
Do not clean glass shelves or covers
with warm water when they are cold. Glass shelves and
covers may break if exposed to sudden temperature
changes or impact such as bumping or dropping.
Tempered glass is designed to shatter into many small
pieces if it breaks.
Do not wash any plastic refrigerator parts in the
dishwasher.
The chill/thaw tray is dishwasher safe.
CARE AND CLEANING
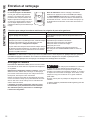
Directions for Cleaning Outside Surfaces, Door Handles, and Trim
DO USE DO NOT USE
Soft, clean cloth or sponge Abrasive cloths, scrubbing sponges, scouring or steel
wool pads
Mild detergent mixed with warm water
$SSURYHGVWDLQOHVVVWHHOFOHDQHUV9LVLWWKH&DIp
Appliances parts store for approved stainless steel
cleaners: cafeappliances.com/parts
&OHDQHUVZLWKR[DOLFDFLGVXFKDV%DU.HHSHUV)ULHQG6RIW
Cleanser™ can be used to remove surface rust, tarnish
and small blemishes on stainless steel surfaces only.
Abrasive powders or sprays
Window Sprays or Ammonia
Citrus or plant oil-based cleaners
Acidic or vinegar-based cleaners
Oven cleaners
Cleaners containing acetone (propanone)
Any cleaner with WARNING about plastic contact
NOTE: DO NOT allow stainless steel cleaner to come in contact with any plastic parts such as trim pieces, handle
hardware and liners. If unintentional contact of cleaners with plastic parts does occur, clean plastic part with a
sponge and mild detergent mixed with warm water.

49-1000209 Rev. 0 13
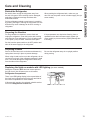
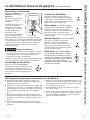
Behind the Refrigerator
Be careful when moving the refrigerator away from
the wall. All types of floor coverings can be damaged,
particularly cushioned coverings and those with
embossed surfaces.
Pull the refrigerator straight out and return it to position
by pushing it straight in. Moving the refrigerator in a side
direction may result in damage to the floor covering or
refrigerator.
When pushing the refrigerator back, make sure you
don’t roll over the power cord or icemaker supply line (on
some models).
CARE AND CLEANING
Care and Cleaning
Preparing for Vacation
For long vacations or absences, remove food and
unplug the refrigerator. Clean the interior with a baking
soda solution of one tablespoon (15 ml) of baking soda
to one quart (1 liter) of water. Leave the doors open.
Set the icemaker power switch to the OFF position and
shut off the water supply to the refrigerator.
,IWKHWHPSHUDWXUHFDQGURSEHORZIUHH]LQJKDYHD
qualified servicer drain the water supply system (on
some models) to prevent serious property damage due
to flooding.
Preparing to Move
Secure all loose items such as shelves and drawers by
taping them securely in place to prevent damage.
When using a hand truck to move the refrigerator, do not
rest the front or back of the refrigerator against the hand
truck. This could damage the refrigerator. Handle only
from the sides of the refrigerator.
Be sure the refrigerator stays in an upright position
during moving.
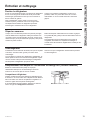
Replacing the lights on models with LED lighting (on some models)
Setting the controls to OFF does not remove power to
the light circuit. Not all features are on all models.
Refrigerator Compartment
There is an LED lighting display in the top and sides of
the fresh food compartment and in the rear and side of
WKHIUHH]HUFRPSDUWPHQWRQVRPHPRGHOV
If this assembly needs to be replaced, schedule service
on-line at cafeappliances.com/service.
LED
Lighting
Display

49-1000209 Rev. 014
Installation Instructions
Refrigerator Models
CZS22M
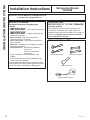
BEFORE YOU BEGIN
Read these instructions completely and
carefully.
•
IMPORTANT — Save these instructions
for local inspector’s use
•
IMPORTANT — Observe all governing
codes and ordinances.
• Note to Installer – Be sure to leave these
instructions with the Consumer.
• Note to Consumer –.HHSWKHVHLQVWUXFWLRQVIRU
future reference.
• Skill level – Installation of this appliance requires
basic mechanical skills.
• Completion time – Refrigerator Installation
30 minutes
Water Line Installation
30 minutes
• Proper installation is the responsibility of the
installer.
• Product failure due to improper installation is not
covered under the Warranty.
If the refrigerator has already been installed, remove
the base grille (see Step 2 in Moving the Refrigerator),
then skip to Step 5 in Installing the Refrigerator.
PREPARATION
WATER SUPPLY TO THE ICEMAKER
(on some models)
If the refrigerator has an icemaker, it will have to be
connected to a cold water line. A water supply kit is
available at extra cost from your dealer or
by visiting our
website at cafeappliances.com/parts. In Canads,
visit cafeappliances.ca/parts.
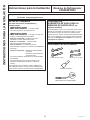
TOOLS YOU WILL NEED
Phillips Head Screwdriver
´DQG´6RFNHW ´DQG´:UHQFK
3ODVWLF3XWW\.QLIH
Questions? Visit our Website at: cafeappliances.com
In Canada, visit cafeappliances.ca
INSTALLATION INSTRUCTIONS

49-1000209 Rev. 0 15
INSTALLATION INSTRUCTIONS
Installation Instructions
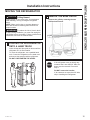
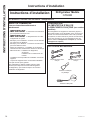
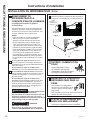
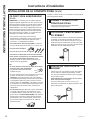
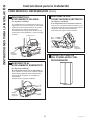
MOVING THE REFRIGERATOR
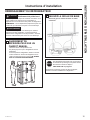
LOADING THE REFRIGERATOR
ONTO A HAND TRUCK
Leave all tape and door pads on doors until the
refrigerator is in its final location.
To move the refrigerator, use a padded hand
truck. Center the refrigerator on the hand truck
and secure the strap around the refrigerator.
DO NOT OVERTIGHTEN THE STRAP.
1
REMOVE THE BASE GRILLE
Remove the grille by removing the two
Phillips head screws.
2
If the refrigerator must go through any
HQWUDQFHWKDWLVOHVVWKDQ´ZLGHWKH
doors must be removed. Proceed to
Step 3.
DO NOT remove the handles.
,IDOOHQWUDQFHVDUHPRUHWKDQ´ZLGH
skip to Installing the Refrigerator.
CAUTION
Lifting Hazard.
Single person lift can cause injury. Use assistance
when handling, moving or lifting the refrigerator
doors.
NOTE: When moving door, to prevent damage to
door and electronics carefully place the door in a
proper location.
WARNING
To reduce the risk of electric shock
or injury during installation, you must first unplug the
refrigerator before proceeding. Failure to follow these
instructions can result in electrical shock.

49-1000209 Rev. 016
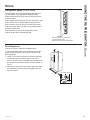
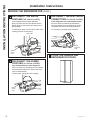
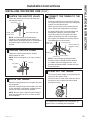
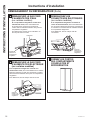
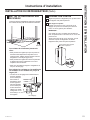
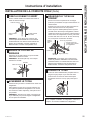
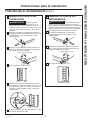
DISCONNECT THE WATER
COUPLING (on some models)
If the refrigerator has a water dispenser,
there is a water line from the cabinet into the
ERWWRPKLQJHRQWKHIUHH]HUGRRUWKDWPXVWEH
disconnected.
To disconnect, push in on the white collar of the
coupling and pull out the tubing.
White collar
Bottom
IUHH]HU
hinge
3
Installation Instructions
MOVING THE REFRIGERATOR (Cont.)
DISCONNECT THE POWER
COUPLING (on some models)
If the refrigerator has a water dispenser,
there is a power line (harness) from the cabinet
LQWRWKHERWWRPKLQJHRQWKHIUHH]HUGRRUWKDW
must be disconnected.
To disconnect, pull apart at the coupling.
4
Bottom
IUHH]HU
hinge
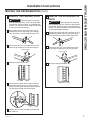
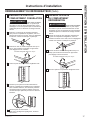
DISCONNECT THE ELECTRICAL
CONNECTORS (on some models)
If the refrigerator has a refreshment center,
there are electrical connectors (harnesses)
from the cabinet into the bottom hinge on the
refrigerator door that must be disconnected.
To disconnect, pull apart each connector.
5
Bottom
refrigerator
hinge
CLOSE THE FREEZER AND
REFRIGERATOR DOORS
6
INSTALLATION INSTRUCTIONS

49-1000209 Rev. 0 17
INSTALLATION INSTRUCTIONS
Installation Instructions
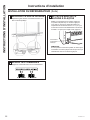
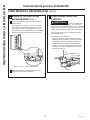
MOVING THE REFRIGERATOR (Cont.)
D
E
REMOVE THE REFRIGERATOR
DOOR
WARNING
Follow all steps for removing
and reinstalling the door. Failure to follow these
instructions, leaving off parts, or overtightening
screws, can lead to the door falling off and result
in injury and property damage.
Remove the refrigerator door top hinge cover (if
HTXLSSHGE\HLWKHUVTXHH]LQJLWDQGSXOOLQJLW
up or by prying it off with a plastic putty knife.
5HPRYHWKHWZR´KH[KHDGVFUHZVWKHQ
lift the hinge straight up to free the hinge pin.
Open the refrigerator door to 90.°
8
A
B
C
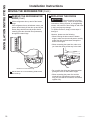
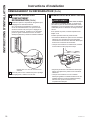
REMOVE THE FREEZER DOOR
WARNING
Follow all steps for removing
and reinstalling the door. Failure to follow these
instructions, leaving off parts, or overtightening
screws, can lead to the door falling off and result
in injury and property damage.
5HPRYHWKHIUHH]HUGRRUWRSKLQJHFRYHULI
HTXLSSHGE\HLWKHUVTXHH]LQJLWDQGSXOOLQJLW
up or by prying it off with a plastic putty knife.
5HPRYHWKHWZR´KH[KHDGVFUHZVWKHQ
lift the hinge straight up to free the hinge pin.
2SHQWKHIUHH]HUGRRUWR.°
$VRQHSHUVRQVORZO\OLIWVWKHIUHH]HUGRRUXS
and off the bottom hinge, the second person
should carefully guide the water line and power
line (harness) through the bottom hinge.
Set the door on a non-scratching surface with
the inside up.
7
A
C
B
´+H[+HDG
90°
90°
´+H[+HDG
90°

49-1000209 Rev. 018
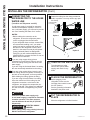
Installation Instructions
MOVING THE REFRIGERATOR (Cont.)
REMOVE THE REFRIGERATOR
DOOR (Cont.)
Lift the refrigerator door up and off the bottom
hinge.
If the refrigerator has a refreshment center, one
person should slowly lift the door up and off the
bottom hinge and the second person should
carefully guide the electrical lines (harnesses)
through the bottom hinge.
Set the door on a non-scratching surface with
the inside up.
8
90°
Refreshment Center Models only
D
E
REPLACING THE DOORS
WARNING
Follow all steps for removing
and reinstalling the door. Failure to follow these
instructions, leaving off parts, or overtightening
screws, can lead to the door falling off and result
in injury and property damage.
To replace the doors, simply reverse steps 3
through 8.
However, please note the following:
• When lowering the doors onto the bottom
hinges, make sure the second person carefully
guides the tube and harnesses through the
holes in the hinges.
• When connecting the water line, make sure
you insert the tubing all the way to the mark.
• Do not pinch the tubing and harnesses when
placing the doors on the bottom hinges.
• When connecting the power line and the
electrical lines (refreshment center models
only), be sure that the connectors are seated
together fully.
9
Mark
INSTALLATION INSTRUCTIONS

49-1000209 Rev. 0 19
INSTALLATION INSTRUCTIONS
Installation Instructions
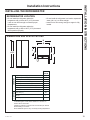
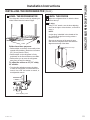
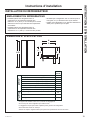
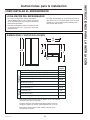
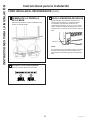
INSTALLING THE REFRIGERATOR
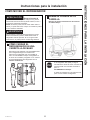
DIMENSIONS AND SPECIFICATIONS
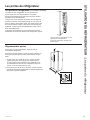
REFRIGERATOR LOCATION
• Do not install the refrigerator where the
temperature will go below 60°F (16°C) because
it will not run often enough to maintain proper
temperatures.
• Do not install the refrigerator where the
temperature will go above 100°F (37°C) because it
will not perform properly.
• Do not install the refrigerator in a location exposed to
water (rain, etc.) or direct sunlight.
• Install it on a floor strong enough to support it fully
loaded.
If installed against a wall, allow clearance of 14-3/16" on
freezer side to remove bin.
Clearance required to remove fresh food full-size pan without
disassembling is 18-15/16".
Allow additional space for any necessary leveling adjustments.
A
G
D
C
F
B
E
H
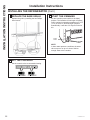
Height to top of hinge (in.)
CZS22M
Models
A
Height to top of case (in.) B
Case depth without door (in.) C
Case depth less door handle (in.) D
Case depth with door handle (in.) E
'HSWKZLWKIUHVKIRRGGRRURSHQÛLQF
Width (in.) G
:LGWKZLWKGRRURSHQÛZLWKGRRUKDQGOHLQH
Each side (in.)
Top (in.)
Back (in.)
AIR
CLEARANCES
OVERALL
DIMENSIONS
70-1/8
69
24
28-3/4
29-3/8
46-1/2
36-1/4
42-1/4
1/8
1
2
La page est en cours de chargement...
La page est en cours de chargement...
La page est en cours de chargement...
La page est en cours de chargement...
La page est en cours de chargement...
La page est en cours de chargement...
La page est en cours de chargement...
La page est en cours de chargement...
La page est en cours de chargement...
La page est en cours de chargement...
La page est en cours de chargement...
La page est en cours de chargement...
La page est en cours de chargement...
La page est en cours de chargement...
La page est en cours de chargement...
La page est en cours de chargement...
La page est en cours de chargement...
La page est en cours de chargement...
La page est en cours de chargement...
La page est en cours de chargement...
La page est en cours de chargement...
La page est en cours de chargement...
La page est en cours de chargement...
La page est en cours de chargement...
La page est en cours de chargement...
La page est en cours de chargement...
La page est en cours de chargement...
La page est en cours de chargement...
La page est en cours de chargement...
La page est en cours de chargement...
La page est en cours de chargement...
La page est en cours de chargement...
La page est en cours de chargement...
La page est en cours de chargement...
La page est en cours de chargement...
La page est en cours de chargement...
La page est en cours de chargement...
La page est en cours de chargement...
La page est en cours de chargement...
La page est en cours de chargement...
La page est en cours de chargement...
La page est en cours de chargement...
La page est en cours de chargement...
La page est en cours de chargement...
La page est en cours de chargement...
La page est en cours de chargement...
La page est en cours de chargement...
La page est en cours de chargement...
La page est en cours de chargement...
La page est en cours de chargement...
La page est en cours de chargement...
La page est en cours de chargement...
La page est en cours de chargement...
La page est en cours de chargement...
La page est en cours de chargement...
La page est en cours de chargement...
La page est en cours de chargement...
La page est en cours de chargement...
La page est en cours de chargement...
La page est en cours de chargement...
La page est en cours de chargement...
La page est en cours de chargement...
La page est en cours de chargement...
La page est en cours de chargement...
La page est en cours de chargement...
La page est en cours de chargement...
La page est en cours de chargement...
La page est en cours de chargement...
La page est en cours de chargement...
La page est en cours de chargement...
La page est en cours de chargement...
La page est en cours de chargement...
La page est en cours de chargement...
La page est en cours de chargement...
La page est en cours de chargement...
La page est en cours de chargement...
La page est en cours de chargement...
La page est en cours de chargement...
La page est en cours de chargement...
La page est en cours de chargement...
La page est en cours de chargement...
-
 1
1
-
 2
2
-
 3
3
-
 4
4
-
 5
5
-
 6
6
-
 7
7
-
 8
8
-
 9
9
-
 10
10
-
 11
11
-
 12
12
-
 13
13
-
 14
14
-
 15
15
-
 16
16
-
 17
17
-
 18
18
-
 19
19
-
 20
20
-
 21
21
-
 22
22
-
 23
23
-
 24
24
-
 25
25
-
 26
26
-
 27
27
-
 28
28
-
 29
29
-
 30
30
-
 31
31
-
 32
32
-
 33
33
-
 34
34
-
 35
35
-
 36
36
-
 37
37
-
 38
38
-
 39
39
-
 40
40
-
 41
41
-
 42
42
-
 43
43
-
 44
44
-
 45
45
-
 46
46
-
 47
47
-
 48
48
-
 49
49
-
 50
50
-
 51
51
-
 52
52
-
 53
53
-
 54
54
-
 55
55
-
 56
56
-
 57
57
-
 58
58
-
 59
59
-
 60
60
-
 61
61
-
 62
62
-
 63
63
-
 64
64
-
 65
65
-
 66
66
-
 67
67
-
 68
68
-
 69
69
-
 70
70
-
 71
71
-
 72
72
-
 73
73
-
 74
74
-
 75
75
-
 76
76
-
 77
77
-
 78
78
-
 79
79
-
 80
80
-
 81
81
-
 82
82
-
 83
83
-
 84
84
-
 85
85
-
 86
86
-
 87
87
-
 88
88
-
 89
89
-
 90
90
-
 91
91
-
 92
92
-
 93
93
-
 94
94
-
 95
95
-
 96
96
-
 97
97
-
 98
98
-
 99
99
-
 100
100
-
 101
101


Cafe CZS22MP2NS1 Le manuel du propriétaire
- Catégorie
- Frigos
- Taper
- Le manuel du propriétaire
dans d''autres langues
- English: Cafe CZS22MP2NS1 Owner's manual
- español: Cafe CZS22MP2NS1 El manual del propietario