Indesit EDPA 745 A1 ECO EU Le manuel du propriétaire
- Catégorie
- Sèche-linge
- Taper
- Le manuel du propriétaire

1
GB
Contents
Installation, 2
Where to install the tumble dryer
Ventilation
Electrical connections
Preliminary information
Warnings, 4
General safety
Saving energy and respecting the environment
Care and maintenance, 6
Disconnecting the power supply
Cleaning the filter after each cycle
Checking the drum after each cycle
Emptying the water container after each cycle
Cleaning the condenser unit
Cleaning the tumble dryer
Description of the tumble dryer, 8
Features
Control panel
How to carry out a drying cycle, 10
Starting and selecting a programme
Programmes and options, 11
Programme chart
Special programmes
Options
Opening the door
Laundry, 14
Sorting laundry
Care labels
Drying times
Troubleshooting, 15
Assistance and Guarantee, 16
Spare parts
Product guarantee and repair information
Information on recycling and disposal
EDPA 745 A ECO
Instruction manual
TUMBLE DRYER
English,1
EN
Español,33
ES
PT
Français,17
FR
IT
DE
Deutsch, 65Português, 49
! This symbol reminds you to read this
instruction manual.
! Keep this manual at hand for immediate reference whenever
necessary. Always store this manual close to the tumble dryer and
remember to pass it on to any new owners when selling or tran-
sferring the appliance, so they may familiarise with the warnings
and suggestions herein contained.
! Read these instructions carefully: the following pages contain
important information on installation and useful suggestions for
operating the appliance.
www.indesit.com

2
GB
Where to put your dryer
• Place your dryer at a
distance from gas ranges,
stoves, heaters, or cooktops
because flames can damage
the appliance. The dryer
should be installed in an
ambient room temperature
of between 20 to 23°C
for optimum performance.
But will function if the room is between 14 and
30°C. If you are going to install the appliance
under a work counter, be sure to leave a 10 mm
space between the top and any other objects
on or above the machine and a 15 mm space
between the sides and lateral furnishings or
walls. This is to ensure proper air circulation.
The appliance must be installed with the rear
surface placed against a wall.
Ventilation
• When the dryer is in use, there has to be adequate ventilation.
Make sure you put your dryer in an environment that is not damp
and has proper air circulation throughout. Airflow around the dryer is
essential to condense the water produced during the washing, the
dryer will not operate efficiently in an enclosed space or cupboard.
! If using the dryer in a small or cold room some
condensation will be experienced.
!
We do not recommend that the dryer is
installed in a cupboard but the dryer must never
be installed behind a lockable door, a sliding
door or a door with a hinge on the opposite
side to that of the dryer door.
1
2
2
1
Less than 1m
Fig. A Fig. B
Water Drain
If the machine is positioned close to a drain it is possible to drain the
condensed water directly without using the waterbottle. In which
case it is no longer necessary to empty the water bottle at the end
of each cycle. If the Dryer is positioned above or close to a Washing
Machine the same drainage can be used. Just remove the tube
indicated in figure A and connect it to the drainage. If the drainage
is further away than the length of the tube it is possible to buy and
connect a tube of the same diameter and the necessary length in
order to reach the drain. To install the new tube just substitute the
existing one as indicated in figure B inserting it in the same place.
! The drain tube has to be below 1 m from the bottom of
the Dryer.
! Once the Dryer has been installed please assure that
the drain tube is not bent or kinked.
Electrical connections
Before plugging the appliance into the socket,
check the following:
• Make sure your hands are dry.
• The socket must have an earth connection.
• The socket must be able to withstand the
machine’s maximum power output as indi-
cated on the rating plate (see Description
of the tumble dryer)
• The power supply voltage must fall within
the values indicated on the data plate (see
Description of the tumble dryer).
• The socket must be compatible with the
dryer’s plug. Should this not be the case,
replace the plug or the socket.
! DO NOT USE EXTENSION CORDS.
! The dryer must not be installed outdoors,
even if the space is sheltered. It can be very
dangerous if exposed to rain or storms.
! Once installed, the dryer’s electrical wire and
plug must be within reach.
! The power cord must not be bent or
squashed.
! If the plug being replaced is a non-
rewirable type, then the cut-off plug must
be disposed of safely. DO NOT leave it
where it can be inserted into a socket
and create a shock hazard.
! The power must be regularly che-
cked. If the supply cord is damaged, it
must be replaced by the manufacturer,
its service agent or similarly qualified
persons in order to avoid a hazard.
(see Assistance). New or longer elec-
tric cords are supplied by authorised
dealers at a supplementary cost.
! The manufacturer denies any
responsibility should any of these rules
not be followed.
! If in doubt about any of the above
consult a qualified electrician.
Levelling the tumble dryer
The dryer must be installed level for correct
operation.
When you have installed your dryer in its final
location check that it is level first side-to-side,
then front to back. If the dryer is not level,
adjust the two legs up or down until your
dryer is level.
Preliminary information
Once you’ve installed your dryer and before you use it, clean
the inside of the drum to remove any dust that could have
accumulated during transportation.
Warning ! Before you use your dryer ensure that its has
been in a upright position for at least 6 hours.
Installation
10 mm
15 mm
15 mm

3
GB
This household tumble drier is a Condenser
The weighted Annual Energy Consumption (AEc)* kWh 1) 354.0
This household tumble drier is a Automatic
Energy consumption full load; Edry - kWh 2) 2.96
Energy consumption partial load; Edry½ - kWh 2) 1.63
Power consumption: off-mode (Po) - Watts 0.14
Power consumption: left-on mode (Pl) - Watts 1.79
Prog. Time - weighted (Tt) full & partial load - minutes 3) 164
Full load (Tdry) - minutes 215
Partial load (Tdry½) - minutes 125
weighted (Ct) full & partial load 3) 71
full load (Cdry) 71
partial load (Cdry½) 72
Airborne acoustical noise emissions - dB(A) re 1 pW 69.0
Programme time in minute, for program “Synthetics” full load 90
Partial load for program “Synthetics” N/A
Average condensation efficiency - %
1) "Standard cotton” at full and partial load is the standard programme to which the
information in the label and the fiche relates. The standard cotton program is
suitable to dry at cupboard level (0%) cotton laundry and is the most efficient
programme in terms of energy consumption. Partial load is half the rated load.
2) based on 160 drying cycles of the standard cotton programme at full and partial
load, and the consumption of the low-power modes. Actual energy consumption
will depend on how the appliance is used.
3) Weighted average of 3 cycles at full load and 4 cycles at half load.
Regulation 932/2012.
Energy consumption in kWh, for program “Synthetics” full load 0.92
Energy efficiency class on a scale from A+++ (low consumption)
to D (high consumption)
A
Duration of the 'left-on mode' for power management system -
minutes
30
Condensation efficiency class on a scale from G (least efficient) to
A (most efficient)
C
P
roduct Data - Regulation 392/2012.
Brand
Indesit
Model
EDPA 745 A ECO (EU)
Rated capacity of cotton laundry for the "standard cotton
programme" at full load - kg
7.0
Where to put your dryer
• Place your dryer at a
distance from gas ranges,
stoves, heaters, or cooktops
because flames can damage
the appliance. The dryer
should be installed in an
ambient room temperature
of between 20 to 23°C
for optimum performance.
But will function if the room is between 14 and
30°C. If you are going to install the appliance
under a work counter, be sure to leave a 10 mm
space between the top and any other objects
on or above the machine and a 15 mm space
between the sides and lateral furnishings or
walls. This is to ensure proper air circulation.
The appliance must be installed with the rear
surface placed against a wall.
Ventilation
• When the dryer is in use, there has to be adequate ventilation.
Make sure you put your dryer in an environment that is not damp
and has proper air circulation throughout. Airflow around the dryer is
essential to condense the water produced during the washing, the
dryer will not operate efficiently in an enclosed space or cupboard.
! If using the dryer in a small or cold room some
condensation will be experienced.
!
We do not recommend that the dryer is
installed in a cupboard but the dryer must never
be installed behind a lockable door, a sliding
door or a door with a hinge on the opposite
side to that of the dryer door.
1
2
2
1
Less than 1m
Fig. A Fig. B
Water Drain
If the machine is positioned close to a drain it is possible to drain the
condensed water directly without using the waterbottle. In which
case it is no longer necessary to empty the water bottle at the end
of each cycle. If the Dryer is positioned above or close to a Washing
Machine the same drainage can be used. Just remove the tube
indicated in figure A and connect it to the drainage. If the drainage
is further away than the length of the tube it is possible to buy and
connect a tube of the same diameter and the necessary length in
order to reach the drain. To install the new tube just substitute the
existing one as indicated in figure B inserting it in the same place.
! The drain tube has to be below 1 m from the bottom of
the Dryer.
! Once the Dryer has been installed please assure that
the drain tube is not bent or kinked.
Electrical connections
Before plugging the appliance into the socket,
check the following:
• Make sure your hands are dry.
• The socket must have an earth connection.
• The socket must be able to withstand the
machine’s maximum power output as indi-
cated on the rating plate (see Description
of the tumble dryer)
• The power supply voltage must fall within
the values indicated on the data plate (see
Description of the tumble dryer).
• The socket must be compatible with the
dryer’s plug. Should this not be the case,
replace the plug or the socket.
! DO NOT USE EXTENSION CORDS.
! The dryer must not be installed outdoors,
even if the space is sheltered. It can be very
dangerous if exposed to rain or storms.
! Once installed, the dryer’s electrical wire and
plug must be within reach.
! The power cord must not be bent or
squashed.
! If the plug being replaced is a non-
rewirable type, then the cut-off plug must
be disposed of safely. DO NOT leave it
where it can be inserted into a socket
and create a shock hazard.
! The power must be regularly che-
cked. If the supply cord is damaged, it
must be replaced by the manufacturer,
its service agent or similarly qualified
persons in order to avoid a hazard.
(see Assistance). New or longer elec-
tric cords are supplied by authorised
dealers at a supplementary cost.
! The manufacturer denies any
responsibility should any of these rules
not be followed.
! If in doubt about any of the above
consult a qualified electrician.
Levelling the tumble dryer
The dryer must be installed level for correct
operation.
When you have installed your dryer in its final
location check that it is level first side-to-side,
then front to back. If the dryer is not level,
adjust the two legs up or down until your
dryer is level.
Preliminary information
Once you’ve installed your dryer and before you use it, clean
the inside of the drum to remove any dust that could have
accumulated during transportation.
Warning ! Before you use your dryer ensure that its has
been in a upright position for at least 6 hours.
Installation
10 mm
15 mm
15 mm
Maximum load sizes: 7 kg

4
GB
Warnings
! This appliance has been designed and built
according to international safety standards.
These warnings are given for safety reasons
and must be followed carefully.
General safety
• This appliance can be used by children
aged from 8 years and above and
persons with reduced physical, sensory or
mental capabilities or lack of experience
and knowledge if they have been given
supervision or instruction concerning use of
the appliance in a safe way and understand
the hazards involved.
• This tumble dryer has been designed for
home, and not professional, use.
• Do not touch the appliance while barefoot
or with wet hands or feet.
• Unplug the machine by pulling on the plug,
not the cord.
• After using the dryer, turn it off and unplug
it. Keep the door closed to make sure that
children do not use it as a toy.
• Children should be supervised to ensure
that they do not play with the dryer.
• Cleaning and user maintenance shall not be
made by children without supervision.
•Children of less than 3 years should be
kept away from the appliance unless
continuously supervised.
• The appliance must be installed correctly
and have proper ventilation. The air intake
at the front of the dryer should never be
obstructed (see Installation).
• Never use the dryer on carpeting where
the pile height would prevent air from
entering the dryer from the base.
• Check to see if the dryer is empty before
loading it.
•
The back of the dryer could become
very hot. Never touch it while in use.
• Do not use liquid fabric softeners in the
dryer; add it to the final rinse of your wash.
• Do not overload the dryer (see Laundry for
maximum loads).
• Do not load items that are dripping wet.
• Carefully check all instructions on clothing
labels (see Laundry).
• Do not tumble dry large, very bulky items.
• Do not tumble dry acrylic fibres at high
temperatures.
• Do not turn off the dryer when there are still
warm items inside.
• Clean the filter after each use (see
Maintenance).
• Empty the Water Container after each use
(see Maintenance).
• Clean the Heat Pump filter unit at regular
intervals (see Maintenance).
• Do not allow lint to collect around the dryer.
• Never climb on top of the dryer. It could
result in damage.
• Always follow electrical standards and
requirements (see Installation).
• Always buy original spare parts and
accessories (see Service).
To minimise the risk of fire in your tumble
dryer, the following should be observed:
• Tumble dry items only if they have been
washed with detergent and water, rinsed and
been through the spin cycle. It is a fire hazard
to dry items that HAVE NOT been washed
with water.
• Do not dry garments that have been treated
with chemical products.
• ●Do not tumble dry items that have been
spotted or soaked with vegetable or cooking
oils, this constitutes a fire hazard. Oil-affected
items can ignite spontaneously,especially
when exposed to heat sources such as
a tumble dryer. The items become warm,
causing an oxidisation reaction with the
oil, Oxidisation creates heat. If the heat
cannot escape, items can become hot
enough to catch fire. Piling, stacking or
storing oil-effected items can prevent heat
from escaping and so create a fire hazard.
If it is unavoidable that fabrics containing
vegetable or cooking oil or those that have
been contaminated withhair care products
be placed in a tumble dryer they should first
be washed with extra detergent - this will
reduce, but not eliminate the hazard. They
should not be removed from the dryer and
piled or stacked while hot.
• ●Do not tumble dry items that have previously
been cleaned in or washed in, soaked in
or soiled with petrol/gasoline, dry cleaning
solvents or other flammable or explosive
substances. Highly flammable substances
commonly used in domestic environments
including cooking oil, acetone, denatured
alcohol, kerosene, spot removers, turpentine,
waxes and wax removers. Ensure these
items have been washed in hot water with
an extra amount of detergent before being
dried in the tumble dryer.
• Do not tumble dry items containing foam
rubber (also known as latex foam), or
similarly textured rubber like materials.
Foam rubber materials can, when heated,
produce fire by spontaneous combustion.
• Fabric softener or similar products should
not be used in a tumble dryer to eliminate
the effects of static electricity unless the
practice is specifically recommended by
the manufacturer of the fabric softener
product.
• ●Do not tumble dry undergarments that
contain metal reinforcements eg. bras
with metal reinforcing wires. Damage to
the tumble dryer can result if the metal
reinforcements come loose during drying.
• ●Do not tumble dry rubber, plastic articles
such as shower caps or babies waterproof
covers, polythene or paper.
• ●Do not tumble dry rubber backed articles,
clothes fitted with foam rubber pads,
pillows, galoshes and rubber coated tennis
shoes.
• ●Remove all objects from pockets such as
lighters and matches.
! WARNING: Never stop the dryer before
the end of the drying cycle unless all
items are quickly removed and spread
out so that the heat is dissipated.
Save energy and respect the environment
• Wring out all items to eliminate excess water before
tumble drying (if you use a washing machine first, select
a high spin cycle). Doing this will save time and energy
during drying.
• Always dry full loads - you save energy: single items or
small loads take longer to dry.
• Clean the filter after each use to contain energy
consumption costs (see Maintenance).

5
GB
Warnings
! This appliance has been designed and built
according to international safety standards.
These warnings are given for safety reasons
and must be followed carefully.
General safety
• This appliance can be used by children
aged from 8 years and above and
persons with reduced physical, sensory or
mental capabilities or lack of experience
and knowledge if they have been given
supervision or instruction concerning use of
the appliance in a safe way and understand
the hazards involved.
• This tumble dryer has been designed for
home, and not professional, use.
• Do not touch the appliance while barefoot
or with wet hands or feet.
• Unplug the machine by pulling on the plug,
not the cord.
• After using the dryer, turn it off and unplug
it. Keep the door closed to make sure that
children do not use it as a toy.
• Children should be supervised to ensure
that they do not play with the dryer.
• Cleaning and user maintenance shall not be
made by children without supervision.
•Children of less than 3 years should be
kept away from the appliance unless
continuously supervised.
• The appliance must be installed correctly
and have proper ventilation. The air intake
at the front of the dryer should never be
obstructed (see Installation).
• Never use the dryer on carpeting where
the pile height would prevent air from
entering the dryer from the base.
• Check to see if the dryer is empty before
loading it.
•
The back of the dryer could become
very hot. Never touch it while in use.
• Do not use liquid fabric softeners in the
dryer; add it to the final rinse of your wash.
• Do not overload the dryer (see Laundry for
maximum loads).
• Do not load items that are dripping wet.
• Carefully check all instructions on clothing
labels (see Laundry).
• Do not tumble dry large, very bulky items.
• Do not tumble dry acrylic fibres at high
temperatures.
• Do not turn off the dryer when there are still
warm items inside.
• Clean the filter after each use (see
Maintenance).
• Empty the Water Container after each use
(see Maintenance).
• Clean the Heat Pump filter unit at regular
intervals (see Maintenance).
• Do not allow lint to collect around the dryer.
• Never climb on top of the dryer. It could
result in damage.
• Always follow electrical standards and
requirements (see Installation).
• Always buy original spare parts and
accessories (see Service).
To minimise the risk of fire in your tumble
dryer, the following should be observed:
• Tumble dry items only if they have been
washed with detergent and water, rinsed and
been through the spin cycle. It is a fire hazard
to dry items that HAVE NOT been washed
with water.
• Do not dry garments that have been treated
with chemical products.
• ●Do not tumble dry items that have been
spotted or soaked with vegetable or cooking
oils, this constitutes a fire hazard. Oil-affected
items can ignite spontaneously,especially
when exposed to heat sources such as
a tumble dryer. The items become warm,
causing an oxidisation reaction with the
oil, Oxidisation creates heat. If the heat
cannot escape, items can become hot
enough to catch fire. Piling, stacking or
storing oil-effected items can prevent heat
from escaping and so create a fire hazard.
If it is unavoidable that fabrics containing
vegetable or cooking oil or those that have
been contaminated withhair care products
be placed in a tumble dryer they should first
be washed with extra detergent - this will
reduce, but not eliminate the hazard. They
should not be removed from the dryer and
piled or stacked while hot.
• ●Do not tumble dry items that have previously
been cleaned in or washed in, soaked in
or soiled with petrol/gasoline, dry cleaning
solvents or other flammable or explosive
substances. Highly flammable substances
commonly used in domestic environments
including cooking oil, acetone, denatured
alcohol, kerosene, spot removers, turpentine,
waxes and wax removers. Ensure these
items have been washed in hot water with
an extra amount of detergent before being
dried in the tumble dryer.
• Do not tumble dry items containing foam
rubber (also known as latex foam), or
similarly textured rubber like materials.
Foam rubber materials can, when heated,
produce fire by spontaneous combustion.
• Fabric softener or similar products should
not be used in a tumble dryer to eliminate
the effects of static electricity unless the
practice is specifically recommended by
the manufacturer of the fabric softener
product.
• ●Do not tumble dry undergarments that
contain metal reinforcements eg. bras
with metal reinforcing wires. Damage to
the tumble dryer can result if the metal
reinforcements come loose during drying.
• ●Do not tumble dry rubber, plastic articles
such as shower caps or babies waterproof
covers, polythene or paper.
• ●Do not tumble dry rubber backed articles,
clothes fitted with foam rubber pads,
pillows, galoshes and rubber coated tennis
shoes.
• ●Remove all objects from pockets such as
lighters and matches.
! WARNING: Never stop the dryer before
the end of the drying cycle unless all
items are quickly removed and spread
out so that the heat is dissipated.
Save energy and respect the environment
• Wring out all items to eliminate excess water before
tumble drying (if you use a washing machine first, select
a high spin cycle). Doing this will save time and energy
during drying.
• Always dry full loads - you save energy: single items or
small loads take longer to dry.
• Clean the filter after each use to contain energy
consumption costs (see Maintenance).

6
GB
Disconnecting the power supply
! Disconnect the dryer when not in use or
during cleaning and maintenance operations.
Cleaning the filter after each cycle
The filter is a fundamental component of the
dryer: its function is to collect lint and fluff that
form during drying.
Clean the filter once
drying is completed, by
rinsing it under running
water or cleaning it with a
vacuum cleaner. Should
the filter become clog-
ged, the flow of air inside
the dryer will be seriously
hampered: drying times becomes longer and
more energy is consumed. Moreover, the dryer
may become damaged.
The filter is located in
front of the dryer seal
(see Picture).
Removing the filter:
1. Pull the filter’s plastic
handle upwards (see
Picture).
2. Clean the fluff off the
filter and replace it correctly. Ensure that the
filter is pushed fully home.
! Do not use the dryer unless the filter has
been replaced in its holder.
Checking the drum after each cycle
Rotate the drum manually to remove smaller items (handker-
chiefs) that could have been left inside the dryer.
Cleaning the drum
! Avoid using abrasives, steel wool or stainless steel cleaning
agents to clean the drum. A coloured film may appear on the
stainless steel drum surface: it may be caused by a combina-
tion of water and/or cleaning agents such as wash-softeners.
This coloured film does not affect the dryer’s performance.
Emptying the water container after each
cycle
2
Remove the water container and
empty it into a sink or other
suitable drain outlet, then
replace it correctly.
Always check the water contai-
ner and empty it before starting
a new drying cycle.
-Failure to empty the water container may cause the
following:
- The dryer stops heating (thus the load may still be
damp at the end of the drying cycle).
- The “Empty water container” LED activates to show
that the water container is full.
Priming the Water Collection System
When your dryer is new, the Water Container will not
collect Water until the system is primed, this will take
1 or 2 drying cycles. Once primed it will collect Water
during every cycle.
Cleaning the Heat Pump Filter Unit
• Periodically (every 5 drying cycles) remove
Heat pump filter unit and clean any build up
of fluff from the surface of the filter by rinsing
it under running water or with your vacuum
cleaner.
We however recommend that you clean this
filter after every drying cycle to optimize the
dryers performance.
To remove Heat pump
filter unit:
1. Unplug the dryer and
open the door.
2. Remove the filter unit
by rotating the 4 clips
to the vertical position
then pulling the filter
unit towards you.
3. Separate the two
parts of the filter unit and
clean the surface of the
filter.
! Warning: The front of
the heat pump is made
from thin metal plates.
Take care that you do
not damage these or cut
yourself when cleaning,
removing or replacing
the filter unit.
4.Whenever you clean
the Heat pump filter
unit always clean any
build up of fluff from
the surface of the metal
plates. Carefully clean
this fluff off with a damp
cloth,sponge or vacuum
cleaner. Never use your
Fingers.
5. Assemble the two parts of the filter clean
the surface of the seals and replace with the
4 clips into the horizontal position, sure that
the catches have been secured.
Cleaning the tumble dryer
• The external metal, plastic and rubber parts can be clea-
ned with a damp cloth.
• Clean the front air intake grille regularly (every 6 months)
with a vacuum cleaner to remove any lint, fluff or dust
deposits. Furthermore, remove any lint deposits from the
front part of the condenser and from the filter area, using a
vacuum cleaner every so often.
! Do not use solvents or abrasives.
! Have the dryer checked regularly by authorised technical
personnel in order to ensure that the electrical and mechani-
cal parts work safely (see Assistance).
Care and maintenance
2
Water container
Heat pump
filter unit
Condenser cover
Catches
Filter
Handle
Air intake
Quick Tips
!Remember to clean your filter and Heat
Pump filter unit after each load.
! Remember to empty your water contain-
er after each load.
! Doing this will keep your machine work-
ing at its BEST!

7
GB
Disconnecting the power supply
! Disconnect the dryer when not in use or
during cleaning and maintenance operations.
Cleaning the filter after each cycle
The filter is a fundamental component of the
dryer: its function is to collect lint and fluff that
form during drying.
Clean the filter once
drying is completed, by
rinsing it under running
water or cleaning it with a
vacuum cleaner. Should
the filter become clog-
ged, the flow of air inside
the dryer will be seriously
hampered: drying times becomes longer and
more energy is consumed. Moreover, the dryer
may become damaged.
The filter is located in
front of the dryer seal
(see Picture).
Removing the filter:
1. Pull the filter’s plastic
handle upwards (see
Picture).
2. Clean the fluff off the
filter and replace it correctly. Ensure that the
filter is pushed fully home.
! Do not use the dryer unless the filter has
been replaced in its holder.
Checking the drum after each cycle
Rotate the drum manually to remove smaller items (handker-
chiefs) that could have been left inside the dryer.
Cleaning the drum
! Avoid using abrasives, steel wool or stainless steel cleaning
agents to clean the drum. A coloured film may appear on the
stainless steel drum surface: it may be caused by a combina-
tion of water and/or cleaning agents such as wash-softeners.
This coloured film does not affect the dryer’s performance.
Emptying the water container after each
cycle
2
Remove the water container and
empty it into a sink or other
suitable drain outlet, then
replace it correctly.
Always check the water contai-
ner and empty it before starting
a new drying cycle.
-Failure to empty the water container may cause the
following:
- The dryer stops heating (thus the load may still be
damp at the end of the drying cycle).
- The “Empty water container” LED activates to show
that the water container is full.
Priming the Water Collection System
When your dryer is new, the Water Container will not
collect Water until the system is primed, this will take
1 or 2 drying cycles. Once primed it will collect Water
during every cycle.
Cleaning the Heat Pump Filter Unit
• Periodically (every 5 drying cycles) remove
Heat pump filter unit and clean any build up
of fluff from the surface of the filter by rinsing
it under running water or with your vacuum
cleaner.
We however recommend that you clean this
filter after every drying cycle to optimize the
dryers performance.
To remove Heat pump
filter unit:
1. Unplug the dryer and
open the door.
2. Remove the filter unit
by rotating the 4 clips
to the vertical position
then pulling the filter
unit towards you.
3. Separate the two
parts of the filter unit and
clean the surface of the
filter.
! Warning: The front of
the heat pump is made
from thin metal plates.
Take care that you do
not damage these or cut
yourself when cleaning,
removing or replacing
the filter unit.
4.Whenever you clean
the Heat pump filter
unit always clean any
build up of fluff from
the surface of the metal
plates. Carefully clean
this fluff off with a damp
cloth,sponge or vacuum
cleaner. Never use your
Fingers.
5. Assemble the two parts of the filter clean
the surface of the seals and replace with the
4 clips into the horizontal position, sure that
the catches have been secured.
Cleaning the tumble dryer
• The external metal, plastic and rubber parts can be clea-
ned with a damp cloth.
• Clean the front air intake grille regularly (every 6 months)
with a vacuum cleaner to remove any lint, fluff or dust
deposits. Furthermore, remove any lint deposits from the
front part of the condenser and from the filter area, using a
vacuum cleaner every so often.
! Do not use solvents or abrasives.
! Have the dryer checked regularly by authorised technical
personnel in order to ensure that the electrical and mechani-
cal parts work safely (see Assistance).
Care and maintenance
2
Water container
Heat pump
filter unit
Condenser cover
Catches
Filter
Handle
Air intake
Quick Tips
!Remember to clean your filter and Heat
Pump filter unit after each load.
! Remember to empty your water contain-
er after each load.
! Doing this will keep your machine work-
ing at its BEST!

8
GB
On/Off
button
Start/Pause button
and indicator light
Programme
selection knob
Description of
the tumble dryer
Control panel
Options
buttons and
indicator lights
Drying phase
or Delay timer
indicator lights
Maintenance
indicator lights
Press
the door
Heat Pump
Filter Unit
(cover open)
Water container
Rating plate
Heat Pump Filter
Unit cover handle
(Pull here to open)
Filter
Air
intake
grille
Opening the door Features
Model
& Serial
Numbers
Ajustable feet
(to level dryer)

9
GB
ON/OFF/Reset button
Pressing the button normally will cause the machine to switch on or off. If the button is pressed for 3 seconds while the dryer is in
function, the machine will switch off and the running cycle will reset.
Programme selection knob
Allows for setting the programme: turn until the indicator points towards the desired programme (see Starting and selecting a programme).
Options buttons
Allow for selecting the options available for the selected programme. The relative indicator lights turn on when the option has been
selected (see Programmes and options).
START/PAUSE button and indicator light
When the green light flashes slowly, press the button to start the programme. When the cycle is under way, the indicator light remains
on. To put the programme into pause mode, press the button again; the indicator light will turn orange and start flashing again.
To resume the programme from the point it was interrupted, press the button again (see Start and programme selection).
Indicator lights
“Maintenance” indicator lights
The indicator lights provide important information. They indicate the following:
The “Empty water container” indicator light signals that the water container must be emptied.
If the water container fills during the course of the programme, the LED lights up. The dryer automatically starts a cool tumble cycle
and the START/PAUSE LED flashes orange. Press the START/PAUSE button to resume the cycle from the point it was interrupted.
In order to avoid this procedure, always empty the water container after using the tumble dryer (see Care and maintenance).
Before each programme, the “Clean filter” indicator light signals that it is essential to clean the filter each time before using the
tumble dryer (see Care and maintenance).
The “Clean Heat Pump filter unit” indicator light signals that it is essential to clean the condenser regularly (see Care and main-
tenance).
“Drying phases” indicator lights
The indicator light signals that the drying phase is running.
The indicator light signals that the cooling phase is running.
The END indicator light signals that the programme has ended.
“Delay timer” indicator light
If the ”Delay timer” option has been activated (see “Programmes and options”), after the programme has started, the indicator light
corresponding to the chosen delay time will start flashing:
As time passes, the remaining delay will be displayed and the corresponding indicator light will flash:
Once the set delay time ends, the flashing LED will turn off and the set programme will start.

10
GB
Starting and selecting a programme
1. Plug the dryer into the power supply socket.
2. Select the programme according to the type of laundry (see Laundry).
3. Open the door, ensure that the filter is clean and securely placed and that the water container is empty and correctly slotted (see
Care and maintenance).
4. Load the machine, making sure that no piece of laundry gets between the door and the door seal. Close the door.
5. Press the ON/OFF button to start the machine.
6. After consulting the programme chart and the indications for each type of fabric (see Laundry), turn the Programme selection
knob towards the programme corresponding to the type of laundry to be dried (see Programmes and options).
! Warning: If the position of the programme selection knob changes after pressing the START/PAUSE button, the selected program-
me will NOT be modified. To modify the programme, press the START/PAUSE button to put the programme in pause mode (the
indicator light flashes orange), then select a new programme and the relative options. Press the START/PAUSE button to start the
new programme.
7. If necessary, set the time of the delayed start and any other options (see Programmes and options).
8. Press the START/PAUSE button to start the drying cycle.
Laundry can be checked while the drying programme runs and any garments already dry can be removed, while drying continues
for the remaining items. After closing the door, press the START/PAUSE button to resume machine operation.
9. The final COOL TUMBLE phase (i.e. the fabrics are cooled) activates during the last few minutes of the drying programme; always
allow this phase to terminate.
10. When the END indicator light turns on, the programme has ended. The buzzer will beep 3 times to let you know that your
programme is complete. Open the door, remove the laundry then clean the filter and replace it. Empty the water container and put it
back in its slot (see Care and maintenance).
If the “Anti Crease” option was selected and laundry is not removed immediately, the drum will rotate garments at intervals for 10
hours or until the door is opened.
11. Disconnect the dryer from the power supply.
Standby mode
This tumble dryer, in compliance with new energy saving regulations, is fitted with an automatic standby system which is enabled
after about 30 minutes if no activity is detected. Press and hold the ON/OFF button until the dryer reactivates.
How to carry out a
drying cycle

11
GB
Programme chart
Programmes and options
Programme
Max.
load
(kg)
Compatible options
Cycle
3
duration
Fast & Easy
1 Fast 45’
1
Anti Crease - Delay Timer. 45’
2 Easy mix
3
Anti Crease - Delay Timer. 100’
3 Cotton fast Iron
Max. Extra Care - Anti Crease - Delay Timer. 170’
4 Synthetic fast Iron
4 Anti Crease - Delay Timer. 65’
Essentials
5 Standard Cotton
2
Max. Extra Care - Energy Saver
1
- Anti Crease - Delay Timer. 195’
6 Cotton ready to wear
Max. Anti Crease - Delay Timer. 205’
7 Synthetics
4 Energy Saver
1
- Anti Crease - Delay Timer. 95’
8 Jeans
3
Anti Crease - Delay Timer. 135’
Special Care
9 Baby&Delicates
2 Anti Crease - Delay Timer. 80’
10 Wool
1 - 60’
11 Duvet
1,5 Anti Crease - Delay Timer. 100’
12 Special Shoes
1 pair - 100’
Timed & Post Dry
13 60 minutes
- Extra Care - Anti Crease - Delay Timer. -
14 120 minutes
- Extra Care - Anti Crease - Delay Timer. -
15 Crease Relax
- - 10’
16 Freshen Up
2,5 - 20’
NOTES: 1 with this option the maximum load size is modifi ed. Refer to the option description. 2 Standard Cotton is the most effi cient program
in terms of energy consumption (EU 392/2012). 3 The duration of these programs will depend on the size of the load, types of textiles, the spin
speed used in your washer and any extra options selected.
Special/Sport/Partial Programmes
Fast 45’
45
’
This is a quick timed programme, ideal for drying garments spun at high speed in the washing machine, for example shirts used in a
working week.
Easy Mix
This programme is ideal for drying cotton and synthetic fabrics together.
Standard Cotton: Dries your items to a dryness level that allows you to put your clothes away straight from the dryer.
Cotton Ready to Wear: Dries your items to the maximum possible dryness level. Even drier than Standard Cotton.
Jeans
●This is a programme for jeans made from denim cotton. Before drying your jeans turn the front pockets inside out.
●Do not mix dark and light coloured items.
It can also be used on other garments made from the same material, such as jackets.
Loads dried using this programme are usually ready to wear, the edges or seams may be slightly damp. If this is the case, try turning
the jeans inside out and running the programme again for a short period.
! We do not recommend that you use this programme if your jeans have elastic waist bands, studs or embroidery.
Baby&Delicates
A programme appropriately designed to dry clothing and linen of new-born babies (cotton and chenille) and delicate clothes. Do not
dry articles which have plastic covering.

12
GB
Fabric
Load
1 kg 2 kg 3 kg - kg - kg
Cotton –
high heat
60 minutes
60 or 120
minutes
120 minutes - -
Synthetics –
low heat
60 minutes 60 minutes
60 or 120
minutes
- -
Acrylics –
low heat
60 minutes 120 minutes - - -
Wool Programme
This programme is specific for items that withstand tumble drying and are labelled with the symbol. It is suitable for loads of up to
1 kg (about 3 jerseys). We recommend turning the garments inside out before drying them. Garments dried with this programme are
usually ready to be worn, although the edges of heavier garments may be slightly damp. Leave them to dry naturally, as an additio-
nal drying process may damage them.
Unlike other materials, the shrinking process in wool is irreversible, i.e. the garment does not resume its original dimension and sha-
pe. This programme is not suited for acrylic items.
Duvet
A cycle intended to dry down jackets, giving their natural softness back (2 jackets).
Special Shoes Programme
This programme is specific for drying sports shoes. The shoes must have been previously washed and spun at a minimum spin
speed of 400 revolutions.
A specific shoe rack is provided and must be used, otherwise the dryer will be damaged if shoes are dried in the drum. Remove the
filter from its holder on the front part of the dryer and position the shoe rack.
Place shoelaces inside the shoes then load with the tips of the shoes facing downwards and the soles frontwards.
Drying times vary according to the shape and type of the shoe. If the shoes are not completely dry at the end of the programme,
restart the programme.
! Do not dry shoes that have gel or flashing lights inside them. Only dry shoes made of synthetic material or rope. Once the pro-
gramme ends, remove the shoe rack and replace the filter into its holder.
Crease Relax
A short 10-minute programme that relaxes the garment’s fibres in order to facilitate ironing and folding.
This programme is particularly recommended for cotton or mixed cotton fabrics.
For optimal results, do not overload the drum (the following values refer to the weight of dry garments):
Fabric: maximum load
Cotton and mixed cotton: 2.5 kg
Synthetic garments: 2 kg
Jeans: 2 kg
Empty the dryer as soon as the programme ends; hang, fold or iron garments then place them in the wardrobe. If this is not possi-
ble, repeat the programme.
As this is not a drying programme, it is not to be used for garments that are still wet.
The effect produced by the programme varies according to the characteristics of the each fabric: fabrics such as acrylic fibres or
Tencel
®
do not give the same results as traditional fibres (e.g. cotton).
Freshen Up
A short programme suitable for refreshing fibres and garments. It lasts about 20 minutes.
! As this is not a drying programme, it is not to be used for garments that are still wet.
● It can be used on any load size but is more effective on smaller loads.

13
GB
Options
The options allow for customising the selected programme according to one’s own needs.
Extra Care
This is a special option designed to gentle dry delicate clothes.
Press this button to select the low temperature setting; the light next to the button will switch on. Activating this option will increase
the duration of the cycles.
Energy Saver
An option designed to optimise the results when drying small loads (cotton loaded to a max. of 2 kgs. and synthetic
load to a max. of 1 kg.) thereby minimising consumption and drying times.
Anti Crease
The Anti-crease option automatically actives a pre and post crease treatment. The Anti-crease by alternating rotation of the drum
prevents the formation of wrinkles by rotating repeatedly the garments. The option includes a pre Anti-crease phase, which is acti-
vated only when the delay time has been selected, and a post Anti-crease at the end of the drying cycle.
The Anti-crease is therefore the best solution to avoid the formation of wrinkles when the delayed start has been activated and
when you aren’t available to remove the load immediately the end of the cycle.
Delay timer
The start of some programmes (see Programmes and options) may be delayed up to 9 hours. Press the button repeatedly to enter
the desired delay time. Before setting a delayed start, make sure that the water container is empty and that the filter is clean.The
drum will rotate occasionally before the drying programme starts to prevent the formation of creases.
! Not all options are available on all programmes (see Programmes and options).
Opening the door
If the door is opened (or the START/PAUSE button is pressed) while a programme is running, the dryer stops and the following
may occur:
• The START/PAUSE button flashes orange.
• When a delayed start is running, the delay countdown continues. It is necessary to press the START/PAUSE button to resume
the “Delay timer” programme. One of the “Delay timer” indicator light flashes to signal the delay time entered.
• It is necessary to press the START/PAUSE button to resume the programme. The progress indicator lights signal the running
phase and the START/PAUSE indicator light stops flashing and turns green.
• During the post care phase, the programme ends. Pressing the START/PAUSE button reactivates a new programme from the
beginning.
• By turning the Programme selection knob, a new programme is selected and the START/PAUSE indicator light flashes green.
This procedure can be used to select the Cold drying programme to cool garments if they are judged to be dry enough.
Press the START/PAUSE button to start the new programme.
Heat Pump Protection System
The heat pump sytem has a compressor protection feature, that operates if you open the door or there is a power disruption or
you turn off the dryer. This system will prevent the heat pump compressor from starting for 5 minutes after the door is closed and
the programme started.
Note: If you have a power cut, switch off the power or remove the plug. When power is restored, plug in the machine, press and
hold the ON/OFF button until the dryer reactivates, then press Start/Pause button.

14
GB
Automatic drying times
Cotton
High Heat
Drying times after 800-1000 rpm wash cycles
1 kg
2 kg 3 kg 4 kg 5 kg 6 kg 7 kg
60 - 90 minutes
80 - 100
minutes
100 - 130
minutes
120-140
minutes
140 - 180
minutes
150 - 190
minutes
170 - 200
minutes
Synthetics
Low Heat
Drying times after wash cycles at lower speeds
1 kg
2 kg 3 kg 4 kg
40 - 50 minutes 50 - 60 minutes 60 - 90 minutes 90 - 110 minutes
Acrylics
Low Heat
Drying times after wash cycles at lower speeds
1 kg
2 kg
40 - 80 minutes 80 - 140 minutes
Sorting laundry
• Check the symbols on the care labels of the various gar-
ments to verify whether the garments can be safely tumble
dried.
• Sort laundry according to the type of fabric.
• Empty all pockets and check for loose buttons.
• Close zips and hooks and fasten belts and strings without
tightening them.
• Wring out garments to remove the maximum amount of
water possible.
!
Do not load the dryer when garments are dripping wet.
Maximum load sizes
Do not overload the drum.
The following values indicate the weight of dry garments:
Natural fibres: maximum kg
Synthetic fibres: maximum kg
! Do not overload the dryer as this may result is reduced
drying performance.
Care labels
Always check the care labels, especially when placing
garments in the tumble dryer for the first time. Below are the
most commonly used symbols:
May be tumble dried.
Do not tumble dry.
Tumble dry – high heat.
Tumble dry – low heat.
Drying times
Drying times are approximate and may vary depending on
the following:
• Amount of water retained by items after the spin cycle:
towels and delicate items retain a lot of water.
• Fabrics: items of the same fabric, but with different texture
and thickness may have different drying times.
• Amount of laundry: single items and small loads may take
longer to dry.
• Drying: if items are to be ironed, they can be removed
from the dryer while still slightly damp. Items that require
complete drying can be left longer.
• Heat setting.
• Temperature of the room: the lower the temperature of the
room, the longer it will take for the dryer to dry clothing.
• Bulk: certain bulky items require special care during the
drying process. We suggest removing these items and
replacing them in the dryer once they have been shaken
out: repeat this procedure several times during the course
of the drying cycle.
! Do not over-dry items.
All fabrics contain natural dampness which helps to keep
them soft and fluffy.
The drying times provided refer to the automatic Cupboard
dry programmes.
The Timed drying settings are also indicated to enable you
to select the most suitable timed option.
The weight refers to dry items.
Laundry
7
4

15
GB
Sorting laundry
• Check the symbols on the care labels of the various gar-
ments to verify whether the garments can be safely tumble
dried.
• Sort laundry according to the type of fabric.
• Empty all pockets and check for loose buttons.
• Close zips and hooks and fasten belts and strings without
tightening them.
• Wring out garments to remove the maximum amount of
water possible.
!
Do not load the dryer when garments are dripping wet.
Maximum load sizes
Do not overload the drum.
The following values indicate the weight of dry garments:
Natural fibres: maximum kg
Synthetic fibres: maximum kg
! Do not overload the dryer as this may result is reduced
drying performance.
Care labels
Always check the care labels, especially when placing
garments in the tumble dryer for the first time. Below are the
most commonly used symbols:
May be tumble dried.
Do not tumble dry.
Tumble dry – high heat.
Tumble dry – low heat.
Drying times
Drying times are approximate and may vary depending on
the following:
• Amount of water retained by items after the spin cycle:
towels and delicate items retain a lot of water.
• Fabrics: items of the same fabric, but with different texture
and thickness may have different drying times.
• Amount of laundry: single items and small loads may take
longer to dry.
• Drying: if items are to be ironed, they can be removed
from the dryer while still slightly damp. Items that require
complete drying can be left longer.
• Heat setting.
• Temperature of the room: the lower the temperature of the
room, the longer it will take for the dryer to dry clothing.
• Bulk: certain bulky items require special care during the
drying process. We suggest removing these items and
replacing them in the dryer once they have been shaken
out: repeat this procedure several times during the course
of the drying cycle.
! Do not over-dry items.
All fabrics contain natural dampness which helps to keep
them soft and fluffy.
The drying times provided refer to the automatic Cupboard
dry programmes.
The Timed drying settings are also indicated to enable you
to select the most suitable timed option.
The weight refers to dry items.
Laundry
Troubleshooting
If you feel that the dryer is not working properly, consult the following troubleshooting suggestions before contacting the Technical
Assistance Centre
(see Assistance).
The dryer does not start.
• The plug has not been inserted far enough into the socket to make contact.
• There has been a power cut.
• The fuse has burned out. Try connecting another appliance to the same socket.
• If an extension cord is used, try connecting the dryer plug directly into the socket.
• The door has not been closed properly.
• The programme has not been set correctly (see How to carry out a drying cycle).
• The START/PAUSE button has not been pressed (see How to carry out a drying cycle).
• On machines equipped with “Locked” function, check the option is not enabled (see Programmes and options).
The drying cycle does not start.
• A delayed start time has been set (see Programmes and options).
• The START/PAUSE button has been pressed; a short delay follows before the dryer starts running. Wait for the drying cycle to
start; do not press the START/PAUSE button otherwise the dryer switches to the pause mode and the drying cycle will not start.
Drying times are too long.
• The filter has not been cleaned (see Care and maintenance).
• The water container must be emptied? The “Empty water container” indicator light flashes (see Care and maintenance).
• The Heat Pump Filter Unit needs to be cleaned (see Care and maintenance).
• The heat setting is not suited to the type of fabric to be dried (see Programmes and options).
• An incorrect drying time was selected for the type of load (see Laundry).
• The air intake grille or the rear air vents are clogged up (see Installation, and Care and maintenance).
• The items are too wet (see Laundry).
• The dryer is overloaded (see Laundry).
The “Empty water container” indicator light flashes.
• The water bottle was not emptied before starting the programme. Always empty it before starting a new drying programme (see
Description of the tumble dryer) - do not wait for the bottle full signal (buzzer beeps once every 5 seconds and the indicator light
flashes) before emptying the water container.
The programme is finished but the items are damper than expected.
! For safety reasons, the dryer programmes last a maximum of 5 hours. If an automatic programme has not detected the final
dampness level required in this interval, the dryer completes the programme and stops. Check the above points and repeat the
programme; if the items are still damp, contact the Technical Assistance Centre (see Assistance).
The “Options” and “START/PAUSE” indicator lights flash and one of the “Maintenance” or “Drying phases” indicator lights
turns on without flashing.
• Switch the appliance off and unplug it, then clean the filter and Heat Pump Filter Unit (see “Care and Maintenance”). Reinsert the
plug, switch the appliance on and start another programme.
If the problem persists, contact the Technical Assistance Service.
The dryer is noisy during the first few minutes of operation.
• This is normal, especially if the dryer has not been used for a long time. If the noise persists during the entire cycle, contact the
Technical Assistance Centre.
The lights on the dryer control panel are off although the dryer is switched on.
The dryer has gone into standby mode to save power. This occurs if you have left the dryer on or have had a power cut. It occurs
after 30 minutes:
- if you leave the dryer without starting a programme;
- after your drying programme has finished.
Press and hold the ON/OFF button until the dryer reactivates

16
GB
Assistance
This appliance conforms to the following EU directives:
- 2006/95/EC (Low Voltage Directive)
- 2004/108/EC (Electromagnetic Compatibility Directive).
Information on recycling and disposal
As part of our continual commitment towards environmental protection, we reserve the right to use recycled quality components
to reduce costs for our customers and to minimise materials wastage.
• Disposing of the packaging materials: follow local regulations to allow for recycling of packaging materials.
• In order to minimise the risk of injury to children, remove the door and plug, then cut the power supply cord flush with the
appliance. Dispose of these parts separately to prevent the appliance from being connected to a power supply socket.
Disposal of old household appliances
The European Directive 2012/19/EC on Waste Electricaland Electronic Equipment (WEEE), requires that oldhousehold
electrical appliances must not be disposedof in the normal unsorted municipal waste stream. Old appliances must be
collected separately in order tooptimise the recovery and recycling of the materialsthey contain and reduce the impact on
human healthand the environment. This dryer has a sealed heat pump unit containing Fgases which should be recovered
and destroyed.The crossed out “wheeled bin” symbol on theproduct reminds you of your obligation,thatwhen you dispose of
the appliance it must beseparately collected.Consumers should contact their local authority orretailer for information concer-
ning the correct disposalof their old appliance.
Heat Pump System
This dryer is fitted with a sealed heat pump system to dry your clothes. To operate, the heat pump contains fluorinated greenhouse
gases ( F gases) which are covered by the Kyoto Protocol. These F gases are contained in a hermetically sealed unit. This sealed
unit contains 0.29 kg of the F gas R134a which acts as a refrigerant.
If the sealed unit fails then it must be replaced by a new sealed unit. Contact your nearest service centre for advise.
Note: The gases contained in the sealed unit are not hazardous to health, but if they escape they will have an impact on global
warming.
Spare Parts
This dryer is a complex machine. Repairing it yourself or having a nonauthorised person try to repair it could cause harm to one or
more persons and to the machine, and could invalidate the spare parts warranty.
Call an authorised technician if you experience problems while using the machine.
Please note that it is an offence for an unqualified person to undertaken any servicing or repair work that involves breaking into the
sealed heat pump unit.
Product Guarantee And Repair Information
Guarantee
12 Months Parts and Labour Guarantee
Your appliance has the benefit of our manufacturer’s guarantee, which covers the cost of breakdown repairs for twelve months from the
date of purchase.
This gives you the reassurance that if, within that time, your appliance is proven to be defective because of either workmanship or
materials, we will, at our discretion, either repair or replace the appliance at no cost to you:
This guarantee is subject to the following conditions:
- The appliance has been installed and operated correctly and in accordance with our operating and maintenance instructions.
- The appliance is used only on the electricity or gas supply printed on the rating plate.
- The appliance has been used for normal domestic purposes only.
- The appliance has not been altered, serviced, maintained, dismantled, or otherwise interfered with by any person not authorised by us.
- Any repair work must be undertaken by us or our appointed agent.
- Any parts removed during repair work or any appliance that is replaced become our property.
- The appliance is used in the United Kingdom or Republic of Ireland.
The guarantee does not cover:
- Damage resulting from transportation, improper use, neglect or interference or as a result of improper installation.
- Replacement of any consumable item or accessory. These include but are not limited to: plugs, cables, batteries, light bulbs, fluorescent
tubes and starters, covers and filters.
- Replacement of any removable parts made of glass or plastic.
THIS GUARANTEE WILL NOT APPLY IF THE APPLIANCE HAS BEEN USED IN COMMERCIAL
OR NON-DOMESTIC PREMISES.
Repairs and After Sales
For product help and advice, repairs, spare parts or accessories, we’re here to help.
For local repair engineers - 03448 111 606 ROI - 0818 313 413 UK standard local rate applies ROI local Irish rate applies
For Parts and Accessories visit: parts.indesit.co.uk/shop
Please remember to register your appliance at www.indesitservice.co.uk to activate your 10 year parts guarantee.
Please note, our advisors will require the following information: model number, serial number.
This information can be found on the data plate located behind the door.

17
FR
Français
FR
Mode d’emploi
SÈCHE-LINGE
! Ce symbole vous rappelle de lire ce
mode d’emploi.
! Conservez cette notice d’utilisation et d’installation à portée de
main de manière à pouvoir vous y référer si nécessaire. Conservez
cette notice toujours à côté du sèche-linge et si vous vendez cet
appareil ou que vous le donniez à un tiers, faites en sorte que
cette notice accompagne le sèche-linge de manière à ce que le
nouveau propriétaire soit informé des avertissements et des con-
seils concernant le fonctionnement de ce sèche-linge.
! Lisez attentivement ce mode d’emploi : les pages suivantes
contiennent des informations importantes concernant l’installation
et des conseils relatifs au fonctionnement de cet appareil.
EDPA 745 A ECO
www.indesit.com
Table des matières
Installation, 18
Où installer le sèche-linge
Ventilation
Raccordement électrique
Informations préliminaires
Précautions, 20
Sécurité générale
Économie d’énergie et protection de l’environnement
Soin et entretien, 22
Interruption de l’alimentation électrique
Nettoyage du filtre après chaque cycle
Contrôle du tambour après chaque cycle
Vidange du réservoir d’eau après chaque cycle
Nettoyage du groupe filtre de la pompe à chaleur
Nettoyage du sèche-linge
Description du sèche-linge, 24
Caractéristiques
Tableau de bord
Comment effectuer
un cycle de séchage, 26
Démarrage et choix du programme
Programmes et options, 27
Tableau des programmes
Programmes Spécial/Sport/Partiaux
Options
Ouverture de la porte
Linge, 30
Tri du linge
Étiquettes d’entretien
Temps de séchage
Problèmes et solutions, 31
Assistance, 32
Pièces détachées
Informations pour le recyclage et la mise au rebut

18
FR
Où installer le sèche-linge
• Placez votre sèche-
linge à une certaine
distance des cuisinières,
fourneaux, radiateurs,
ou plaques de cuisson
à gaz, car les flammes
peuvent endommager
cet appareil. Pour garantir
un fonctionnement
optimal, installez votre
sèche-linge dans une pièce à température
ambiante entre 20 et 23 °C. Cependant,
l’appareil fonctionnera si la température de la
pièce se situe entre 14 et 30 °C.
Si vous installez cet appareil sous un plan de
travail, faites en sorte de laisser un espace
de 10 mm entre le dessus de l’appareil et
tout autre objet sur ou au-dessus de celui-
ci, et un espace de 15 mm entre ses côtés
et les éléments d’ameublement ou les murs
latéraux. Ceci a pour objectif d’assurer une
ventilation convenable.
La surface arrière de l’appareil doit être
placée contre un mur.
Ventilation
• Lorsque le sèche-linge est en marche, une aération
adéquate est nécessaire. Faites en sorte d’installer votre
sèche-linge dans un environnement qui n’est pas humide
et qui est doté d’une bonne circulation d’air dans toute
la pièce. La circulation d’air autour du sèche linge est
essentielle pour condenser l’eau produite au cours du
lavage ; le sèche linge ne fonctionnera pas efficacement
dans un espace clos ou dans un placard.
! Si l’on utilise le sèche linge dans une pièce froide ou petite,
on rencontrera un certain degré de condensation.
! Nous vous déconseillons d’installer votre
sèche-linge dans un placard ; par ailleurs,
le sèche-linge ne doit en aucun cas être
placé derrière une porte fermant à clé, une
porte coulissante ou une porte montée sur
des gonds du côté opposé à la porte de
chargement du sèche-linge.
Vidange de l’eau
Si votre sèche-linge est installé à proximité d’une évacuation,
l’eau peut être vidangée directement dans ce tuyau. Cela
évite d’utiliser et de vider le réservoir d’eau.
Si vous installez le sèche-linge au-dessus ou à côté d’un
lave-linge, il pourra partager la même vidange. Il suffit de
débrancher le tuyau indiqué par la figure A et de le brancher
à la vidange.
Si la vidange est plus loin que la longueur du tuyau, il
possible d’acheter et de brancher un tuyau ayant le même
diamètre et la longueur nécessaire.
10 mm
15 mm
15 mm
Pour installer le nouveau il suffit de remplacer le tuyau exi-
stant comme illustré par la figure B dans la même position.
! La hauteur de la vidange doit être inférieure à 1 m en
partant du bas du sèche-linge.
! Assurez-vous que le tuyau n’est pas écrasé ou plié une
fois le sèche-linge placé dans sa position définitive.
1
2
2
1
Less than 1m
Fig. A Fig. B
Raccordement électrique
Assurez-vous des points suivants avant de
brancher la fiche de l’appareil dans la prise
de mains:
• Assurez-vous d’avoir les mains sèches.
• La prise de courant doit être reliée à la
terre.
• La prise de courant doit pouvoir supporter
la puissance maximale de la machine, qui
est indiquée sur la plaque signalétique de
l’appareil (voir Description du sèche-linge).
• La tension électrique doit appartenir à la
gamme de valeurs indiquée sur la plaque
signalétique de l’appareil (voir Description
du sèche-linge).
• La prise de courant doit être compatible
avec la fiche du sèche-linge. Autrement,
remplacez la prise ou la fiche.
! N’UTILISEZ PAS DE RALLONGES.
! Le sèche-linge ne doit pas être utilisé à
l’extérieur, même si l’espace en question est
abrité. Cela peut être dangereux si l’appareil
est exposé à la pluie ou à des orages.
! Une fois le sèche-linge installé, le cordon
d’alimentation et la fiche doivent être
d’accès facile.
! Le cordon d’alimentation ne doit pas être
courbé ou écrasé.
! Si la fiche à remplacer est de type
incorporée, il faut l’éliminer conformément
aux consignes de sécurité. Ne la laissez
Installation
jamais dans un endroit où elle peut être
branchée à une prise et provoquer ainsi un
choc électrique.
! Le câble électrique doit être contrôlé
périodiquement. Si le câble est endommagé,
il faut le faire remplacer par le fabricant, par
son service après-vente ou par tout autre
personnel qualifié afin d’éviter tout risque
de danger. (voir Service après-vente). Des
cordons d’alimentation neufs ou plus longs
sont fournis par les revendeurs agréés contre
un supplément..
! Le fabricant rejette toute responsabilité
en cas de non-respect de toutes ou partie
de ces règles.
! En cas de doute au sujet des points
précédents, consultez un électricien
qualifié.
Mise à niveau du sèche-linge
Le sèche-linge doit être installé sur une
surface plane pour un fonctionnement
optimal.
Après avoir installé le sèche-linge dans sa
position définitive, contrôler s’il est placé de
niveau dans le sens de la largeur dans un
premier temps et ensuite sur la profondeur.
Si le sèche-linge n’est pas de niveau, régler
les deux pieds avant jusqu’à atteindre une
position adéquate.
Informations préliminaires
Une fois que vous avez installé votre sèche-linge, et avant
de l’utiliser, nettoyez l’intérieur du tambour pour retirer les
poussières qui pourraient s’y être accumulées pendant le
transport.
ATTENTION : avant d’utiliser le sèche-linge, assurez-
vous qu’il est resté en position verticale pendant au
moins 6 heures.

19
FR
Consommation d'énergie à pleine charge ; Edry- kWh 2) 2.96
Consommation d'énergie à demi-charge ; Edry½,- kWh 2) 1.63
Consommation d'électricité : mode arrêt (Po) - Watts 0.14
Pleine charge (Tdry) - minutes 215
Demi-charge (Tdry½) - minutes 125
pondéré (Ct) pleine et demi-charge 3) 71
charge pleine Cdr 71
demi-charge Cdry½ 72
Niveau de bruit aérien - dB(A) re 1 pW 69.0
Synthétique: consommation d'énergie à pleine charge; kWh 0.92
Synthétique: pleine charge (Tdry) - minutes 90
2) La consommation annuelle est basée sur la base de 160 cycles de séchage pour
le programme coton standard à pleine charge et à demi-charge, et de la
consommation des modes à faible puissance. La consommation réelle d’énergie
par cycle dépend des conditions d’utilisation de l’appareil.
3) Moyenne pondérée de 3 cycles à pleine charge et de 4 cycles à demi-charge.
R
églementation 932/2012.
Synthétique: demi-charge N/A
Durée du programme - pondérée (Tt) pour pleine et demi-charge
- minutes
164
Classe de taux de condensation sur une échelle allant de G
(appareils les moins efficaces) à A (appareils les plus efficaces)
C
Taux de condensation moyen - %
1) Le « programme coton standard » à charge pleine ou partielle et le « programme
coton standard » à charge partielle sont les programmes standards auxquels se
réfèrent les informations de l'étiquette et de la fiche. Ces programmes sont parfaits
pour sécher du linge en coton au niveau armoire (0%) et ce sont aussi les
programmes les plus efficaces au point de vue consommation d'énergie. La charge
partielle est égale à la moitié de la charge nominale.
Ce sèche-linge domestique à tambour est un sèche-linge Automatique
Consommation d'électricité : mode laissé sur marche (Pl) - Watts
1.79
Durée du mode laissé sur marche pour le système de gestion de
la consommation d’électricité - minutes
30
Ce sèche-linge domestique à tambour est un sèche-linge À condens.
Classe d'efficacité énergétique de A+++ (faible consommation) à
D (consommation élevée)
A
La consommation d’énergie annuelle (AEc)* pondérée Kwh 1) 354.0
D
onnées techniques - Réglementation 392/2012.
Marque
Indesit
Modèle
EDPA 745 A ECO (EU)
Capacité nominale de linge en coton pour le « programme coton
standard » à pleine charge - kg
7.0
Où installer le sèche-linge
• Placez votre sèche-
linge à une certaine
distance des cuisinières,
fourneaux, radiateurs,
ou plaques de cuisson
à gaz, car les flammes
peuvent endommager
cet appareil. Pour garantir
un fonctionnement
optimal, installez votre
sèche-linge dans une pièce à température
ambiante entre 20 et 23 °C. Cependant,
l’appareil fonctionnera si la température de la
pièce se situe entre 14 et 30 °C.
Si vous installez cet appareil sous un plan de
travail, faites en sorte de laisser un espace
de 10 mm entre le dessus de l’appareil et
tout autre objet sur ou au-dessus de celui-
ci, et un espace de 15 mm entre ses côtés
et les éléments d’ameublement ou les murs
latéraux. Ceci a pour objectif d’assurer une
ventilation convenable.
La surface arrière de l’appareil doit être
placée contre un mur.
Ventilation
• Lorsque le sèche-linge est en marche, une aération
adéquate est nécessaire. Faites en sorte d’installer votre
sèche-linge dans un environnement qui n’est pas humide
et qui est doté d’une bonne circulation d’air dans toute
la pièce. La circulation d’air autour du sèche linge est
essentielle pour condenser l’eau produite au cours du
lavage ; le sèche linge ne fonctionnera pas efficacement
dans un espace clos ou dans un placard.
! Si l’on utilise le sèche linge dans une pièce froide ou petite,
on rencontrera un certain degré de condensation.
! Nous vous déconseillons d’installer votre
sèche-linge dans un placard ; par ailleurs,
le sèche-linge ne doit en aucun cas être
placé derrière une porte fermant à clé, une
porte coulissante ou une porte montée sur
des gonds du côté opposé à la porte de
chargement du sèche-linge.
Vidange de l’eau
Si votre sèche-linge est installé à proximité d’une évacuation,
l’eau peut être vidangée directement dans ce tuyau. Cela
évite d’utiliser et de vider le réservoir d’eau.
Si vous installez le sèche-linge au-dessus ou à côté d’un
lave-linge, il pourra partager la même vidange. Il suffit de
débrancher le tuyau indiqué par la figure A et de le brancher
à la vidange.
Si la vidange est plus loin que la longueur du tuyau, il
possible d’acheter et de brancher un tuyau ayant le même
diamètre et la longueur nécessaire.
10 mm
15 mm
15 mm
Pour installer le nouveau il suffit de remplacer le tuyau exi-
stant comme illustré par la figure B dans la même position.
! La hauteur de la vidange doit être inférieure à 1 m en
partant du bas du sèche-linge.
! Assurez-vous que le tuyau n’est pas écrasé ou plié une
fois le sèche-linge placé dans sa position définitive.
1
2
2
1
Less than 1m
Fig. A Fig. B
Raccordement électrique
Assurez-vous des points suivants avant de
brancher la fiche de l’appareil dans la prise
de mains:
• Assurez-vous d’avoir les mains sèches.
• La prise de courant doit être reliée à la
terre.
• La prise de courant doit pouvoir supporter
la puissance maximale de la machine, qui
est indiquée sur la plaque signalétique de
l’appareil (voir Description du sèche-linge).
• La tension électrique doit appartenir à la
gamme de valeurs indiquée sur la plaque
signalétique de l’appareil (voir Description
du sèche-linge).
• La prise de courant doit être compatible
avec la fiche du sèche-linge. Autrement,
remplacez la prise ou la fiche.
! N’UTILISEZ PAS DE RALLONGES.
! Le sèche-linge ne doit pas être utilisé à
l’extérieur, même si l’espace en question est
abrité. Cela peut être dangereux si l’appareil
est exposé à la pluie ou à des orages.
! Une fois le sèche-linge installé, le cordon
d’alimentation et la fiche doivent être
d’accès facile.
! Le cordon d’alimentation ne doit pas être
courbé ou écrasé.
! Si la fiche à remplacer est de type
incorporée, il faut l’éliminer conformément
aux consignes de sécurité. Ne la laissez
Installation
jamais dans un endroit où elle peut être
branchée à une prise et provoquer ainsi un
choc électrique.
! Le câble électrique doit être contrôlé
périodiquement. Si le câble est endommagé,
il faut le faire remplacer par le fabricant, par
son service après-vente ou par tout autre
personnel qualifié afin d’éviter tout risque
de danger. (voir Service après-vente). Des
cordons d’alimentation neufs ou plus longs
sont fournis par les revendeurs agréés contre
un supplément..
! Le fabricant rejette toute responsabilité
en cas de non-respect de toutes ou partie
de ces règles.
! En cas de doute au sujet des points
précédents, consultez un électricien
qualifié.
Mise à niveau du sèche-linge
Le sèche-linge doit être installé sur une
surface plane pour un fonctionnement
optimal.
Après avoir installé le sèche-linge dans sa
position définitive, contrôler s’il est placé de
niveau dans le sens de la largeur dans un
premier temps et ensuite sur la profondeur.
Si le sèche-linge n’est pas de niveau, régler
les deux pieds avant jusqu’à atteindre une
position adéquate.
Informations préliminaires
Une fois que vous avez installé votre sèche-linge, et avant
de l’utiliser, nettoyez l’intérieur du tambour pour retirer les
poussières qui pourraient s’y être accumulées pendant le
transport.
ATTENTION : avant d’utiliser le sèche-linge, assurez-
vous qu’il est resté en position verticale pendant au
moins 6 heures.
Charge maximale: 7 kg

20
FR
! Cet électroménager a été conçu et réalisé
conformément aux normes internationales de
sécurité. Ces consignes sont fournies pour
des raisons de sécurité, il faut les respecter
scrupuleusement.
Sécurité générale
• Ce sèche-linge peut être utilisé par des
personnes (notamment des enfants de
plus de 8 ans) présentant des capacités
physiques, motrices ou mentales
réduites, ou manquant d’expérience et de
connaissances, si elles sont placées sous
surveillance ou ont reçu les instructions
nécessaires à l’utilisation de l’appareil de la
part d’une personne responsable de leur
sécurité.
• Ce sèche-linge a été conçu pour un usage
domestique, et non professionnel.
• Ne touchez pas cet appareil lorsque vous
êtes pieds nus ou avec des mains ou des
pieds humides.
• Débranchez cette machine en tirant sur la
fiche et non sur le cordon.
• Après avoir utilisé ce sèche-linge, éteignez-
le et débranchez-le. Tenez la porte fermée
pour assurer que les enfants ne jouent pas
avec.
• Surveillez les enfants de façon à ne pas les
laisser jouer avec le sèche-linge.
• Le nettoyage et l’entretien ne doivent
pas être effectués par des enfants non
surveillés.
• Les enfants de moins de 3 ans doivent être
tenus à bonne distance du sèche-linge s’ils
ne sont pas sous surveillance constante.
• Cet appareil doit être installé correctement
et avoir une ventilation convenable.
L’arrivée d’air sur le devant du sèche-linge
et l’évent derrière le sèche-linge ne doivent
jamais être obstrués (voir Installation).
• N’utilisez jamais le sèche-linge sur de
la moquette où la hauteur des poils
empêcherait l’air d’entrer dans la sèche-
linge à partir de la base.
• Vérifiez que le sèche-linge est bien vide
avant de le charger.
• L’arrière du sèche-linge peut devenir
très chaud.
Ne le touchez jamais en cours d’utilisation.
• N’utilisez pas le sèche-linge si le filtre, le
réservoir d’eau et le condenseur ne sont
pas bien en place (voir Entretien).
• Ne surchargez pas le sèche-linge (voir
Linge pour les charges maximales).
• Ne chargez pas d’articles qui dégouttent
d’eau.
• Vérifiez avec soin toutes les instructions sur
les étiquettes des vêtements (voir Linge).
• Ne séchez pas d’articles de grande taille,
très volumineux.
• Ne séchez pas de fibres acryliques à
hautes températures.
• N’éteignez pas le sèche-linge s’il contient
encore des articles chauds.
• Nettoyez le filtre après chaque utilisation
(voir Entretien).
• Videz le réservoir d’eau après chaque
utilisation (voir Entretien).
• Nettoyez le groupe condenseur à
intervalles réguliers(voir Entretien).
• Ne laissez pas s’accumuler de peluches
autour du sèche-linge.
• Ne montez jamais sur le sèche-linge. Cela
pourrait l’endommager.
• Respectez toujours les normes et
exigences électriques (voir Installation).
• Achetez toujours des pièces de rechange
et accessoires d’origine (voir Service
Après-vente).
Vous devez observer les consigne
suivantes pour réduire tout risque
d’incendie dans votre sèche-linge :
• Ne séchez que des articles qui ont été
lavés avec de l’eau et un détergent, rincés
et essorés. Le fait de sécher des articles
qui N’ONT PAS été lavés avec de l’eau
constitue un danger d’incendie.
• Ne séchez pas des vêtements qui ont été
traités avec des produits chimiques.
• Ne placez pas d’articles tachés ou
imbibés d’huile végétale or de cuisson,
ils risqueraient de provoquer un incendie.
Les articles contenant de l’huile
peuvent prendre feu spontanément,
particulièrement lorsqu’ils sont exposés à
des sources de chaleur comme un sèche-
linge. En chauffant, les articles provoquent
une réaction d’oxydation avec l’huile
générant alors de la chaleur. Si la chaleur
ainsi générée ne peut pas être évacuée,
les articles peuvent devenir suffisamment
chauds pour prendre feu. Le fait d’empiler,
de superposer ou de stocker des articles
contenant de l’huile peut empêcher la
chaleur d’être évacuée et donc provoquer
un incendie. Si vous ne pouvez pas faire
autrement que de placer des articles
contenant de l’huile végétale ou de l’huile
de cuisson ou ayant été en contact avec
des produits coiffants dans le sèche-linge,
il convient de les laver au préalable à l’aide
d’une dose supplémentaire de détergent.
Cette précaution minimise, sans toutefois
l’éliminer, le risque d’incendie. Les articles
ne doivent pas être retirés du sèche-linge
et empilés ou superposés lorsqu’ils sont
chauds.
• Ne placez pas d’articles ayant été
préalablement nettoyés ou lavés, imbibés
ou tachés avec du pétrole/de l’essence,
des solvants de nettoyage à sec ou
d’autres substances inflammables ou
explosives. Les substances hautement
inflammables couramment utilisées
dans l’environnement domestique sont
notamment l’huile de cuisson, l’acétone,
l’alcool dénaturé, la kérosène, les
détachants, la térébenthine, les cires et
les produits permettant d’éliminer la cire.
Assurez-vous que ces articles ont été
lavés à l’eau chaude à l’aide d’une dose
supplémentaire de détergent avant de les
mettre à sécher dans le sèche-linge.
• Ne placez pas d’articles contenant du
caoutchouc mousse (également connu
sous l’appellation mousse de latex) ou
des matériaux similaires renfermant du
caoutchouc dans le sèche-linge. Les
matériaux contenant du caoutchouc
mousse peuvent, lorsqu’ils sont chauffés,
s’enflammer par combustion spontanée.
• Les produits assouplissants ou les produits
similaires ne doivent pas être utilisés dans
un sèche-linge en vue d’éliminer les effets
de l’électricité statique sauf si leur emploi
est spécifiquement recommandé par le
fabricant du produit assouplissant.
• Ne placez pas de sous-vêtements
contenant des renforts en métal comme les
soutiens-gorge à armature dans le sèche-
linge. Si les renforts en métal venaient à se
détacher pendant le séchage, ils pourraient
endommager le sèche- linge.
• Ne placez pas d’articles en caoutchouc
ou en plastiquedans le sèche-linge,
comme des bonnets de douche ou des
couvertures étanches pour bébé, des
articles en polyéthylène ou en papier.
• Ne placez pas d’articles contenant des
pièces de caoutchouc plaquées, des
vêtements présentant des pièces en
mousse de caoutchouc, des oreillers,
des bottes en caoutchouc et des tennis
recouvertes de caoutchouc dans le sèche-
linge.
• Enlever tous les objets des poches,
notamment les briquets et les allumettes.
! ATTENTION: N’arrêtez pas le sèche-
linge avant la fin du cycle de séchage si
vous n’avez pas la possibilité de retirer
rapidement tous les articles et de les
étendre pour évacuer la chaleur.
Économie d’énergie et protection de
l’environnement
• Essorez les articles pour éliminer l’eau en excès avant de
les passer au sèche-linge (si vous utilisez une machine à
laver, sélectionnez un cycle d’essorage à grande vitesse).
Ceci vous permettra d’économiser de l’énergie durant le
séchage.
• Séchez toujours des charges complètes – vous
économiserez de l’énergie : les articles uniques ou les
petites charges prennent plus longtemps à sécher.
• Nettoyez le filtre après chaque utilisation pour limiter les
coûts de consommation d’énergie (voir Entretien).
Précautions
La page est en cours de chargement...
La page est en cours de chargement...
La page est en cours de chargement...
La page est en cours de chargement...
La page est en cours de chargement...
La page est en cours de chargement...
La page est en cours de chargement...
La page est en cours de chargement...
La page est en cours de chargement...
La page est en cours de chargement...
La page est en cours de chargement...
La page est en cours de chargement...
La page est en cours de chargement...
La page est en cours de chargement...
La page est en cours de chargement...
La page est en cours de chargement...
La page est en cours de chargement...
La page est en cours de chargement...
La page est en cours de chargement...
La page est en cours de chargement...
La page est en cours de chargement...
La page est en cours de chargement...
La page est en cours de chargement...
La page est en cours de chargement...
La page est en cours de chargement...
La page est en cours de chargement...
La page est en cours de chargement...
La page est en cours de chargement...
La page est en cours de chargement...
La page est en cours de chargement...
La page est en cours de chargement...
La page est en cours de chargement...
La page est en cours de chargement...
La page est en cours de chargement...
La page est en cours de chargement...
La page est en cours de chargement...
La page est en cours de chargement...
La page est en cours de chargement...
La page est en cours de chargement...
La page est en cours de chargement...
La page est en cours de chargement...
La page est en cours de chargement...
La page est en cours de chargement...
La page est en cours de chargement...
La page est en cours de chargement...
La page est en cours de chargement...
La page est en cours de chargement...
La page est en cours de chargement...
La page est en cours de chargement...
La page est en cours de chargement...
La page est en cours de chargement...
La page est en cours de chargement...
La page est en cours de chargement...
La page est en cours de chargement...
La page est en cours de chargement...
La page est en cours de chargement...
La page est en cours de chargement...
La page est en cours de chargement...
La page est en cours de chargement...
La page est en cours de chargement...
-
 1
1
-
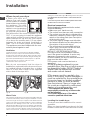 2
2
-
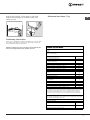 3
3
-
 4
4
-
 5
5
-
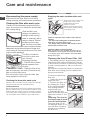 6
6
-
 7
7
-
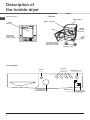 8
8
-
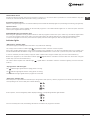 9
9
-
 10
10
-
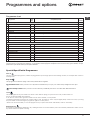 11
11
-
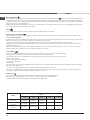 12
12
-
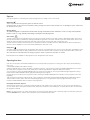 13
13
-
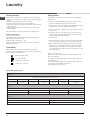 14
14
-
 15
15
-
 16
16
-
 17
17
-
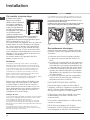 18
18
-
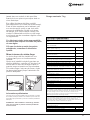 19
19
-
 20
20
-
 21
21
-
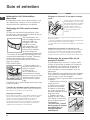 22
22
-
 23
23
-
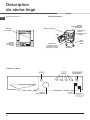 24
24
-
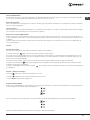 25
25
-
 26
26
-
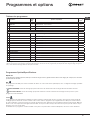 27
27
-
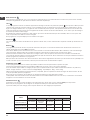 28
28
-
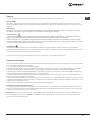 29
29
-
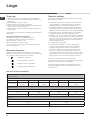 30
30
-
 31
31
-
 32
32
-
 33
33
-
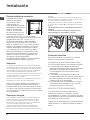 34
34
-
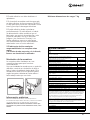 35
35
-
 36
36
-
 37
37
-
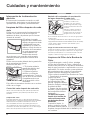 38
38
-
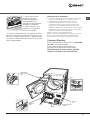 39
39
-
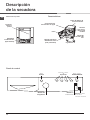 40
40
-
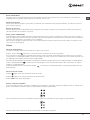 41
41
-
 42
42
-
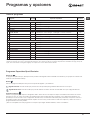 43
43
-
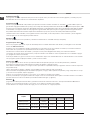 44
44
-
 45
45
-
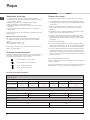 46
46
-
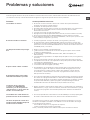 47
47
-
 48
48
-
 49
49
-
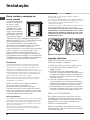 50
50
-
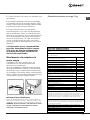 51
51
-
 52
52
-
 53
53
-
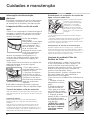 54
54
-
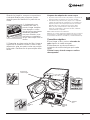 55
55
-
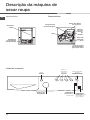 56
56
-
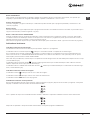 57
57
-
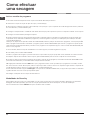 58
58
-
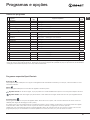 59
59
-
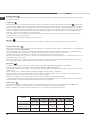 60
60
-
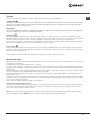 61
61
-
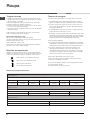 62
62
-
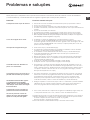 63
63
-
 64
64
-
 65
65
-
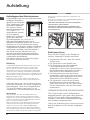 66
66
-
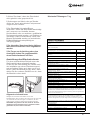 67
67
-
 68
68
-
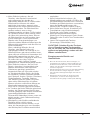 69
69
-
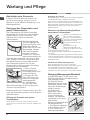 70
70
-
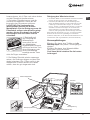 71
71
-
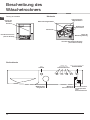 72
72
-
 73
73
-
 74
74
-
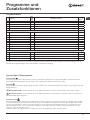 75
75
-
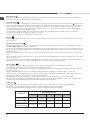 76
76
-
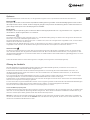 77
77
-
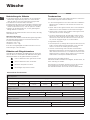 78
78
-
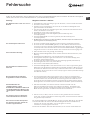 79
79
-
 80
80


Indesit EDPA 745 A1 ECO EU Le manuel du propriétaire
- Catégorie
- Sèche-linge
- Taper
- Le manuel du propriétaire