Master Lock DSH0615KA4S Guide d'installation
- Taper
- Guide d'installation

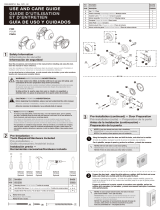
Pre-Installation —
Tools Required/Hardware Included
Pré-installation —
Outils nécessaires /matériel inclus
Instalación previa —
Herramientas necesarias/Hardware incluido
WARNING/AVERTISSEMENT/ADVERTENCIA:
If the door needs to be drilled, be familiar with how to use your drill safely, and
understand all the door preparation steps before proceeding.
S’il faut percer la porte, sachez comment utiliser adéquatement votre perceuse
et assurez-vous que vous connaissez toutes les étapes De préparation de la
porte avant de continuer.
Si debe perforar la puerta, sepa cómo usar su taladro con seguridad, y
entienda todos los pasos de preparación de la puerta antes de proceder.
NOTE/REMARQUE/NOTA:
To ensure a long lasting finish, remove the locks, or do not install the locks, prior to painting
your door. Periodically clean the locks with mild soap and a soft cloth. Do not use abrasives or
harsh chemicals, and avoid sharp or scratching objects.
Pour assurer un fini durable, retirer les serrures, ou ne les installez avant de peindre votre
porte. Nettoyez régulièrement les serrures avec un savon doux et un chiffon doux. Evitez les
produits abrasifs ou chimiques agressifs, et évitez les objets pointus ou susceptibles de gratter.
Para garantizar un acabado de larga duración, retire las cerraduras, o no instale una cerradura,
antes de pintar la puerta. Limpie las cerraduras periódicamente con jabón y paño suaves. No
use productos químicos abrasivos o agresivos, y evite los objetos afilados o que puedan causar
rayones.
Read the precautions and instructions in this manual before installing and using this lock.
Save this manual for future reference.
Lisez les consignes et instructions contenues dans le présent manuel avant d’installer et
d’utiliser cette serrure. Conservez ce manuel pour consultation ultérieure.
Lea las advertencias e instrucciones en este manual antes de instalar y usar esta cerradura.
Guarde este manual para consultas futuras.
1
3
2
Using the template, mark the door and drill the holes, and chisel out a mortise.
À l’aide du modèle, marquez la porte et percez et ciselez une mortaise.
Con la plantilla, marque la puerta y perfore los orificios, y cincele las muescas.
NOTE: Drill from both sides to avoid wood splitting.
REMARQUE: Percez des deux côtés pour éviter l’éclatement du bois.
NOTA: Perfore de ambos lados para evitar dañar la madera.
NOTE: If your door already has holes, skip to Installation.
REMARQUE: Si votre porte a déjà des trous, passez à l’installation.
NOTA: Si su puerta ya tiene agujeros, pase a la instalación.
USE AND CARE GUIDE
GUIDE D’UTILISATION
ET D’ENTRETIEN
GUÍA DE USO Y CUIDADOS
FOR
POUR
PARA
Safety Information
Informations de sécurité
Información de seguridad
CAUTION/ATTENTION/ADVERTENCIA:
Before beginning the installation, please read and understand the entire manual.
Avant de continuer l’installation, veuillez lire et comprendre tout le manuel.
Antes de comenzar la instalación, lea y entienda todo el manual.
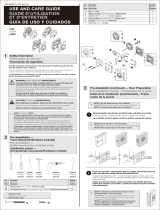
Pre-Installation (continued) — Door Preparation
Pré-installation (suite) — Préparation de la porte
Antes de la instalación (continuación) – Preparación de
la puerta
Optional
Facultatif
Opcional
Optional
Facultatif
Opcional
Optional
Facultatif
Opcional
Optional
Facultatif
Opcional
Optional
Facultatif
Opcional
OR O OU
A5
D
A6
A
B
C
D
E
F
G
OR
O
OU
E
OR
O
OU
D
A
A4
A1
A2
A3
B
C
D
E
F
G
OR
O
OU
E
A
A5
OR
O
OU
Note: Not to scale.
Remarque: Pas à l'échelle.
Nota: No está a escala.
AA
EE
DD
FF
CC
BB
Part
Pièce
Parte
Description
Description
Descripción
Quantity
Quantité
Cantidad
AA
BB
CC
DD
EE
2
2
2
4
1
FF
Deadbolt mounting screws / Vis de montage du pêne dormant / Tonillos para montaje del cerrojo
Deadbolt mounting screws / Vis de montage du pêne dormant / Tonillos para montaje del cerrojo
Long wood screw / Vis à bois longue / Tornillo de madera largo
Short wood screw / Vis à bois courte / Tornillo corto para madera
Set screw / Vis de serrage / Tornillo de fijación
Allen wrench / Clé hexagonale / Llave Allen
1
GG 1
Puller / Tireur / Extractor
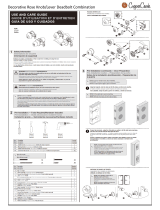
PACKAGE CONTENTS (SINGLE CYLINDER FUNCTIONS)
CONTENU (FUNCIONES DEL SOLO CILINDRO)
CONTENIDOS DEL PAQUETE (FONCTION D’CYLINDRE SEUL)
PACKAGE CONTENTS
(DOUBLE CYLINDER FUNCTIONS)
CONTENU (FONCTIONS DE DOUBLE CYLINDRE)
CONTENIDOS DEL PAQUETE (FUNCIONES DEL CILINDRO DOBLE)
Interior assembly / Assemblage intérieur / Montaje interior
Deadbolt Latch / Serrure à Pêne Dormant / Picaporte de Cerrojomuerto
Exterior Cylinder Assembly / Montage Cylinder Extérieur / Ensamble del Cilindro Exterior
Keys / Clés /
Clave
For concealed screws only / Pour vis cachées seulement / Para tornillos ocultos sólo
Thumb turn / Bouton / Botón giratorio
1
1
2
1
Spring / Ressort / Resorte
Interior deadbolt rosette / Rosette de serrure intérieure / Rosetón interior del cerrojo
Upper strike plate / Gâche supérieure / Chapa superior
Reinforcement Plate / Plaque de renfort / Placa del refuerzo 1
Plastic strike box / Étui de gâche en plastique / Caja contra de plástico
1
1
1
Deadbolt mounting plate / Plaque de montage du pêne dormant / Placa para montar el cerrojo
1
Interior reinforcing plate / Renfort d'âme intérieur / Placa de refuerza interior
Cap / Chapeau / Tapa
1
1
1
1
1
1
Part
Pièce
Parte
Description
Description
Descripción
Quantity
Quantité
Cantidad
A1
A2
A3
A4
A5
A6
A
B
C
D
E
F
G
GG
P44563 - DGZ-A4000P14
16/02-00
AA
AA
BB
BB
CC
CC
DD
DD
EE
FF

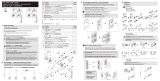
1-3/4”
(45 mm)
1-3/8”
(35 mm)
1-9/16”
(40 mm)
Ø 2-1/8” (54 mm)
2-3/4” (70 mm)
2-3/8” (60 mm)
TEMPLATE
MODÉLE
PLANTILLA
NOTE: Double check your product for the correct hole
sizes.
REMARQUE: Vérifiez attentivement votre produit
pour vous assurer que les tailles du trou sont correctes.
NOTA: Verifique nuevamente los tamaños correctos
de los orificios para su producto.
Drill a 1” (25 mm) diameter
hole at the center of the door
edge.
Percez un trou de 1” dans le
centre du rebord de la porte.
Hacer un agujero de 1” en el
centro del borde de la puerta.
Fold here.
Place on the door edge.
Pliez ici.
Placez sur le rebord de la
porte.
Doble aqui.
Ponga en el borde de la
puerta.
Backset
Distance d’entrée
Entrada
Backset
Distance d’entrée
Entrada
OR
O
OU
4
A. Attach the correct faceplate
Fixez la bonne plaque frontale
Coloque la placa frontal correcta
B. Set the latch backset
Réglez la distance d’entrée de la serrure
Fije la entrada del pestillo
C. Install the latch
Installez la gâche
Instale el pestillo
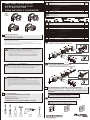
INSTALLING THE LATCH
INSTALLATION DE LA SERRURE
INSTALACIÓN DEL PESTILLO
Installation
Installation
Instalación
CAUTION: Be sure the latch cam is upright before making any backset adjustment.
ATTENTION: Assurez-vous que la came de la gâche est droite en effectuant tous les ajustements nécessaires de la distance d’entrée.
ADVERTENCIA: Asegúrese de que la leva del pestillo está en posición vertical antes de ajustar la entrada.
NOTE: The bevel should face the door jamb.
REMARQUE: Le biseau doit faire face jambage de la porte.
NOTA: El bisel debe enfrentar al montante de la puerta.
OR
O
OU
OR
O
OU
OR
O
OU
OR O OU
Exterior
Extérieur
Exterior
Exterior
Extérieur
Exterior
Interior
Intérieur
Adentro
Interior
Intérieur
Adentro
Interior
Intérieur
Adentro
Interior
Intérieur
Adentro
INSTALL OUTSIDE CYLINDER (SINGLE CYLINDER FUNCTIONS)
INSTALLER LE CYLINDRE EXTÉRIEUR (FUNCIONES DEL SOLO CILINDRO)
INSTALE EL CILINDRO EXTERIOR (FONCTION D’CYLINDRE SEUL)
INSTALL OUTSIDE CYLINDER (DOUBLE CYLINDER FUNCTIONS)
INSTALLER LE CYLINDRE EXTÉRIEUR (FONCTIONS DE DOUBLE CYLINDRE)
INSTALE EL CILINDRO EXTERIOR (FUNCIONES DEL CILINDRO DOBLE)
INSIDE
INTÉRIEUR
ADENTRO
EXTERIOR
EXTÉRIEUR
EXTERIOR
OR
O
OU
For Concealed Screws
Pour Vis Cachées
Para Tornillos Ocultos
B.
A.
For Exposed Screws
Pour Vis Apparentes
Para Tornillos Expuestos
Right/
Correct/
Correcto
Wrong/
Incorrect/
Equivocado
Right/
Correct/
Correcto
Wrong/
Incorrect/
Equivocado
Tighten screw firmly
Serrez la vis fermement
Apriete el tornillo firmemente
OR
O
OU
For Concealed Screws
Pour Vis Cachées
Para Tornillos Ocultos
B.
A.
For Exposed Screws
Pour Vis Apparentes
Para Tornillos Expuestos
Right/Correct/Correcto
Wrong/Incorrect/Equivocado
OR O OU
Inside
À l'intérieur
Adentro
Outside
Dehors
Afuera
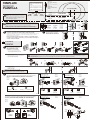
INSTALLING THE STRIKE PLATE
INSTALLATION DE LA GÂCHE
INSTALACIÓN DEL CERRADERO
Door jamb hole
dimension
c
b
f
e
a
d
a. 1-3/16 in.
b. 1-9/16 in.
c. 1 in.
d. 5/32 in.
e. 2-3/4 in.
f. 1-1/8 in.
a. 1-3/16 po
b. 1-9/16 po
c. 1 po
d. 5/32 po
e. 2-3/4 po
f. 1-1/8 po
Dimensión del
orificio en la jamba
de la puerta
a. 30 mm
b. 40 mm
c. 25 mm
d. 4 mm
e. 70 mm
f. 28 mm
Dimension du
trou du montant
de porte
NOTE: To assure proper lockset function, the holes in the door jamb must be drilled 1-1/8 ”.
(28 mm) deep.
REMARQUE: Pour assurer un bon fonctionnement de la serrure complète, les trous sur le
jambage de la porte doit être percé de 1-1/8 pouce. (28 mm) de profondeur.
NOTA: Para garantizar un funcionamiento adecuado del juego de cerradura, debe perforar
los orificios del portante de la puerta hasta una profundidad de 1-1/8 pulgada (28 mm).
1-1/8”
(28mm)
90º
90º
Prepare the door jamb – using the strike plate as a pattern, drill the latch and
screw holes, and chisel out a mortise until the strike plate fits flush
Préparez le jambage de la porte – à l’aide de la gâche comme modèle, percez
les trous de la serrure et de la vis, ciselez une mortaise jusqu’à ce que la
gâche puisse entrer sans force.
Prepare el portante de la puerta: usando el cerradero como plantilla, perfore
los orificios de la cerradura y el cerradero, y cincele una muesca hasta que el
cerradero entre perfectamente.
-
 1
1
-
 2
2


Master Lock DSH0615KA4S Guide d'installation
- Taper
- Guide d'installation
dans d''autres langues
Autres documents
-
Schlage Home Front by – Knob Guide d'installation
-
-
-
 Copper Creek EKDB141BC Guide d'installation
-
 Sure-Loc Hardware SS100 11P RH Guide d'installation
-
 Sure-Loc Hardware DB201-SMD FBL Guide d'installation
-
 Sure-Loc Hardware DB201-MD FBL Mode d'emploi
-
-
-
Defiant EVBR6B91B Guide d'installation


