ITEMS REQUIRED
(Purchase separately)
• Screwdriver
• Gloves(ifusingfrictionblades)
IMPORTANT SAFETY INSTRUCTIONS
Whenusingproduct,basicprecautionsshouldalwaysbe
followed,includingthefollowing:
• Heedallwarnings,includingbelowwarningsAND
thoseincludedonproduct.
• HALO
®
recessedluminaires(xtures)aredesignedto
meetthelatestNECrequirementsandareUL/cUL
listedinfullcompliancewithUL1598.Before
attemptinginstallationofanyrecessedlighting
luminairecheckyourlocalelectricalcode.Thiscode
setsthewiringstandardsforyourlocalityandshould
becarefullystudiedbeforestarting.
• Readandfollowtheseinstructions.
• Riskofre.MINIMUM90°CSUPPLYCONDUCTORS.
• RiskforFireorElectricShock:Pleaseconsultan
electricianforinstallationifuncertainofluminaire
electricalsystems.
• Riskofelectricshock.Toavoidpossibleelectricalshock,
besurethatpowersupplyisturnedoffatfuseboxor
circuitbreakerbeforeinstallingorservicingxture.
• Topreventwiringdamageorabrasion,donotexpose
wiringtoedgesofsheetmetalorothersharpobjects.
CAUTION
• Connectxturetoa120volt,60Hzpowersource.Any
otherconnectionvoidsthewarranty.
• Fixtureshouldbeinstalledbypersonswithexperience
inhouseholdwiringorbyaqualiedelectrician.The
electricalsystem,andthemethodofelectrically
connectingthexturetoit,mustbeinaccordancewith
theNationalElectricalCodeandlocalbuildingcodes.
• ThisdevicecomplieswithPart15oftheFCCRules.
Operationissubjecttothefollowingtwoconditions:
(1)thisdevicemaynotcauseharmfulinterference,and
RL560 Series Instructions
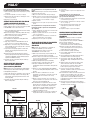
PACKAGING CONTENTS /CONTENIDO DEL PAQUETE
RL560 Instrucciones Serie RL560 Directives série
HALO
®
Cooper Lighting 1121 Highway 74 South Peachtree City, Georgia 30269
ARTÍCULOS NECESARIOS
(se compran por separado)
• Destornillador
• Guantes(siseutilizalashojasdefricción)
INSTRUCCIONES IMPORTANTES DE
SEGURIDAD
Alutilizarelproducto,siempresedebenseguirlas
precaucionesbásicas,incluídolosiguiente:
• Tengaencuentatodaslasadvertencias,incluyendolas
advertenciasacontinuaciónYaquellasincluidasenel
producto.
• Laluminarias(accesorios)empotradasHALO
®
están
diseñadasparacumplirconlosrequisitosNECmás
recientesyestáncatalogadasporUL/cULencompleto
cumplimientoconUL1598.Antesdecomenzarla
instalacióndesuluminariaempotradaveriqueelcódigo
local.Estecódigojalosestándaresdecableadosdesu
localidadydebeserestudiadocuidadosamenteantesde
comenzar.
• Leaysigaestasinstrucciones.
• Riesgodeincendio.UTILICECONDUCTORESDE
SUMINISTROQUESOPORTENUNMÍNIMODE90°C.Sino
estáseguroconsulteaunelectricista.
• Riesgodeincendioodedescargaeléctrica:Porfavor
consulteconunelectricistasitienedudassobrelos
sistemaseléctricosdelámparas.
• Riesgodedescargaeléctrica.Paraevitarunadescarga
eléctrica,asegúresequeelsuministroeléctricoesté
desconectadoenlacajadefusiblesointerruptoresde
circuitoantesdeinstalarodarmantenimientoal
accesorio.
• Paraprevenirdañosorozadurasenloscables,nolos
expongaalosbordesdeláminasmetálicasodeotros
objetoscortantes.
PRECAUCIÓN
• Conecteelaccesorioaunafuentedeenergíade120
Voltios,60Hz.Cualquierotrotipodeconexiónanulala
garantía.
ARTICLES NÉCESSAIRES
(à acheter séparément)
• Tournevis
• Gants(sivousutilisezdeslamesdefriction)
IMPORTANTES INSTRUCTIONS DE SÉCURITÉ
Desprécautionsdebasedoiventêtresuivieslorsde
l’utilisationdeceproduit,incluant:
• Respecteztouslesavertissements,ycomprisles
avertissementsci-dessousETceuxquisontinscritssur
l’étiquetted’avertissement.
• LesluminairesencastrésHALO
®
sontconçuspourêtre
conformesauxexigencesduCodenationaldel’électricité
etsonthomologuésUL/cULenpleineconformitéavec
UL1598.Avantdecommencerl’installationd’unéclairage
encastréquelconque,vériezvotrecodeélectriquelocal.
Cecodeétablitlesnormesdecâblagepourvotrelocalité
etdoitêtreétudiéattentivementavantdecommencer.
• Lisezetsuivezcesinstructions.
• Risqued’incendie.FILSD’ALIMENTATIONDE90ºC
MINIMUM.Sivousn’êtespassûr,consultezunélectricien.
• Risqued’incendieoudechocélectrique:consultezun
électricienpourfairel’installationsivousneconnaissez
paslessystèmesélectriquespourluminaires.
• Risquedechocélectrique.Pourévitertoutepossibilitéde
chocélectrique,vériezquel’alimentationestcoupéeau
coffretdefusiblesouaudisjoncteuravantl’installation
oul’entretienduluminaire.
• Pouréviterl’abrasionoulesdommagesaucâblage,
n’exposezpaslecâblageauxbordsdetôleouàd’autres
objetscoupants.
PRÉCAUTION
• Raccorderl’appareild’éclairageàunealimentation120V,
60Hz.Touteautreconnexionannulelagarantie.
• L’appareild’éclairagedoitêtreinstalléparunélectricien
ouunepersonnechevronnéeencâblagedomestique.Le
systèmeélectriqueetlaméthodedeconnexionélectrique
del’appareild’éclairagedoiventêtreconformesauCode
nationaldel’électricitéetauxcodeslocauxdubâtiment.
Cetappareilestconformeauchapitre15desrèglements
825-0813
RL560 Series
page 1
Questions?/¿Preguntas?/Questions ? 1-800-334-6871 [email protected]
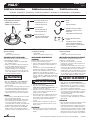
RL560WH, RL560WH-R, RL560WH-C, RL560SN, RL560SN-R, RL560SN-C, RL560WH68XX, RL560SN68XX
C.#8-32HexNut
Tuercahexagonal#8-32
Écrouhexagonal#8-32
F. E26Edisonscrewbaseadapter
Adaptadordelabaseconrosca
EdisonE26
L’adaptateurdebaseEdisonE26
D.LEDconnectorbox
CajadeconectadordelLED
BoîtierdeconnecteurDEL
G.Frictionclip,numberdenotes
cansize
Sujetadordefricción;elnúmero
indicaeltamañodelalojamiento
Attachedefriction,lenuméroindique
ladimensionduboîtier.
B.#8-32Selftappingscrew
Tornillomecánico#8-32
Visdemécanique#8-32
E. Gasket
Junta
Bagued’étanchéité
A.LEDmoduleandconnector
MóduloLEDyconector
ModuleàDELetconnecteur
WARNING
ADVERTENCIA
AVERTISSEMENT

HALO
®
RL560 Series
page 2
(2)thisdevicemustacceptanyinterferencereceived,
includinginterferencethatmaycauseundesired
operation.
• Donotmakeoralteranyopenholesinanenclosureof
wiringorelectricalcomponentsduringkitinstallation.
SAVE THESE INSTRUCTIONS AND WARNINGS.
HOUSINGS
WARNING:RiskofFireorElectricShock.ForUseonlywith
thefollowingrecessedLuminaires.
• TheRL560seriescomeswithadedicatedLED
connectorforCaliforniaTitle24Complianceandis
ULListedforinstallationintoHalorecessedLED
housings(seehousinglist).
• TheRL560seriesalsoincludesanE26Edisonscrew
baseadaptertoaccommodatestandardscrewbase
housings.TheRL560isULListedandClassiedfor
retrotinthefollowinghousings:
UL Listed
- HALO
®
:H7ICAT,H7ICT,H7T,H7ICATNB,H7ICTNB,
H7TNB,H7UICAT,H7UICT,H7TCP,H7RICAT,H7RICT,
H7RT,H27ICAT,H27ICT,H27T,H27RICAT,H27RICT,
H27RT,H5ICAT,H5RICAT,H5T,H5RT,H5TM,H25ICAT
-HALO
®
LED:H750ICAT,H750RICAT,H750T,H750TCP,
H2750ICAT,H550ICAT,H550RICAT
- HALO
®
LED Retrofit:ML7BXRFK,ML7E26RFK
- ALL-PRO
™
:EI700,EI700AT,EI700ATNB,EI700U,
EI700UAT,EI700NB,EI700R,EI700RAT,ET700,ET700R,
EI2700,EI2700AT,ET2700,EI2700R,ET2700R,
EI500AT,ET500,EI500RAT,ET500R
UL Classified
- Juno:IC22,IC22R,IC22W,IC22S,IC23,IC23W,IC21,
IC21R,IC2,TC2,TC2R,IC20,IC20R,IC25,IC25R,
IC25W,IC25S,TC20,TC20R
- Lightolier:1104ICS*,1104ICR*,1104SIC*,
1104SICR*,1004ICS*,1004ICR*,1004SIC*,
1004SICR*
1104ICX-RequiresinstallationofHaloML7RABretrot
adapterbandaccessory.
- Capri:CR1,PR1,QL1,R9ASIC,R5*
- Progress:P87-AT*,P86TG
- Lithonia:L7X,L7XP
- Thomas:PS1,R9ASIC/PS9RM
- Prescolite:IBXS
- Commercial Electric:C7ICA(H3),H18
- Elco:(HL7ICA)EL7ICA
* RequiresReplacementoftorsionspringswith5”or6”
frictionclips(included).
DIMMING
TheHaloLEDluminairecanbedimmed,howeverupdates
indimmertechnologyandspecialconditionsmayapply
dependingonthedimmertypebeingused.Forthelatest
informationregardingdimmersforusewiththisLED
luminaire,pleaseseetheHaloLEDDimmingReference
Sheetatwww.cooperlighting.com.Inaddition,youmaywish
toconsultthedimmermanufacturerfortheirlatestdimmer
congurationsandproductinformation.
• Elaccesoriodebeserinstaladoporpersonascon
experienciaencableadodomésticooporunelectricista
calicado.Elsistemaeléctricoyelmétododeconexión
eléctricadelaccesoriodebecumplirconelCódigo
eléctriconacionalyloscódigoslocalessobreedicios.
• Estedispositivocumpleconparte15delasreglasde
FFC.SUoperaciónestásujetaalassiguiente
condiciones:(1)Estedispositivonopuedecausar
interferenciadañina,y(2)estedispositivopuederecibir
interferencia,incluyendoaquellaquepuedecausaruna
operaciónnodeseadadeldispositivo.
• Noperforenialtereningúnagujeroenuncompartimiento
decablesocomponenteseléctricosdurantela
instalacióndelkit.
GUARDE ESTAS INSTRUCCIONES Y ADVERTENCIAS.
ALOJAMIENTOS
ADVERTENCIA:Riesgodeincendioodedescarga
eléctrica.Parausarúnicamenteconlassiguienteslámparas
empotradas
• LaserieRL560vieneconunconectorLEDespecial
paraelcumplimientodelTítulo24deCaliforniayestá
homologadoporULparalainstalaciónenalojamientos
deLEDHalo®empotrados(verlistadealojamientos).
• ElRL560tambiénincluyeunadaptadordebaseEdison
paraadaptaralojamientosICATdebaseconrosca
estándar.ElRL560estáhomologadoyclasicadoporUL
paraadaptarseenlossiguientesalojamientos.
Homologado por UL
- HALO
®
:H7ICAT,H7ICT,H7T,H7ICATNB,H7ICTNB,
H7TNB,H7UICAT,H7UICT,H7TCP,H7RICAT,H7RICT,
H7RT,H27ICAT,H27ICT,H27T,H27RICAT,H27RICT,
H27RT,H5ICAT,H5RICAT,H5T,H5RT,H5TM,H25ICAT
-HALO
®
LED:H750ICAT,H750RICAT,H750T,H750TCP,
H2750ICAT,H550ICAT,H550RICAT
- HALO
®
LED Retrofit:ML7BXRFK,ML7E26RFK
- ALL-PRO
™
:EI700,EI700AT,EI700ATNB,EI700U,
EI700UAT,EI700NB,EI700R,EI700RAT,ET700,ET700R,
EI2700,EI2700AT,ET2700,EI2700R,ET2700R,
EI500AT,ET500,EI500RAT,ET500R
Clasificado UL
- Juno:IC22,IC22R,IC22W,IC22S,IC23,IC23W,IC21,
IC21R,IC2,TC2,TC2R,IC20,IC20R,IC25,IC25R,
IC25W,IC25S,TC20,TC20R
- Lightolier:1104ICS*,1104ICR*,1104SIC*,
1104SICR*,1004ICS*,1004ICR*,1004SIC*,
1004SICR*
1104ICX-RequierelainstalacióndeHaloML7RAB
adaptaciónaccesorioadaptadordebanda.
- Capri:CR1,PR1,QL1,R9ASIC,R5*
- Progress:P87-AT*,P86TG
- Lithonia:L7X,L7XP
- Thomas:PS1,R9ASIC/PS9RM
- Prescolite:IBXS
- Commercial Electric:C7ICA(H3),H18
- Elco:(HL7ICA)EL7ICA
* Requiereelremplazodelosresortesdetorsióncon
sujetadoresdefricciónde5”o6”(incluidos).
REGULADOR DE INTENSIDAD DE LUZ
ElsistemadeiluminaciónLEDdeHalosepuedenregular,
sinembargo,cambiosenlatecnologíadereguladorylas
condicionesespecialespuedenaplicarsedependiendodel
tipodereductordeluzqueseutiliza.Paraobtenerlaúltima
informaciónconrespectoalosamortiguadoresparaeluso
conestaluminariaLED,consulteelHaloLEDdeatenuación
enlaHojadereferenciawww.cooperlighting.com.Además,
esposiblequedeseeconsultaralfabricantedelregulador
desusúltimasconguracionesdeintensidaddeluzyde
informacióndelproducto.
FCC.Lamiseestoeuvreestsousréservedesdeux
conditionssuivantes:
(1)Cetappareilneprovoquepasdebrouillagenuisible,et
(2)Cetappareildoitacceptertouteinterférencereçue,
notammentl’interférencequipourraitprovoquerun
fonctionnementindésirable.
• Aucoursdel’installationdukit,nefaitespasde
nouveauxtrousounemodiezpaslestrousexistants
dansunboîtiercontenantdescâblesoudescomposants
électriques.
CONSERVEZ CES INSTRUCTIONS ET CES
AVERTISSEMENTS.
BOÎTIERS
AVERTISSEMENT :Risqued’incendieoudechocélectrique.
Àutiliserseulementaveclesluminairesencastréssuivants.
• LasérieRL560estéquipéed’unconnecteurDELdédié,
enconformitéaveclanormeCaliforniaTitle24etest
certiéeULpourinstallationdansdesboîtiersDEL
encastrésHalo®(voirlalistedesboîtiers).
• LeproduitRL560comprendégalementunadaptateurde
baseEdisons’adaptantauxboitiersàculotsàvis
classiquesdelaCIAT.LeproduitdepostcâblageRL560
estrépertoriéetclassiéULpourlesboitierssuivants:
Répertorié UL
- HALO®:H7ICAT,H7ICT,H7T,H7ICATNB,H7ICTNB,
H7TNB,H7UICAT,H7UICT,H7TCP,H7RICAT,H7RICT,
H7RT,H27ICAT,H27ICT,H27T,H27RICAT,H27RICT,
H27RT,H5ICAT,H5RICAT,H5T,H5RT,H5TM,H25ICAT
- HALO
®
LED:H750ICAT,H750RICAT,H750T,H750TCP,
H2750ICAT,H550ICAT,H550RICAT
- HALO® LED Retrofit:ML7BXRFK,ML7E26RFK
- ALL-PRO™:EI700,EI700AT,EI700ATNB,EI700U,
EI700UAT,EI700NB,EI700R,EI700RAT,ET700,ET700R,
EI2700,EI2700AT,ET2700,EI2700R,ET2700R,
EI500AT,ET500,EI500RAT,ET500R
Classifié UL
- Juno:IC22,IC22R,IC22W,IC22S,IC23,IC23W,IC21,
IC21R,IC2,TC2,TC2R,IC20,IC20R,IC25,IC25R,
IC25W,IC25S,TC20,TC20R
- Lightolier:1104ICS*,1104ICR*,1104SIC*,
1104SICR*,1004ICS*,1004ICR*,1004SIC*,
1004SICR*
1104ICX-Nécessitel’installationdeHaloML7RAB
rénovationaccessoirebandeadaptateur.
- Capri:CR1,PR1,QL1,R9ASIC,R5*
- Progress:P87-AT*,P86TG
- Lithonia:L7X,L7XP
- Thomas:PS1,R9ASIC/PS9RM
- Prescolite:IBXS
- Commercial Electric:C7ICA(H3),H18
- Elco:(HL7ICA)EL7ICA
* Nécessiteleremplacementdesressortsdetorsionpar
desattachesdefrictionde5poet6po(fournies).
GRADATION DE LUMIÈRE
LeluminaireDELHalopeutêtreatténuée,toutefoismises
àjourenmatièredetechnologieetgradateurconditions
spécialespeuvents’appliquerselonletypegradateurutilisé.
Pourlesdernièresinformationsconcernantlesgradateurs
pouruneutilisationavecceluminaireLED,s’ilvousplaît
voirleHaloLEDgradationFichederéférenceà
www.cooperlighting.com.Enoutre,vouspouvezconsulter
lefabricantvariateurdelumièrepourleurscongurations
plusrécentesgradateursetinformationssurlesproduits.
INSTALLATION DU FIL DE TERRE
REMARQUE : Leldeterredoitêtreinstalléde
manièresécuritairesurleboîtier.Troisméthodesde
raccordementillustréesci-dessous.
825-0813
Cooper Lighting 1121 Highway 74 South Peachtree City, Georgia 30269
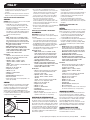
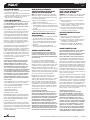
Fig. 1
Groundwire
elcabledeconexiónatierra
Lefildeterre

HALO
®
RL560 Series
page 3
GROUND WIRE ATTACHMENT
NOTE: Groundwiremustbesecurelyinstalledtothe
housing.Threeconnectionmethodsshownbelow.
1. ForgroundconnectionfromLEDmoduletohousing,
useprovidedgreengroundwire(factoryinstalled)as
shownin(Fig.1).
2. Connectotherendofgroundwiretohousing.Connection
tohousingmayvarydependingonmodel.Three
connectionmethodsaredescribedbelow.
•Useexistingscrewinsidehousing(Fig.2).
•Usesupplied#8nutonexistingstud(Fig.3).
•Usesupplied#8screw(B)inexistinghole(Fig.4)
DETERMINING WHICH INSTALLATION
METHOD TO USE
For 6” housings with torsion spring receiving brackets:
NOTE:Moduleshipswithtorsionspringpre-installedinthe
6”bracketposition.
•Nofurtherassemblyrequired.
For 6” housings without torsion spring receiving
brackets (see page 1 in the HOUSINGS section of these
instructions for a listing of the most common housings):
1. Removetorsionspringbracketscompletely
(keepscrews)(seeFig.5).
2. Locatefrictionclipwith“6”cutout(seeFig.6).
3. Attachfrictioncliptobasewith“6”marking(usescrew
fromStep1)(seeFig.6).
4. Repeat1-3forsecondclip.
For 5” housings with torsion spring receiving brackets:
NOTE: Moduleshipswithtorsionspringpre-installedinthe
6”bracketposition.
1. Loosentorsionspringbracketscrew(Fig.5).
2. Slidebrackettoinwardpositionsuchthatthebracketts
overtheguideontheheatsinkandscrewispositioned
nextto“5”(Fig.7).
3. Tightenscrew.
4. Repeatsteps1-3for2ndtorsionspringbracket.
INSTALACIÓN DEL CABLE DE CONEXIÓN A
TIERRA
NOTA: elcabledeconexiónatierradebeserinstalado
rmementeenelalojamiento.Abajosemuestrantres
métodosdeconexión.
1.PararealizarlaconexiónatierradesdeelmóduloLED
hastaelalojamiento,utiliceelcableverdedeconexión
atierraproporcionado(instaladoenlafábrica)comose
muestra(Fig.1).
2. Conecteelotroextremodelcableverdealalojamiento.
Laconexiónalalojamientopuedevariarsegúnelmodelo.
Abajosedescribentresmétodosdeconexión.
• Utiliceeltornilloexistenteenelalojamiento(Fig.2).
•Uselatuerca#8incluidaenlavigaexistente(Fig.3).
•Useeltornillo#8incluidoenelagujeroexistente
(Fig.4).
PARA DETERMINAR CUáL MÉTODO DE
FIJACIÓN USAR
Para alojamientos de 6” con soporte de resortes de
torsión.
NOTA:Elmodeloincluyeunresortedetorsiónpreinstalado
enlaposicióndesoportede6”.
•Noserequiereensamblajeadicional.
Para alojamientos de 6” sin soportes de resortes de
torsión (Véase la página 1 en la sección de
ALOJAMIENTOS de estas instrucciones para obtener un
listado de los alojamientos más comunes):
1. Retirecompletamentelossoportesderesortedetorsión
(guardeeltornillo)(seeFig.5).
2. Ubiqueelsujetadordefricciónconelrecortemarcado
como“6”(vealaFig.6).
3. Fijeelsujetadordefricciónalabaseconlamarca
“6”(utiliceeltornillodelpaso1)(vealaFig.6).
4. Repitalospasos1al3parael2ºsujetador.
1. Pourunraccordementdemiseàlaterredumodule
àDELauboîtier,utilisezleldeterrevertfourni
(installéàl’usine)commeillustré(Fig.1).
2.Raccordezl’autreextrémitéduldeterreauboîtier.
Leraccordementauboîtierpeutvarierselonlemodèle.
Troisméthodesderaccordementsontillustrées
ci-dessous.
• Utilisezlavisexistanteàl’intérieurduboîtier(Fig.2).
• Utilisezl’écrouno8fournisurlegoujonexistant
(Fig.3).
• Utilisezlavisno8fourniedansletrouexistant(Fig.4).
DÉTERMINER QUELLE MÉTHODE DE
FIXATION UTILISER
Pour les boîtiers de 6 po avec support de ressort de
torsion:
REMARQUE : Modulefourniavecunressortdetorsion
préinstalléàlapositiondesupportde6po(15,2cm).
•Aucunassemblagesupplémentairerequis.
Pour les boîtiers de 6 po sans supports pour
accueillir les ressorts de torsion (reportez-vous à la
page 1 de la section BOÎTIERS de ces instructions pour
consulter la liste des boîtiers les plus courants) :
1. Retirezcomplètementlessupportsderessortde
torsion(conservezlesvis)(seeFig.5).
2. Repérezl’attachedefrictionavecladécoupeenforme
de«6»(seeFig.6).
3. Fixezl’attachedefrictionàlabaseaveclerepère
«6»(utilisezlavisdel’étape1)(seeFig.6).
4. Répétezlesétapes1à3pourla2eattache.
Pour les boîtiers de 5 po avec supports de ressort
de torsion :
REMARQUE :Modulefourniavecunressortdetorsion
préinstalléàlapositiondesupportde6po(15,2cm).
1. Dévissezlessupportsderessortdetorsiondumodule
(Fig.5).
2. Déplacezlesupportversl’intérieurdemanièreàce
quelalanguettesoitinséréedansletrouindiquéparun
5(Fig.7).
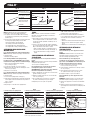
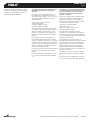
Fig. 2 Fig. 4
#1
#2
#3
Ceilingthickness
adjustmentslot(oneof
threeslotsinsidehousing)
Ranuradeajustedel
gruesodeltecho(unade
tresranuras)
Réglagedelafenteselon
l’épaisseurduplafond
(unedestroisfentes)
Groundwire
Cabledeconexiónatierra
Miseàlaterre
(Viewfrominsidethehousing)
(Vistainternadelalojamiento)
(Vuedel’intérieurduboîtier)
#1
#2
#3
#1
#2
#3
Fig. 3
Threadedstudinsidewallofhousing
Posteroscadoenlaparedlateraldelalojamiento
Goujonfiletésurlaparoilatérale
Groundwire
Cabledeconexiónatierra
Miseàlaterre
(Viewfrominsidethehousing)
(Vistainternadelalojamiento)
(Vuedel’intérieurduboîtier)
#8Nut
Tuerca#8
L’écrouno8
6 INCH TORSION SPRINGS
6" Housings using Torsion Spring Bracket
Alojamientos de 6” con soporte de resortes
de torsión
Boîtiers de 6 po (15,2 cm) avec support de
ressort de torsion
TorsionSpringBracketintheoutwardposition
Soportederesortedetorsiónorientadohacia
afuera
Supportderessortdetorsiondanslaposition
versl’extérieur
Fig. 5
6 INCH FRICTION CLIPS
6" Housings using Friction Clip Blades
Alojamientos de 6” con paletas de sujeción
de fricción
Boîtiers de 6 po (15,2 cm) avec lames
d’attache de friction
Frictionclipinstallationfor6”housingsinthe
outwardposition
Instalacióndesujetadordefricciónpara
alojamientosde6”enlaposiciónhaciaafuera
Installationdesattachesdefrictionpourles
boîtiersde6popositionnésversl’extérieur
Fig. 6
5" Housings using Torsion Spring Bracket
Alojamientos de 5” con soporte de resortes
de torsión
Boîtiers de 5 po (12,7 cm) avec support de
ressort de torsion
TorsionSpringBracketpositionsforinstallation
into5"housings
Posicionesdelaabrazaderaderesortedetensión
paralainstalaciónenalojamientosde5”
Positiondessupportsdesressortsdetorsionpour
uneinstallationdansdesboîtiersde5po
Fig. 7
5 INCH FRICTION CLIPS
5" Housings using Friction Clip Blades
Alojamientos de 5” con paletas de sujeción
de fricción
Boîtiers de 5 po (12,7 cm) avec lames
d’attache de friction
FrictionClipinstallationfor5"housings
Instalacióndesujetadordefricciónpara
alojamientosde5”
Installationdesattachesdefrictionpourles
boîtiersde5po
Fig. 8

HALO
®
RL560 Series
page 4
For 5” housings without torsion spring receiving
brackets (see page 1 for a list of pre-tested housings):
1. Removetorsionspringbracketscompletely(keepscrew)
(seeFig.5).
2. Locatefrictionclipwith“5”cutout(seeFig.8).
3. Attachfrictioncliptobasewith“5”marking(usescrew
fromStep1)(seeFig.8).
4. Repeat1-3forsecondclip.
RETROFIT INSTALLATION INTO E26 EDISON
SCREW BASE RECESSED HOUSINGS
NOTE:ConrmhousingiscompatiblewithRL560series
modules.Alistingofthemostcommonhousingsisprovided
intheHOUSINGSsectionoftheseinstructions.
1. Removemountingbracketandplatefrominsideexisting
recessedhousing(ifinstalled).
1a.Ensurebottomedgeofcan/housingisushwithceiling.
Adjustheightifnecessarytoensureatightnish.
2. Releasesocketfromplate(ifinstalled).
3. Placegasketontrimringange.
4. ScrewEdisonbaseadapterintoexistingEdisonbase
socketinhousing(Fig.9a).
5. PlugorangeconnectoronRL56LEDmoduleintothe
orangeconnectoronscrewbaseadapter(Fig.9b).
6. Alignwiresoneachsideoforangeconnetcorswiththe
slotsintheLEDconnectorbox(Fig.9c).Onceconnected,
closeboxandsnapshut.
7. Squeezethetorsionspringstogetherasshownand
installintotorsionspringbracketsinsiderecessed
housing(Fig.10).
7a. Ifusingfrictionclips,whilewearingglovessqueeze
opposingclipstogetheruntilclipstinsidehousingthen
carefullyinsertRL560intohousingallowingspringsto
expandtoholdRL560inhousing.
8. Carefullyroutewiresintoxtureandpushmoduleup
ushtoceilingsurface.
INSTALLATION INTO HALO H2750x,
H550x and H750x SERIES LED
(non-screw base) HOUSINGS
NOTE:MaybeusedtomeetCaliforniaTitle24,Washington
StateEnergyCode,andInternationalEnergyConservation
CodeHighEfcacyCompliance.
1. PlugmoduleintoHalorecessedxtureconnector(Fig.11).
2. Squeezetorsionspringstogetherasshown(Fig.10a)
andinstallintotorsionspringbracketsinsiderecessed
housing(Fig.10b).
3. Carefullyroutewiresintoxtureandpushmoduleup
ushtoceilingsurface.
Para alojamientos de 5” con soportes de resortes de
torsión
NOTA:Elmodeloincluyeunresortedetorsiónpreinstalado
enlaposicióndesoportede6”.
1. Aojeresortedetorsióntornillodelsoporte(Fig.5).
2. Deslizarelsoportealaposiciónhaciaadentrodemanera
queelsoportesecolocasobrelaguíaeneldisipadorde
caloryeltornillosecolocaalladode“5”(Fig.7).
3. Aprieteeltornillo.
4. Repitalospasos1al3parael2ºsoportederesortesde
torsión.
Para alojamientos de 5” sin soportes de resortes de
torsión (vea la página 1 para la lista de alojamientos
que se aplican).
1. Retirecompletamentelossoportesderesortedetorsión
(guardeeltornillo)(vealaFig.5).
2. Ubiqueelsujetadordefricciónconelrecortemarcado
como“5”(vealaFig.8).
3. Fijeelsujetadordefricciónalabaseconlamarca“6”
(utiliceeltornillodelpaso1)(vealaFig.6).
4. Repitalospasos1al3parael2ºsujetador.
INSTALACIÓN ADAPTADA EN ALOJAMIENTO
EMPOTRADO DE BASE CON ROSCA
EDISON E26
NOTA:Conrmequeelalojamientoescompatiblecon
elmódulodeluzRL560.Sepresentaunalista
delosalojamientosmáscomunesenlasección
“ALOJAMIENTOS”deestasinstrucciones.
1. Quiteelsoportedemontajeylaplacadeadentrodel
alojamientoempotradoexistente(siinstalado).
1a.Cercióresedequeelbordeinferiordelalojamientoestéa
rasconelcieloraso.Ajustelaalturasiesnecesariopara
asegurarunterminadoajustado.
2. Quiteelportalámparasdelaplaca(siinstalado).
3. Coloquelajuntaenelrebordedelarodeadorno.
4. EnrosqueeladaptadordebaseEdisonenel
portalámparasexistentedebaseEdisondelalojamiento
(Fig.9a).
5. EnchufeelconectoranaranjadodelmóduloLEDRL56
enelconectoranaranjadodeladaptadordebaseroscado
(Fig.9b).
6. Alineeloscablesencadaladodelosconectores
anaranjadosconlasranurasenlacajadelconectordel
LED(Fig.9c).Unavezconectados,cierrelacaja
presionando.
7. Aprietelosresortesdetorsión,comosemuestraen
conjuntoeinstalarenlossoportesderesortedetorsión
dentrodelacajaempotrada(Fig.10).
7a.Siestáutilizandolossujetadoresdefricción,usando
guantesaprietelossujetadoresopuestosparajuntarlos
hastaqueentrenenelalojamiento;despuésinserte
cuidadosamenteelmóduloRL560enelalojamiento,
dejandoqueseexpandanlosresortesparaque
sostenganelRL560enelmismo.
8. Cuidadoguíeloscablesenelaccesorioyelmódulode
empujarhaciaarribaarasdelasuperciedeltecho.
3. Serrezlavis.
4. Répétezlesétapes1à3pourle2esupportderessort
detorsion.
Pour les boîtiers de 5 po sans supports pour
accueillir les ressorts de torsion (reportez-vous à la
page 1 pour la liste des boîtiers).
1. Retirezcomplètementlessupportsderessortdetorsion
(conservezlesvis)(seeFig.5).
2. Repérezl’attachedefrictionavecladécoupeenforme
de«5»(seeFig.8).
3. Fixezl’attachedefrictionàlabasedotéed’un
marquageà6po(utilisezlavisdel’étape1)
(voirFig.6).
4. Répétezlesétapes1à3pourla2eattache.
INSTALLATION DE POSTCÂBLAGE DANS
LE BOITIER ENCASTRÉ À BASE VISSÉE
EDISON E26
REMARQUE :Vériezqueleboîtierestcompatible
aveclemoduleàRL560.Unelistedesboitiers
lespluspopulairesestfournieauchapitre«BOITIERS»
danslesprésentesinstructions.
1. Retirezlabrideetlaplaquedemontagede
l’intérieurduboîtierencastréexistant(siinstallé).
1a. Assurez-vousquel’arêteinférieureduboîtierse
trouveàeurduplafond.Sinécessaire,ajustezla
hauteurand’assurerunniparfait.
2. Retirezladouilledelaplaque(siinstallée).
3. Placezlebagued’étanchéitésurlacollerettede
l’anneaudegarniture.
4. Vissezl’adaptateurdebaseEdisondansladouilleà
visd’Edisonexistantesurleboitier(Fig.9a).
5. InsérezlacheorangedumoduleàDELRL560
dansladouilleorangedel’adaptateuràbasevissée
(Fig.9b).
6. Alignezleslsdepartetd’autredeschesorange
danslesrainuresduboîtierdeconnexionDEL
(Fig.9c).Unefoislaconnexioneffectuée,fermezle
boîtieretpressezjusqu’auclicdefermeture.
7. Pressezlesressortsdetorsionensembletel
qu’illustré,etinstallezlesbridesàressortdetorsionà
l’intérieurduboîtierencastré(Fig.10).
7a.Sivousutilisezdesattachesdefriction,munissez-vous
degantsetserrezlesattachesl’unecontrel’autre
jusqu’àcequ’ellesrentrentdansleboîtier,puisinsérez
soigneusementlemodèleRL560dansleboîtieren
permettantauxressortsdesedéployerpourmaintenirle
RL560dansleboîtier.
8. Faitespasserleslssoigneusementdansl’appareil
d’éclairageetpoussezlemoduleverslehautjusqu’àce
qu’ilafeurelasurfaceduplafond.
Fig. 9b
Fig. 10a Fig. 11
Fig. 9a
E26Edisonscrewbase
Adaptadordelabaseconrosca
EdisonE26
L’adaptateurdebaseEdisonE26
Fig. 9c
TorsionSpringBrackets
Soportederesortesdetorsión
Supportderessortdetorsion
Fig. 10b
Fig. 12

HALO
®
RL560 Series
page 5
INSTALACIÓN EN ALOJAMIENTOS
(SIN BASE CON ROSCA) DE LED HALO®
SERIE H2750x, H550x AND H750x
NOTA:PuedeutilizarseparacumplirconelTítulo24de
California,elCódigodeenergíadelestadodeWashington
ylasnormasdealtaecienciadelCódigoInternacionalde
ConservacióndeEnergía(IECC).
1. EnchufeelmodeloRL7068xxenelconectordela
lámparaHaloempotrada(Fig.11).
2. Aprietelosresortesdetorsiónhastajuntarloscomose
muestra(Fig.10a),einstálelosenlasabrazaderaspara
losresortesdetorsióndentrodelalojamientoempotrado
(Fig.10b).
3. Concuidadoguíeloscablesenelaccesorioyempujeel
módulohaciaarribaparaquequedealrasdeltecho.
REMPLAZO DEL MÓDULO LED O DE LOS
AROS DE ADORNO
1. Conlasyemasdelosdedos,tirermementehaciaabajo
hastaqueelmóduloseseparedelalojamiento.
2. Presioneambosresortesdetorsiónparajuntarlosy
quitarelmóduloLED.Siestáutilizandosujetadoresde
fricción,tiredelmódulolentamentepararetirarlodel
alojamiento.
3. DesconecteelcabledelmóduloLEDdelalata
empotrada(ConectorLEDobaseEdisonenroscable).
GARANTIA LIMITADA DE 5 AÑOS
LASIGUIENTEGARANTÍAESEXCLUSIVAYREEMPLAZA
ATODASLASDEMÁSGARANTÍAS,YASEANIMPLÍCITAS,
EXPLÍCITASOESTATUTARIAS,INCLUIDAS,ENTREOTRAS,
LASGARANTÍASDECOMERCIABILIDADEIDONEIDADPARA
UNFINPARTICULAR.
CooperLighting,LLC(“CooperLighting”)garantizaa
susclientesquelosproductosdeCooperLightingno
presentarándefectosenlosmaterialesyenlafabricación
duranteunperíododecincoañosdesdelafechadecompra.
LaobligacióndeCooperLightingsegúnestagarantíase
limitaexpresamentealsuministrodelosproductosde
reemplazo.Estagarantíaseextiendesóloparaelcomprador
originaldelproducto.Unrecibodecomprauotrapruebade
lafechadecompraoriginalaceptableparaCooperLighting.
Estoesnecesarioparalaejecucióndelagarantía.
EstagarantíanoseaplicaalosproductosdeCooper
Lightingquehayansidoalteradosoreparadosoque
estuvieronsujetosanegligencia,abuso,malusooaccidente
(inclusolosdañosduranteelenvío).Estagarantíanose
aplicaalosproductosCooperLightingnofabricadospor
CooperLightingquehayansidosuministrados,instalados
outilizadosjuntoconlosproductosCooperLighting.Los
dañosdelproductocausadosporbombillasdereemplazo,
corrosiónodecoloracióndeloscomponentesdelatónno
estáncubiertosporestagarantía.
LIMITACIÓNDERESPONSABILIDAD:
COOPERLIGHTINGNOSERÁRESPONSABLELEGALEN
NINGÚNCASODEDAÑOSINDIRECTOS,ACCIDENTALESO
RESULTANTES(SINIMPORTARLAACCIÓNLEGAL,YASEA
PORCONTRATO,RESPONSABILIDADESTRICTAODEFORMA
EXTRACONTRACTUALINCLUYENDOLANEGLIGENCIA),NI
PORTAMPOCODELAPÉRDIDADEGANANCIAS;COOPER
LIGHTINGTAMPOCOSEHACERESPONSABLEPOR
DAÑOSQUESURJANOESTÉNCONECTADOSCONESTOS
TÉRMINOSOCONLAFABRICACIÓN,VENTA,ENTREGA,USO,
MANTENIMIENTO,REPARACIÓNOMODIFICACIÓNDELOS
PRODUCTOSDECOOPERLIGHTINGODELSUMINISTRODE
CUALQUIERPIEZADEREPUESTOQUEEXCEDAELPRECIO
DECOMPRADELOSPRODUCTOSDECOOPERLIGHTING
REPLACING LED MODULE
1. Withngertips,pulldownrmlyontrimringuntilmodule
isremovedfromthehousing.
2. SqueezetorsionspringstogethertoremoveLEDmodule.
Ifusingfrictionblades,pullmoduleoutofhousingslowly.
3. DisconnectLEDmodulewiringfromrecessedcan.
(LEDconnectororscrew-inEdisonbase).
5-YEAR LIMITED WARRANTY
THEFOLLOWINGWARRANTYISEXCLUSIVEANDINLIEUOF
ALLOTHERWARRANTIES,WHETHEREXPRESS,IMPLIED
ORSTATUTORYINCLUDING,BUTNOTLIMITEDTO,ANY
WARRANTYOFMERCHANTABILITYORFITNESSFORANY
PARTICULARPURPOSE.
CooperLighting,LLC(“CooperLighting”)warrantsto
customersthat,foraperiodofveyearsfromthedateof
purchase,HaloRL560seriesproductswillbefreefrom
defectsinmaterialsandworkmanship.Theobligationof
CooperLightingunderthiswarrantyisexpresslylimited
totheprovisionofreplacementproducts.Thiswarranty
isextendedonlytotheoriginalpurchaseroftheproduct.
Apurchaser’sreceiptorotherproofofdateoforiginal
purchaseacceptabletoCooperLighting.Thisisrequired
beforewarrantyperformanceshallberendered.
ThiswarrantydoesnotapplytoCooperLightingproducts
thathavebeenalteredorrepairedorthathavebeen
subjectedtoneglect,abuse,misuseoraccident(including
shippingdamages).Thiswarrantydoesnotapplyto
productsnotmanufacturedbyCooperLightingwhichhave
beensupplied,installed,and/orusedinconjunctionwith
CooperLightingproducts.Damagetotheproductcaused
byreplacementbulbsorcorrosionordiscolorationofbrass
componentsarenotcoveredbythiswarranty.
LIMITATIONOFLIABILITY:
INNOEVENTSHALLCOOPERLIGHTINGBELIABLEFOR
SPECIAL,INDIRECT,INCIDENTAL,ORCONSEQUENTIAL
DAMAGES(REGARDLESSOFTHEFORMOFACTION,
WHETHERINCONTRACT,STRICTLIABILITY,ORINTORT
INCLUDINGNEGLIGENCE),NORFORLOSTPROFITS;NOR
SHALLTHELIABILITYOFCOOPERLIGHTINGFORANY
CLAIMSORDAMAGEARISINGOUTOFORCONNECTEDWITH
THESETERMSORTHEMANUFACTURE,SALE,DELIVERY,
USE,MAINTENANCE,REPAIRORMODIFICATIONOFCOOPER
LIGHTINGPRODUCTS,ORSUPPLYOFANYREPLACEMENT
PARTSTHEREFORE,EXCEEDTHEPURCHASEPRICEOF
COOPERLIGHTINGPRODUCTSGIVINGRISETOACLAIM.
NOLABORCHARGESWILLBEACCEPTEDTOREMOVEOR
INSTALLFIXTURES.
Toobtainwarrantyservice,pleasecontactCooperLighting,
LLC,at1-800-334-6871,pressoption2forCustomer
Service,orviae-mailConsumerProducts@cooperlighting.
comandincludethefollowinginformation:
•Name,addressandtelephonenumber
•Dateandplaceofpurchase
•Catalogandquantitypurchase
•Detaileddescriptionofproblem
AllreturnedproductsmustbeaccompaniedbyaReturn
GoodsAuthorizationNumberissuedbytheCompanyand
mustbereturnedfreightprepaid.Anyproductreceived
withoutaReturnGoodsAuthorizationNumberfromthe
Companywillberefused.
CooperLighting,LLCisnotresponsibleformerchandise
damagedintransit.Repairedorreplacedproductsshallbe
subjecttothetermsofthiswarrantyandareinspectedwhen
packed.Evidentorconcealeddamagethatismadeintransit
shouldbereportedatoncetothecarriermakingthedelivery
andaclaimledwiththem.
INSTALLATION DANS BOÎTIERS (SANS
CULOT À VIS) DE SÉRIES H2750x,
H550x ET H750x DE HALO®
REMARQUE :Peutêtreutilisépourlaconformitéàlahaute
efcacitéselonlescodesCaliforniaTitle24,Washington
StateEnergyCodeetInternationalEnergyConservation
Code.
1. Branchezlemoduledansleconnecteurduluminaire
encastréHalo(Fig.11).
2. Pressezlesressortsdetorsionensembletelqu’illustré
(Fig.10a),etinstallezlessupportsàressortdetorsion
àl’intérieurduboîtierencastré(Fig.10b).
3. Faitespasserleslssoigneusementdansl’appareil
d’éclairageetpoussezlemoduleverslehautjusqu’à
cequ’ilafeurelasurfaceduplafond.
REPLACER LE MODULE DEL OU LES
GARNITURES
1. Duboutdesdoigts,tirezfermementsurl’anneaude
garniturejusqu’àretirerlemoduleduboîtier.
2. Pressezlesressortsdetorsionensemblepourretirerle
moduleDEL.Sivousutilisezdesattachesdefriction,
sortezdoucementlemoduleduboîtier.
3. DébranchezlecâblagedumoduleDELduboîtier
encastré(ConnecteurDELoudouilleEdisonàvis).
GARANTIE LIMITÉE DE 5 ANS
LAPRÉSENTEGARANTIECONSTITUELASEULEGARANTIE
POURCEPRODUITETPRÉVAUTSURTOUTEAUTRE
GARANTIE,QU’ELLESOITEXPRESSEOUTACITEYCOMPRIS,
SANSTOUTEFOISS’YLIMITER,TOUTEGARANTIEDE
QUALITÉMARCHANDEETPOURUNUSAGEPARTICULIER.
CooperLighting,LLC(«CooperLighting»)garantitàses
clients,pendantunepériodedecinqansàcompterdela
dated’achat,quesesproduitsCooperLightingsontexempts
detoutdéfautdematériauxetdefabrication.Envertudela
présentegarantie,l’obligationdeCooperLightingselimite
expressémentàfournirdesproduitsderemplacement.La
présentegarantien’estproposéequ’àl’acheteurinitialdu
produit.CooperLightingrequiertunreçuouautrepreuve
d’achatqu’ellejugeraacceptablesurlequelestindiquéela
datedel’achatinitial.Cettepreuved’achatestrequisepour
obtenirl’exécutiondelagarantie.
Lagarantienes’appliquepasauxproduitsCooperLighting
quiontétémodiésouréparés,ouquiontfaitl’objetd’une
négligenceoud’unusageabusifouinapproprié,ouquiont
étéendommagésenraisond’unaccident(ycomprisdurant
letransport).Cettegarantienes’appliquepasauxproduits
quinesontpasfabriquésparCooperLightingetquiontété
fournis,installéset/ouutilisésavecdesproduitsCooper
Lighting.Lesdommagesauproduitcausésparuneampoule
derechangeoulacorrosion,etladécolorationdespiècesde
laitonnesontpascouvertsparcettegarantie.
LIMITATIONDESRESPONSABILITÉS:
COOPERLIGHTINGNESERAENAUCUNCASTENU
RESPONSABLEDESDOMMAGESSPÉCIAUX,INDIRECTS,
ACCESSOIRESETCONSÉCUTIFS(QUELLEQUESOITLA
RAISON,MÊMESICETTERESPONSABILITÉREPOSESUR
UNCONTRAT,LARESPONSABILITÉSTRICTE,OUDES
DÉLITS,YCOMPRISLANÉGLIGENCE),NIPOURLAPERTE
DEPROFITS,ETMÊMESILARESPONSABILITÉDECOOPER
LIGHTINGPOURDESRÉCLAMATIONSOUDESDOMMAGES
FAITSUITEÀLAPRÉSENTEGARANTIEOUESTLIÉEAUX
MODALITÉSDESPRÉSENTES,ÀLAFABRICATION,ÀLA
VENTE,ÀLALIVRAISON,ÀL’UTILISATION,ÀL’ENTRETIEN,
ÀLARÉPARATION,OUÀLAMODIFICATIONDEPRODUITS
COOPERLIGHTING,OUÀLAFOURNITUREDETOUTEPIÈCE
DERECHANGECONNEXE,LECOÛTDESDOMMAGESNE
825-0813
Cooper Lighting 1121 Highway 74 South Peachtree City, Georgia 30269

QUEORIGINANUNRECLAMO.NOSEACEPTARÁNCARGOS
PORMANODEOBRAPARAQUITAROINSTALARLOS
ACCESORIOS.
Paraobtenerelserviciodelagarantíacomuníquesecon
CooperLighting,LLC,al1-800-334-6871,presionela
opción2paraelServicioalCliente,oporcorreoelectrónico
a[email protected]eincluyala
siguienteinformación:
•Nombre,direcciónynúmerodeteléfono
•Fechaylugardecompra
•Catálogoycantidaddelacompra
•Descripcióndetalladadelproblema
Todoslosproductosdevueltosdebenestaracompañados
porunNúmerodeautorizacióndeproductosdevueltos
emitidoporlacompañíaydebendevolverseconete
prepagado.Serechazarátodoproductorecibidosinun
Númerodeautorizacióndeproductosdevueltosdesdela
compañía.
CooperLighting,LLCnosehaceresponsableporla
mercancíadañadaduranteeltransporte.Losproductos
reparadosoreemplazadosestaránsujetosalostérminosde
estagarantíayseinspeccionanalserempacados.Eldaño
evidenteyocultoqueseprovoqueduranteeltransportese
debeinformardeinmediatoaltransportistaquerealizala
entregaysedebepresentarunreclamo.
Lareproduccióndeestedocumentosinlaaprobaciónprevia
porescritodeCooperLighting,LLCestáestrictamente
prohibida.
Parasolicitarayuda,llameal1-800-334-6871oenvíeun
correoelectrónicoaConsumerProducts@cooperlighting.
com.
Reproductionsofthisdocumentwithoutpriorwritten
approvalofCooperLighting,LLCarestrictlyprohibited.
Forassistance,call1-800-334-6871ore-mailusat
PEUTDÉPASSERLECOÛTD’ACHATDUPRODUITCOOPER
LIGHTINGFAISANTL’OBJETDELARÉCLAMATIONAUTITRE
DELAPRÉSENTEGARANTIE.AUCUNFRAISDEMAIN-
D’OEUVRENESERAREMBOURSÉPOURENLEVEROU
INSTALLERUNLUMINAIRE.
Pourfaireuneréclamationautitredelagarantie,veuillez
appelerCooperLighting,LLC,au18003346871,en
choisissantl’option2pourleServiceàlaclientèle,ou
envoyeruncourrielàConsumerProducts@cooperlighting.
cometfournirlesrenseignementsci-après:
•Nom,adresseetnumérodetéléphone
•Dateetlieudel’achat
•Numérodecatalogueetquantitéachetée
•Descriptiondétailléeduproblème
Toutproduitretournédoitcomporterunnuméro
d’autorisationderetourdeproduitfourniparl’entreprise
etêtreexpédiéportpayé.Nousrefuseronstoutproduitqui
n’estpasaccompagnéd’unnumérod’autorisationderetour
deproduitfourniparl’entreprise.
CooperLighting,LLCn’estpasresponsabledela
marchandiseendommagéedurantletransport.Lesproduits
réparésouremplacésserontsoumisauxmodalitésdela
présentegarantieetserontinspectésaumomentd’être
emballés.Toutdommageapparentounonsurvenant
pendantletransportdoitêtresignaléimmédiatementau
transporteureffectuantlalivraisonetuneréclamationdoit
êtreadresséeàcedernier.
Lareproductiondecedocumenteststrictementinterdite
sansl’autorisationpréalableparécritdeCooperLighting,
LLC.
Pourassistance,appelezle1-800-334-6871ouenvoyez-
nousuncourrielà[email protected].
HALO
®
RL560 Series
page 6
825-0813
Cooper Lighting 1121 Highway 74 South Peachtree City, Georgia 30269
-
 1
1
-
 2
2
-
 3
3
-
 4
4
-
 5
5
-
 6
6


dans d''autres langues
- English: Halo RL560SN6827 Installation guide
- español: Halo RL560SN6827 Guía de instalación
Documents connexes
-
Halo RA5606930WHR-CA Mode d'emploi
-
-
Halo RA406930WHR-CA Mode d'emploi
-
-
Halo RL560WH6930-6PK Mode d'emploi
-
-
Eaton RL560WHZHA69 Mode d'emploi
-
-
-