Stork Craft 04521-701 Guide d'installation
- Catégorie
- Meubles de bébé
- Taper
- Guide d'installation

1
Adult assembly required. Small parts may
present choking hazard prior to assembly.
Enclosed please find the simple step-by-step instructions
to help you quickly assemble your product. Before you
begin we recommend that you follow the steps below:
1. Please read the instructions thoroughly
2. Identify all parts and hardware
3. You may need to provide the following tools: Philips
Head screw driver, Flat head screw driver, Hammer.
Do Not Use Power Drills or Drivers
To protect your parts during assembly please place them on a soft
surface. To clean surface use only water on a damp cloth. Do not
use window cleaners or cleaning abrasives as it will scratch the
surface and could damage the protective coating.
To register your product for important safety alerts and updates
to your product please visit www.storkcraft.com and click on
Product Registration.
Doit être assemblé par un adulte.
Les petites pièces peuvent présenter un
risque d’étouffement avant l’assemblage.
Veuillez trouver ci-joint les simples instructions, étape par étape,
pour vous aider à rapidement assembler votre produit. Avant de
commencer, nous vous recommandons de suivre les étapes
ci-dessous:
1. Veuillez lire les instructions attentivement
2. Identifier toutes les pièces et le matérie
3. Vous devrez peut-être fournir les outils suivants:
Philips tournevis, tournevis à tête plate, marteau.
Ne pas utiliser de perceuse out outils électrique
Pour protéger vos pièces lors de l’assemblage veuillez placez-
les sur une surface souple. Pour nettoyer la surface souple.
Pour nettoyer la surface de l’eau sur un chiffon humide. Ne pas
utiliser de nettoyants ou de nettoyage abrasifs comme il ne fera
qu’égratigner la surface et pourrait endommager le revêtement
de protection.
Pour enregistrer votre produit afin de recevoir des alertes de
sécurité et des mises à jour importantes relatives à
votre produit, veuillez visiter le site www.storkcraft.com, puis
cliquer sur Enregistrement de produits.
Se requiere ensamblaje por un adulto.
Las pieza pequeñas pueden presentar
un peligro de asfixia antes de instalarlas
Adjunto encontrará instrucciones sencillas paso a paso para
ayudarle a ensamblar rápidamente su producto. Antes de
empezar le recomendamos que siga los siguientes pasos:
1. Por favor leer detenidamente las instrucciones
2. Identificar todas las piezas y herrajes
3. Necesitará las siguientes herramientas (no incluidas):
Destornillador de cruz, Destornillador plano Martillo
No utilice destornilladores eléctricos
Para proteger las piezas durante el montaje por favor,
colóquelos sobre una superficie blanda. Para limpiar l
superficie, usar sólo agua sobre un paño húmedo
Para registrar su producto a fin de recibir importantes alertas
actualizaciones de seguridad, visite www.storkcraft.com y haga
clic en Registro de Productos (Product Registration).
ID7202
Oct. 2018
© 2018 Graco Children’ s Products
GRACO
®
is a registered trademark of Graco
Children's Products Inc., used with permission.
GRACO
®
est une marque déposée de Graco
Children Products Inc., utilisé avec permission.
GRACO
®
es una Marca Registrada de Graco
Children´s Products Inc., usada con autorización.
Hadley Convertible Crib w/ Drawer
Lit de bébé W/ Tiroir Hadley
Cuna W/ Drawer Hadley
Model /
Modele No /
Numéro de modèle
04521-70 -MB
COLOR / COULEUR / COLOR
!
WA
R
N
I
N
G
:
IN
F
A
N
T
S
C
AN
S
U
FF
O
CA
TE
O
N
S
O
F
T
B
E
D
D
I
NG
. NE
V
E
R
A
D
D
A
P
I
L
LO
W
O
R
C
O
M
F
O
R
T
E
R
.
N
E
V
E
R
P
L
A
C
E
A
D
D
I
T
I
ON
A
L
P
A
D
D
ING
U
ND
E
R
A
N
I
NF
A
N
T
.
S
E
E
M
A
T
T
RESS
S
U
P
P
O
R
T
F
O
R
A
D
DI
T
I
O
N
A
L
W
A
R
N
I
N
G
S
.
D
I
0
2
0
B
!
:
L
I
T
E
R
I
E
.
V
E
U
I
L
L
E
Z
N
E
J
A
M
A
I
S
A
JO
U
T
E
R
U
N
O
R
E
I
L
L
E
R
,
E
D
R
E
D
O
N
O
U
B
O
R
D
U
R
E
D
E
PR
O
T
E
C
T
I
O
N
S
.
N
E
J
A
M
A
I
S
A
J
O
U
T
E
R
D
E
R
E
M
BO
U
R
R
A
GE
E
N
D
E
S
S
O
U
S
D
’U
N
B
E
B
E
.
V
E
U
I
L
L
E
Z
V
O
U
S
R
E
F
E
R
EZ
A
LA
B
A
S
E
D
U
M
A
T
E
L
A
S
P
O
U
R
L
E
S
M
I
S
E
S
E
N
G
AR
D
E
A
D
D
I
T
I
O
N
N
EL
L
ES
I
D
2
0
3
B
M
I
S
E
E
N
G
A
R
D
E
!
!
Made in China/ Fabriqué en Chine/ Hecho en China

1XHVWURHTXLSRGHDWHQFLyQDOFOLHQWHHVWiDTXtSDUDD\XGDUOH
6LWLHQHDOJXQDGXGDFRQHOHQVDPEODMHGHVXSURGXFWRRVLWLHQHDOJXQDSUHJXQWDDFHUFDGHOHQYtRSDUWHV\RVLGHVHD
LQIRUPDFLyQGHVXQXHYRSURGXFWRSRUIDYRUSyQJDVHHQFRQWDFWRSULPHURFRQQXHVWURHTXLSRGHDWHQFLyQDOFOLHQWH
1XHVWURHTXLSRHVWDUiIHOL]GHD\XGDUOH(VWDPRVGLVSRQLEOHVGH/XQHVD9LHUQHVGHDPDSP367DPDSP(67
693YHXLOOH]YRXVDVVXUHUGDYRLUOLQIRUPDWLRQVXLYDQWHHQPDLQ9RXVWURXYHUH]FHWWHLQIRUPDWLRQVXUOpWLTXHWWH
EODQFKHVLWXpHVXUYRWUHSURGXLW0RGHOH1R_1XPpURGH32_'DWHGHIDEULFDWLRQ
/DPDQHUDPiVIiFLOGHFRQWDFWDUQRVHV
3RUQXHVWURFKDWHQOtQHDDWUDYpVGHQXHVWUDSiJLQDZHEZZZVWRUNFUDIWGLUHFWFRP
3RUFRUUHRHOHFWUyQLFRDFXVWRPHUFDUH#VWRUNFUDIWFRP
3RUWHOpIRQRVLQFRVWRDOHQ1RUWH$PpULFD
6HUiXQSODFHUDVLVWLUOH
¢1(&(6,7$$<8'$&2168352'8&72"
2XU&XVWRPHU&DUHWHDPLVKHUHIRU\RX
,I\RXKDYHDQ\TXHVWLRQVDERXWDVVHPEOLQJ\RXUSURGXFWRUKDYHDQ\FRQFHUQVUHODWLQJWRSDUWVVKLSSLQJRU\RXU
QHZSURGXFWJHWLQWRXFKZLWKRXU&XVWRPHU&DUHWHDPILUVWDQGWKH\ZLOOEHKDSS\WROHW\RXNQRZZKDWWRGRQH[W
:H¶UHDYDLODEOH0RQGD\WR)ULGD\IURPDP±SP367DP±SP(67
3OHDVHKDYHWKHIROORZLQJSURGXFWLQIRUPDWLRQUHDG\ORFDWHGRQWKHZKLWHVWLFNHUODEHORQ\RXUSURGXFW
0RGHOQXPEHU_32QXPEHU_'DWHRIPDQXIDFWXUH
+HUHDUHDIHZHDV\ZD\VWRFRQWDFWXV
2QOLQHDWZZZVWRUNFUDIWGLUHFWFRPYLDRXUOLYHFKDW
(PDLOXVDWFXVWRPHUFDUH#VWRUNFUDIWFRP
&DOOXVWROOIUHHLQ1RUWK$PHULFDDW
:HORRNIRUZDUGWRKHDULQJIURP\RX
1(('352'8&76833257"
1RWUHVHUYLFHjODFOLHQWqOHHVWLFLSRXUYRXVDLGHU
6LYRXVDYH]GHVTXHVWLRQVDXVXMHWGHO¶DVVHPEODJHGHYRWUHSURGXLWRXVLYRXVDYH]GHVSUpRFFXSDWLRQVDXVXMHWGXSURGXLW
OXLPrPHGHVSLqFHVRXGHODOLYUDLVRQYHXLOOH]FRQWDFWHUQRWUHVHUYLFHjODFOLHQWqOHHWQRXVVHURQVKHXUHX[GHYRXVDLGHU
1RXVVRPPHVGLVSRQLEOHGX/XQGLDX9HQGUHGLGHDPSP+13DPSP+1(
3RUIDYRUWHQJDODLQIRUPDFLyQFRPSOHWDGHOSURGXFWRDODPDQR(VWDVHHQFXHQWUDXELFDGDHQODHWLTXHWDEODQFDSHJDGDDO
SURGXFWR1~PHURGHPRGHOR_1XPHURSRVWDO_)HFKDGHPDQXIDFWXUD
9RLFLGHX[PDQLqUHVIDFLOHVGHQRXVFRQWDFWHU
3DUFRXUULHUpOHFWURQLTXHFXVWRPHUFDUH#VWRUNFUDIWFRP
3DUWpOpSKRQH(Q$PpULTXHGX1RUGFRPSRVH]VDQVIUDLV
1¶KpVLWH]SDVjQRXVFRQWDFWHU
%(62,1'¶$,'($9(&9275(352'8,7"

3
WARNING
Ь Read all instructions before assembling the crib. KEEP INSTRUCTIONS FOR FUTURE USE.
Ь Infants can suffocate on soft bedding. Never add a pillow or comforter. Never place additional
padding under an infant.
Ь The mattress used in this crib should not be more than 6 inches (15cm) thick and should be of such length
and width that the gap between the mattress and the sides of the crib is not more than 1 3/16 inches (3cm)
when the mattress is pushed into the corner of the crib.
Ь Infants can suffocate in gaps between crib sides and a mattress that is too small.
Ь Check this product for damaged hardware, loose joints, loose bolts or other fasteners, missing parts or sharp
edges before and after assembly and frequently during use. Securely tighten loose bolts and other
fasteners. DO NOT us
e the crib if any parts are missing, damaged or broken. Contact Stork Craft for
replacement parts and instructional literature if needed. DO NOT substitute parts.
Ь To reduce the risk of SIDS, pediatricians recommend healthy infants be placed on their backs to sleep,
unless otherwise advised by your physician.
Ь DO NOT use a water mattress with this crib.
Ь Never use plastic shipping bags or other plastic film as mattre s covers because they can cause suffocation.
Ь If re-finishing, use non-toxic finish specified for childr s products.
Ь
DO NOT
use this crib if the attached or enclosed instructions cannot be strictly adhered to.
Ь Follow warnings on all products in a crib.
STRANGULATION HAZARD
Ь Strings can cause strangulation! Do not place items with a string around a child’s neck, such as hood strings
or pacifier cords. Do not suspend strings over a crib or toddle bed for any reason or attach strings to toys.
Ь To help prevent strangulation tighten all fasteners. A child can trap parts of the body or clothing on
loose fasteners.
Ь
DO NOT place crib near window where cords from blinds or drapes may strangle a child.
FALL HAZARD
Ь When child is able to pull up to standing position, set mattress to lowest position and remove bumper pads,
large toys and other objects that could serve as steps for climbing out.
Ь Stop using crib when child begins to climb out or reaches the height of 35 inches (89 cm)
Distributed by
Storkcraft Manufacturing Inc. 3993 Howard Hughes Parkway, Unit# 250
Las Vegas, NV, USA. 89169
T: 1 877 274 0277 | E: [email protected] | Twitter @Storkcraft
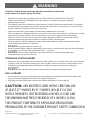
Failure to follow these warnings and the assembly instructions
could result in serious injury or death.
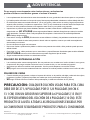
CAUTION: ANY MATTRESS USED IN THIS CRIB SHALL BE
AT LEAST 27
1/4
INCHES BY 51
5/8
INCHES69 CM X 131 CM
WITH A THICKNESS. NOT EXCEEDING 6 INCHES 15 CMAND
THE MINIMUM MATTRESS THICKNESS OF 4 INCHES 10 CM.
THIS PRODUCT CONFORMS TO APPLICABLE REGULATIONS
PROMULGATED BY THE CONSUMER PRODUCT SAFETY COMMISSION.

4
MISE EN GARDE
Ь Ne pas utiliser le lit à moins d’être en mesure de suivre précisément les instructions qui l’accompagnent.
Ь Les bébés peuvent s’étouffé avec la literie. Veuillez ne jamais ajouter des oreillers, édredons, bordures de
Ь protection ou rembourrage en dessous du bébé.
Ь Le défaut de suivre ces mises en garde et instructions d’assemblage pourrait entrainer des blessures grave
Ь et / ou la mort. Garder ces instructions pour référence future.
Ь RISQUE D’ÉTRANGLEMENT - Les cordes peuvent étrangler. N’utiliser pas d’objets avec des
cordons autour du coup d’un enfant, tel que les sucettes ou un vêtement a capuchon avec un cordon. Ne rien
attacher sur ou prêt du lit avec une corde ou ficelle ou jouet
Ь RISQUE D’ÉTRANGLEMENT - Ne pas placer le lit prêt des fenêtres ou les corde persienne ou de
tenture pouvant étrangler un enfant.
Ь RISQUE DE CHUTES - Ne pas utiliser le lit si l’enfant est capable d’en sortir ou mesure plus de 89 cm.
Ь Inspectez le lit régulièrement pour tous dommages, pièces détachés, desserrés, manquante ou tranchantes
avant et après chaque assemblage ou durant l’usage. Serrer correctement boulons et autres fixations. Ne pa
utiliser ce lit si toutes pièces est endommages, détachés, desserrés, manquante ou tranchantes. Veuillez nous
contacter pour pièces de rechange ou instruction d’assemblage nécessaire. Ne jamais substituer les pièces du lit.
Ь Pour réduire le risque du (MSN / SIDS), les pédiatres recommande que les enfants en bonne sante dorme sur leur dos
à moins qu’il n’en soit recommande de manières différentes par un docteur
Ь RISQUE D’ÉTRANGLEMENT - Pour éviter le danger d’étranglement assurez vous de bien serrer toute les
pièces du lit de bébé. Un enfant peut coincer un membre du corps ou ses vêtements avec des pièces desserré
Ь RISQUE DE CHUTES - Lorsqu’un enfant est capable de se tenir debout placer le matelas dans la position la
plus basse du lit et enlever les coussinets de protection, gros jouets et tout autre objet sur lesquels l’enfant pourrait
grimper pour sortir du lit.
Ь RISQUE DE CHUTES - Pour les lit à côté abaissant, une fois le côté élevé, assurez-vous qu’il soit verrouillé.
Ь RISQUE DE CHUTES - Pour les lit à côté abaissant, Ne jamais laisser un enfant dans le lit avec le côté
abaisser, assurez-vous que le côté soit élevé et verrouillé
Ь Veuiller suivre toutes les mises en garde sur ce lit.
Ь Ne jamais utiliser un matelas a eau avec ce lit.
Ь Pour retoucher ce lit, utiliser seulement des produits non-toxiques spécifiés pour les produits d’enfant
Ь N’utiliser jamais de sacs en plastique ou film plastique pour c uvrir le matelas puisque cela pourrait étouffer un enfant.
Ь Un enfant peut suffoquer dans les espaces entre les côtés du lit et le matelas si le matelas est trop petit.
Distribué par
Storkcraft Manufacturing Inc. 3993 Howard Hughes Parkway, Unit# 250
Las Vegas, NV, USA. 89169
Le non-respect de ces avertissements et des instructions de
montage peut entraîner des blessures graves ou la mort.
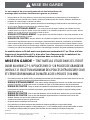
Le matelas dans ce lit doit avoir une épaisseur maximale de 6’’ ou 15cm et d’une
longueur et largeurtelles qu’il y ai au plus 3cm d’espace entre le matelas et les
côtés du lit lorsque le matelas est pousse dans un coin du lit.
MISE EN GARDE TOUT MATELAS UTILISE DANS CE LIT DOIT
AVOIR AU MOINS 21/4 POUCES PAR 55/8 POUCES DE GRANDEUR
69CM X 131 CMET UN MAXIMUM DE 6 POUCES D’ÉPAISSEUR15
ET L’ÉPAISSEUR MINIMALE DU MATELAS DE 4 POUCE100 MM
T: 1 877 274 0277 | E: [email protected] | Twitter @Storkcraft

5
ADVERTENCIA
Ь Lea completamente las instrucciones antes de ensamblar la cuna, guarde las instrucciones para su uso posterior.
Ь Los bebés pueden sofocarse con la ropa de cama. Nunca ponga almohadas, edredones o relleno debajo del niño.
Ь El colchón para esta cuna no debe exceder 6” (15 cm) de grosor y debe ser de un ancho y largo que permita un
espacio entre elcolchón y los lados no superiores a 1 3/16'' (3 cm) al arrinconar el colchón hacia una esquina de
la cuna. Los niños pueden sofocarse en los espacios entre la cuna y un colchón muy pequeño.
Ь Inspeccione su producto por piezas dañadas, faltantes o sueltas, bordes filosos o astillas antes, durante
después del uso.
NO UTILIZAR si tiene alguna pieza faltante o dañada. Asegúrese que todos los tornillos
estén apretados. Contacte a Stork Craft para piezas de reemplazo o instrucciones de ensamblaje faltantes.
NO sustituya ninguna pieza.
Ь Para reducir el riesgo de
SIDS
(Síndrome de muerte súbita en el infante), los pediatras recomiendan que los
bebés en buen estado de salud sean puestos a dormir sobre su espalda, a menos que estén aconsejados de
otra manera por su doctor.
Ь No use colchones de agua con esta cama.
Ь Nunca use fundas o productos de plástico o similar como protector de colchón, dicho producto puede provocar
asfixia al bebé
Ь Para pintar su cuna, utilice productos que no sean tóxicos y específicamente formulados para muebles infantiles
Ь NO UTILIZAR esta cuna si las instrucciones no pueden seguirse al pie de la letra.
Ь Seguir las advertencias incluidas con estas instrucciones.
PELIGRO DE ESTRANGULACIÓN
Ь Las cuerdas pueden causar estrangulación. No use productos con cuerdas en el cuello del bebé, como gorros,
chupones etc. No ponga cuerdas encima de la cuna o cama de día y no use cuerdas en juguetes.
Ь Asegúrese que todos los tornillos estén apretados. Un niño puede atraparse con tornillos sueltos.
Ь NO ponga la cuna cerca de ventanas donde los cordones de cortinas podrían enrollarse en el cuello del niño.
PELIGRO DE CAÍDA
Ь Cuando el bebé ya logre pararse, coloque el soporte del colchón en la posición más baja y retire todo los cojines,
protectores, juguetes y objetos que puedan ser usados por el niño para trepar fuera de la cuna.
Ь NO seguir usando esta cuna cuando el niño pueda trepar y/o alcanzar una altura de 35'' (89 cm).
Distribuido por
De no seguir correctamente estas instrucciones y advertencias
podría resultar en accidentes graves e incluso la muerte.
PRECAUCIÓN: CUALQUIER COLCHÓN USADO PARA ESTA CUNA
DEBE SER DE 27 1/4 PULGADAS POR 51 5/8 PULGADA69 CM X
13 1 CM CON UN GROSOR NO SUPERIOR A 6 P ULGADAS15 CM Y
EL ESPESOR MÍNIMO DEL COLCHÓN DE 4 PULGADAS10 CM. ESTE
PRODUCTO SE AJUSTA A TODAS LAS REGULACIONES EXIGIDAS POR
LA COMISIÓN DE SEGURIDAD DE PRODUCTOS PARA EL CONSUMIDOR.
Storkcraft Manufacturing Inc. 3993 Howard Hughes Parkway, Unit# 250
Las Vegas, NV, USA. 89169
T: 1 877 274 0277 | E: [email protected] | Twitter @Storkcraft

6
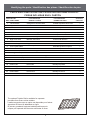
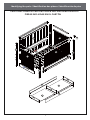
PARTS ENCLOSED IN CARTON/ PIÈCES INCLUSE DANS LA BOITE/
PIEZAS INCLUIDAS EN EL CARTÓN
Identifying the parts / Identification des pièces / Identificación de piez
QUANTITY
QUANTITÉ
CANTIDAD
LISTA DE PIEZAS
NOMBRE DE PIEZA
PARTS LIST
REF. PART NAME
LISTE DE PIÈCES
NOM DE LA PIÈCE
The optional Toddler Rail is available for separate
purchase from Graco online retailers
L'enfant en garde-corps en option est disponible pour l'achat
séparé de la Graco les détaillants en ligne
El párvulo guardarraíl opcional está disponible para la
compra por separado de Graco de minoristas en línea
1. Left Crib Side Côté gauche du lit de bébé Costado izquierdo de la cuna 1
2. Right Crib Side Côté droit du lit de bébé Costado derecho de la cuna 1
3. Back Rail Panneau arrière Barandilla posterior 1
1 latnorf allidnaraB tnava uaennaP liaR tnorF .4
5. Left Back Post Montant arrière gauche Poste posterior izquierdo 1
6. Right Back Post Montant arrière droit Poste posterior derecho 1
7. Left Front Post Montant avant gauche Poste frontal izquierdo 1
8. Right Front Post Montant avant droit Poste frontal derecho 1
1 raB allimaC erèivic ed erraB rab rehctertS .9
1 oyopA nóhcloC saletam ed troppuS troppuS sserttaM .01
11. Crib Top Back Rail
traverse supérieure arrière du lit de bébé
barandilla posterior superior 1
12. Bottom Back Rail Panneau arrière inférieure Barandilla posterior inferior 1
13.
Crib Left Side Top
Lit d'extrémité gauche haut
Cuna extremo izquierdo arriba
1
14.
Crib Right Side Top
Lit d'extrémité droite Haut
Cuna extremo derecho arriba
1
15.
Toddler Bed Post Top Left
Toddler Bed Post en haut à gauche
Cama niño Post arriba a la izquierda
1
16.
Toddler Bed Post Top Right Toddler Bed Post en haut à droite Cama niño Post arriba a la derecha
1
latnorF allidnaraB tnava edraG liaR tnorF .71
1
18. Drawer Front Face avant de tiroir Frente del cajón 1
19. Drawer Left Tiroir sortie Bandeja izquierda 1
20. Drawer Right Tiroir droit Bandeja derecha 1
21. Drawer Division Division de tiroir Drawer división 1
22. Drawer Back Tiroir arrière Bandeja de nuevo 1
23. Drawer Bottom Fond de tiroir Bandeja inferior 2

7
PARTS ENCLOSED IN CARTON/ PIÈCES INCLUSE DANS LA BOITE/
PIEZAS INCLUIDAS EN EL CARTÓN
Identifying the parts / Identification des pièces / Identificación de piez
5
1
2
3
11
6
8
7
9
4
10
1213
14
15
16
17
23
23
20
19
21
22
18
!
WA
R
N
I
N
G
:
I
N
F
A
N
T
S
C
A
N
S
U
F
F
O
C
A
T
E
O
N
S
O
F
T
B
E
D
D
I
N
G
.
N
E
V
E
R
A
D
D
A
P
IL
L
O
W
O
R
C
O
M
F
O
R
T
E
R
.
N
E
V
E
R
P
L
A
C
E
A
D
D
I
T
I
O
N
A
L
P
A
D
D
I
N
G
U
N
D
E
R
A
N
I
N
F
A
N
T
.
S
E
E
M
A
T
T
R
E
S
S
S
U
P
P
O
R
T
F
O
R
A
D
D
I
T
I
O
N
A
L
W
A
R
N
I
NG
S
.
D
I
0
2
0
B
!
:
L
I
T
E
R
I
E
.
V
E
U
I
L
L
E
Z
N
E
J
A
M
A
IS
A
J
O
U
T
E
R
U
N
O
R
E
I
L
L
E
R
,
E
D
R
E
D
O
N
O
U
B
O
R
D
U
R
E
D
E
P
R
O
T
E
C
T
I
O
N
S
.
N
E
J
A
M
A
I
S
A
J
O
U
T
E
R
D
E
R
E
M
B
O
U
R
R
A
G
E
E
N
D
E
S
S
O
U
S
D
’
U
N
B
E
B
E
.
V
E
U
I
L
L
E
Z
V
O
U
S
R
E
F
E
R
E
Z
A
L
A
B
A
S
E
D
U
M
A
T
E
L
A
S
P
OU
R
L
E
S
M
I
S
E
S
E
N
G
A
R
D
E
A
D
D
I
T
I
O
N
N
E
L
L
E
S
I
D
2
0
3
B
M
I
S
E
E
N
G
A
R
D
E
!
!
D
i
s
3
S
t
o
r
3
9
9
H
o
w
L
k
a
a
C
s
r
T
d
r
V
e
a
t
e
H
l
r
:
i
g
u
b
a
M
1
g
u
s
,
h
t
f
g
e
8
e
N
.
d
s
7
(
V
P
B
7
U
,
a
y
S
r
:
U
2
k
A
S
7
)
w
A
,
4
.
a
y
I
8
n
0
,
9
c
2
1
.
U
,
6
7
n
9
i
7
t
#
2
5
0

8
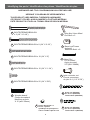
BOLTS/PERNOS/BOULON
x 2 (1/4” X 3-1/4”)
A
BOLTS/PERNOS/BOULON x 8 (1/4” X 2-1/2”)
B
BOLTS/PERNOS/BOULON x 18 (1/4” X 2”)
C
BOLTS/PERNOS/BOULON x 22 (1/4” X 5/8”)
E
J
H
G
Identifying the parts / Identification des pièces / Identificación de piez
HARDWARE AND TOOL DIAGRAM/QUINCAILLERIE INCLUSE/
HERRAJE Y DIAGRAMA DE HERRAMIENTAS
Wooden dowel/
Clavija de madera/
Manchon en bois
X 15 (ø8 X 30mm)
Allen Key/ Liave Allen/
Clef Allen x 2
THIS PRODUCT USES IMPERIAL THREADED HARDWARE/
CE PRODUIT UTILISE LA BOULONNERIE A FILETAGE IMPÉRIAL/
ESTE PRODUCTO UTILIZA LA TORNILLERIA DE ROSCA IMPERIAL
BOLTS/PERNOS/BOULON x 10 (1/4” X 1-1/4”)
D
Barrel nut/Tureca
de barril/
Manchon fileté x 8
K Metal Pin/
Pin en métal/
Aguja de metal
X 2 (Ø4 X 30MM)
L
Joint connector nut
Écrous connecteur
de joint X 4 ( 1/4” X 5/8”)
M
N
P
Screw x 6 (4X45mm)
Vis de x 6 (4X45mm)
Tornillo de X 6(4X45mm)
Screw x 6 (4X25mm)
Vis de x 6 (4X25mm)
Tornillo de X 6 (4X25mm)
Plastic Barrel Nut x 6
écrous à portée
cylindrique en plastique x 6
Tuerca cilíndrica plástica x 6

9
Step 1/ Étape 1/ Paso 1
ASSEMBLY INSTRUCTIONS / INSTRUCTIONS D'ASSEMBLAGE /
INSTRUCCIONES DE ENSAMBLAJE (CONTINUACIÓN)
18
19
21
20
N X 6
N
N
23
23
21
20
19
22
19
21
20
18
P X 6
M X 6
P
M
M
P
M X 6
N X 6
P X 6

10
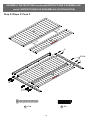
Step 2/ Étape 2/ Paso 2
ASSEMBLY INSTRUCTIONS (continued)/INSTRUCTIONS D'ASSEMBLAGE
(suite)/ INSTRUCCIONES DE ENSAMBLAJE (CONTINUACIÓN)
11
3
G
C
C X 10
3
5
6
12
12
G X 2C X 10
G
C
C

11
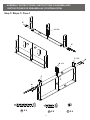
Step 3/ Étape 3/ Paso 3
Step 4/ Étape 4/ Paso 4
ASSEMBLY INSTRUCTIONS (continued)/INSTRUCTIONS D'ASSEMBLAGE
(suite)/ INSTRUCCIONES DE ENSAMBLAJE (CONTINUACIÓN)
D X 4
4
17
A
G
A X 2
A X 2 C X 2 G X 3
G X 4
G
G
C X 2
C
1
2
13
14
!
WA
R
N
I
N
G
:
I
N
F
A
N
T
S
C
A
N
S
U
F
F
O
C
A
T
E
O
N
S
O
F
T
B
E
D
D
I
N
G
.
N
E
V
E
R
A
D
D
A
P
I
L
L
O
W
O
R
C
OM
F
O
R
T
E
R
.
N
E
V
E
R
P
L
A
C
E
A
D
D
I
T
I
O
N
A
L
P
A
D
D
IN
G
U
N
D
E
R
A
N
I
N
F
A
N
T
.
S
E
E
M
A
T
T
R
E
S
S
S
U
P
P
O
R
T
F
O
R
A
D
D
I
T
I
O
N
A
L
W
A
R
N
I
NG
S
.
D
I
0
2
0
B
!
:
L
I
TER
I
E
.
V
E
U
I
L
L
E
Z
N
E
J
A
M
A
I
S
A
J
O
U
T
E
R
U
N
O
R
E
I
L
L
E
R
,
E
D
R
E
D
O
N
O
U
B
O
R
D
U
R
E
D
E
P
R
O
T
E
C
T
I
O
N
S
.
N
E
J
A
M
A
I
S
A
J
O
U
T
E
R
D
E
R
E
M
B
O
U
R
R
A
G
E
E
N
D
ES
S
O
U
S
D
’
U
N
B
E
B
E
.
V
E
U
I
L
L
E
Z
V
O
U
S
R
E
F
E
R
E
Z
A
L
A
B
A
S
E
D
U
M
A
T
E
L
A
S
P
O
U
R
L
E
S
M
I
S
E
S
E
N
G
A
R
D
E
A
D
D
I
T
IO
N
N
E
L
L
E
S
I
D
2
0
3
B
M
I
S
E
E
N
G
A
R
D
E
!
!
D
i
s
3
S
t
o
r
3
9
9
H
o
w
L
k
a
a
C
s
r
T
d
r
V
e
a
t
e
H
l
r
:
i
g
u
b
a
M
1
g
u
s
,
h
t
f
g
e
8
e
N
.
d
s
7
(
V
P
B
7
U
,
a
y
S
r
:
U
2
k
A
S
7
)
w
A
,
4
.
a
y
I
8
n
0
,
9
c
2
1
.
U
,
6
7
n
9
i
7
t
#
2
5
0
G
D
D
D
G
G
G
D

12
Step 5/ Étape 5/ Paso 5
ASSEMBLY INSTRUCTIONS (continued)/INSTRUCTIONS D'ASSEMBLAGE
(suite)/ INSTRUCCIONES DE ENSAMBLAJE (CONTINUACIÓN)
B x 8 G x 4J x 8
B X 4
B
B
B
J
J X 4
J
J
G
G
!
WA
R
N
I
N
G:
I
N
F
A
N
T
S
C
A
N
S
U
F
F
O
C
A
T
E
O
N
S
O
FT
B
E
D
D
I
N
G
.
N
E
V
E
R
A
D
D
A
P
I
L
L
O
W
O
R
C
O
M
F
O
R
T
E
R
.
N
E
V
E
R
P
L
A
C
E
A
D
D
I
T
I
O
N
A
L
P
A
D
D
I
N
G
U
N
D
E
R
A
N
I
N
F
A
N
T
.
S
E
E
M
A
T
T
R
E
S
S
S
U
P
P
O
R
T
F
O
R
A
D
D
I
T
I
O
N
A
L
W
A
R
N
I
N
G
S
.
D
I
0
2
0
B
!
:
L
I
T
E
R
I
E
.
V
E
U
I
L
L
E
Z
N
E
J
A
M
A
I
S
A
J
O
U
T
ER
U
N
O
R
E
I
L
L
E
R
,
E
D
R
E
D
O
N
O
U
B
O
R
DU
R
E
D
E
P
R
O
T
E
CT
I
O
N
S
.
N
E
J
A
M
A
I
S
A
J
O
U
T
E
R
D
E
R
E
M
B
O
U
R
R
A
G
E
E
N
D
E
S
S
O
U
S
D
’
U
N
B
E
B
E
.
V
E
U
I
L
L
E
Z
V
O
U
S
R
E
F
E
R
E
Z
A
L
A
B
A
S
E
D
U
M
A
T
E
L
A
S
P
O
U
R
L
E
S
M
I
S
E
S
E
N
G
A
R
D
E
A
D
D
I
T
IO
N
N
E
L
L
E
S
I
D
2
0
3
B
M
I
S
E
E
N
G
A
R
D
E
!
!
D
i
s
3
S
t
o
r
3
9
9
H
o
w
L
k
a
a
C
s
r
T
d
r
V
e
a
t
e
H
l
r
:
i
g
u
b
a
M
1
g
u
s
,
h
t
f
g
e
8
e
N
.
d
s
7
(
V
P
B
7
U
,
a
y
S
r
:
U
2
k
A
S
7
)
w
A
,
4
.
a
y
I
8
n
0
,
9
c
2
1
.
U
,
6
7
n
9
i
7
t
#
2
5
0
1
2
3
1
2
7
8
B X 4
B
J
J
J
B
B
J X 4
G
G
!
WA
R
N
I
N
G
:
I
N
F
A
N
T
S
C
A
N
S
U
F
F
O
C
A
T
E
O
N
S
O
F
T
B
E
D
D
I
N
G
.
N
E
V
E
R
A
D
D
A
P
I
L
L
O
W
O
R
C
O
M
F
O
R
T
E
R
.
N
E
V
E
R
P
L
A
C
E
A
D
D
I
T
I
O
N
A
L
P
A
D
D
I
N
G
U
N
D
E
R
A
N
I
N
F
A
N
T
.
S
E
E
M
A
T
T
R
E
S
S
S
U
P
P
O
R
T
F
O
R
A
D
D
I
T
I
O
N
A
L
W
A
R
N
I
N
G
S
.
D
I
0
2
0
B
!
:
L
I
T
E
R
I
E
.
V
E
U
I
L
L
E
Z
N
E
J
A
M
A
I
S
A
J
O
U
T
E
R
U
N
O
R
E
I
L
L
E
R
,
E
D
R
E
D
O
N
O
U
B
O
R
D
U
R
E
D
E
P
R
O
T
E
C
T
I
O
N
S
.
N
E
J
A
M
A
I
S
A
J
O
U
T
E
R
D
E
R
E
M
B
O
U
R
R
A
G
E
E
N
D
E
S
S
O
U
S
D
’
U
N
B
E
B
E
.
V
E
U
I
L
L
E
Z
V
O
U
S
R
E
F
E
R
E
Z
A
L
A
B
A
S
E
D
U
M
A
T
E
L
A
S
P
O
U
R
L
E
S
M
I
S
E
S
E
N
G
A
R
DE
A
D
D
I
T
I
O
N
N
E
L
L
E
S
I
D
2
0
3
B
M
I
S
E
E
N
G
A
R
D
E
!
!
D
i
s
3
S
t
o
r
3
9
9
H
o
w
L
k
a
a
C
s
r
T
d
r
V
e
a
t
e
H
l
r
:
i
g
u
b
a
M
1
g
u
s
,
h
t
f
g
e
8
e
N
.
d
s
7
(
V
P
B
7
U
,
a
y
S
r
:
U
2
k
A
S
7
)
w
A
,
4
.
a
y
I
8
n
0
,
9
c
2
1
.
U
,
6
7
n
9
i
7
t
#
2
5
0

13
Step 6/ Étape 6/ Paso 6
ASSEMBLY INSTRUCTIONS (continued)/INSTRUCTIONS D'ASSEMBLAGE
(suite)/ INSTRUCCIONES DE ENSAMBLAJE (CONTINUACIÓN)
C X 2
9
7
C X 2
C
C
9
7
8
!
WA
R
N
I
N
G
:
I
N
F
A
N
T
S
C
A
N
S
U
F
F
O
C
A
T
E
O
N
S
O
F
T
B
E
D
D
I
N
G
.
N
E
V
E
R
A
D
D
A
P
I
L
L
O
W
O
R
C
O
M
F
O
R
T
E
R
.
N
E
V
E
R
P
L
A
C
E
A
D
D
I
T
I
O
N
A
L
P
A
D
D
I
N
G
U
N
D
E
R
A
N
I
N
F
A
N
T
.
S
E
E
M
A
T
T
R
E
S
S
S
U
P
P
O
R
T
F
O
R
A
D
D
I
T
I
O
N
A
L
W
A
R
N
I
NG
S
.
D
I
0
2
0
B
!
:
L
I
T
E
R
I
E
.
V
E
U
I
L
L
E
Z
N
E
J
A
M
A
I
S
A
J
O
U
T
E
R
U
N
O
R
E
I
L
L
E
R
,
E
D
R
E
D
O
N
O
U
B
O
R
D
U
R
E
D
E
P
R
O
T
E
C
T
I
O
N
S
.
N
E
J
A
M
A
I
S
A
J
O
U
T
E
R
D
E
R
E
M
B
O
U
R
R
A
G
E
E
N
D
E
S
S
O
U
S
D
’
U
N
B
E
B
E
.
V
E
U
I
L
L
E
Z
V
O
U
S
R
E
F
E
R
E
Z
A
L
A
B
A
S
E
D
U
MA
T
E
L
A
S
P
O
U
R
L
E
S
M
I
S
E
S
E
N
G
A
R
D
E
A
D
D
I
T
I
O
N
N
E
L
L
E
S
I
D
2
0
3
B
M
I
S
E
E
N
G
A
R
D
E
!
!
D
i
s
3
S
t
o
r
3
9
9
H
o
w
L
k
a
a
C
s
r
T
d
r
V
e
a
t
e
H
l
r
:
i
g
u
b
a
M
1
g
u
s
,
h
t
f
g
e
8
e
N
.
d
s
7
(
V
P
B
7
U
,
a
y
S
r
:
U
2
k
A
S
7
)
w
A
,
4
.
ay
I
8
n
0
,
9
c
2
1
.
U
,
6
7
n
9
i
7
t
#
2
5
0

14
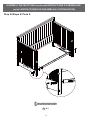
Step 7/ Étape 7/ Paso 7
ASSEMBLY INSTRUCTIONS (continued)/INSTRUCTIONS D'ASSEMBLAGE
(suite)/ INSTRUCCIONES DE ENSAMBLAJE (CONTINUACIÓN)
After assembly Tighten bolts firmly and retighten
periodically
Après l'assemblage serrer les vis et les resserrer
fermement périodiquement
Después de apretar los tornillos de montaje y
vuelva a apretar firmemente periódicamente
Spring shown here in Lowest position.
NOTE: We recommend setting the spring in
the highest position for newborn babies.
Lower the mattress spring as the child grows
and becomes more mobile.
Printemps illustré ici dans la position la plus basse.
Remarque : Nous vous conseillons de régler le
ressort dans la position la plus haute pour les
nouveau-nés. Abaisser le matelas printemps
quand l'enfant grandit et devient plus mobile.
Aquí se muestra el muelle en la posición más baja.
Nota: Le recomendamos que configure el muelle
en la posición más alta para los recién nacidos.
Bajar el colchón primavera a medida que el niño
crece y se vuelve más móvil.
E X 18K X 2
3 posiciones de ajuste
de la altura del colchón
3- postition mattress
height adjustment
3- position de réglage
en hauteur du matelas
These holes are only used for full size bed conversion.
9
K
K
K X 2
E X 16
E
E X 2
E
Tab
3
7
8
9
10
10
12
1
2
!
WA
R
N
I
N
G
:
I
N
F
A
N
T
S
C
A
N
S
U
F
F
O
C
A
T
E
O
N
S
O
F
T
B
E
D
D
I
N
G
.
N
E
V
E
R
A
D
D
A
P
I
L
L
O
W
O
R
C
O
M
F
O
R
T
E
R
.
NE
V
E
R
P
L
A
C
E
A
DD
I
T
I
O
N
A
L
P
A
D
D
I
N
G
U
N
D
E
R
A
N
I
N
F
A
N
T
.
S
E
E
M
A
T
T
R
E
S
S
S
U
P
P
O
R
T
F
O
R
A
D
D
I
T
I
O
N
A
L
W
A
R
N
I
N
G
S
.
D
I
0
2
0
B
!
:
L
I
T
E
R
I
E
.
V
E
U
I
L
L
E
Z
N
E
J
A
M
A
I
S
A
J
O
U
T
E
R
U
N
O
R
E
I
L
L
E
R
,
E
D
R
E
D
O
N
O
U
B
O
R
D
U
R
E
D
E
P
R
O
T
E
C
T
I
O
N
S
.
N
E
J
A
M
A
I
S
A
J
O
U
T
E
R
D
E
R
E
M
B
O
U
R
R
A
G
E
E
N
D
E
S
SO
U
S
D
’
U
N
B
E
B
E
.
V
E
U
I
L
L
E
Z
V
O
U
S
R
E
F
E
R
E
Z
A
L
A
B
A
S
E
D
U
M
A
T
E
L
A
S
P
O
U
R
L
E
S
M
I
S
E
S
E
N
G
A
R
D
E
A
D
D
I
T
I
O
N
N
E
L
L
E
S
I
D
2
0
3B
M
I
S
E
E
N
G
A
R
D
E
!
!

15
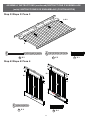
Step 8/ Étape 8/ Paso 8
ASSEMBLY INSTRUCTIONS (continued)/INSTRUCTIONS D'ASSEMBLAGE
(suite)/ INSTRUCCIONES DE ENSAMBLAJE (CONTINUACIÓN)
C X 4 G X 2
4
9
7
8
K
K
C
C X 4
C
G
G X 2
!
WA
R
N
I
N
G
:
I
N
F
A
N
T
S
C
A
N
S
U
F
F
O
C
A
T
E
ON
S
O
F
T
B
E
D
D
I
N
G
.
N
E
V
E
R
A
D
D
A
P
I
L
L
O
W
O
R
C
O
M
F
O
R
T
E
R
.
N
E
V
E
R
P
L
A
C
E
A
D
D
I
T
I
O
N
A
L
P
A
D
D
I
N
G
U
N
D
E
R
A
N
I
N
F
A
N
T
.
S
EE
M
A
T
T
R
E
S
S
S
U
PP
O
R
T
F
O
R
A
D
D
I
T
I
O
N
A
L
W
A
R
N
I
NG
S
.
D
I
0
2
0
B
!
:
LI
T
E
R
I
E
.
V
E
U
I
LL
E
Z
N
E
J
A
M
A
I
S
A
J
O
U
T
E
R
U
N
O
R
E
I
L
L
E
R
,
E
D
R
E
D
O
N
O
U
B
O
R
D
U
R
E
D
E
P
R
O
T
E
C
T
I
O
N
S
.
N
E
J
A
M
A
I
S
A
J
O
U
T
E
R
D
E
R
E
M
B
O
U
R
R
A
G
E
E
N
D
E
S
S
O
U
S
D
’
U
N
B
E
B
E
.
V
E
U
I
L
L
E
Z
VO
U
S
R
E
F
E
R
E
Z
A
L
A
B
A
S
E
D
U
M
A
T
E
L
A
S
P
O
U
R
L
E
S
M
I
S
E
S
E
N
G
A
R
D
E
A
D
D
I
T
I
O
N
N
E
L
L
E
S
I
D
2
0
3
B
M
I
S
E
E
N
G
A
R
D
E
!
!

16
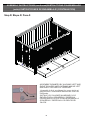
Step 9/ Étape 9/ Paso 9
ASSEMBLY INSTRUCTIONS (continued)/INSTRUCTIONS D'ASSEMBLAGE
(suite)/ INSTRUCCIONES DE ENSAMBLAJE (CONTINUACIÓN)
ASSEMBLE DRAWERS BY ALIGNING LEFT AND
RIGHT ROLLERS WITH OPENING ABOVE LEFT
AND RIGHT ROLLERS OF DRESSER
Assemble le tiroir en alignant les roues droite et
gauche avec l’ouverture au dessus des roues du
chiffonnier
INSTALE LOS CAJONES ALINEANDO LOS
RIELES POR LA IZQUIERDA Y DERECHA
LEVANTANDO UN POCO HACIA ARRIBA A LA
IZQUIERDA Y DERECHA LOS RIELES DEL
CAJÓN.
1
2
4
18
!
WA
R
N
I
N
G
:
I
N
F
A
N
T
S
C
A
N
S
U
F
F
O
C
A
TE
O
N
S
O
F
T
B
E
D
D
I
N
G
.
N
E
V
E
R
A
D
D
A
P
I
L
LO
W
O
R
C
O
M
F
O
R
T
E
R
.
N
E
V
E
R
P
L
A
C
E
A
D
D
I
T
I
ON
A
L
P
A
D
D
I
N
G
U
N
D
E
R
A
N
I
N
F
A
N
T
.
S
E
E
M
A
T
T
R
E
S
S
S
U
P
P
O
R
T
F
O
R
A
D
D
I
T
I
O
N
A
L
W
A
R
N
I
NG
S
.
D
I
0
2
0
B
!
:
L
I
T
E
R
I
E
.
V
E
U
I
L
L
E
Z
N
E
J
AM
A
I
S
A
J
O
U
T
E
R
U
N
O
R
E
I
L
L
E
R
,
E
D
R
E
D
O
N
O
U
B
O
R
D
U
R
E
D
E
P
R
O
T
E
C
T
I
O
N
S
.
N
E
J
A
M
A
I
S
A
J
O
U
T
E
R
D
E
R
E
M
B
O
U
R
R
A
G
E
E
N
D
E
S
S
O
U
S
D
’
U
N
B
E
B
E
.
V
E
U
I
L
L
E
Z
V
O
U
S
R
E
F
E
R
E
Z
A
L
A
B
A
S
E
D
U
M
A
T
E
L
A
S
P
O
U
R
L
E
S
MI
S
E
S
E
N
G
A
R
D
E
A
D
D
I
T
I
O
N
N
E
L
L
E
S
I
D
2
0
3
B
M
I
S
E
E
N
G
A
R
D
E
!
!

17
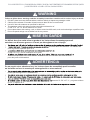
WARNING
MISE EN GARDE
ADVERTENCIA
DO NOT place bed near windows where cord from blinds or drapes may strangle a child.
Child must be at least 15 months old and not more than 50 lbs. to use this bed.
Use a full size crib mattress as specified for this bed
The mattress used in this bed must have a minimum dimension of
51 5/8” x 27 1/4” x 4” and a maximum of 6” thick.
Do not place items with a string, cord, or ribbon around a child’s neck, such as hood strings or pacifier cords
Do not suspend strings over a toddler bed for any reason
pour ètre dans ce lit d’enfant.- Le matelas doit
avoir la grandeur spécifiée pour ce lit
51 5/8"x 27 1/4" x 4"et un maximum de 6" épais.
vêtement à capuchon avec corde attache. N’attacher rien sur le lit avec une corde où ficell
pour des jouets où décoration.
muerte por estrangulación o atascamiento.
nimas de 51 5/8'' x 27 ¼'' y un grosor mínimo
de x 4'' y máximo de 6''.
Failure to follow these warnings and the assembly instructions could result in serious injury or death.
TO CONVERT TO A TODDLER/DAY BED | POUR CONVERTIR EN UN BAMBIN/LIT DE JOUR
| CONVERSIÓN A CAMA CUNA/CAMA DE DÍA
Le défaut de suivre cette mise en garde et les instructions de montage pourrait
entrainer une blessure grave ou la mort par étranglement ou coinçage.
De no seguir estas advertencias y las instrucciones de ensamblaje podría resultar
en lesiones serias o la muerte por estrangulación o atascamiento.

18
ASSEMBLY INSTRUCTIONS (continued) / INSTRUCTIONS D'ASSEMBLAGE
(suite) / INSTRUCCIONES DE ENSAMBLAJE (continuación)
Step 2 / Étape 2/ Paso 2
Step 1 / Étape 1/ Paso 1
(IMPERIAL) 1/4” X 1-3/4”= 3pcs
Safety rail can be assembled on opposite sides if desired.
La barre de retenu peut être installé le côté droit ou gauche, comme desire.
El mini barandal protector puede ser instalado en ambos sentidos si se desea.
THIS PRODUCT USES IMPERIAL THREADED HARDWARE/
CE PRODUIT UTILISE LA BOULONNERIE A FILETAGE IMPÉRIAL/
ESTE PRODUCTO UTILIZA LA TORNILLERIA DE ROSCA IMPERIAL
The optional Toddler Rail is available for separate
purchase from Graco online retailers
L'enfant en garde-corps en option est disponible pour l'achat
séparé de la Graco les détaillants en ligne
El párvulo guardarraíl opcional está disponible para la
compra por separado de Graco de minoristas en línea
L X 4E X 4
D X 6 G X 2
8
7
4
7
8
!
W
A
R
N
I
N
G
:
I
N
F
A
N
T
S
C
A
N
SU
F
F
O
C
A
T
E
O
N
S
O
F
T
B
E
D
D
I
N
G
.
N
E
V
E
R
A
D
D
A
P
IL
L
O
W
O
R
C
O
M
F
O
R
T
E
R
.
N
E
V
E
R
P
L
A
C
E
A
D
D
I
T
I
O
N
A
L
P
A
D
D
I
N
G
U
N
D
E
R
A
N
I
N
F
A
N
T
.
S
E
E
M
A
T
TR
E
S
S
S
U
P
P
O
R
T
F
O
R
A
D
D
I
T
I
O
N
A
L
W
A
R
N
I
NG
S
.
D
I
0
2
0
B
!
:
L
I
T
E
R
I
E
.
V
E
U
I
L
L
E
Z
N
E
J
A
MA
I
S
A
J
O
U
T
E
R
U
N
O
R
E
I
L
L
E
R
,
E
D
R
E
D
O
N
O
U
B
O
R
D
U
R
E
D
E
P
R
O
T
E
C
T
I
O
N
S
.
N
E
J
A
M
A
I
S
A
J
O
U
T
E
R
D
E
R
E
M
B
O
U
R
R
A
G
E
E
N
D
E
S
S
O
U
S
D
’U
N
B
E
B
E
.
V
E
U
I
L
L
E
Z
V
O
U
S
R
E
F
E
R
E
Z
A
L
A
B
A
S
E
D
U
M
A
T
E
L
A
S
P
O
U
R
L
E
S
M
I
S
E
S
E
N
G
A
R
D
E
A
D
D
I
T
I
O
N
N
E
L
L
E
S
I
D
2
0
3
B
M
I
S
E
E
N
G
A
R
D
E
!
!
!
WA
R
N
I
N
G
:
I
N
F
A
N
T
S
C
A
N
S
U
F
F
O
C
A
T
E
O
N
S
OF
T
B
E
D
D
I
N
G
.
N
E
V
E
R
A
D
D
A
P
I
L
L
O
W
O
R
C
O
M
F
O
R
T
E
R
.
N
E
V
E
R
P
L
A
C
E
A
D
D
I
T
I
O
N
A
L
P
A
D
D
I
N
G
U
N
D
E
R
A
N
I
N
F
A
N
T
.
S
E
E
M
A
T
T
R
E
S
S
S
U
P
P
O
R
T
F
O
R
A
D
D
I
T
I
O
N
A
L
W
A
R
N
I
N
G
S
.
D
I
0
2
0
B
!
:
L
I
T
E
R
I
E
.
V
E
U
I
L
L
EZ
N
E
J
A
M
A
I
S
A
J
O
U
T
E
R
U
N
O
R
E
I
L
L
E
R
,
E
D
R
E
D
O
N
O
U
B
O
R
D
U
R
E
D
E
P
R
O
T
E
C
T
I
O
N
S
.
N
E
J
A
M
A
I
S
A
J
O
U
T
E
R
D
E
R
E
M
B
O
U
R
R
A
G
E
E
N
D
E
S
S
O
U
S
D
’
U
N
B
E
B
E
.
V
E
U
I
L
L
E
Z
V
O
U
S
R
E
F
E
R
E
Z
A
L
A
B
A
S
E
D
U
M
A
T
E
L
A
S
P
O
U
R
L
E
S
M
I
S
E
S
E
N
G
A
R
D
E
A
D
D
I
T
I
O
N
N
E
L
L
E
S
I
D
2
0
3
B
M
I
S
E
E
N
G
A
R
D
E
!
!
!
WA
RN
I
N
G
:
I
N
F
A
N
T
S
C
A
N
S
U
F
F
O
C
A
T
E
O
N
S
O
F
T
B
E
D
D
I
N
G
.
N
E
V
E
R
A
D
D
A
P
I
L
L
O
W
O
R
C
O
M
F
O
R
T
E
R
.
NE
V
E
R
P
L
A
C
E
A
D
D
I
T
I
O
N
A
L
P
A
D
D
I
N
G
U
N
D
E
R
A
N
I
N
F
A
N
T
.
S
E
E
M
AT
T
R
E
S
S
S
U
P
P
O
R
T
F
O
R
A
D
D
I
T
I
O
N
A
L
W
A
R
N
I
N
G
S
.
D
I
0
2
0
B
!
:
L
I
T
E
R
I
E
.
V
E
U
I
L
L
E
Z
N
E
JA
M
A
I
S
A
J
O
U
T
E
R
U
N
O
R
E
I
L
L
E
R
,
E
D
R
E
D
O
N
O
U
B
O
R
D
U
R
E
D
E
P
R
O
T
E
C
T
I
O
N
S
.
N
E
J
A
M
A
I
S
A
J
O
U
T
E
R
D
E
R
E
M
B
O
U
R
R
A
G
E
E
N
D
E
S
S
O
U
S
D
’
U
N
B
E
B
E
.
V
E
U
I
L
L
E
Z
V
O
U
S
R
E
F
E
R
E
Z
A
L
A
B
A
S
E
D
U
MA
T
E
L
A
S
P
O
U
R
L
E
S
M
I
S
E
S
E
N
G
A
R
D
E
A
D
D
I
T
I
O
N
N
E
L
L
E
S
I
D
2
0
3
B
M
I
S
E
E
N
G
A
R
D
E
!
!
10
9
18
D
G
G
L
L
L
E X 2
E X 2
D
D
D
L
16
15

19
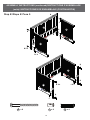
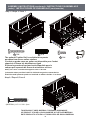
ASSEMBLY INSTRUCTIONS (continued) / INSTRUCTIONS D'ASSEMBLAGE
(suite) / INSTRUCCIONES DE ENSAMBLAJE (continuación)
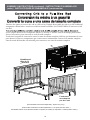
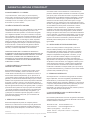
Conversion de crèche à un grand lit
Convertir la cuna a una cama de tamaño completo
You have the option to convert the crib to a full size bed. Simply disassemble the crib to get the headboard
components shown below. Attach it to a full size metal bed frame (NOT INCLUDED) to convert to a full
size bed.
crèche jusqu'à obtenir la tête composants illustrés ci-dessous. L'attacher à un lit métallique plein format
châssis (non inclus) pour convertir en un lit de taille complète.
Usted tiene la opción de convertir la cuna a la cama de tamaño completo. Sólo hay que desmontar la cuna
para obtener la cabecera componentes que se muestran a continuación. Conecte a un tamaño completo
cama de metal del bastidor (no incluido) para convertir a una cama de tamaño completo.
(Full size Bed Frame Sold Seperately ; Styles may vary)
(Pleine taille Cadre de lit vendu séparément ; Les styles peuvent varier )
TranslateEl marco de la cama de tamaño completo (se vende por separado ; estilos pueden variar ).
Headboard
tête de lit
cabecera
Footboard
marchepied
pie de cama
3
4
E X 8
3
4

20
STORKCRAFT LIMITED WARRANTY
STORAGE AND CARE
DO NOT remove any part that is attached with wood screws,
The stationary side rail, mattress base can all be disassembled for
storage. Simply review the assembly instructions for each and reverse
the order to disassemble. Wipe all parts with a dampened clean cloth.
DO NOT use abrasives. To convert to a double bed please follow
the instructions in the double bed kit. (MUST BE PURCHASED
SEPARATELY)
LIMITED ONE YEAR WARRANTY
This one (1) year Limited Warranty ("Warranty") is a voluntary
manufacturer’s warranty. This Warranty supplies consumers with
rights separate to those rights provided by applicable consumer law,
including, but not limited to those applicable consumer laws relating
to non-conforming goods. Accordingly, this Warranty shall not, in
any way, limit, suspend, enlarge, nor restrict any rights provided by
applicable law to any consumer. Notwithstanding any other terms,
or conditions in this Warranty, all claims made under this Warranty
shall be governed by the terms and conditions set forth in this
Warranty document.
NOTE THAT BY USING YOUR STORKCRAFT PRODUCT YOU
ARE AGREEING TO BE BOUND BY THE TERMS AND
CONDITIONS OF THIS WARRANTY. IF YOU DO NOT AGREE
WITH THE TERMS OF THIS WARRANTY, THEN DO NOT USE
THIS STORKCRAFT PRODUCT AND CONTACT STORKCRAFT’S
CUSTOMER CARE DEPARTMENT.
I. WARRANTY LIMITATIONS AND TIME PERIOD:
Storkcraft Manufacturing Inc. warrants this product against defects in
the materials and workmanship of the same, when used normally by
consumer pursuant to Storkcraft’s Guidelines (as defined), for a period
of one (1) year from the date of the original retail purchase (such to
be the “Warranty Period”). Storkcraft’s Guidelines include, but are not
limited to product technical specifications, product or user manuals,
product service announcements and communications (printed or
circulated). Prior to any consumer receiving any benefits under this
Warranty, Storkcraft and/or its agents may: (a) demand the production
of proof of purchase by the consumer; (b) require consumer to follow
additional instructions or procedures to obtain benefits under this
Warranty; and/or (c) require consumer to answer questions or verify
product information (including, but not limited to requests
for photographs).
II. WARRANTY SERVICE:
Storkcraft will replace parts or products, at its sole option, from any
defective product. Service under this Warranty shall be rendered in
the manner deemed appropriate by Storkcraft in its own judgment,
and Storkcraft may, at its sole discretion, require consumer to mail or
ship items or products. Storkcraft may supply consumer with parts or
hardware for consumer’s own/do-it-yourself (“DIY”) installation. DIY
parts and hardware will only be shipped within the Continental United
States or Canada, pursuant to all applicable laws and regulations.
Customers outside of these areas may be subject to additional
shipping charges. Storkcraft shall not be responsible for labor or
other costs incurred by consumer in connection with DIY installations.
Notwithstanding the foregoing, Storkcraft reserves the right to: (a)
change the method by which Storkcraft will accept consumer repair or
replacement requests under this Warranty; (b) limit, modify, restrict, or
enlarge consumer rights based on applicable law; (c) charge shipping,
handling, or other charges in connection with supplied parts or
hardware; and/or (d) require the return of defective products, parts, or
hardware. Storkcraft may replace any parts or hardware with similar
and/or equal quality parts or hardware.
III. LIMITATIONS ON LIABILITY:
Except as provided for in this Warranty, and only to the maximum
extent permitted by applicable law, Storkcraft shall not be responsible
for direct, special, incidental, or consequential damages that may
result from, or which flow from, any breach of warranty or condition,
and/or that may be asserted using any legal theory. This Warranty is
specifically disclaimed to second-hand purchasers of any products.
This Warranty shall further not apply in instances of product abuse,
product misuse, product neglect, commercial use of such products,
or due to accidental damage and/or natural forces. The foregoing
limitations shall be modified or removed in any state, countr , or
province that does not permit such limitations (and only to the
minimum extent that such are prohibited by law).
IV. GENERAL TERMS:
If any term or condition of this Warranty is deemed to be illegal
or unenforceable, then the legality and enforceability of the other
terms and conditions of this Warranty shall be unaffected. No agent,
employee, reseller, nor other individual or company shall be permitted
without specific written authorization to modify or otherwise change
this Warranty. This Warranty shall be construed and governed by the
laws of the country, state, or province where the subject purchase of
the product occurred.
V. PROCEDURE FOR OBTAINING
WARRANTY SERVICE:
Consumer may obtain Warranty Service by contacting Storkcraft’s
Customer Care department through the channels listed below.
Storkcraft Website: www.storkcraftdirect.com
Email: [email protected]
Phone Toll Free: 1-877-274-0277
Hours of Operation: 6:30 am - 4:00 pm PST / 9:30 am- 7:00 pm EST - Mon to Fri
Distributed by
Storkcraft Manufacturing Inc. 3993 Howard Hughes Parkway, Unit# 250 Las Vegas, NV, USA. 89169
La page est en cours de chargement...
La page est en cours de chargement...
-
 1
1
-
 2
2
-
 3
3
-
 4
4
-
 5
5
-
 6
6
-
 7
7
-
 8
8
-
 9
9
-
 10
10
-
 11
11
-
 12
12
-
 13
13
-
 14
14
-
 15
15
-
 16
16
-
 17
17
-
 18
18
-
 19
19
-
 20
20
-
 21
21
-
 22
22


Stork Craft 04521-701 Guide d'installation
- Catégorie
- Meubles de bébé
- Taper
- Guide d'installation
dans d''autres langues
Autres documents
-
Storkcraft Graco Hadley 5-in-1 Convertible Crib Assembly Instructions
-
-
-
-
-
-
-
-
-
Graco 04532-111 Manuel utilisateur