Krups Blender ZX7000 Manuel utilisateur
- Catégorie
- Petits appareils de cuisine
- Taper
- Manuel utilisateur

ZX7000
www.krups.com
EN
FR
ES

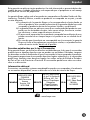
E
F
G
I
J
H
A
B
C
D
G1
L
K

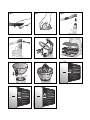
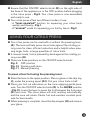
Fig.1 Fig.2 Fig.3
Fig.4 Fig.5 Fig.6
Fig.7 Fig.8 Fig.9
Fig.10 Fig.11

English
TABLE OF CONTENTS
IMPORTANT SAFEGUARDS ............................................PG. 6-8
DESCRIPTION OF PARTS ................................................PG. 9
BEFORE USING YOUR APPLIANCE
FOR THE FIRST TIME.........................................................PG. 9
ASSEMBLING YOUR CITRUS PRESS.........................PG. 10-11
USING YOUR CITRUS PRESS .......................................PG. 11-12
FOR BEST RESULTS ..........................................................PG. 12
CLEANING .............................................................................PG. 12
WARRANTY ...........................................................................PG. 13-14
5

English
6
IMPORTANT SAFEGUARDS
Read all instructions carefully before using.
When using electrical appliances, basic safety precautions
should always be followed to reduce the risk of fire, electric
shock, and/or injury to persons, including the following:
Use appliance only for its intended use.
To protect against risk of electrical shock, do not immerse
the base in water or any other liquid.
Close supervision is necessary when any appliance is used
near children. This appliance is not intended for use by
children.
Unplug from outlet when not in use, before putting on or
taking off parts, and before cleaning.
Avoid contact with moving parts. Keep hands, hair, clothing,
as well as spatulas and other utensils away during operation
to reduce the risk of injury to persons, and/or damage to
the appliance.
Do not operate any appliance with a damaged cord or plug
or after the appliance malfunctions, or is dropped or dama-
ged in any manner. Return the appliance to an authorized
KRUPS Service Center for examination or repair.
The use of attachments not recommended or sold by
KRUPS may cause fire, electric shock or injury.
Do not use outdoors.
Do not let cord hang over edge of table or counter.
Do not let cord contact hot surface, including the stove.
The appliance is not intended to prepare large quantites of
food at one time.
A rubber/plastic spatula or wooden spoon may be used,
when the appliance is in “off” position and unplugged.

English
This appliance is for household use only. Any servicing other
than cleaning and user maintenance should be performed
by an authorized KRUPS Service Center.
SAVE THESE
INSTRUCTIONS
CAUTION
This appliance complies with applicable technical rules
and standards at the time of manufacture.
Do not leave the appliance within reach of children.
An electrical appliance is not a toy and should be kept
out of reach of children.
This appliance is intended for household use only. Do not
use it for commercial purposes. Any servicing other than
cleaning and user maintenance should be performed by
the nearest authorized KRUPS Service Center.
Check voltage to be sure that the voltage indicated on the
rating label matches your voltage.
Do not immerse the appliance in water or any other liquid.
To reduce the risk of fire or electric shock, do not remove
the base. No user serviceable parts inside. Repairs should
be done by an authorised KRUPS Service Center only.
Keep your hands and the cord away from hot parts during
operation.
Never clean with harsh or abrasive cleaners or sponges.
Clean using gentle dishwashing liquid and warm water.
Dry all parts carefully before next use.
Do not place or use the appliance on hot surfaces such as
stoves, hotplates, or near open gas flames.
7

English
8
Do not unplug the unit by pulling on the cord. Instead grasp
plug and pull to disconnect.
Only use the appliance on a stable working surface away
from water splashes.
SHORT CORD INSTRUCTIONS
A. We do not recommend using an extension cord with
this device.
B. If an extension cord is absolutely necessary,
1) the marked electrical rating of the extension cord
should be at least as great as the electrical rating of
the machine,
2) the longer cord should be arranged so that it will not
drape over the counter top or table top where it can
be pulled on by children or tripped over.
C. This machine has a polarized plug (one blade is wider
than the other). To reduce the risk of electric shock, this
plug is intended to fit into a polarized outlet only one
way. If the plug does not fit fully into the outlet, reverse
the plug. If it still does not fit, contact a qualified
electrician. Do not attempt to modify the plug in any way.
In the interest of improving products, Krups reserves
the right to change specifications without prior notice.

English
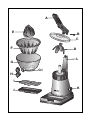
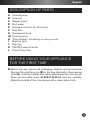
DESCRIPTION OF PARTS
A
Pressing lever
B
Lever pin
C
Splash guard
D
Fruit press
E
Universal cone for all citrus fruits
F
Pulp filter
G
Transparent bowl
G1
Pouring spout
H
“Drip stopper” accessory (according to model)
I
Drip tray grid
J
Drip tray
K
ON/OFF selector knob
L
Citrus Press Arm
BEFORE USING YOUR APPLIANCE
FOR THE FIRST TIME
Before first use, remove all packaging, stickers, and accessories.
Remove the small lever pin
(B)
in the bag attached to the pressing
lever
(A)
, it will be needed later when assembling the citrus press.
Rinse all removable parts
(C-D-E-F-G-H-I-J)
and dry carefully.
Wipe the outside of the citrus press with a clean damp cloth.
9

English
10
ASSEMBLING YOUR CITRUS PRESS
ENSURE THE ON/OFF SELECTOR KNOB IS IN THE OFF
POSITION AND THE CITRUS PRESS IS NOT PLUGGED IN
WHEN ASSEMBLING.
Remove the small lever pin
(B)
in the bag attached to the pressing
lever
(A) - Fig.4
.
Holding the black portion of the pressing lever
(A)
horizontally,
slip the silver end of the pressing lever
(A)
into the notches at the
top of the citrus press arm
(L)
. Note the hole on the silver end of
the pressing lever
(A)
should be on the right side
- Fig.3
.
While holding the pressing lever
(A)
in place, align the hole on
the right side of the lever with the hole in the shaft. Hold the black
end of the lever pin
(B)
, and push the lever pin
(B)
into the hole.
The lever can now be moved up and down.
Put the lever
(A)
in its upper position.
Rest the lever in the upright position so that the round notches on
the center of the underside of the handle are visible. Press the
clear splash guard
(C)
onto the round notches, it will click in place.
Align the notches on the black fruit press
(D)
with the metal bar in
the center of the round notches, then turn clockwise one quarter
turn to lock into place. Once locked in place, the fruit press
(D)
cannot be pulled off, but can be moved up and down
- Fig.5
.
Slip the drip tray
(J)
and drip tray grid
(I)
in place
- Fig.6
.
Rest the lever in the up position. Slide the clear bowl
(G)
onto the
black plastic shaft of the citrus press. Align the clear bowl
(G)
so
that the plastic pouring spout
(G1)
is on the front, to the left of
the center (7:00 position), then turn counter-clockwise so that
the pouring spout
(G1)
is centered and the bowl is locked in
place
- Fig.7
.
Place the pulp filter
(F)
inside the clear bowl
(G) - Fig.8
.
Slide the juicing cone onto the center of the black axis in the
center of the pulp filter
(F)
and check that the cone rotates
smoothly both clockwise and counter-clockwise.

English
Ensure that the ON/OFF selector knob
(K)
on the right side of
the base of the appliance is in the OFF position before plugging
in the citrus press
- Fig.9
. Your citrus press is now assembled
and ready to use.
Your citrus press offers two different modes of use:
- A
“lever-operated”
function for squeezing your citrus fruits
quickly and cleanly
- Fig.1
.
- A
“manual”
mode for squeezing your fruit by hand
- Fig.2
.
USING YOUR CITRUS PRESS
Your citrus press can be used with or without the pressing lever
(A)
. The lever will help press citrus fruits against the rotating jui-
cing cone for clean, efficient extraction and is helpful when pres-
sing larger fruits, or large quantities of citrus fruits.
In manual mode, fruit is pressed by hand against the rotating jui-
cing cone
(E)
.
There are three positions on the ON/OFF selector knob:
Fig. 9
OFF position
Fig. 10
Pressing with lever
Fig. 11
Manual pressing
To press citrus fruit using the pressing lever:
Raise the lever to the upper position. Place a glass on the drip tray
(J)
, under the pouring spout
(G1)
. Cut your citrus fruits in half.
Place your fruit cut side down on the cone, applying gentle pres-
sure. Turn the ON/OFF selector knob
(K)
to the
LEVER
position
- Fig.10
. Lower the lever to press the fruit between the fruit press
(D)
and cone. The citrus press will start working automatically,
and the cone will rotate. Center fruit and maintain constant pres-
sure for best results.
When pressing is complete, close the drip stopper
(H)
and remove
your glass.
11

English
12
Pressing by hand:
Raise the lever to the upper position. Place a glass on the drip tray
(J)
, under the pouring spout
(G1)
. Cut your citrus fruits in half.
Turn the ON/OFF selector knob
(K)
to the
MANUAL
position
- Fig.11
. Place your fruit cut side down on the cone
(E)
, applying
pressure against the cone. The cone will automatically start rotating
once pressure is applied. Keep fruit centered and maintain
constant pressure for best results.
When pressing is complete, close the drip stopper
(H)
and remove
your glass.
FOR BEST RESULTS
For optimal juice extraction, press fruit at room temperature. Roll
fruit on a table, using the palm of your hand to apply gentle pres-
sure before cutting in half.
CLEANING
The removable parts
(C-D-F-G-H-I-J)
can be washed in the upper
level of the dishwasher. Wash with warm water and gentle dis-
hwashing liquid.
The pressing lever
(A)
and the lever pin
(B)
cannot be washed in
the dishwasher. Wipe with a soft damp cloth to clean. Always dry
before re-assembling.
Rinse the pulp filter
(F)
after juicing for easy cleaning. Once pulp
has dried on the filter, soak in warm water to loosen the pulp and
then wipe with a sponge. Do not use abrasive or harsh chemical
cleaners or sponges to clean the removable parts.
Note the underside of the base includes a cord wrap that can be
used to organize excess powercord length or store the powercord
when the appliance is not in use.

English
MANUFACTURER'S WARRANTY
: www.krups.com
With a strong commitment to the environment, most of Krups products
are repairable during and after the warranty period. Before returning any
defective products to the point of purchase, please call Krups consumer
service directly at the phone number below for repair options.
Your help to sustain the environment is appreciated!
The Warranty
This product is guaranteed by Krups for a period of
2 years
against any manufac-
turing defect in materials or workmanship, starting from the initial date of purchase.
The manufacturer's warranty by Krups is an extra benefit which does not affect
consumer's Statutory Rights.
The Krups warranty covers all costs related to restoring the proven defective pro-
duct so that it conforms to its original specifications, through the repair or repla-
cement of any defective part and the necessary labor. At Krups’s choice, a
replacement product may be provided instead of repairing a defective product.
Krups’s sole obligation and your exclusive resolution under this warranty are limited
to such repair or replacement.
Conditions & Exclusions
The Krups warranty only applies within USA, Canada & Mexico, and is valid only
on presentation of a proof of purchase. The product can be taken directly in per-
son to an authorized service centre or must be adequately packaged and returned,
by recorded delivery (or equivalent method of postage), to a Krups authorized ser-
vice centre. Full address details for each country’s authorized service centre are
listed on the Krups website (www.krups.com
) or by calling the appropriate tele-
phone number listed below to request the appropriate postal address.
Krups shall not be obliged to repair or replace any product which is not accompa-
nied by a valid proof of purchase.
This warranty will not cover any damage which could occur as a result of misuse,
negligence, failure to follow Krups instructions, use on current or voltage other
than as stamped on the product, or a modification or unauthorized repair of the
product. It also does not cover normal tear and wear, maintenance or replacement
of consumable parts, and the following:
-using the wrong type of water or consumable
-scaling (any de-scaling must be carried out according to the instructions for use);
-ingress of water, dust or insects into the product;
-mechanical damages, overloading
-damages or bad results due to wrong voltage or frequency
-accidents including fire, flood, lightning, etc
-professional or commercial use
-damage to any glass or porcelain ware in the product
13

English
14
This warranty does not apply to any product that has been tampered with, or to
damages incurred through improper use and care, faulty packaging by the owner
or mishandling by any carrier.
The Krups manufacturer's warranty applies only for products purchased and used
in USA, Canada & Mexico. Where a product purchased in one country and then
used in another one:
a) The Krups guarantee duration is the one in the country of usage of the pro-
duct, even if the product was purchased in another listed country with dif-
ferent guarantee duration.
b) The Krups guarantee does not apply in case of non conformity of the pur-
chased product with the local standards, such as voltage, frequency, power
plugs, or other local technical specifications.
c) The repair process for products purchased outside the country of use may
require a longer time if the product is not locally sold by Krups.
d) In cases where the product is not repairable in the new country, the Krups
guarantee is limited to a replacement by a similar product or an alternative
product at similar cost, where possible.
Consumer Statutory Rights
This Krups manufacturer's warranty does not affect the statutory rights a consumer
may have or those rights that cannot be excluded or limited, nor rights against the
retailer from which the consumer purchased the product. This warranty gives a
consumer specific legal rights, and the consumer may also have other legal rights
which vary from State to State or Country to Country or Province to Province. The
consumer may assert any such rights at his sole discretion.
Additional information
Accessories, Consumables and end-user replaceable parts can be purchased, if
locally available, as described in Krups internet site.
: www.krups.com
CANADA
GROUPE SEB
CANADA
345 Passmore
Avenue
Toronto, ON
M1V 3N8
MEXICO
G.S.E.B. MEXICANA,
S.A. de C.V. Goldsmith
38 Desp. 401, Col.
Polanco Chapultepec
Delegacion
Miguel Hildalgo
11 560 Mexico D.F.
U.S.A.
GROUPE SEB
USA
2121 Eden Road
Millville,
NJ 08332
1-800-418-3325 (01800) 112 83 25 800-526-5377

Français
TABLE DES MATIÈRES
IMPORTANTES MISES EN GARDE . . . . . . . . . . . . . . . p. 16-18
DESCRIPTION . . . . . . . . . . . . . . . . . . . . . . . . . . . . . . . . . p. 19
AVANT LA PREMIÈRE UTILISATION . . . . . . . . . . . . . . . p. 19
ASSEMBLAGE DU PRESSE-AGRUMES . . . . . . . . . . p. 20-21
UTILISATION DE VOTRE PRESSE-AGRUMES. . . . . . p. 21-22
POUR DE MEILLEURS RÉSULTATS . . . . . . . . . . . . . . . p. 22
NETTOYAGE . . . . . . . . . . . . . . . . . . . . . . . . . . . . . . . . . . . p. 22
GARANTIE . . . . . . . . . . . . . . . . . . . . . . . . . . . . . . . . . . . . . p. 23-24
15

Français
16
IMPORTANTES
MISES EN GARDE
Lisez soigneusement toutes les instructions avant utilisation.
Il convient de toujours respecter quelques précautions
élémentaires lorsque l’on utilise un appareil domestique afin
de limiter le risque d’incendie, de choc électrique et de
blessures, y compris les suivantes :
Utilisez uniquement l’appareil pour son usage prévu.
Pour éviter tout choc électrique, n’immergez pas la base
de l’appareil dans l’eau ou dans un autre liquide.
Une surveillance étroite est nécessaire lorsqu’il est utilisé à
proximité d’un enfant. Il ne doit pas être utilisé par les enfants.
Débranchez de la prise murale lorsque vous ne vous en
servez pas, avant de le nettoyer et avant d’enlever ou de
remonter des pièces.
Évitez tout contact avec les pièces en mouvement. Gardez les
mains, les cheveux, les vêtements, les spatules et autres usten-
siles éloignés de l’appareil pendant son fonctionnement afin de
limiter le risque de blessure ou d’endommager l’appareil.
N’utilisez pas un appareil dont le cordon ou la prise est en-
dommagé ou si l’appareil fonctionne mal, ou s’il a été
échappé ou endommagé. Retournez le produit à un centre
de service agréé KRUPS pour examen ou réparation.
L’utilisation d’accessoires qui ne sont pas recommandés
ou vendus par KRUPS peut être à l’origine d’incendies, de
chocs électriques ou de blessures.
N’utilisez pas l’appareil à l’extérieur.
Ne laissez pas le cordon pendre d’une table ou d’un comptoir.
Ne laissez pas le cordon entrer en contact avec des parties
chaudes, cuisinière y compris.
L’appareil n’a pas été conçu pour préparer de grandes
quantités à la fois.
On peut utiliser une cuillère en plastique ou en bois lorsque
l’appareil est en position « off » et débranché.

Français
Cet appareil est conçu pour un usage domestique unique-
ment. Toute opération autre que le nettoyage et l’entretien
par l’utilisateur doit-être effectuée par un centre de service
agréé KRUPS.
CONSERVER CES
INSTRUCTIONS
ATTENTION
Cet appareil satisfait aux normes et réglementations tech-
niques en vigueur au moment de sa fabrication.
Ne laissez pas l’appareil à la portée des enfants.
Les lames fournies avec l’appareil sont acérées; les jeunes
enfants ou les personnes atteintes d’un handicap grave doi-
vent toujours être supervisés lorsqu’ils utilisent l’appareil.
Cet appareil électrique n’est pas un jouet et doit être gardé
hors de la portée des enfants.
Le produit a été conçu pour un usage domestique seule-
ment. Il ne doit en aucun cas faire l'objet d'une utilisation
professionnelle. Toute opération autre que le nettoyage et
l’entretien par l’utilisateur doit-être effectuée par le centre
de service KRUPS agréé le plus proche.
Vérifiez la tension pour qu’elle corresponde à celle qui est
indiquée sur la plaque de l’appareil.
N’immergez pas l’appareil dans l’eau ou dans un autre liquide.
Pour réduire le risque d’incendie ou de choc électrique, ne
démontez pas la base. Il n’y a aucune pièce à changer par
l’utilisateur. Les réparations doivent être faites par un centre
de service agréé KRUPS uniquement.
Ne mettez pas vos mains ou le cordon près des parties
chaudes pendant le fonctionnement.
N’utilisez jamais de nettoyants forts ou abrasifs ni de tam-
pons à récurer abrasifs pour le nettoyage.
Nettoyez l’appareil à l’aide d’un savon à vaisselle doux et
de l’eau tiède. Séchez soigneusement toutes les pièces
avant la prochaine utilisation.
17

Français
18
Ne mettez pas l’appareil sur une surface chaude comme
une cuisinière, des plaques électriques ou à proximité près
de flammes.
Ne débranchez pas l’appareil en tirant sur le cordon. Tirez
sur la prise.
Utilisez l’appareil uniquement sur une surface stable, loin
de sources d’éclaboussures.
INSTRUCTIONS POUR UN CORDON
D’ALIMENTATION COURT
A. Cet appareil est muni d’un cordon d’alimentation court
ou amovible pour réduire les risques de s’emmêler ou
de trébucher sur un cordon d’alimentation plus long.
B. Des cordons d’alimentation amovibles plus longs ou
des rallonges sont disponibles et peuvent être utilisés
si des précautions sont prises.
C. Si cordon d’alimentation amovible plus long ou une
rallonge est utilisé,
1) le calibre du cordon ou de la rallonge doit être au
minimum le même que celui de la machine;
2) si l’appareil est mis à la terre, le cordon ou la
rallonge doit comporter une fiche à trois tiges (avec
mise à la terre)
3) le cordon ou la rallonge ne doit pas pendre de la
table ou du comptoir, où il pourrait être tiré par un
enfant ou faire trébucher quelqu’un.
Cet appareil est doté d’une fiche polarisée (une lame est
plus large que l’autre). Pour diminuer le risque de choc
électrique, cette fiche ne peut être branchée dans la prise
que d’une seule façon. Si elle ne rentre pas complètement
dans la prise, retournez-la. Si elle ne rentre toujours pas,
communiquer avec un électricien qualifié. Ne modifiez en
aucun cas la prise.

Français
DESCRIPTION
A
Levier de commande
B
Axe de fixation du levier de commande
C
Couvercle anti-éclaboussures
D
Pousse-fruit
E
Cône universel pour tous les agrumes
F
Filtre à pulpe
G
Bol transparent
G1
Bec verseur
H
Accessoire « arrête-gouttes » (selon le modèle)
I
Grille d’égouttage
J
Plateau d’égouttage
K
Interrupteur / sélecteur de fonction
L
Bras du presse-agrumes
AVANT LA PREMIÈRE UTILISATION
DE VOTRE APPAREIL
Avant d’utiliser l’appareil pour la première fois, retirer tous les em-
ballages, autocollants et accessoires. Retirez l’axe de fixation
(B)
de l’emballage fixé sur le levier
(A)
, vous en aurez besoin pour as-
sembler le presse-agrumes.
Rincez toutes les pièces amovibles
(C-D-E-F-G-H-I-J)
et séchez-
les soigneusement.
Essuyez le corps de l’appareil avec un linge humide.
19

Français
20
ASSEMBLAGE DU PRESSE-AGRUMES
ASSUREZ-VOUS QUE L’INTERRUPTEUR EST ON POSITION
« OFF » ET QUE L’APPAREIL N’EST PAS BRANCHÉ AVANT
DE L’ASSEMBLER.
Retirez l’axe de fixation
(B)
de l’emballage fixé sur le levier
(A)
- Fig.4.
En tenant en position horizontale la partie noire du levier
de commande
(A)
, glissez l’extrémité argentée du levier de com-
mande
(A)
dans l’orifice sur le dessus du bras du presse-agrumes
(L)
. Le trou situé sur l’extrémité argentée du levier
(A)
devrait être
du côté droit
- Fig.3
.
En tenant le levier
(A)
en place, alignez ce trou avec celui du bras
du presse-agrumes. Tenez la partie noire de l’axe de fixation
(B)
et poussez l’axe de fixation
(B)
dans le trou.
Le levier peut maintenant bouger de haut en bas.
Placez le levier
(A)
en position levée.
Laissez le levier en position levée de façon à ce que les coches
rondes situées sous le levier, au centre, soient visibles. Insérez le
couvercle anti-éclaboussures transparent
(C)
dans les coches
rondes; un clic se fait entendre lorsqu’il est bien en place. Alignez
les coches du pousse-fruit noir
(D)
avec la tige métallique située
au centre des coches noires, puis tournez un quart de tour en
sens horaire pour le verrouiller en place. Une fois en place, le
presse-agrumes
(D)
ne peut être retiré, mais peut se déplacer de
haut en bas
- Fig.5.
Installez le plateau d’égouttage
(J)
et sa grille
(I)
en place
- Fig.6.
Placez le levier en position levée. Glissez le bol transparent
(G)
sur l’axe de plastique noir du presse-agrumes. Alignez le bol trans-
parent
(G)
de façon à ce que le bec verseur
(G1)
soit sur le
devant, à gauche du centre (en position 7h00), puis tournez-le en
sens antihoraire de façon à ce que le bec verseur
(G1)
soit centré
et que le bol soit verrouillé en place
- Fig.7.
Placez le filtre à pulpe
(F)
à l’intérieur du bol transparent
(G)
- Fig.8.
Insérez le cône au centre de l’axe noir au centre du filtre à pulpe
(F)
et vérifiez que le cône puisse tourner facilement, tant en sens
horaire qu’antihoraire.

Français
Assurez-vous que l’interrupteur « ON/OFF »
(K)
sur le côté droit de
la base de l’appareil est en position « OFF » avant de brancher votre
presse-agrumes
- Fig.9.
Votre presse-agrumes est maintenant as-
semblé et prêt à être utilisé.
Votre presse-agrumes possède deux modes de fonctionnement :
- Un mode
« assisté »
pour presser les agrumes rapidement et
proprement
- Fig.1.
- Un mode
« manuel »
pour presser vos agrumes à la main
- Fig.2.
UTILISATION
DE VOTRE PRESSE-AGRUMES
Votre presse-agrumes peut être utilisé en utilisant ou pas le levier
de commande
(A)
. Le levier aide à presser les agrumes contre le
cône rotatif pour une extraction propre et efficace, et il est utile
pour presser de plus gros agrumes ou une plus grande quantité
d’agrumes.
En mode manuel, le fruit est pressé à la main contre le cône rotatif
(E)
.
Le sélecteur de fonctions peut être placé en 3 positions :
Fig. 9
position arrêt « OFF »
Fig. 10
position assistée « LEVER »
Fig. 11
position manuelle « MANUAL »
Pour utiliser le presse-agrumes en mode assisté :
Levez le levier
(A)
. Placez un verre sur le plateau d’égouttage
(J)
sous le bec verseur
(G1)
. Coupez votre agrume en deux.
Positionnez votre agrume face vers le bas sur le cône en exerçant
une légère pression sur celui-ci. Placez l’interrupteur
(K)
en posi-
tion assistée
« LEVER » - Fig.10.
Abaissez le bras de façon à ce
que le fruit soit coincé entre le pousse-fruit
(D)
et le cône. Le
presse-agrumes se mettra en marche automatiquement et le cône
tournera. Centrez le fruit et maintenez une pression constante
pour de meilleurs résultats.
Une fois terminé, fermez l’accessoire arrête-gouttes
(H)
et retirez
le verre.
21
La page charge ...
La page charge ...
La page charge ...
La page charge ...
La page charge ...
La page charge ...
La page charge ...
La page charge ...
La page charge ...
La page charge ...
La page charge ...
La page charge ...
La page charge ...
-
 1
1
-
 2
2
-
 3
3
-
 4
4
-
 5
5
-
 6
6
-
 7
7
-
 8
8
-
 9
9
-
 10
10
-
 11
11
-
 12
12
-
 13
13
-
 14
14
-
 15
15
-
 16
16
-
 17
17
-
 18
18
-
 19
19
-
 20
20
-
 21
21
-
 22
22
-
 23
23
-
 24
24
-
 25
25
-
 26
26
-
 27
27
-
 28
28
-
 29
29
-
 30
30
-
 31
31
-
 32
32
-
 33
33


Krups Blender ZX7000 Manuel utilisateur
- Catégorie
- Petits appareils de cuisine
- Taper
- Manuel utilisateur
dans d''autres langues
- English: Krups Blender ZX7000 User manual
- español: Krups Blender ZX7000 Manual de usuario