Essential Style QUA55CCP Guide d'installation
- Taper
- Guide d'installation

CARE INSTRUCTIONS
Rinse the product with clear water.
Dry the product with a soft cloth.
DO NOT:
Use abrasive cleansers, cloths, or
paper towels. Use any cleaning agents
containing acid, polish, wax, alcohol,
ammonia, bleach, solvent or any other
corrosive or harsh chemical cleansers.
INSTRUCTIONS D’ENTRETIEN
Rincer le robinet avec de l’eau claire
et l’essuyer avec un tissu doux.
À NE PAS FAIRE :
Utiliser des tissus ou essuie-tout
abrasifs, produits nettoyants contenant
de l’acide, agent polisseur, cires, alcool,
ammoniaque, eau de Javel, solvants ou
tout autres produits chimiques corrosifs.
Customer Service
Monday to Friday:
8 a.m. - 4:30 p.m. E.S.T.
Tel: 1-800-361-5960
Service à la clientèle
Lundi au vendredi :
8 h 00 à 16 h 30 H.N.E.
Fax : 1-888-533-8313
clientinf[email protected]
Replacement parts are available on order
Les pièces de remplacement sont disponibles sur commande
IBQUA55CCP_v220209
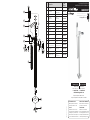
8
7
3
4
12
5
2
10
9
14
13
16
15
1
6
11
FLOOR MOUNT BATHTUB FILLER
ROBINET AUTOPORTANT POUR BAIGNOIRE
QUA55CCP
No Description Part
Pièce
1Spout assembly Ensemble du bec FCSPSA022
2Spout repair kit Ensemble de
réparation du bec FCKTS9017
3Cartridge Cartouche FC9M6
4Temperature
limiting device
Limiteur
de température FCCARL9M6
5Retainer nut Écrou FCNUTC015
6Handle Poignée FCKTS2064
7Base flange cover Garniture de bride FCDEC7043
8Base flange bride de la base FCOTH9018
9Hose boyau 96179
10 Check valve
(14mm)
Soupape anti-retour
(14mm) FC98244CV
11 Diverter handle Poignée de l’inverseur FCKTS2052
12 Diverter Inverseur FCCARD003
13 Washer
(19mm x 9.5mm x 2.5mm)
Rondelle
(19mm x 9.5mm x 2.5mm) FCWAA1007
14 Check valve
(15mm-1.8 gpm)
Soupape anti-retour
(15mm-6,8 L/min) FCVAL1001
15 Hand shower Douche à main FCSPS2003
16 Hand shower support Support
de douche à main FCKTS5008
For warranty and to register your product
Garantie et enregistrement de votre produit
belangerH2O.com

Installation steps - Étapes d’installation
Technical drawing - Dessin technique
v141121
IMPORTANT
Bélanger recommends using a professional plumber for all
installation and repair. Please inform yourself about the
Canadian Plumbing Code’s regulations and your local
municipality plumbing codes before installation. The Canadian
Plumbing Code requires the installation of surge arresting devices to eliminate water
hammering.
ALLOW AN ADEQUATE OPENING IN ORDER TO EASILY ACCESS
CONNECTIONS OR OTHER PLUMBING DEVICES FOR MAINTENANCE OR REPAIR.
Bélanger recommande de faire appel à un plombier compétent pour l’installation et
la réparation de ce produit. Veuillez vous informer des différentes règles
du Code Canadien de plomberie et des exigences de votre localité avant l’installation.
Le Code Canadien de plomberie exige l’installation d’un dispositif anti-bélier a n
d’amortir les coups de bélier dans la plomberie.
PRÉVOIR UNE OUVERTURE
SUFFISANTE POUR FACILITER L’ACCÈS AUX RACCORDEMENTS OU À TOUT AUTRE
DISPOSITIF DE PLOMBERIE EN VUE DE L’ENTRETIEN OU DE LA
RÉPARATION.
Before you begin / Avant de commencer
2”
The model shown in the installation steps may differ from the one in box however connection type
and installation steps are the same.
Le modèle démontré dans les étapes d’installation peut différer du produit en boîte, mais le type
de connexions et d’installation demeure le même.
RECOMMENDED TOOLS / OUTILS RECOMMANDÉS
* Apply Bélanger thread seal tape on threaded connections.
Appliquez du ruban d’étanchéité Bélanger sur les connexions letées.
Thread seal tape
Ruban d’étanchéité
pour joints letés *
Included / Inclus
QUA55CCP
Floor
Plancher
1-1/2”
(28 mm)
8”
(203 mm)
7-3/16”
(182 mm)
33-1/2”
(851 mm)
8-7/16”
(214 mm)
1-21/32”
(42 mm)
5-15/16”
(150 mm)
2”
(50 mm)
5”
(127 mm)
6”
(152 mm)
Ø 4-5/32"
(Ø 106 mm)
Ø 5/16"
(Ø 8 mm)
120°
OFF
FERMÉ
MAIN WATER VALVE
ENTRÉE D’EAU PRINCIPALE
TRACE A 2” DIAMETER CIRCLE ON THE FLOOR ABOVE THE ALREADY INSTALLED WATER
SUPPLIES AND CUT ON THE DIELINE TO MAKE A HOLE
TRACER UN CERCLE DE 2 POUCES DE DIAMÈTRE SUR LE PLANCHER, AUDESSUS DES
ENTRÉES D’EAU DÉJÀ INSTALLÉES ET COUPER EN SUIVANT LE TRACÉ
POUR FAIRE UN TROU.
WATER
SUPPLIES
ENTRÉES
D’EAU
HOT
(RED)
CHAUD
(ROUGE)
THREAD GLUE
COLLE POUR
FILET
COLD
(BLUE)
FROID
(BLEU)
ALIGN THE FAUCET TOWARD
THE BATHTUB
ALIGNEZ LE ROBINET FACE
À LA BAIGNOIRE
21
87654
OUVERT
OPEN
109
INSTALL THE FLOORING AROUND THE HOLE LEAVING A 5” DIAMETER CIRCLE OF SPACE
TO INSTALL ROUGHIN (TRIPOD)
INSTALLER LE REVÊTEMENT DE SOL AUTOUR DU TROU EN LAISSANT UN ESPACE CIRCU
LAIRE DE 5 POUCES DE DIAMÈTRE POUR L’INSTALLATION PRIMAIRE (TRÉPIED)
3
-
 1
1
-
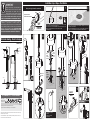 2
2


Essential Style QUA55CCP Guide d'installation
- Taper
- Guide d'installation
dans d''autres langues
Documents connexes


Autres documents
-
H2flo SOU45CP Guide d'installation
-
-
-
Keeney QUA55CCP Guide d'installation
-
-
-
-
-