ROCCAT Leadr Manuel utilisateur
- Catégorie
- Souris
- Taper
- Manuel utilisateur

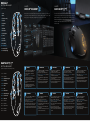
ROC C AT® OWL-EYE
OPTICAL SENSOR
World-beating 12k dpi optical sensor. Translating
your mouse movements on screen with 1:1
accuracy, Owl-Eye delivers unrelenting pointer
precision making it a leading optical sensor and a
prime choice for competitive gamers.
CHARGING DOCK
PLUS TOP-UP CABLE
A weapon is only as good as the holster holding it.
With a premium docking stand featuring charging
and status LEDs, the Leadr is ready and primed.
Low battery? Connect the top-up cable to carry on
gaming. Freedom without compromise.
WIRELESS
WITHOUT COMPROMISE
The freedom of wireless with the performance
of wired – that’s the Leadr. Featuring zero lag and
with virtually zero latency, it combines consistent
tracking and pinpoint precision for gamers who
won’t settle for second best.
QUICK-INSTALLATION GUIDE
IMPORTANT DOCUMENT
WIRELESS
R O YA LT Y.
U
N
R
E
L
E
N
T
I
N
G
P
R
E
C
I
S
I
O
N
12 K D P I
RO CC AT OWL-EYE
OPTICAL SENSOR
CONGRATULATIONS!
You are now the proud owner of a ROCCAT® Leadr! The Leadr is the flexible, competitive-grade wireless gaming mouse
that suits every style and every game. Featuring an X-Celerator analog thumb paddle and an intuitively placed fin switch,
its multi-button layout provides unrivaled command power. RGB illumination in 16.8m colors plus countless additional
features combine to make this mouse a king.
The Leadr is wireless royalty!
SPECIFICATIONS
PACKAGE CONTAINS
ROCCAT® Leadr –
Wireless Multi-Button RGB Gaming Mouse
Quick-Installation Guide
Docking/transmission Stand
1× micro USB to USB cable
Disposal Information
SYSTEM REQUIREMENTS
Windows® 7 32/64 bit
Windows® 8
Windows® 10
USB 2.0 port
Internet connection
(for driver installation)
TECH SPECS
ROCCAT® Owl-Eye optical sensor
with 12000dpi
Wired/Wireless combo mouse
1000mAh inbuilt Li-Ion rechargeable battery
2.4GHz wireless transmission
1000Hz polling rate; 1ms response time
50g acceleration
250ips motion detection speed
Mouse acceleration: no
Angle snapping: no
72MHz ARM Cortex-M0 (both mouse & stand)
512kB on board memory (mouse)
DCU (Distance Control Unit)
1.8m micro USB to USB cable
FEDERAL COMMUNICATION COMMISSION INTERFERENCE STATEMENT:
This equipment has been tested and found to comply with the limits for a Class B digital device, pursuant to part 15 of the FCC rules. These limits are designed to provide reasonable protection against harmful interference
in a residential installation. This equipment generates, uses and can radiate radio frequency energy and, if not installed and used in accordance with the instructions, may cause harmful interference to radio communications.
However, there is no guarantee that interference will not occur in a particular installation. If this equipment does cause harmful interference to radio or television reception, which can be determined by turning the equipment
off and on, the user is encouraged to try to correct the interference by one or more of the following measures: -Reorient or relocate the receiving antenna. -Increase the separation between the equipment and receiver.
-Connect the equipment into an outlet on a circuit different from that to which the receiver is connected. -Consult the dealer or an experienced radio/TV technician for help.
ROCCAT GmbH • Paul-Dessau-Str. 3G • 22761 Hamburg, Germany
© 2017 ROCCAT GmbH. All rights reserved. Any product names mentioned in this manual may be trademarks
or registered trademarks and are the property of their respective owners. Information contained herein is
subject to change without notice. ROCCAT GmbH shall not be made liable for any errors that may appear in this
manual. This publication or parts of it may not be reproduced without the express consent of the publisher.
FCC Caution: This device complies with Part 15 of the FCC Rules. Operation is subject to the following
two conditions: (1) this device may not cause harmful interference and (2) this device must accept any
interference received, including interference that may cause undesired operation.
BSMI RoHS information: http://bsmi.roccat.org
MOUSE FCC ID: X8DLEADR STAND FCC ID: X8DLEADR-S T3B283
RoHS
Should you need assistance …
Our support team is ready to help with any technical questions.
Just send an e-mail to support@roccat.org. Or visit our website at:
WWW.ROCCAT.ORG/SUPPORT
ROCCAT Owl-Eye
Optical Sensor
12000DPI
P/N: GM 1852- 00A 01
ROC-11-852
Wireless Multi-B utton
RGB Gaming Mouse
Designed at ROCCAT Studios, ROCCAT GmbH, Paul-Dessau-Straße 3G, 22761 Hamburg, Germany
Made in China
T36145
FCC Caution : This devi ce com plies with Part 15
of the FCC Rule s. Operati on is subje ct to t he
followin g two conditi ons: (1) t his device m ay
not caus e harm ful in terf eren ce and ( 2) this
device mu st acce pt any i nterfer ence rece ived,
includin g inte rfer ence t hat m ay cau se
undesired ope ration
FCC ID: X8DLEADR
PLEASE USE YOUR PRODUCT’S SERIAL NUMBER
(LOCATED ON THE BOTTOM LABEL) FOR
REGISTRATION. SIGN IN AT:
WWW.ROCCAT.ORG/SUPPORT/AUTHENTICITY-CHECK

Swarm provides next-level ROCCAT® product integration. It works a unified driver suite where you
can keep tabs on all of your ROCCAT® devices in one place. Say goodbye to multiple tray icons – with
Swarm you have a veritable gaming command HQ for every weapon in your arsenal.
WHAT’S
ROCCAT® SWARM?
1. Liitä ROCCAT® Leadr -lataustelakan USB-liitin mihin
tahansa vapaana olevaan USB-porttiin.
2. Käynnistä tietokoneesi ja yhdistä internetiin.
3. Mene osoitteeseen www.roccat.org/roccat-swarm ja
lataa viimeisin Swarm-ohjelmisto.
4. Aloita ohjelmiston asennus ja seuraa ruudulla näkyviä ohjeita.
5. Kytke hiiri päälle sen alla olevasta napista.
6. Muodosta laitepari pitämällä telakan ja hiiren laiteparin
muodostus -painiketta painettuna samanaikaisesti.
OHJEET
FI
1. Anslut USB-kontakten på laddningsdockan
ROCCAT® Leadr till en ledig USB-port.
2. Starta datorn och anslut till den Internet.
3. Gå till www.roccat.org/roccat-swarm och ladda ner den
senaste versionen av Swarm.
4. Starta installationen av programvaran och följ
anvisningarna på skärmen.
5. Slå på musen med knappen under den.
6. Para ihop enheten genom att hålla in parningsknapparna
på dockan och musen samtidigt.
INSTRUKTIONER
SE
1. Enchufa el conector USB de la base de carga ROCCAT®
Leadr en cualquier puerto USB libre.
2. Enciende tu equipo y conéctate a Internet.
3. Dirígete a www.roccat.org/roccat-swarm y descarga la
última versión de Swarm.
4. Inicia el proceso de instalación del software y sigue las
instrucciones que aparecen en pantalla.
5. Usa el botón situado bajo el ratón para encenderlo.
6. Mantén pulsados al mismo tiempo los botones de asocia-
ción de la base y del ratón para asociar el dispositivo.
INSTRUCCIONES
ES
1. Подключите разъем зарядной станции ROCCAT® Leadr
к любому свободному USB-порту.
2. Включите компьютер и подключитесь к сети интернет.
3. Откройте адрес www.roccat.org/roccat-swarm в вашем
браузере и загрузите последнюю версию Swarm.
4. Начните установку программы и следуйте инструкциям
на экране.
5. Включите мышь при помощи кнопки в нижней ее части.
6. Произведите сопряжение устройств, одновременно
удерживая кнопки на станции и на мыши.
ИНСТРУКЦИИ
RU
1. Sæt USB-stikket fra din ROCCAT® Leadr-opladningsdock i
en hvilken som helst ledig USB-port.
2. Tænd computeren, og opret forbindelse til nettet.
3. Gå til www.roccat.org/roccat-swarm, og download den
nyeste version af Swarm.
4. Start installationsprocessen, og følg instrukserne på
skærmen.
5. Tænd for musen ved at trykke på knappen under den.
6. Knyt enheden til musen ved at holde tilknytningsknap-
perne på docken og musen nede på samme tid.
INSTRUKTIONER
DK
1. Podłącz złącze USB stacji dokującej ROCCAT® Leadr
do dowolnego gniazda USB.
2. Uruchom komputer i połącz się z internetem.
3. Przejdź na stronę www.roccat.org/roccat-swarm i
pobierz najnowszą wersję oprogramowania Swarm.
4. Rozpocznij instalację oprogramowania i postępuj zgodnie
ze wskazówkami na ekranie.
5. Włącz mysz za pomocą przycisku znajdującego się na
spodzie urządzenia.
6. Powiąż urządzenie, jednocześnie przytrzymując przyciski
powiązania na stacji dokującej i myszy.
INSTRUKCJA
PL
1. Plug the USB connector on your ROCCAT® Leadr
charging dock into any free USB port.
2. Boot your computer and connect to the internet.
3. Navigate to www.roccat.org/roccat-swarm and
download the latest version of Swarm.
4. Start the software installation process and follow the
on-screen instructions.
5. Turn on the mouse using the button underneath it.
6. Pair the device by holding the pairing buttons on the
dock and mouse at the same time.
INSTRUCTIONS
EN
1. Liga o conector USB do dock de carregamento do teu
ROCCAT® Leadr a qualquer porta USB livre.
2. Inicia o teu computador e liga-te à Internet.
3. Vai até www.roccat.org/roccat-swarm e transfere a
mais recente versão do Swarm.
4. Inicia o processo de instalação do software e segue as
instruções no ecrã.
5. Usa o botão por baixo do rato para o ligar.
6. Mantém premidos os botões de emparelhamento no
dock e no rato ao mesmo tempo para emparelhares o
dispositivo.
INSTRUÇÕES
PT
DE
1. Verbinde den USB-Stecker Deiner ROCCAT® Leadr-
Ladestation mit einem freien USB-Anschluss.
2. Fahre Deinen Computer hoch und verbinde ihn
mit dem Internet.
3. Gehe zu www.roccat.org/roccat-swarm und lade
die aktuelle Version von Swarm herunter.
4. Starte den Installationsvorgang der Software und
folge den Bildschirmanweisungen.
5. Nimm über die Taste an der Unterseite die Maus
in Betrieb.
6. Verbinde die Geräte miteinander, indem Du die
Verbindungstasten an der Ladestation und an der
Maus gleichzeitig gedrückt hältst.
ANLEITUNG
1. Branchez le connecteur USB de votre ROCCAT® Leadr
sur un port USB libre de votre PC.
2. Démarrez votre ordinateur et connectez-vous à Internet.
3. Rendez-vous sur www.roccat.org/roccat-swarm et
téléchargez la dernière version de Swarm.
4. Démarrez l’installation et suivez les instructions à l’écran.
5. Allumez la souris à l’aide du bouton situé en-dessous.
6. Jumelez les appareils en maintenant appuyés les boutons
de jumelage de la station et de la souris en même temps.
INSTRUCTIONS
FR
WHAT’S
EASY-SHIFT[+]™?
The Leadr features world famous Easy-Shift[+]™ button duplicator technology.
It lets you assign a secondary function to your mouse buttons, for a total of 31
possible functions. These secondary functions can be activated by pressing a
button while holding down the dedicated Easy-Shift[+]™ button. This gives you
the power to pack a massive amount of quickly-accessible control into a clean,
uncluttered space.
1 = Click
2 = Menu
3 = Universal scrolling
4 = Scroll up
5 = Scroll down
6 = DPI up
7 = DPI down
8 = Next profile
9 = Previous profile
10 = Tilt left
11 = Tilt right
12 = IE forward
13 = IE backward
14 = Easy-Shift[+]™
15 = Scroll up (analog)
16 = Scroll down (analog)
1
2
3
6
7
4
9
5
8
10
12
11
13
16 15
14
14 + 1 = Disabled
14 + 2 = Disabled
14 + 3 = Multimedia play/pause
14 + 4 = Volume up
14 + 5 = Volume down
14 + 6 = Home
14 + 7 = End
14 + 8 = Mute volume
14 + 9 = Illumination toggle
14 + 10 = Previous track
14 + 11 = Next track
14 + 12 = Disabled
14 + 13 = Disabled
14 + 14 = Not available
14 + 15 = Disabled
14 + 16 = Disabled
1
2
3
6
7
4
9
5
8
10
12
11
13
16 15
14
(no driver installed)
DEFAULT
BUTTON ASSIGNMENT
(activated by holding down the Easy-Shift[+]™ button)
EASY-SHIFT[+]™
BUTTON ASSIGNMENT
-
 1
1
-
 2
2


ROCCAT Leadr Manuel utilisateur
- Catégorie
- Souris
- Taper
- Manuel utilisateur
dans d''autres langues
- English: ROCCAT Leadr User manual
- dansk: ROCCAT Leadr Brugermanual
- polski: ROCCAT Leadr Instrukcja obsługi
Documents connexes
-
ROCCAT Nyth BLK Le manuel du propriétaire
-
ROCCAT PMW3381 Guide d'installation
-
ROCCAT Isku+ Force FX Manuel utilisateur
-
ROCCAT Kain 120 AIMO Guide d'installation rapide
-
ROCCAT Burst Pro Guide d'installation rapide
-
ROCCAT Kova AIMO Guide d'installation rapide
-
-
-
-