Peerless PJR125-POR Guide d'installation
- Catégorie
- Supports de projecteur
- Taper
- Guide d'installation

12018-08-01 #:126-9221-2 (2018-10-16)
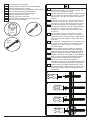
PJR125-POR
ENG
ESP
FRN
DEU
NEL
ITL
ČEŠ
SLK
POR
TÜR
125 lb
(56 kg)
MAX

22018-08-01 #:126-9221-2 (2018-10-16)
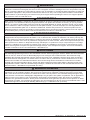
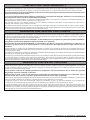
ENG - Before installing make sure the supporting surface will support the combined load of the equipment and
hardware. Screws must be tightly secured. Do not overtighten screws or damage can occur and product may fail.
Never exceed the Maximum Load Capacity. Always use an assistant or mechanical lifting equipment to safely lift
and position equipment. This product is intended for indoor use only. Use of this product outdoors could lead to
product failure or personal injury. Be careful not to pinch ngers when operating the mount. For support please
call customer care at 1-800-865-2112.
WARNING
ESP - Antes de instalarlo, asegúrese de que la supercie de apoyo sostendrá la carga combinada del equipo y
los jadores. Los tornillos se tienen que jar rmemente. No apriete los tornillos en exceso, ya que se pueden
dañar y el producto podría fallar. Nunca exceda la Capacidad Máxima de Carga. Siempre cuente con la ayuda
de un asistente o utilice un equipo mecánico de izar para levantar y colocar el equipo con más seguridad. Este
producto está diseñado para uso en interiores solamente. Utilizar este producto en exteriores podría causar
fallas del producto o lesiones a individuos. Tenga cuidado de no pincharse los dedos cuando mueva el soporte.
Si necesita ayuda, por favor, llame a Servicio al Cliente de Peerless al 1-800-865-2112.
ADVERTENCIA
ADVERTISSEMENT
FRN - Avant de procéder à l’installation, assurez-vous que la surface de support peut soutenir la charge totale de
l’équipement ainsi que des pièces de xation. Les vis doivent être serrées au maximum. Ne serrez pas trop les
vis pour éviter tout risque d’endommager le produit et de causer sa défaillance. Ne dépassez jamais la capacité
de charge maximale. Pour lever et positionner l’équipement en toute sécurité, faites-vous toujours aider par une
autre personne ou utilisez un dispositif de levage mécanique. Ce produit est conçu uniquement pour un usage
intérieur. L’utilisation de ce produit à l’extérieur peut causer une défaillance du produit ou des blessures corpo-
relles. Prenez garde à ne pas vous pincer les doigts lorsque vous manipulez le support. Pour toute assistance,
veuillez contacter le service à la clientèle au 1-800-865-2112.
ACHTUNG
DEU - Vergewissern Sie sich vor der Anbringung, dass die tragende Fläche das Gesamtgewicht der Geräte und
der Befestigungsteile tragen kann. Die Schrauben müssen sicher angezogen werden. Ziehen Sie die Schrauben
nicht zu fest an, damit es nicht zu Beschädigungen und Versagen des Produkts kommt. Die maximale Trag-
fähigkeit darf niemals überschritten werden. Ziehen Sie immer eine zusätzliche Person heran oder verwenden
Sie mechanische Hebegeräte, um Geräte sicher zu heben und zu positionieren. Dieses Produkt ist nur für den
Gebrauch innerhalb von Gebäuden bestimmt. Eine Verwendung dieses Produkts im Freien kann zu Produk-
tausfall oder Personenschaden führen. Achten Sie beim Umgang mit dem Halter darauf, dass die Finger nicht
eingeklemmt werden. Falls Sie Unterstützung benötigen, wenden Sie sich bitte an den Kundendienst unter der
Telefonnummer 1-800-865-2112 (innerhalb der USA).
WAARSCHUWING
NEL - Vóór de installatie dient u zich ervan te overtuigen dat het dragende oppervlak het totaalgewicht van de
apparatuur en de hardware aankan. Alle schroeven moeten stevig vastzitten. Draai de schroeven niet te strak
aan, want dit zou kunnen resulteren in schade en/of falen van het product. Het maximale draagvermogen mag
nooit worden overschreden. Belangrijke veiligheidstip: zorg er tijdens het optillen en plaatsen van de apparatuur
altijd voor dat u een helper of een mechanische henrichting ter beschikking hebt. Dit product is uitsluitend
bedoeld voor gebruik binnenshuis. Als dit product buitenshuis wordt gebruikt, zijn falen van het product en letsel
bij personen mogelijk. Let er tijdens het gebruiken van de bevestiging op dat uw vingers niet beklemd raken. Voor
ondersteuning kunt u terecht bij de afdeling Klantenzorg op +1-800-865-2112 (in de VS).

32018-08-01 #:126-9221-2 (2018-10-16)
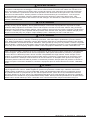
SLK - Pred montážou overte, či nosný povrch unesie kombinované zaťaženie zariadenia a vybavenia. Skrutky
je potrebné pevne utiahnuť. Skrutky nedoťahuje príliš silno, inak môže dôjsť k poškodeniu a poruche zariad-
enia. Nikdy neprekračujte maximálnu nosnosť. Na bezpečné zdvíhanie a umiestňovanie zariadení vždy použite
pomocníka alebo mechanické zdvíhacie zariadenie. Tento produkt je určený len na použitie v interiéri. Pri použití
tohto produktu v exteriéri by mohlo dôjsť k jeho poruche alebo osobnému poraneniu. Pri práci s držiakom dávajte
pozor, aby ste si nezovreli prsty. Podporu získate v centre na podporu zákazníkov na čísle 1-800-865-2112.
VÝSTRAHA
ČEŠ - Před instalací se ujistěte, že nosná plocha unese kombinované zatížení zařízení a technického vybavení.
Šrouby musí být pevně zajištěny. Šrouby příliš neutahujte, nebo může dojít k poškození a produkt se může
poškodit. Nikdy nepřekročte maximální nosnost. Na bezpečné zvedání a umísťováni zařízení vždy používejte
asistenta nebo mechanické zvedací zařízení. Tento produkt je určen pouze pro použití v interiéru. Použití tohoto
produktu v exteriéru by mohlo způsobit selhání produktu nebo zranění osob. Při práci s držákem dávejte pozor,
abyste si nesevřeli prsty. Pro podporu volejte oddělení péče o zákazníky na čísle 1-800-865-2112.
VÝSTRAHA
TUR - Montaja başlamadan önce taşıyıcı yüzeyin hem takacağınız donanımı hem de aksamı birlikte
taşıyacağından emin olunuz. Vidalar sağlam bir şekilde sıkıştırılmalıdır. Vidaları aşırı sıkmanız durumunda
vidalara hasar verebilirsiniz ve ürün arızalanabilir. Azami Yük Kapasitesini asla aşmayınız. Ekipmanı güvenli
bir şekilde kaldırmak ve yerleştirmek için her zaman başka birinden yardım alınız veya mekanik bir kaldırma
donanımı kullanınız. Bu ürün yalnızca iç mekânlarda kullanılmak üzere imal edilmiştir. Bu ürünün dış mekânda
kullanılması ürün arızalarına veya yaralanmalara sebep olabilir. Montaj sırasında parmaklarınızı sıkıştırmamaya
dikkat ediniz. Destek almak için lütfen 1-800-865-2112 numaralı telefondan müşteri hizmetlerini arayınız.
UYARI
POR - Antes de instalar, certique-se de que a superfície de apoio suporta a carga combinado do equipamento
e das ferragens. Os parafusos devem ser bem apertados. Não aperte demasiado os parafusos, pois podem
ocorrer danos ou falhas do produto. Nunca exceder a Capacidade de carga máxima. Utilize sempre um as-
sistente ou equipamento de elevação mecânica para elevar e posicionar o equipamento em segurança. Este
produto destina-se a utilização exclusivamente em zonas interiores. A utilização deste produto em espaços
exteriores poderá conduzir à falha do produto ou ferimentos pessoais. Atenção para não prender os dedos ao
utilizar o suporte. Para obter assistência, contacte a equipa de apoio ao cliente através do número 1-800-865-
2112.
AVISO
ITL - Prima di iniziare l’installazione, accertarsi che la supercie di supporto sia in grado di sorreggere il carico
combinato unità/dispositivi di ssaggio. Le viti devono essere strette in maniera ben salda. Non serrare le viti
oltre il necessario, altrimenti si rischiano danni o guasti al prodotto. Non superare mai la capacità massima di
carico. Per sollevare e posizionare senza rischi il prodotto, farsi aiutare da un’altra persona o usare un’unità
meccanica di sollevamento. Questo prodotto è indicato esclusivamente per uso all’interno. L’uso di questo
prodotto all’esterno potrebbe causare il malfunzionamento del prodotto o danni sici alla persona. Fare
attenzione a non schiacciarsi le dita durante l’uso del sostegno. Per assistenza, chiamare il servizio clienti al
numero 1-800-865-2112.
AVVERTENZA

42018-08-01 #:126-9221-2 (2018-10-16)
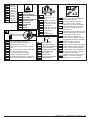
Symbols
Símbolos
Symboles
Symbole
Symbolen
Simboli
Symboly
Symboly
Símbolos
Semboller
ENG
ESP
FRN
DEU
NEL
ITL
ČEŠ
SLK
POR
TÜR
WARNING
ADVERTENCIA
ADVERTISSEMENT
ACHTUNG
WAARSCHUWING
AVVERTENZA
VÝSTRAHA
VÝSTRAHA
AVISO
UYARI
ENG
ESP
FRN
DEU
NEL
ITL
ČEŠ
SLK
POR
TÜR
#
Skip to step.
Continúe con el
paso.
Passez à l’étape.
Weiter mit Schritt.
Ga door naar stap.
Vai al passo.
Přeskočte na krok.
Preskočte na krok.
Saltar para o
passo.
Su adıma geç.
ENG
ESP
FRN
DEU
NEL
ITL
ČEŠ
SLK
POR
TÜR
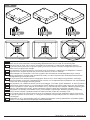
x3
Screws must get at least three
full turns and t snug.
Los tornillos tienen que dar,
por lo menos, tres vueltas
completas y quedar ajustados.
Il faut effectuer au moins trois
tours de vis complets et bien
serrer les vis.
Schrauben sind mindestens drei
volle Umdrehungen einzudrehen
und müssen fest anliegen.
De schroeven moeten ten
minste drie hele slagen worden
aangedraaid en stevig vastzitten.
Girare tre volte le viti che
devono risultare aderenti.
Šrouby se musí otočit minimálně
tři plné otáčky a plně dosednout.
Skrutky sa musia otočiť aspoň
tri celé otáčky a tesne dosadnúť.
Os parafusos devem completar,
no mínimo, três voltas
completas e ajustar-se no local.
Vidalar en az üç tam dönüş
yapmalı ve sıkı oturmalıdır.
ENG
ESP
FRN
DEU
NEL
ITL
ČEŠ
SLK
POR
TÜR
Do not overtighten screws.
No apriete de más los tornillos.
Ne pas trop serrer les vis.
Ziehen Sie die Schrauben nicht zu
fest an.
Draai de schroeven niet te strak aan.
Non stringere troppo le viti.
Šrouby neutahujte příliš silně.
Skrutky neuťahujte príliš silno.
Não apertar demasiado os parafusos.
Vidaları gereğinden fazla sıkmayın.
ENG
ESP
FRN
DEU
NEL
ITL
ČEŠ
SLK
POR
TÜR
Front of mount
Frente de montaje
Avant de la montagne
Vor der Montage
Voorkant van de berg
Fronte del monte
Přední hoře
Predné vrchu
Frente de montagem
Montaj önünde
ENG
ESP
FRN
DEU
NEL
ITL
ČEŠ
SLK
POR
TÜR
F

52018-08-01 #:126-9221-2 (2018-10-16)
1
2
ENG
ESP
FRN
DEU
NEL
ITL
ČEŠ
SLK
POR
TÜR
To properly tighten screws: Tighten until screw
head makes contact, then tighten another 1/2
turn. Do not overtighten screws.
Apriete adecuado de los tornillos: Apriete hasta
que la cabeza del tornillo haga contacto y luego
apriete otra 1/2 vuelta. No apriete de más los
tornillos.
Pour bien serrer les vis : Serrez jusqu’à ce que
la tête de la vis entre en contact, puis serrez
encore d’un 1/2 tour. Ne serrez pas trop les vis.
Korrektes Festziehen der Schrauben: Ziehen
Sie die Schrauben fest, bis der Schraubenkopf
Kontakt hat, und dann um eine weitere 1/2
Umdrehung. Ziehen Sie die Schrauben nicht
zu fest an.
Ga als volgt te werk om de schroeven naar
behoren aan te draaien: Draai de schroef aan
totdat de kop het oppervlak raakt; maak daarna
nog een halve slag. Draai de schroeven niet te
strak aan.
Per stringere correttamente le viti: stringere no
a quando la testa della vite fa contatto, quindi
stringere di un altro 1/2 giro. Non stringere
eccessivamente.
Správné utažení šroubů: Utahujte, dokud se
šroub nedostane do kontaktu, poté utáhněte
ještě půl otočky. Šrouby neutahujte příliš silně.
Správne utiahnutie skrutiek: Uťahujte, kým sa
skrutka nedostane do kontaktu, potom utiahnite
ešte pol otočky. Skrutky neuťahujte príliš silno.
Para apertar correctamente os parafusos:
aperte até que a cabeça do parafuso
estabeleça contacto e, em seguida, aperte mais
1/2 volta. Não aperte demasiado os parafusos.
Vidaları doğru bir şekilde sıkılamak için: Vida
başı temas edene kadar döndürün, sonra yarım
tur daha döndürün. Vidaları gereğinden fazla
sıkılamayın.
+1/2
4
3
Tools Needed for Assembly.
Herramientas necesarias para el ensamblaje.
Outils nécessaires au montage.
Für den Zusammenbau erforderliche Werkzeuge.
Voor montage benodigd gereedschap.
Attrezzi necessari per l’assemblaggio.
Nástroje potřebné k montáži.
Nástroje potrebné na montáž.
Ferramentas necessárias para a montagem.
Montaj İçin Gerekli Aletler.
ENG
ESP
FRN
DEU
NEL
ITL
ČEŠ
SLK
POR
TÜR
5/16"
(8mm)
5/16"
(8mm)

62018-08-01 #:126-9221-2 (2018-10-16)
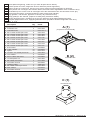
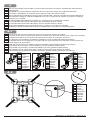
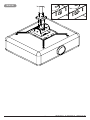
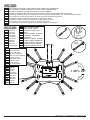
Parts (Before beginning, make sure you have all parts shown below).
Piezas (antes de iniciar, asegúrese de tener todas las piezas siguientes).
Pièces (avant de commencer, assurez-vous d’avoir toutes les pièces illustrées ci-dessous).
Teile (Achten Sie vor Beginn der Arbeiten darauf, dass alle unten abgebildeten Teile vorhanden sind).
Onderdelen (hoort u zich ervan te overtuigen dat u alle onderdelen hebt, die hieronder te zien zijn).
Parti (prima di iniziare, accertarsi di disporre tutte le parti sotto indicate).
Díly (předtím, než začnete, připravte si všechny díly zobrazené níže).
Diely (predtým, ako začnete, pripravte si všetky diely zobrazené nižšie).
Peças (antes de iniciar, certique-se de que tem todas as peças apresentadas em baixo).
Parçalar (Başlamadan önce, aşağıda gösterilen bütün parçaların elinizde olduğundan emin olun).
ENG
ESP
FRN
DEU
NEL
ITL
ČEŠ
SLK
POR
TÜR
A (1)
projector mount assembly
C (1)
connection box
B (2)
extension arm
Parts List Part #Description Qty
Aprojector mount assembly 1 056-1417-1
Bextension arm 2 056-1406
Cconnection box 1 056-1411-1
DM4 x 12mm socket pin screw 6 520-1079
EM4 x 25mm socket pin screw 6 520-1082
FM5 x 12mm socket pin screw 6 520-1064
GM5 x 25mm socket pin screw 6 520-1122
HM6 x 12mm socket pin screw 6 520-1050
IM6 x 25mm socket pin screw 6 520-1211
JM8 x 12mm socket pin screw 6 520-1724
KM8 x 25mm socket pin screw 6 520-1101
L#10 washer 6 540-9400
M11/32" washer 12 540-9406
Nspacer 12 600-1215
O1/4-20 x 1/2" socket pin screw 2 520-1054
P1/4" washer 2 540-9440
QM10 x 10mm set screw 2 520-0850
R1/4-20 square nut 2530-1050
SM6 x 8mm hex screw 4 521-1038
T4mm allen wrench 1 560-9646
Uretaining collar 1 1800-375
VM5 x 8mm socket pin screw 2 520-1062
Wber washer 1540-9432
X5mm allen wrench 1 560-9640

72018-08-01 #:126-9221-2 (2018-10-16)
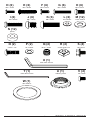
R (2)
1/4-20 square nut
S (4)
M6 x 8mm
Q (2)
M10 x 10mm
D (6)
M4 x 12mm
G (6)
M5 x 25mm
J (6)
M8 x 12mm
L (6)
#10 washer
M (12)
11/32" washer
K (6)
M8 x 25mm
E (6)
M4 x 25mm
F (6)
M5 x 12mm
I (6)
M6 x 25mm
H (6)
M6 x 12mm
N (12)
spacer
O (2)
1/4-20 x 1/2"
P (2)
1/4" washer
V (2)
M5 x 8mm
U (1)
retaining collar
T (1)
4mm allen wrench
X (1)
5mm allen wrench
W (1)
ber washer

82018-08-01 #:126-9221-2 (2018-10-16)
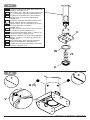
1-1
1-2
x5
ENG
ESP
FRN
DEU
NEL
ITL
ČEŠ
SLK
POR
TÜR
UL listed Peerless model AEC, EXT series sold
separately; (800)865-2112.
Serie modelo AEC, EXT de Peerless clasicado
por UL vendido por separado; (800)865-2112.
Les gammes du modèle AEC, EXT Peerless
homologué UL sont vendues séparément;
(800)865-2112.
UL-gelistete Peerless-Modellserien AEC, EXT
werden separat verkauft; (800)865-2112.
Peerless model met UL-vermelding uit de AEC,
EXT serie apart aan te schaffen;
(800)865-2112.
Il modello Peerless serie AEC, EXT omologato
UL è venduto a parte (800)865-2112.
Model Peerless řada AEC, EXT s certikací UL
je prodáván zvlášť; (800)865-2112.
Jedinečný modelový rad AEC, EXT predávaný
osobitne, uvedený v zozname spoločnosti UL;
(800)865-2112.
Série modelo AEC, EXT Peerless listada UL,
vendida separadamente; (800)865-2112.
UL listelenmiş Peerless model AEC, EXT serisi
ayrı satılır; (800)865-2112.
U
Q (2)
W
C
V
T
X

92018-08-01 #:126-9221-2 (2018-10-16)
2
2a 3-12b
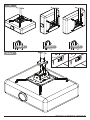
If projector does not have at least three mounting holes, do not use this adaptor. Some projectors have feet
which can be removed and the corresponding threaded insert can be used as a mounting hole.
Si el proyector no tiene, por lo menos, tres agujeros de montaje, no utilice este adaptador. Algunos
proyectores tienen patas que se pueden quitar y entonces el inserto roscado correspondiente se puede
utilizar como un agujero de montaje.
Si le projecteur ne comporte pas au moins trois trous de montage, n'utilisez pas cet adaptateur. Certains
projecteurs sont équipés de pieds qui peuvent être enlevés, et le trou taraudé.
Diesen Adapter nur verwenden, wenn der Projektor über mindestens drei Montagebohrungen verfügt.
Manche Projektoren verfügen über abnehmbare Füße, und der entsprechende Gewindeeinsatz kann als
Montagebohrung verwendet werden.
Als de projector niet minstens drie montagegaten heeft, moet u deze adapter niet gebruiken. Sommige
projectors hebben voeten die verwijderd kunnen worden, en de bijbehorende inzetstukken met schroefdraad
kunnen dan als montagegat worden gebruikt.
Se il proiettore non è dotato di almeno tre fori di montaggio, non usare questo adattatore. In alcuni proiettori i
piedi possono essere rimossi, e il corrispondente inserto lettato può essere usato come foro di montaggio.
Pokud na projektoru nejsou alespoň tři montážní otvory, nepoužívejte tento adaptér. Některé projektory jsou
vybaveny odnímatelnými nohami, přičemž příslušné závitové vložky lze použít jako montážní otvory.
Ak projektor nemá aspoň tri montážne otvory, tento adaptér nepoužívajte. Niektoré projektory majú nohy,
ktoré je možné odobrať a príslušná závitová vložka sa môže použiť ako montážny otvor.
Se o projector não tiver pelo menos três furos de montagem, não use este adaptador. Alguns projectores
têm pés que podem ser removidos, e a inserção rosqueada correspondente pode ser usada como um furo
de montagem.
Projektörde en az üç montaj deliği yoksa, bu adaptörü kullanmayın. Bazı projektörlerde çıkarılabilir ayaklar
bulunur ve onun dişli ankrajı montaj deliği olarak kullanılabilir.
ENG
ESP
FRN
DEU
NEL
ITL
ČEŠ
SLK
POR
TÜR

10 2018-08-01 #:126-9221-2 (2018-10-16)
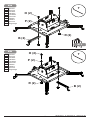
2a
2b
P (2)
B (2)
O (2)
R (2)
P (2)
O (2)
B (2)
R (2)
3-1
T
T
Optional.
Opcional.
Facultatif.
Fakultativ.
Facultatief.
Opzionale.
Volitelné.
Voliteľné.
Opcional.
İsteğe bağli.
ENG
ESP
FRN
DEU
NEL
ITL
ČEŠ
SLK
POR
TÜR
Optional.
Opcional.
Facultatif.
Fakultativ.
Facultatief.
Opzionale.
Volitelné.
Voliteľné.
Opcional.
İsteğe bağli.
ENG
ESP
FRN
DEU
NEL
ITL
ČEŠ
SLK
POR
TÜR

11 2018-08-01 #:126-9221-2 (2018-10-16)
3-1
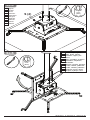
Position feet of adaptor bracket over mounting holes.
Coloque las patas del soporte adaptador sobre los agujeros de montaje.
Placez les pattes du support adaptateur sur les trous de xation.
Positionieren Sie die Füße der Adapterhalterung über den Montagelöchern.
Breng de voetjes van de adapterbeugel op de montagegaten aan.
Collocare i piedi della staffa adattatore sui fori di supporto.
Nastavte nohy držáku adaptéru nad montážní otvory.
Nastavte nohy držiaka adaptéra nad montážne otvory.
Posicione os pés do suporte adaptador sobre os orifícios de montagem.
Adaptör braketinin ayaklarını montaj delikleri üzerine yerleştirin.
ENG
ESP
FRN
DEU
NEL
ITL
ČEŠ
SLK
POR
TÜR
F
Note orientation.
Fíjese en la orientación.
Observez l’orientation.
Beachten Sie die Ausrichtung.
Let op de oriëntatie.
Notare l’orientamento.
Povšimněte si orientace.
Dávajte pozor na orientáciu.
Note a orientação.
Yönüne dikkat edin.
ENG
ESP
FRN
DEU
NEL
ITL
ČEŠ
SLK
POR
TÜR

12 2018-08-01 #:126-9221-2 (2018-10-16)
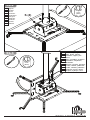
Tighten all screws while keeping center of
gravity.
Apriete todos los tornillos, sin cambiar el centro
de gravedad.
Serrez toutes les vis, tout en maintenant le
centre de gravité.
Ziehen Sie unter Beibehaltung des
Schwerpunkts alle Schrauben an.
Draai alle schroeven aan terwijl u het
zwaartepunt in stand houdt.
Stringere tutte le viti mantenendo il centro di
gravità.
Utáhněte všechny šrouby při zachování těžiště.
Utiahnite všetky skrutky pri zachovaní ťažiska.
Aperte todos os parafusos mantendo o centro
de gravidade.
Ağırlık merkezi koruyarak tüm vidaları sıkın.
ENG
ESP
FRN
DEU
NEL
ITL
ČEŠ
SLK
POR
TÜR
x3
J H,JD,F
ML ML
I,KE,G
N N
3-2 T
ENG
ESP
FRN
DEU
NEL
ITL
ČEŠ
SLK
POR
TÜR
Use of spacers is optional.
Uso de espaciadores opcional.
Facultatif utilisation d’entretoises.
Fakultativ Verwendung von Abstandhaltern.
Facultatief gebruik van tussenringen.
Uso opzionale di distanziatori.
Volitelné použití rozpěr.
Voliteľné použitie rozpierok.
Opcional utilize espaçadores.
Ayırıcıların ísteğe bağli kullanımı.

13 2018-08-01 #:126-9221-2 (2018-10-16)
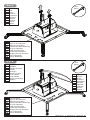
4-1
4
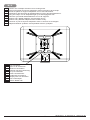
Feet of channels are used to raise the mount off the projector surface as needed.
Las patas de los rieles se utilizan para separar el soporte de la supercie del proyector, según sea necesario.
Les pattes des rails servent à soulever le support de la surface du projecteur au besoin.
Die Halterung wird mithilfe der Prolfüße nach Bedarf von der Projektoroberäche angehoben.
De afstand tussen de bevestiging en het oppervlak van de projector kan naar behoefte worden gevarieerd
met de voetjes van de kanalen.
I piedi dei canali servono per alzare secondo necessità il supporto dalla supercie del proiettore.
Nohy kanálů se používají ke zvednutí držáku z povrchu projektoru podle potřeby.
Nohy kanálov sa používajú na zdvihnutie držiaka z povrchu projektora podľa potreby.
São utilizados pés de canais para subir a superfície do projetor tanto quanto necessário.
Kanal ayakları montaj aparatını projektör yüzeyinden gereken şekilde yükseltmek için kullanılır.
TÜR
ENG
ESP
FRN
DEU
NEL
ITL
ČEŠ
SLK
POR
It is the responsibility of the installer to ensure that the projector is properly ventilated per manufacturer's
requirements.
El instalador es responsable de asegurarse de que el proyector tenga una ventilación adecuada.
Il incombe à l'installateur de s'assurer que le projecteur est correctement ventilé.
Die für die Montage zuständige Person ist dafür verantwortlich, dass der Projektor ausreichend belüftet ist.
De installateur draagt de verantwoordelijkheid om ervoor te zorgen dat er rondom de projector voldoende
ruimte is voor ventilatie.
È responsabilità dell'installatore accertarsi che il proiettore sia correttamente ventilato.
Je na zodpovědnosti montéra zabezpečit, aby byl projektor správně větraný.
Je na zodpovednosti montéra zabezpečiť, aby bol projektor správne vetraný.
É da responsabilidade do montador garantir que o projetor é corretamente ventilado.
Projektörün düzgün havalandırılmış olmasını sağlamak kurulumu yapanın sorumluluğundadır.
ENG
ESP
FRN
DEU
NEL
ITL
ČEŠ
SLK
POR
TÜR
4-2
Loosen.
Aoje.
Desserrez.
Lösen.
Losdraaien.
Allentare.
Uvolnit.
Uvoľniť.
Desaperte.
Gevşetin.
ENG
ESP
FRN
DEU
NEL
ITL
ČEŠ
SLK
POR
TÜR
Tighten.
Apretar.
Serrer.
Anziehen.
Aandraaien.
Stringere.
Utáhněte.
Utiahnite.
Apertar.
Sıkmak.
ENG
ESP
FRN
DEU
NEL
ITL
ČEŠ
SLK
POR
TÜR
Adjust.
Ajuste.
Réglez
Einstellen
Aanpassen
Regolare
Nastavit
Nastaviť
Ajuste
Ayarlayın
ENG
ESP
FRN
DEU
NEL
ITL
ČEŠ
SLK
POR
TÜR
Tighten.
Apretar.
Serrer.
Anziehen.
Aandraaien.
Stringere.
Utáhněte.
Utiahnite.
Apertar.
Sıkmak.
ENG
ESP
FRN
DEU
NEL
ITL
ČEŠ
SLK
POR
TÜR
T

14 2018-08-01 #:126-9221-2 (2018-10-16)
5a-1
5
5b-1 5c-15a-1

15 2018-08-01 #:126-9221-2 (2018-10-16)
5a-2
5b-1
S (4) 5/16"
(8mm)
6
Tighten.
Apretar.
Serrer.
Anziehen.
Aandraaien.
Stringere.
Utáhněte.
Utiahnite.
Apertar.
Sıkmak.
ENG
ESP
FRN
DEU
NEL
ITL
ČEŠ
SLK
POR
TÜR

16 2018-08-01 #:126-9221-2 (2018-10-16)
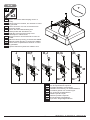
5b-2
S (4)
5/16"
(8mm)
5/16"
(8mm)
5b-3 Loosen, adjust, tighten.
Aoje, ajuste, apriete.
Desserrez, réglez, puis
serrez.
Lösen, einstellen, anziehen.
Losdraaien, aanpassen,
aandraaien.
Allentare, regolare, stringere.
Uvolnit, nastavit, přitáhnout.
Uvoľniť, nastaviť, pritiahnuť.
Desaperte, ajuste, aperte.
Gevşetin, ayarlayın, sıkın.
ENG
ESP
FRN
DEU
NEL
ITL
ČEŠ
SLK
POR
TÜR
6
Tighten.
Apretar.
Serrer.
Anziehen.
Aandraaien.
Stringere.
Utáhněte.
Utiahnite.
Apertar.
Sıkmak.
ENG
ESP
FRN
DEU
NEL
ITL
ČEŠ
SLK
POR
TÜR

17 2018-08-01 #:126-9221-2 (2018-10-16)
5c-1
5c-2
Note orientation.
Fíjese en la orientación.
Observez l’orientation.
Beachten Sie die Ausrichtung.
Let op de oriëntatie.
Notare l’orientamento.
Povšimněte si orientace.
Dávajte pozor na orientáciu.
Note a orientação.
Yönüne dikkat edin.
ENG
ESP
FRN
DEU
NEL
ITL
ČEŠ
SLK
POR
TÜR
Note orientation.
Fíjese en la orientación.
Observez l’orientation.
Beachten Sie die Ausrichtung.
Let op de oriëntatie.
Notare l’orientamento.
Povšimněte si orientace.
Dávajte pozor na orientáciu.
Note a orientação.
Yönüne dikkat edin.
ENG
ESP
FRN
DEU
NEL
ITL
ČEŠ
SLK
POR
TÜR
5/16"
(8mm)
5/16"
(8mm)
Replace
Remplace
Remettez en place
Ersetzen
Vervangen
Rimettere a posto
Znova nasadit
Znova nasadiť
Coloque novamente
Değiştirin
ENG
ESP
FRN
DEU
NEL
ITL
ČEŠ
SLK
POR
TÜR
Remove.
quite.
retirez.
entfernen.
verwijderen.
rimuovere.
odstranit.
odstrániť.
remova.
çıkartın.
ENG
ESP
FRN
DEU
NEL
ITL
ČEŠ
SLK
POR
TÜR
Tighten.
Apretar.
Serrer.
Anziehen.
Aandraaien.
Stringere.
Utáhněte.
Utiahnite.
Apertar.
Sıkmak.
ENG
ESP
FRN
DEU
NEL
ITL
ČEŠ
SLK
POR
TÜR

18 2018-08-01 #:126-9221-2 (2018-10-16)
5c-3

19 2018-08-01 #:126-9221-2 (2018-10-16)
5c-4
S (4) 5/16"
(8mm)
5/16"
(8mm)
5c-5 Loosen, adjust, tighten.
Aoje, ajuste, apriete.
Desserrez, réglez, puis
serrez.
Lösen, einstellen, anziehen.
Losdraaien, aanpassen,
aandraaien.
Allentare, regolare, stringere.
Uvolnit, nastavit, přitáhnout.
Uvoľniť, nastaviť, pritiahnuť.
Desaperte, ajuste, aperte.
Gevşetin, ayarlayın, sıkın.
ENG
ESP
FRN
DEU
NEL
ITL
ČEŠ
SLK
POR
TÜR
Tighten.
Apretar.
Serrer.
Anziehen.
Aandraaien.
Stringere.
Utáhněte.
Utiahnite.
Apertar.
Sıkmak.
ENG
ESP
FRN
DEU
NEL
ITL
ČEŠ
SLK
POR
TÜR

20 2018-08-01 #:126-9221-2 (2018-10-16)
6-1 Loosen, adjust, tighten.
Aoje, ajuste, apriete.
Desserrez, réglez, puis
serrez.
Lösen, einstellen, anziehen.
Losdraaien, aanpassen,
aandraaien.
Allentare, regolare, stringere.
Uvolnit, nastavit, přitáhnout.
Uvoľniť, nastaviť, pritiahnuť.
Desaperte, ajuste, aperte.
Gevşetin, ayarlayın, sıkın.
ENG
ESP
FRN
DEU
NEL
ITL
ČEŠ
SLK
POR
TÜR
Optional.
Opcional.
Facultatif.
Fakultativ.
Facultatief.
Opzionale.
Volitelné.
Voliteľné.
Opcional.
İsteğe bağli.
ENG
ESP
FRN
DEU
NEL
ITL
ČEŠ
SLK
POR
TÜR
+ 20°/- 20°
5/16"
(8mm)
Note: Support the weight of the projector when making any adjustments.
Nota: El soporte el peso del proyector cuando hacer cualquier ajuste.
Remarque: supporter le poids du projecteur lors des réglages.
Hinweis: Unterstützen Sie das Gewicht des Projektors, wenn Sie Einstellungen vornehmen.
Opmerking: Ondersteuning van het gewicht van de projector bij het maken van eventuele aanpassingen.
Nota: Sostenere il peso del proiettore quando effettuare qualsiasi regolazione.
Poznámka: Podpora hmotnost projektoru při jakýchkoliv úprav.
Poznámka: Podpora hmotnosť projektora pri akýchkoľvek úprav.
Nota: Apoiar o peso do projetor ao fazer quaisquer ajustes.
Not: Herhangi bir ayarlama yaparken projektörün ağırlığını destekleyin.
ENG
ESP
FRN
DEU
NEL
ITL
ČEŠ
SLK
POR
TÜR
6
5/16"
(8mm)
Hand tighten.
Apriete a mano.
Serrer à la main.
Handfest anziehen.
Draai met de hand aan.
Serrare a mano.
Dotáhněte rukou.
Utiahnite rukou.
Aperte à mão.
Elle sıkıştırılabilir.
ENG
ESP
FRN
DEU
NEL
ITL
ČEŠ
SLK
POR
TÜR
ENG
ESP
FRN
DEU
NEL
ITL
ČEŠ
SLK
POR
TÜR
Tighten.
Apretar.
Serrer.
Anziehen.
Aandraaien.
Stringere.
Utáhněte.
Utiahnite.
Apertar.
Sıkmak.
La page est en cours de chargement...
La page est en cours de chargement...
La page est en cours de chargement...
La page est en cours de chargement...
-
 1
1
-
 2
2
-
 3
3
-
 4
4
-
 5
5
-
 6
6
-
 7
7
-
 8
8
-
 9
9
-
 10
10
-
 11
11
-
 12
12
-
 13
13
-
 14
14
-
 15
15
-
 16
16
-
 17
17
-
 18
18
-
 19
19
-
 20
20
-
 21
21
-
 22
22
-
 23
23
-
 24
24


Peerless PJR125-POR Guide d'installation
- Catégorie
- Supports de projecteur
- Taper
- Guide d'installation
dans d''autres langues
- italiano: Peerless PJR125-POR Guida d'installazione
- español: Peerless PJR125-POR Guía de instalación
- Deutsch: Peerless PJR125-POR Installationsanleitung
- Nederlands: Peerless PJR125-POR Installatie gids
- português: Peerless PJR125-POR Guia de instalação
- slovenčina: Peerless PJR125-POR Návod na inštaláciu
- Türkçe: Peerless PJR125-POR Yükleme Rehberi
Documents connexes
-
PEERLESS-AV PRG-UNV Guide d'installation
-
Peerless PRSS-UNV Manuel utilisateur
-
-
-
-
-
-
-
-