
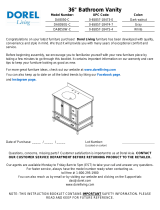
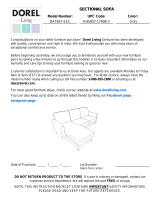
Model Number: UPC Code: Color:
DL039SEC-BG
0-65857-19747-1
Beige
DL039SEC-GR
0-65857-19748-8 Gray
DL039SEC-TE 0-65857-19746-4 Teal
Date of Purchase: _____ / _____ / _____ Lot Number:
(Located on carton)
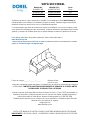
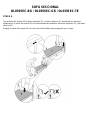
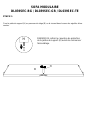
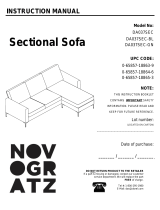
Sectional Sofa
For more great furniture ideas, check out our website at www.dorelliving.com
You can also keep up to date on all the latest trends by liking our Facebook page
and Instagram page.
NOTE: THIS INSTRUCTION BOOKLET CONTAINS IMPORTANT SAFETY
INFORMATION. PLEASE READ AND KEEP FOR FUTURE REFERENCE.
Congratulations on your latest furniture purchase! Dorel Living furniture has been
developed with quality, convenience and style in mind. We trust it will provide you with
many years of exceptional comfort and service.
Before beginning assembly, we encourage you to familiarize yourself with your new
furniture piece by taking a few minutes to go through this booklet. It contains important
information on our warranty and care tips to keep your furniture looking as good as new.
Questions, concerns, missing parts? Customer satisfaction is important to us at Dorel Asia.
CONTACT OUR CUSTOMER SERVICE DEPARTMENT BEFORE RETURNING
PRODUCT TO THE RETAILER.
Our agents are available Monday to Friday 8am to 5pm (EST) to take your call and answer any
questions. For faster service, always have the model number ready when contacting us.
toll free #: 1-800-295-1980
You can also reach us by email or by visiting our website and clicking on the Support tab:
www.dorelliving.com

* CAUTION: Adult assembly required.
* Estimated assembly time: 15 minutes.
1-YEAR LIMITED WARRANTY
WARNING: Should this product become damaged, and/or components are
broken or missing, DO NOT USE.
Dust regularly with a soft, dry cloth to prevent soil build up. Keep away from heat to avoid glazing, melting or
scorching. Use a professional cleaning service to clean the fabric.
Dorel warrants its product to be free from defects in material and workmanship and agrees to remedy any such defect.
This warranty covers 1 year from the date of original purchase from authorized retailers. This warranty is valid only
upon presentation of proof of purchase. This is solely limited to the repair or replacement of defective furniture
components and no assembly labor is included. This warranty does not apply to any product which has been
improperly assembled, subjected to misuse or abuse or which has been altered or repaired in any way. The warranty
does not cover wearing, tearing, fading or splitting of the fabric (where applicable). This warranty gives you specific
legal rights and you may also have other rights which vary from State to State or Province to Province.
* Assemble on a soft, smooth surface to prevent damage to the product finish.
* Read all instructions completely before assembly.
* DO NOT use power tools.
* The cushions have been vacuum packed for transportation purposes. After unpacking, please allow up to 72 hours
so that they can return to their original shape.
CARE, CLEANING AND MAINTENANCE
Canada, H1G 3L1
NOTES
* Ensure all parts and components are present before beginning assembly.
* Assembly and handling will require two people.
CUSTOMER SERVICE
You can also contact us by writing to the address listed below. Please include the product model number, color and a
detailed description of your enquiry.
Dorel Living - Customer Service Department
12345 Albert-Hudon Boulevard, Suite 100
Montreal, Quebec

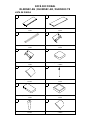
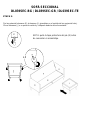
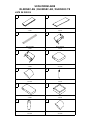
PARTS LIST
A B
C D
E F
G H
I J
K L
OTTOMAN FOOT
PILLOW
4 PCS
2 PCS
LONG SEAT CUSHION
OTTOMAN
1 PC
1 PC
BACK CUSHION
SUPPORT LEG
4 PCS
1 PC
1 PC
2 PCS
1 PC
1 PC
RIGHT ARM
SEAT CUSHION
1 PC
1 PC
FRONT RAIL
LEFT ARM
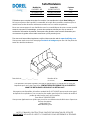
SECTIONAL SOFA
DL039SEC-BG / DL039SEC-GR / DL039SEC-TE
BACK
SEAT PANEL

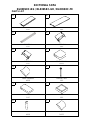
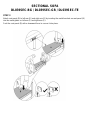
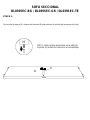
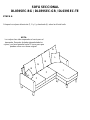
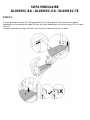
STEP 1
SECTIONAL SOFA
DL039SEC-BG / DL039SEC-GR / DL039SEC-TE
Place all parts on a clean, smooth surface.
Attach front rail (C) to right arm (E) and left arm (D) by inserting the brackets on front rail (C) into the
metal plate on left and right arms (D & E) as shown below.
Push the front rail (C) with a downward force to secure it into place.

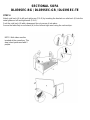
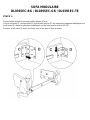
STEP 2
SECTIONAL SOFA
DL039SEC-BG / DL039SEC-GR / DL039SEC-TE
Attach support leg ( H ) to seat panel (B) by rotating clockwise.
NOTE: remove the protective cap on support leg
(H)
before beginning assembly.
H
B
H
Back

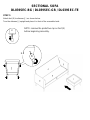
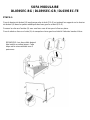
STEP 3
SECTIONAL SOFA
DL039SEC-BG / DL039SEC-GR / DL039SEC-TE
Attach seat panel (B) to left arm (D) and right arm (E) by inserting the metal brackets on seat panel (B)
into the metal glides on left arm (D) and right arm (E).
Push the seat panel (B) with a downward force to secure it into place.

STEP 4
SECTIONAL SOFA
DL039SEC-BG / DL039SEC-GR / DL039SEC-TE
Attach sofa back (A) to left and right arms (D & E) by inserting the brackets on sofa back (A) into the
metal glides on left and right arms (D & E).
Push the sofa back (A) with a downward force to secure it into place.
Secure the fabric flap on sofa back (A) to the left and right arms using the velcro strips.
NOTE: Both sides must be
inser
ted at the same time. This
step is best performed with 2
people.

SECTIONAL SOFA
DL039SEC-BG / DL039SEC-GR / DL039SEC-TE
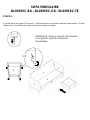
STEP 5
Attach foot (K) to ottoman (J) as shown below.
Turn the ottoman (J) upright and place it in front of the assembled sofa.
NOTE: remove the protective cap on foot (K)
before
beginning assembly.
K
J
K
x 4

SECTIONAL SOFA
DL039SEC-BG / DL039SEC-GR / DL039SEC-TE
STEP 6
Place the cushion (F , G & I) and pillow (L) onto the sofa.
NOTE:The cushions have been vacuum
packed for transportation purposes. After
unpacking, please allow up to 72 hours so
that they can return to their original shape.
F
F
I
G
G
G
G
L
L

Dust regularly with a soft, dry cloth to
prevent soil build up. Keep away from
heat to avoid glazing, melting or
scorching. Use a professional
cleaning service to clean the fabric.
That's it! You've finished assembling your sofa.
SECTIONAL SOFA
DL039SEC-BG / DL039SEC-GR / DL039SEC-TE
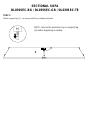
CAUTION: This unit is intended for use only with the products
and/or maximum weights indicated. Use with other products and/or
products heavier than the maximum weights indicated may result in
instability or cause possible injury.
DO NOT RETURN PRODUCT TO THE RETAILER.
If a part is missing or damaged, contact our customer service department.
We will replace the part FREE of charge.
Tel #: 1-800-295-1980
E-Mail: das@dorel.com
Fax #: 514-353-7819
NEED HELP!
CALL US FOR ASSISTANCE
1-800-295-1980
DO NOT RETURN PRODUCT TO STORE
E-MAIL:[email protected]
Recommended Maximum Weight =
225 lbs. per position

Modelo No: CODIGO UPC: Color:
DL039SEC-BG
0-65857-19747-1
Beige
DL039SEC-GR
0-65857-19748-8 Gris
DL039SEC-TE 0-65857-19746-4 Teal
Fecha de compra: _____ / _____ / _____ Número de lote:
(tomado del cartón)
NOTA: ESTE MANUAL DE INSTRUCCIONES CONTIENE INFORMACIÓN DE SEGURIDAD
IMPORTANTE. POR FAVOR, LÉALO Y CONSÉRVELO PARA CONSULTARLO EN EL FUTURO.
SOFÁ SECCIONAL
¡Felicitaciones por su nueva compra de un mueble! Los muebles de la línea Dorel Living han
sido diseñados con la calidad, la comodidad y el estilo en mente. Estamos seguros de que este
mueble le servirá por muchos años con su comodidad excepcional.
Le recomendamos que antes de comenzar a armarlo se familiarice con su nueva compra y tome
unos minutos de su tiempo para leer este manual. Contiene información importante sobre nuestra
garantía y consejos de cuidados para que su mueble siempre conserve su apariencia de nuevo.
Para obtener más ideas de muebles inspirantes, visite nuestro sitio web en
www.dorelliving.com
También puede mantenerse informado de todas las últimas tendencias suscribiéndose a nuestra
página en Facebook page e Instagram page.
Preguntas, inquietudes, partes que faltan? La satisfacción del cliente es importante para nosotros
en Dorel Asia. CONTACTE NUESTRO DEPARTAMENTO DE SERVICIO AL CLIENTE ANTES
DE DEVOLVER EL PRODUCTO A LA TIENDA.
Nuestros agentes están disponibles de lunes a viernes de 8 a.m. a 5 p.m. (EST) para atender su
llamada y responder a cualquier pregunta. Para un servicio más rápido, siempre tenga listo el
número de modelo al contactarnos. Nuestro número gratuito es: 1-800-295-1980
También puede comunicarse con nosotros por correo electrónico o visitando nuestro sitio web
haciendo clic en los enlaces de soporte:
www.dorelliving.com

*
Asegúrese de tener todas las piezas y componentes antes de comenzar a armarla.
*
Ármela sobre superficies blandas para evitar dañar el pulido del producto.
*
No utilice la unidad si se daña o está rota.
*
NO use herramientas eléctricas.
*
*
Pueden necesitarse dos personas para armarla.
*
Tiempo estimado para armarla: 15 minutos
SERVICIO AL CLIENTE
También puede contactarnos escribiendo a la dirección que figura a continuación. Por favor incluya el número de
modelo del producto, el color y una descripción detallada de su pregunta.
Dorel Living - Customer Service Department
12345 Albert-Hudon Boulevard, Suite 100
Montreal, Quebec
Los cojines han sido empacados al vacío para el transporte. Después de haber desembalado los cojines, por
favor permita hasta 72 horas para que puedan volver a su forma original.
Canada, H1G 3L1
NOTAS E INSTALACIÓN
PRECAUCIÓN: Debe ser armada por un adulto.
Revise todos los pernos, tornillos y sujetadores periódicamente y apriételos si es necesario.
GARANTÍA LIMITADA DE 1 AÑO
ADVERTENCIA: Si este producto está dañado y/o ciertas piezas faltan o
están rotas, NO LO USE.
Dorel garantiza que este producto está libre de defectos de material y mano de obra y se compromete a remediar
cualquier defecto de este tipo. Esta garantía cubre 1 año a partir de la fecha de compra original. Esta garantía es
válida solamente con presentación de una prueba de compra. Esto se limita a la reparación o reemplazo de
componentes defectuosos del mueble y no se incluye ningún trabajo de ensamblaje. Esta garantía no se aplica a
ningún producto que haya sido mal ensamblado, sujeto a mal uso o abuso, o que haya sido alterado o reparado de
cualquier manera. Cualquier uso, rotura o pérdida de color de la tela no están incluidos en esta garantía (donde
corresponda). Esta garantía le da derechos legales específicas y usted puede también tener otros derechos que
varían de estado a estado o de provincia a provincia.
CUIDADO, LIMPIEZA Y MANTENIMIENTO
Quítele el polvo regularmente con un paño suave y seco, para evitar que la suciedad se acumule. Mantenga
alejado del calor para evitar que se agriete, se funda o se queme. Utilice un servicio de limpieza profesional
para limpiar la tela.

LISTA DE PIEZAS
A B
C D
E F
G H
I J
K L
SOFÁ SECCIONAL
DL039SEC-BG / DL039SEC-GR / DL039SEC-TE
RESPEALDAR DELSOFÁ A DOS PLAZAS
PANEL DEL ASIENTO
1 PZA
1 PZA
RIEL DELANTERO
BRAZO IZQUIERDO
1 PZA
1 PZA
BRAZO DERECHO
COJINES DEL ASIENTO
1 PZA
2 PZAS
COJINES DE RESPALDO
PATA DE APOYO
4 PZAS
1 PZA
PATA DEL OTOMANO
ALMOHADA
4 PZAS
2 PZAS
COJÍN DEL ASIENTO LARGO
OTOMANO
1 PZA
1 PZA

ETAPA 1:
SOFÁ SECCIONAL
DL039SEC-BG / DL039SEC-GR / DL039SEC-TE
Coloque todas las piezas sobre una superficie limpia y lisa.
Una el riel delantero (C) al brazo derecho (E) y al brazo izquierdo (D) insertando los soportes metálicos
en el riel delantero (C) en los deslizamientos metálicos de los brazos izquierdo y derecho (D & E).
Empuje el raíl delantero (C) con una fuerza hacia abajo para asegurarlo en su lugar.

ETAPA 2:
SOFÁ SECCIONAL
DL039SEC-BG / DL039SEC-GR / DL039SEC-TE
Fije la pata de apoyo (H) al panel del asiento (B) girándola en el sentido de las agujas del reloj.
H
NOTA: retire la tapa protectora en la pata de
soporte (H) antes de comenzar el ensamblaje
B
H
Back
atrás

ETAPA 3:
SOFÁ SECCIONAL
DL039SEC-BG / DL039SEC-GR / DL039SEC-TE
Una el panel del asiento (B) al brazo izquierdo (D) y al brazo derecho (E) insertando los soportes
metalicos en el panel del asiento (B) a los deslizamientos metálicos del brazo izquierdo (D) y del brazo
derecho (E).
Empuje el panel del asiento (B) con una fuerza hacia abajo para asegurarlo en su lugar.

ETAPA 4:
SOFÁ SECCIONAL
DL039SEC-BG / DL039SEC-GR / DL039SEC-TE
Fije el respaldar de la silla (A) a los brazos izquierdo y derecho (D & E) insertando los soportes en la
parte posterior de la silla (A) a los deslizadores metálicos de los brazos izquierdo y derecho (D & E).
Empuje el sofá hacia atrás (A) con una fuerza hacia abajo para asegurarlo en su lugar.
Asegure la solapa de tela en el respaldo del sofá (A) a los brazos izquierdo y derecho con las tiras de
velcro
NOTA: Ambos lados deben insertarse al
mismo tiempo. Este paso se realiza mejor
con 2 personas.

ETAPA 5:
SOFÁ SECCIONAL
DL039SEC-BG / DL039SEC-GR / DL039SEC-TE
Fije las patas del otomano (K) al otomano (J) girandolas en el sentido de las agujas del reloj.
Gire el otomano (J) a su posición vertical y colóquelo delante del sofa montado.
NOTA: quite la tapa protectora del pie (K) antes
de comenzar el ensamblaje.
K
J
K
x 4

ETAPA 6:
SOFÁ SECCIONAL
DL039SEC-BG / DL039SEC-GR / DL039SEC-TE
Coloque los cojines del asiento (F, G y I) y almohada (L) sobre la silla del sofa.
NOTA:
Los cojines han sido empacados al vacío para el
transporte. Después de haber desembalado los
cojines, por favor permita hasta 72 horas para que
puedan volver a su forma original.
F
F
I
G
G
G
G
L
L

SOFÁ SECCIONAL
DL039SEC-BG / DL039SEC-GR / DL039SEC-TE
PRECAUCIÓN: Esta unidad está prevista únicamente para ser usada
con los productos y el peso máximo indicados. El usarla con otros productos
más pesados que el peso máximo indicado puede provocar inestabilidad y
causar heridas.
Quítele el polvo regularmente con un
paño suave y seco, para evitar que la
suciedad se acumule. Mantenga
alejado del calor para evitar que se
agriete, se funda o se queme. Utilice
un servicio de limpieza profesional
para limpiar la tela.
¡Listo! Acaba de armar su sofa.
NO DEVUELVA EL PRODUCTO A LA TIENDA.
Si falta una pieza o está dañada, contacte nuestro departamento de
servicio a la clientela. Reemplazaremos la pieza SIN NINGÚN argo.
Tel #: 1-800-295-1980
Correo electrónico: [email protected]
Fax #: 514-353-7819
NEED HELP!
CALL US FOR ASSISTANCE
1-800-295-1980
DO NOT RETURN PRODUCT TO STORE
E-MAIL:[email protected]
Peso máximo recomendado =
225 lbs por cada plaza
La page charge ...
La page charge ...
La page charge ...
La page charge ...
La page charge ...
La page charge ...
La page charge ...
La page charge ...
La page charge ...
La page charge ...
-
 1
1
-
 2
2
-
 3
3
-
 4
4
-
 5
5
-
 6
6
-
 7
7
-
 8
8
-
 9
9
-
 10
10
-
 11
11
-
 12
12
-
 13
13
-
 14
14
-
 15
15
-
 16
16
-
 17
17
-
 18
18
-
 19
19
-
 20
20
-
 21
21
-
 22
22
-
 23
23
-
 24
24
-
 25
25
-
 26
26
-
 27
27
-
 28
28
-
 29
29
-
 30
30


dans d''autres langues
Documents connexes
-
Dorel Living DA010-SF Manuel utilisateur
-
 Dorel Home FA7476-SF Mode d'emploi
-
Dorel Living DA7567LS-A Manuel utilisateur
-
-
 Dorel Home DA7476LS-A Le manuel du propriétaire
-
Dorel Home 0-65857-16919-5 Mode d'emploi
-
-
 Dorel Home DA8050-A Mode d'emploi
-
 Dorel Home FH8050G-C Mode d'emploi
-


Autres documents
-
Dorel Home DA036SEC Manuel utilisateur
-
 Dorel Home Furnishings DA7567SEC-A Le manuel du propriétaire
-
 Novogratz DA037SEC-GN Guide d'installation
-
Dorel Home Ottoman DA037OT-BL Manuel utilisateur
-
Dorel DA7465-SF Assembly Manual
-
Dorel Home DA6164-GR Guide d'installation
-
Simpli Home 3AXC-OTT238 Guide d'installation
-
West Elm Lindrum Scoop 8979650 Assembly Instructions
-
STRUCTUBE KINSEY Assembly Instructions
-
 Dorel Home DA8847G Assembly Manual


