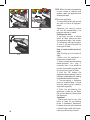
T-Fal GC702D52 Le manuel du propriétaire
- Catégorie
- Fabricants de sandwichs
- Taper
- Le manuel du propriétaire

Instructions for use
Mode d’emploi
Guía del usuario
OPTIGRILL
EN
FR
ES

2
IMPORTANT SAFEGUARDS
Operation, maintenance and product installation: for your safety, please refer to the
different sections of this manual or the corresponding icons.
When using electric appliances, basic safety precautions should always be followed, including
the following:
1. Read all instructions before using.
2. Do not touch hot surfaces. Always use handles or knobs.
3. To protect against electric shock, do not immerse or partially immerse cord, plugs, or
appliance in water or other liquid.
4. Not intended for use by children. Close supervision is necessary when any appliance is used
by or near children.
5. Unplug from outlet when not in use and before cleaning. Allow to cool before putting on
or taking off parts, and before cleaning the appliance.
6. Do not operate the appliance with a damaged cord or plug or after the appliance
malfunctions, or has been damaged in any manner. Return the appliance to the nearest
authorized service facility for examination, repair or adjustment.
7. The use of accessory attachments not recommended by the appliance manufacturer may
cause injuries.
8. Do not use outdoors.
9. Do not let cord hang over the edge of table or counter, or touch hot surfaces.
10. Do not place on or near a hot gas or electric burner, or in a heated oven.
11. Do not use appliance for other than intended use.
12. Extreme caution must be used when moving an appliance containing hot oil or other hot
liquids.
13. Check that the electrical installation is compatible with the wattage and voltage stated on
the bottom of the appliance.
14. CAUTION - To ensure continued protection against risk of electric shock, connect to
properly grounded outlets only.
15. Always attach plug to appliance first, then plug cord in the wall outlet. To disconnect, turn
any control to “off”, then remove plug from wall outlet.
SAVE THESE INSTRUCTIONS.
Safety instructions
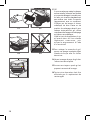
• Accessible surface temperatures can be high when the appliance is operating.
Never touch the hot surfaces of the appliance.
•Never leave the appliance unattended when in use.
•To prevent the appliance from overheating, do not place it in a corner or against a wall.
•Neverleavetheappliancepluggedinwhennotinuse.

3
•Do not place the hot plate under water or on a fragile surface.
•Ifyouhaveanyproblems,contacttheauthorizedafter-salesservicecenterortheinternet
address www.t-falusa.com
Short Cord instructions
A short power-supply cord (or detachable power-supply cord) is to be provided to reduce the
risk resulting from becoming entangled in or tripping over a longer cord.
Longer detachable power-supply cords or extension cords are available and may be used if
care is exercised in their use.
If a long detachable power-supply cord or extension cord is used :
1) The marked electrical rating of the cord or extension cord should be at least as great as the
electrical rating of the appliance;
2) If the appliance is of the grounded type, the extension cord should be a grounding-type3-
wire cord; and
3) The longer cord should be arranged so that it does not drape over the countertop or table
top where it can be pulled on by children or tripped over unintentionally.
THIS APPLIANCE IS INTENDED FOR HOUSEHOLD USE ONLY.
Thank you for buying this appliance. Read the instructions in this leaflet carefully
and keep them within reach. Any commercial use, inappropriate use or failure to
comply with the instructions, the manufacturer accepts no responsibility and the
guarantee will not apply.
For your safety, this product conforms to all applicable standards and regulations
(Electric Safety, Food Compliant Materials, …).
Our company has an ongoing policy of research and development and may modify
these products without prior notice.
•Donotconsumefoodthatcomesintocontactwiththepartsmarkedwith logo.
•Onlyusepartsoraccessoriesprovidedwiththeapplianceorboughtfrom
an ApprovedService Center. Do not use them for other appliances or intention.
•Toavoidspoilingyourproduct,donotuseflambérecipesinconnectionwithitatany
time.
•Thisapplianceisnotintendedtobeusedinthefollowingapplications,andthe
guarantee will not apply for:
- staff kitchen areas in shops, offices and other working environments;
- farm houses;
- by clients in hotels, motels and other residential type environments;
- bed and breakfast type environments.
•Thisapplianceisnotintendedtobeoperatedbymeansofanexternaltimeror
separate remote-control system.

4
•Ifanaccidentoccurs,rinsetheburnimmediatelywithcoldwaterandcalladoctorif
necessary.
•Whenusingforthefirsttime,washtheplate(s),pouralittlecookingoilontheplate
then wipe it with an absorbent kitchen towel.
•Toavoiddamagingthenon-stickcoatingofthecookingplate,alwaysuseplasticor
wooden utensils.
•Dotnotusealuminumfoilorotherobjectsbetweentheplatesandthefoodbeing
cooked.
•Donotplacecookingutensilsonthecookingsurfacesoftheappliance.
•Donotcookfoodinaluminiumfoil
•Donotremovethegreasecollectiontraywhilecooking,Ifthegreasecollectiontray
becomes full when cooking: let the appliance cool down before emptying
•Onfirstuse,theremaybeaslightodorandalittlesmokeduringthefirstfewminutes.
In these cases open the window and wait until there is no more smoke or odor.
•Thisapplianceisnotintendedforusebypersons(includingchildren)withreduced
physical, sensory or mental capabilities, or lack of experience and knowledge,
unless they have been given supervision or instruction concerning use of the
appliance by an adult responsible for their safety. Children should be supervised
to ensure that they do not play with the appliance.
•Accessiblesurfacetemperaturescanbehighwhentheapplianceisoperating.
Never touch the hot surfaces of the appliance, always use the handles.
•Cookingfumesmaybedangerousforanimalswhichhaveaparticularlysensitive
respiratory system, such as birds, We advise bird owners to keep them away from
the cooking area.
Prevention of accidents at home
Environment protection first!
The packaging of your product is made of recyclable materials. Don’t throw it
in your usual trash can, take it to a nearby separated waste collection center.
Please take your used appliance to a recycling depot in your area. Thank you
for being environmentally friendly.

5
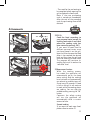
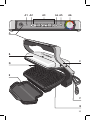
A
A1 A2 A4 A5 A6
D
E
B
C
F
A3
B

6
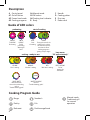
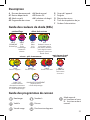
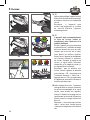
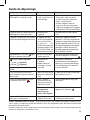
Description
A Control panel
A1 On/off button
A2 Frozen food mode
A3 Cooking programs
A4 Manuel mode
A5 OK button
A6 Cooking level indicator
B Body
C Handle
D Cooking plates
E Drip tray
F Power cord
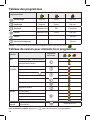
Guide of LED colors
Poultry
Sandwich
Pork/sausage/lambRed meat
Fish
Manual mode:
Traditional grill
for manual
operation
SOLID WHITE
Manual function
selected or mishandling,
refer to
“Trouble shooting guide”.
WHITE FLASHING
Refer to
“Trouble shooting guide”.
Cooking Program Guide
Burger
YELLOW
“Rare” cooking.
ORANGE
“Medium” cooking.
RED
“Well done” cooking.
cooking - ready to eat
RED FLASHING
End of
cooking for
“Well done”.
keep warm
“30’ approximately”
PURPLE
FLASHING
Preheating.
SOLID
PURPLE
End of
preheating
Waiting for
food.
preheating
GREEN
During the start of the
cooking cycle, a beep
will sound to alert the
user that the “Rare”
cooking program is
getting ready to begin.
BLUE
Start
of cooking.
start of cooking
IF
FLASHING

7
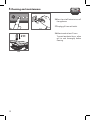
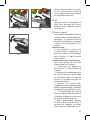
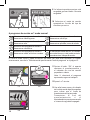
1
3
2
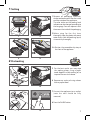
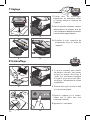
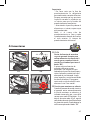
1 Remove all packaging materials,
stickers and accessories from the inside
and the outside of the appliance.
The color sticker on the cooking level
indicator can be changed, according to
the language. You can replace it with
the one on the inside of the packaging.
2
Before using for the first time,
thoroughly clean the plates with warm
water and a little dishwashing liquid,
rinse and dry thoroughly.
3-4
Position the removable drip tray at
the front of the appliance.
5 For the best results you may wipe
the cooking plates using a paper
towel dipped in a little cooking oil, to
improve the non-stick release.
6 Remove any surplus oil using a clean
kitchen paper towel.
7 Connect the appliance to an outlet.
(note the cord should be fully
unwound).
8
Press the On/Off button.
4
OK
5 6
7 8
1
Setting
2
Pre-heating

8
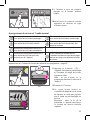
9 If the food that you wish to cook is
frozen, press the “frozen food” button.
10 Select the appropriate cooking
mode according to what type of food
you wish to cook.
11 Press the “OK” button: the appliance
starts pre-heating and the cooking
level indicator flashes purple.
Note: If you have selected the wrong
program, return to stage 8.
12 Wait for 4-7 minutes.
13
An audible tone is heard and the
cooking level indicator stops flashing
purple the pre-heating mode is
complete.
Comments: At the end of pre-heating,
if the appliance remains closed,
the safety system will turn off the
appliance.
9 10
11
13
12
4-7
minutes
6 cooking programs and a manual mode
Select this cooking program if you want
to cook burgers.
Select this cooking program if you want
to cook red meat.
Select this cooking program if you want
to cook poultry.
Select this cooking program if you want
to cook fish.
Select this cooking program if you want
to cook a sandwich.
Select this cooking program if you want
to cook pork/sausage/lamb.
If you select Manual mode the indicator
light is white and you have manual control
of the cooking time.
If you are uncertain about what cooking mode to use for other foods because it is not listed above,
please refer to the “Cooking table for Non-program foods” page 15.

9
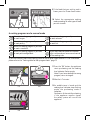
14-15 After pre-heating, the appliance is
ready for use.
Open the grill and place the food on
the cooking plate.
Comments : if the appliance remains
open for too long, the safety system will
turn off the appliance automatically.
16-17 The appliance automatically
adjusts the cooking cycle (time and
temperature) according to the food
thickness and quantity. Close the
appliance to start the cooking cycle.
The cooking level indicator turns blue
and then becomes green to indicate
the cooking is in progress (for the best
results do not open or move your food
during the cooking process). During
the cooking in progress stage, a beep
sounds at each stage of cooking to
warn the user that a cooking level
(eg rare/yellow) has been reached.
Note for very thin pieces of food:
close the appliance, the button OK
will flash and the indicator will stay
“fixed purple”, press OK to ensure the
appliance recognize the food and
that the cooking cycle starts.
18
According to the degree of cooking, the
indicator light changes color. When the
indicator light is yellow with a beep, your
food is rare, when the indicator light is
orange with a beep, your food is
medium and when the indicator light is
red, your food is well done.
Note: if you like your meat very rare,
remove the meat when the cooking level
indicator turns green.
Please note, especially on meat, it
is normal that cooking result vary
depending on type, quality and origin of
food.
14
15
16
3
Cooking
18
rare
medium
well-done
17

10
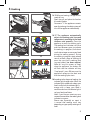
19 -20 When the color corresponding
to your choice of cooking level
appears, open the appliance and
remove your food.
21
Close the appliance.
The control panel will light up and
set itself to ‘choice of program’
mode..
Comment: the security system
will turn off automatically if no
program selection is made.
Cooking more food
If you want to cook a second
batch of food, please pre-heat
the appliance again (see section
2. Pre-heating, starting from point
9) even if you want to cook the
same type of food.
How to cook another batch of
food:
After finishing your first batch of
food:
1.Make sure the appliance is
closed with no food inside.
2. Select the appropriate cooking
mode/program (this step is
necessary even if you decide to
pick the same cooking mode than
for the previous batch of food).
3. Press the “OK” button: the
appliance starts pre-heating. The pre-
heating is symbolized by the cooking
level indicator that flashes purple.
4. The pre-heating is complete
when an audible beep is heard
and the cooking level indicator
stops flashing purple.
5. After the pre-heating, the
appliance is ready for use. Open
the grill and place the food inside
the appliance.
Important:
- Please note that for any new
batch of food, the pre-heating
phase is mandatory. Remember
to always have the grill closed and
no food inside in order for the pre-
heating to effectively function.
21
19
20

11
25
24
4
Comments
22
23
- Then wait for the pre-heating to
be complete before opening the
grill and place the food inside.
Note: if the new pre-heating
cycle is carried out immediately
after the end of the preceding
cycle, the pre-heating time will be
reduced.
22-23-24
Cook the food according to
your personal taste (except for
cooking food under 4 mm thick
where the cooking cycle has
been started by pressing ‘OK’).
If you want to cook food to
different personal tastes, once
you have placed it on the grill,
open the lid and remove the food
when it has reached the desired
level and then close the grill and
continue cooking the other food.
The program will continue its
cooking cycle until it reaches the
‘well done’ level.
25 Keep warm function
When the cooking process
has ended the appliance will
automatically go on the keep
warm setting and the cooking
level indicator will automatically
go red and an audible tone will
sound every 20 seconds. If food
is left on the grill it will continue
to cook, while the cooking plates
are cooling. You can stop the
audible tone by pressing the “OK”
button.
Comment: the safety system
will turn the appliance off
automatically after a certain
amount of time.
Second cooking
If you want to cook more food,
please refere to section 21.

12
26 27
28
2 H
5
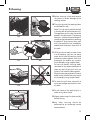
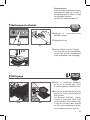
Cleaning and maintenance
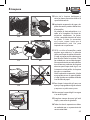
26 Press the on/off button to turn off
the appliance.
27 Unplug grill from wall outlet.
28 Allow to cool at least 2 hours.
To avoid accidental burns, allow
grill to cool thoroughly before
cleaning.

13
29
31
35
32
33 34
30
6
Cleaning
29 Before cleaning, unlock and remove
the plates to avoid damaging the
cooking surface.
30 The drip tray and the cooking plates
are dishwasher safe.
Note: The trip tray should be washed
in the top rack of the dishwasher only.
The appliance and its cord cannot be
placed in the dishwasher. The heating
elements, visible and accessible parts,
should not be cleaned after removing
the plates. If they are very dirty, wait
until the appliance has completely
cooled down and clean them with a
dry cloth.
31-32 If you do not want to clean them
in a dishwasher, you can use warm
water and a little dishwashing liquid
to clean the cooking plates, then rinse
thoroughly to remove any residue.
Dry thoroughly using a paper towel.
Do not use metallic scouring pads,
steel wool or any abrasive cleaners to
clean any part of your grill, only use
nylon or non-metallic cleaning pads.
Empty the drip tray and wash in warm
water and a little dishwashing liquid,
dry thoroughly using a paper towel.
33 To clean the grill cover, wipe with a
warm, wet sponge and dry with a soft,
dry cloth.
34
Do not immerse the body of grill in
water or any other liquid.
35
Always make sure grill is clean and dry
before storing.
36
Any other servicing should be
performed by an authorized service
representative.

14
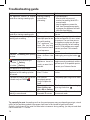
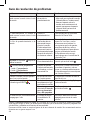
Troubleshooting guide
Problem Cause Solution
The appliance switches to manual
mode when starting a cooking cycle
•Startingacooking
cycle without
preheating.
•2possibleoptions:
- allow to cook, but you must
monitor the cooking (white LED =
manual mode)
- stop the appliance, remove the
food, close the appliance properly,
re-program the appliance and wait
until end of preheating.
The appliance switches to manual
mode when starting a cooking cycle.
•Appliancefailure. •ContactyourlocalT-falCustomer
Service.
The appliance stops during the pre-
heating cycle or cooking.
•The appliance has
been kept open for too
long while cooking.
•
The appliance has
been idle too long
after the end of warm
up or keep warm.
•Disconnecttheappliancefromthe
outlet and leave for 2-3 mins, restart
the process. The next time you use
the appliance, make sure you open
and close it quickly for best cooking
results. If the problem occurs again
contact your local T-fal customer
service.
Indicator
flashing after placing
the food.
•Notsensingthefood.
Meat thickness too
thin.
•You must confirm the start of the
cooking by pressing the button
.
Flashing white indicator light.
+ button flashing
or button flashing
•Appliancefailure.
•Appliance stored or
used in a room that is
too cold.
•Disconnect and reconnect your
appliance and immediately restart a
preheat cycle. If the problem persists,
contact your Customer Service.
The appliance no longer beeps.
I have added my food and closed the
appliance but the cooking cycle has
not started.
•Your food is thicker
than 1.5 inches.
•Foodmust not be thicker than 1.5
inches.
I have put my food on the grill but the
indicator stays on PURPLE
.
•Youhavenot
completely opened
the grill to place the
food.
•Completelyopenthegrillthenclose
it.
•Notsensingthefood.
Meat thickness too
thin, «OK» is flashing.
•Confirm the start of the cooking by
pressing the button
.
The appliance turns itself off during
cooking in manual mode.
•Thecookingtimehas
exceeded 30 minutes
•Presstheon/offbuttonandre-start
the manual mode.
Tip, especially for meat: the cooking results on the preset programs may vary depending on origin, cut and
quality of the food being cooked, the programs have been set and tested for good quality food.
Similarly, the thickness of the meat has to be taken into account during cooking; you may not cook food
that is thicker than 1 1/2 inches.

15
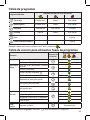
Dedicated program
Cooking level color indicator
Red meat
Rare Medium Well-done
Burger
Rare Medium Well-done
Sandwich
Lightly cooked Browned Crispy
Fish
Lightly cooked Medium Well-done
Poultry
Fully cooked
Pork/sausage/lamb
Fully cooked
Program’s table
Tips: if you like your meat blue rare, you can use
For frozen food, press before selecting your program.
Cooking table for non-program food
Food
Cooking
program
Cooking level
Bread
Slices of bread, toasted sandwiches
Burger: (after pre-cooking the meat)
Meat
& Poultry
Pork filet (boneless), pork belly
Lamb (boneless)
Frozen chicken nuggets
Pork belly
Slice of ham to cook
Marinated chicken breast
Duck breast
Fish
Whole trout
Shelled prawns
King prawns (with and without shells on)
Tuna steak
Manual
mode
Grilled vegetables ...
(fine and constant thickness)
Fixed temp
rare medium well-done
READY READY READY

17
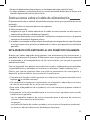
PRÉCAUTIONS IMPORTANTES
Utilisation, entretien et installation du produit : pour votre sécurité, merci de vous référer
aux différents paragraphe de cette notice ou aux pictogrammes correspondants.
Lorsquevousutilisezdesappareilsélectriques,veillezàprendrequelquesprécautionsélémentaires,
les suivantes, en particulier :
1. Lisez le mode d’emploi en entier.
2.Netouchezpasauxsurfaceschaudes;utilisezlespoignéesoulesboutons.
3. Pourvousprotégerd’unrisquedechocélectrique,n’immergezpaslecordond’alimentation,
les fiches ou l’appareil dans l’eau ni dans aucun autre liquide.
4. Cetappareiln’estpasconçupourêtreutilisépardesenfants.Unesurveillanceétroiteest
nécessairelorsqu’unappareilélectriqueestutilisépardesenfantsouàleurportée.
5. Débranchezl’appareilsivousnel’utilisezpasouavantdelenettoyer.Laissezrefroidir
l’appareilavantdemonteroudedémonterdespièces,etavantdelenettoyer.
6. N’utilisezaucunappareildontlecordond’alimentationoulaficheestendommagé,s’il
fonctionnemal,s’ilaétééchappéouendommagédequelquemanièrequecesoit.
Retournezl’appareilàuncentredeserviceautoriséenvued’unexamenoud’uneréparation.
7. L’utilisationd’accessoiresnonrecommandésparlefabricantdel’appareilpourraitcauser
des blessures.
8. Nel’utilisezpasàl’extérieur.
9. Ne laissez pas pendre le cordon du bord d’une table ou d’un plan de travail, et ne le laissez
pas en contact avec toute surface chaude.
10.Neposezpascetappareilsurunecuisinièreàgazouélectriqueouprèsdecelle-cinidans
unfourchauffé.
11.N’utilisezl’appareilquepourl’usagepourlequelilaétéconçu.
12.Des précautions particulières doivent être prises lors du déplacement d’un appareil
contenant de l’huile chaude ou tout autre liquide chaud.
13.Assurez-vousquel’installationélectriqueestcompatibleaveclapuissanceetlatension
indiquéessousl’appareil.
14.Sicetappareilestdotéd’unefichepolarisée(unelamepluslargequel’autre),celle-cise
brancheuniquementsuruneprisepolariséeunidirectionnelleafinderéduirelesrisques
d’électrocution.S’ils’avèreimpossibled’enfoncercomplètementlafichedanslaprise,
inversezlafiche.Silebranchementdemeureimpossible,contactezuntechnicienqualifié.
Ne tentez jamais de modifier la fiche.
15.MISEENGARDE-Pourassureruneprotectioncontinuecontreunrisquedechocélectrique,
nebranchezl’appareilquesurdesprisesmisesàlaterreadéquatement.
16. Branchez toujours la fiche de l’appareil en premier, puis la fiche dans la prise murale. Pour
débrancherl’appareil,appuyezsurleboutondecommande“off”,puisdébranchez-ledela
prise murale.
CONSERVEZ CES INSTRUCTIONS.

18
Consignes de sécurité
• Latempératuredessurfacesaccessiblespeutêtreélevéelorsquel’appareilesten
fonctionnement.
Ne touchez jamais les surfaces chaudes de l’appareil.
•Ne laissez jamais l’appareil sans surveillance si vous l’utilisez.
•
Pourempêcherl’appareildesurchauffer,nelemettezpasdansuncoinouprèsd’unmur.
•Nelaissezjamaisl’appareilbranchélorsqu’iln’estpasutilisé.
•Ne passez pas la plaque chaude sous l’eau et ne la posez pas sur une surface fragile.
•Sivousavezdesproblèmes,joignezunserviceaprès-venteautoriséouallezàl’adresse
Internet suivante : www.t-fal.ca.
Instructions concernant le cordon d’alimentation
L’appareilestmunid’uncordond’alimentationcourtafind’éviterqu’ilnes’emmêleouque
l’onpuissetrébucherdessus.
Ilestpossibled’utiliserunerallongeélectrique,avecvigilance.
Si vous utilisez une rallonge :
1)veillez à ce que le calibre indiqué sur le cordon soit au moins aussi élevé que les
caractéristiquesélectriquesindiquéessurl’appareil;
2)larallongedevraitêtremunied’uncordonà3conducteursavecmiseàlaterre,sil’appareil
estmuniunemiseàlaterre;
3) lecordonetsarallongedoiventêtreplacésdefaçonànepaspendred’uncomptoiroud’unetable
afind’éviterqu’ilsnesoientaccessiblesàdesenfantsouqu’ilsnefassenttrébuchercesderniers.
CET APPAREIL EST CONÇU POUR UN USAGE DOMESTIQUE SEULEMENT.
Nous vous remercions d’avoir acheté cet appareil. Lisez les instructions
attentivement et gardez-les à portée. Le fabriquant ne se tient pas responsable
de tout usage commercial ou inadéquat ou du non-respect des instructions, et la
garantie devient ainsi non valide.
Pour votre sécurité, cet appareil est conforme aux normes et réglementations
applicables(Sécuritéélectrique,matériauxencontactdesaliments,environnement...).
Notresociétéétantdotéed’unepolitiquederechercheetdéveloppementpermanente,
ellepourraitdoncmodifiercesproduitssanspréavis.
•Toutalimentliquideousolideentrantencontactaveclespiècesmarquéesdulogo
nedoitpasêtreconsommé.
•N’utiliserquelesaccessoiresfournisavecl’appareilouachetésàuncentredeservice
autorisé.Nepaslesutiliseravecd’autresappareils.
•Pourévitertoutedégradationdevotreproduit,nejamaisl’utiliserpourpréparerdes
recettesflambées.
•Cetappareiln’apasétéconçupourêtreutilisédanslescassuivantsquinesontpas
couverts par la garantie :

19
-danslescoins cuisines réservésaupersonnel des magasins,bureauxet autres
environnements professionnels,
- dans les fermes,
-parlesclientsdeshôtels,motelsetautresenvironnementsàcaractèrerésidentiel,
- dans les environnements de type chambres d’hôtes.
•Cet appareil n’est pas destiné à être mis en fonctionnement au moyen d’une
minuterieextérieureouparunsystèmedecommandeàdistanceséparé.
•Encasd’accident,rincezimmédiatementlabrûlureàl’eaufroideetappelezun
médecinaubesoin.
•Lorsdelapremièreutilisation,lavezlesplaques;versezunpeud’huilesurlesplaques
et essuyez-les avec un chiffon doux.
•Pourpréserverlerevêtementdelaplaquedecuisson,utiliseztoujoursdesustensiles
en plastique ou en bois.
•N’interposezjamaisdefeuilled’aluminiumoutoutautreobjetentrelaplaqueet
lesalimentsàcuire.
•Neposezpasd’ustensiledecuissonsurlessurfacesdecuissondel’appareil.
•Nefaitespasdecuissonenpapillotte.
•Neretirezpasletiroirderécupérationdegraissespendantlacuisson.Sicelui-ciest
plein durant la cuisson, laissez-le refroidir l’appareil avant de le vider.
•Alapremièreutilisation,unlégerdégagementd’odeuretdefuméepeutseproduire
pendantlespremièresminutes.
Danscecas,ouvrezlafenêtrejusqu’àcequ’iln’yaitplusd’odeuroudefumée.
•Cetappareiln’estpas conçu pourêtreutilisépardespersonnes(ycomprisles
enfants)dontlescapacitésphysiques,sensoriellesoumentalessontréduites,ou
despersonnesnepossédantpasd’expérienceoudeconnaissances,saufsiellesont
pubénéficier,parl’intermédiaired’unepersonneresponsabledeleursécurité,d’une
surveillanceoud’instructionspréalablesconcernantl’utilisationdel’appareil.
Unesupervisiondesenfantsestnécessairepours’assurerqu’ilsnejouentpasavec
l’appareil.
•Latempératuredessurfacesaccessiblespeutêtreélevéelorsquel’appareilfonctionne.
Netouchezjamaislessurfaceschaudesdel’appareil;utiliseztoujourslespoignées.
•Lesfumées de cuissonpourraientêtre dangereuses pourdesanimauxayant
un système respiratoire particulièrement sensible, comme les oiseaux. Nous
conseillonsauxpropriétairesd’oiseauxdeleséloignerdulieudecuisson.
Prévention des accidents à la maison
Participons à la protection de l’environnement !
L’emballageduproduitestconstituédematériauxrecyclables.Nelejetezpas
àlapoubelle,maisapportez-ledansuncentredecollectededéchetsspécialisé.
Déposezvotreappareilusagédansuncentrededépôtderecyclagedevotre
région.Mercidevoussoucierdelaprotectiondel’environnement.

20
A
A1 A2 A4 A5 A6
D
E
B
F
A3
C
B

21
Description
A Panneau de commande
A1 Boutondépart/arrêt
A2 Modesurgelé
A3 Programmes de cuisson
A4 Mode manuel
A5 Bouton OK
A6 Indicateurdudegré
de cuisson
B Corps de l’appareil
C Poignée
D
Plaques de cuisson
E Tiroirderécupérationdejus
F Cordon d’alimentation
Volaille
Sandwich
Porc/saussices/agneau
Viande rouge
Poisson
Mode manuel :
gril traditionnel pour
le fonctionnement
manuel.
BLANC FIXE
Fonction manuelle
sélectionnéeoumauvaise
manipulation, reportez-vous
au«Guidededépannage».
BLANC AVEC CLIGNOTEMENT
Reportez-vous au
«Guidededépannage»
Guide des programmes de cuisson
Hamburger
JAUNE
Cuisson«saignant».
ORANGE
Cuisson«àpoint».
ROUGE
Cuisson«biencuit».
cuisson - prêt à consommer
ROUGE
CLIGNOTANT
Fin de cuisson
«biencuit».
maintien au chaud
(environ 30 min.)
Guide des couleurs de diode (DEL)
VIOLET
CLIGNOTANT
Préchauffage.
VIOLET
FIXE
Fin du
Préchauffage.
Attente des
aliments.
préchauffage
VERT
Pendant la cuisson, un
signal sonore retentit
pour avertir l’utilisateur
queledegrédecuisson
«saignant»(jaune)sera
bientôt atteint.
BLEU
Début
de la
cuisson.
début de la cuisson
IF
FLASHING
La page charge ...
La page charge ...
La page charge ...
La page charge ...
La page charge ...
La page charge ...
La page charge ...
La page charge ...
La page charge ...
La page charge ...
La page charge ...
La page charge ...
La page charge ...
La page charge ...
La page charge ...
La page charge ...
La page charge ...
La page charge ...
La page charge ...
La page charge ...
La page charge ...
La page charge ...
La page charge ...
La page charge ...
-
 1
1
-
 2
2
-
 3
3
-
 4
4
-
 5
5
-
 6
6
-
 7
7
-
 8
8
-
 9
9
-
 10
10
-
 11
11
-
 12
12
-
 13
13
-
 14
14
-
 15
15
-
 16
16
-
 17
17
-
 18
18
-
 19
19
-
 20
20
-
 21
21
-
 22
22
-
 23
23
-
 24
24
-
 25
25
-
 26
26
-
 27
27
-
 28
28
-
 29
29
-
 30
30
-
 31
31
-
 32
32
-
 33
33
-
 34
34
-
 35
35
-
 36
36
-
 37
37
-
 38
38
-
 39
39
-
 40
40
-
 41
41
-
 42
42
-
 43
43
-
 44
44


T-Fal GC702D52 Le manuel du propriétaire
- Catégorie
- Fabricants de sandwichs
- Taper
- Le manuel du propriétaire
dans d''autres langues
- English: T-Fal GC702D52 Owner's manual
- español: T-Fal GC702D52 El manual del propietario
Documents connexes
Autres documents
-
Tefal GC714834 Manuel utilisateur
-
Tefal GC707D16 Le manuel du propriétaire
-
-
-
-
-
-
-
-