La page est en cours de chargement...

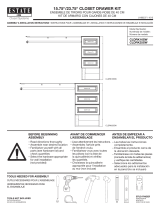
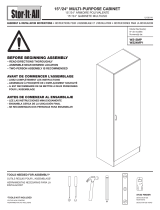
23.75" BASE CABINET
23.75" MODULE DE BASE
23.75" CABINA BAJA
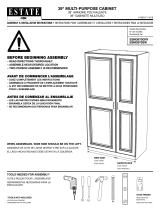
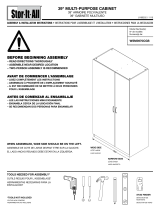
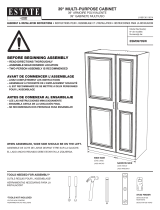
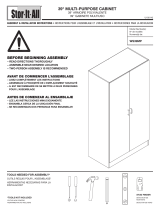
BEFORE BEGINNING ASSEMBLY
– READ DIRECTIONS THOROUGHLY
– ASSEMBLE NEAR DESIRED LOCATION
– TWO-PERSON ASSEMBLY IS RECOMMENDED
AVANT DE COMMENCER L’ASSEMBLAGE
– LISEZ COMPLÈTEMENT LES INSTRUCTIONS
– ASSEMBLEZ À PROXIMITÉ DE L'EMPLACEMENT SOUHAITÉ
– IL EST RECOMMANDÉ DE SE METTRE À DEUX PERSONNES
POUR L'ASSEMBLAGE
ANTES DE COMENZAR AL ENSAMBLAJE
– LEE LAS INSTRUCCIONES MINUCIOSAMENTE
– ENSAMBLA CERCA DE LA UBICACIÓN FINAL
– SE RECOMIENDAN DOS PERSONAS PARA ENSAMBLAR
ASSEMBLY & INSTALLATION INSTRUCTIONS • INSTRUCTIONS POUR L’ASSEMBLAGE ET L’INSTALLATION • INSTRUCCIONES PARA LA INSTALACION
Model Number(s):
N
o
de modèle:
Numero(s) de:
ESBDD24SSW
TOOLS NEEDED FOR ASSEMBLY*
OUTILS REQUIS POUR L'ASSEMBLAGE*
HERRAMIENTAS NECESARIAS PARA LA
INSTALACIÓN*
*TOOLS NOT INCLUDED
*OUTILS NON COMPRIS
*HERRAMIENTAS NO INCLUIDAS
STUD FINDER
DÉTECTEUR DE
MONTANTS
DETECTOR DE VIGAS
U180674 / 0320

HELPFUL TIPS
SUGGESTIONS UTILES
SUGERENCIAS ÚTILES
INSTALLING CAM LOCKS
Align the arrow toward the outside edge of the panel.
Ensure that the cam lock is seated ush with the
surface of the panel.
INSTALLER LES VERROUILLAGES À CAME
Alignez la èche vers le bord extérieur du panneau. Assurez-
vous que le verrouillage à came est posé à ras de la surface
du panneau.
COMO INSTALAR LOS CIERRES DE LEVA
Alinea la echa hacia el borde exterior del panel. Asegúrate
de que el cierre de leva esté ubicado a ras con al supercie
del panel.
TIGHTENING CAM LOCKS
Once panels are joined, turn the cam lock until it
stops. Cam is considered “locked” when it stops
between the 2 and 4 o’clock positions (when starting
from the 9 o'clock position).
SERRER LES VERROUILLAGES À CAME. Une fois que les panneaux sont joints, tournez le verrouillage à came jusqu'à ce qu'il s'arrête.
La came est considérée comme «verrouillée» lorsqu'elle s'arrête entre les positions 2heures et 4heures (en étant partie de la position 9heures).
COMO APRETAR LOS CIERRES DE LEVA. Una vez los paneles estén unidos, gira el cierre de leva hasta que se detenga. La leva se
considera “cerrada” cuando se detiene entre las posiciones de las 2 y 4 horas del reloj (al iniciar en la posición de las 9 horas).
MIN
LOCKED
MAX
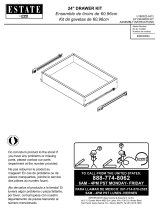
TO CALL FROM THE UNITED STATES:
888-774-8062
6AM-4PM PST MONDAY-FRIDAY
PARA LLAMAR DE MEXICO:
001-714-578-2525
6AM-4PM PST LUNES-VIERNES
DO NOT RETURN PRODUCT TO THE STORE! If you have any problems or missing parts,
please contact our parts department at the number provided.
NE PAS RETOURNER LE PRODUIT AU MAGASIN! En cas de problèma ou de pièces
manquantes, joindre le service des pièces au numéro fourni.
¡EN LOS ESTADOS UNIDOS, NO DEVUELVA EL PRODUCTO A LA TIENDA! Si tuviera algún
problema o pieza faltante, por favor, comuníquese con nuestro departamento de piezas
llamando al número mencionado.
TWO PERSON ASSEMBLY. We recommend assembling this cabinet with two people to
avoid damaging or breaking.
ASSEMBLAGE PAR DEUX PERSONNES. Nous recommandons de se mettre à deux
personnes pour assembler de cette armoire pour éviter d'endommager ou de casser le produit.
SE NECESITAN DOS PERSONAS PARA ENSAMBLARLO. Recomendamos
dos personas para ensamblar este gabinete para así evitar roturas o daños al producto.
DO NOT RETURN PRODUCT TO THE STORE! If you have any problems or missing parts,
please contact our parts department at the number provided.
NE PAS RETOURNER LE PRODUIT AU MAGASIN! En cas de problèma ou de pièces
manquantes, joindre le service des pièces au numéro fourni.
¡EN LOS ESTADOS UNIDOS, NO DEVUELVA EL PRODUCTO A LA TIENDA! Si tuviera algún
problema o pieza faltante, por favor, comuníquese con nuestro departamento de piezas
llamando al número mencionado.

HARDWARE
QUINCAILLERIE
HERRAJES
CAM LOCK
(QTY. 12)
VERROUILLAGE À CAME
CIERRE DE LEVA
CAM BOLT
(QTY. 12)
BOULON À CAME
PERNO DE LEVA
DOWEL
(QTY. 8)
GOUJON
CLAVIJA
#6 x 1/2" SCREW
(QTY. 12)
VIS N°6 DE 1,5PO (QTÉ8)
TORNILLO #20,32 CM X 3,82 CM (CANT. 8)
HINGE PLATE
(QTY. 4)
PLAQUE DE CHARNIÈRE
PLACA DE BISAGRA
HINGE
(QTY. 4)
CHARNIÈRE
BISAGRA
#6 x 1-5/8" SCREW
(QTY. 4)
VIS N°6 DE 1,625PO (QTÉ4)
TORNILLO #20,32 CM X 4,13 CM (CANT. 4)
#8-32 x 3/4" SCREW
(QTY. 4)
VIS
TORNILLO
#10 x 1" SCREW
(QTY. 2)
VIS
TORNILLO
EURO 1/2" SCREW
(QTY. 4)
VIS N°6 DE 0,5PO (QTÉ4)
TORNILLO #20,32 CM X 1,27 CM (CANT. 4)
BUMPER
(QTY. 4)
BUTÉE
PROTECTOR
HANDLE
(QTY. 3)
POIGNÉE
ASA
SHELF CLIP
(QTY. 4)
TAQUET POUR ÉTAGÈRE
GANCHO PARA ESTANTE
NAIL GUIDE
(QTY. 1)
SERRURE DE CAME
BLOQUEO DE LA LEVA
NAIL
(QTY. 20)
CLOU (QTÉ1)
CLAVO (CANT. 1)
BALL BEARING GLIDE
(QTY. 2)
GLASSIER DE TIROIR (QTÉ2)
RIEL DE LA GAVETA (CANT. 2)
#8 x 1" SCREW
(QTY. 2)
VIS N°8 DE 1PO (QTÉ2)
TORNILLO #20,32 CM X 2,54 CM (CANT. 2)
#8-32 x 1-3/8" SCREW
(QTY. 2)
VIS N°8 DE 1,375PO (QTÉ2)
TORNILLO #20,32 CM X 3,49 CM (CANT. 2)
a b c
d e f
hg
i
j k m
n t w
x
U140075 GLIDE
SCALE 1:2
y z

EXPLODED VIEW
VUE ÉCLATÉE
VISTA AMPLIADA
A
Panels are identied on edges.
Les panneaux sont identiés
sur les bords.
Los paneles están marcados
en los bordes.
P
B2
C2
D2
J2
H
G
F2
Q
Q
P
R
LEFT SIDE PANEL
(QTY. 1)
PANNEAU D’AILE GAUCHE
EL PANEL DEL LADO IZQUIERDO
RIGHT SIDE PANEL
(QTY. 1)
PANNEAU DE CÔTÉ DROIT
EL PANEL DEL DERECHO
TOP PANEL
(QTY. 1)
PANNEAUSUPÉRIEUR
PANEL SUPERIOR
BOTTOM PANEL
(QTY. 1)
PANNEAU INFÉRIEUR • PANEL INFERIOR
TOP RAIL
(QTY. 1)
RAIL SUPÉRIEUR • CARRIL SUPERIOR
TOE KICK
(QTY. 1)
COUP-DE-PIED • ZÒCALO
BACK PANEL
(QTY. 1)
PANNEAU ARRIÈRE • PANEL POSTERIOR
SHELF
(QTY. 1)
ÉTAGÈRE • ESTANTE
DOOR
(QTY. 2)
PORTE • PUERTA
DRAWER FRONT
(QTY. 1)
DEVANT DE TIROIR • PARTE FRONTAL DE LA GAVETA
DRAWER END PANEL
(QTY. 2)
PANNEAU D’EXTRÉMITÉ DE TIROIR
PANEL DE EXTREMO DE LA GAVETA
DRAWER BOTTOM PANEL
(QTY. 1)
PANNEAU INFÉRIEUR DE TIROIR
PANEL INFERIOR DE LA GAVETA
DRAWER SIDE PANEL
(QTY. 2)
PANNEAU LATÉRAL DE TIROIR
PANEL LATERAL DE LA GAVETA
PANELS
PANNEAUX
PANELES
A
Panels are identied on edges.
Les panneaux sont identiés sur les bords.
Los paneles están marcados en los bordes.
K3
Q
P
R
A2 C2B2
F2D2 G
H J2 K
A2

A2
B2
Notes/Remarques/Notas:
• Do not fully tighten hinge plate, to allow for easier installation of the doors.
• Ne serrez pas entièrement le plat de charnière, pour tenir compte d’une installation plus facile des portes.
• No apriete completamente la placa de la bisagra, para tener en cuenta una instalación más fácil de las puertas.
CAM LOCK
(QTY. 4)
VERROUILLAGE À CAME
CIERRE DE LEVA
CAM BOLT
(QTY. 8)
BOULON À CAME
PERNO DE LEVA
HINGE PLATE
(QTY. 4)
PLAQUE DE CHARNIÈRE
PLACA DE BISAGRA
a b
e
ATTACH HARDWARE TO PANELS A2 & B2
Attacher la quincaillerie aux panneau A2 et B2
Sujeta los herrajes a los paneles A2 y B2
1

CAM LOCK
(QTY. 8)
VERROUILLAGE À CAME
CIERRE DE LEVA
CAM BOLT
(QTY. 4)
BOULON À CAME
PERNO DE LEVA
DOWEL
(QTY. 4)
GOUJON
CLAVIJA
a
b c
C2
D2
F2
G
ATTACH HARDWARE TO PANELS C2, D2, F2 & G2
Attacher la quincaillerie aux panneaux C2, D2, F2 et G2
Sujeta los herrajes a los paneles C2, D2, F2 y G2
2

a.
b.
x2
x2
x1
Notes/Remarques/Notas:
a. Fully extend Glide and push the release lever up.
b. Release Drawer Member from Glide.
a. Allongez complètement la glissière et tirez le levier de
déverrouillage vers le haut.
b. Retirez le rail de tiroir de la glissière.
a. Extienda completamente el deslizador y presione la palanca
de liberación.
b. Suelte la pieza de la gaveta del deslizador.
A2
B2
U140075 GLIDE
SCALE 1:2
BALL BEARING GLIDE
(QTY. 2)
GLASSIER DE TIROIR (QTÉ2)
RIEL DE LA GAVETA (CANT. 2)
x
EURO 1/2" SCREW
(QTY. 4)
VIS N°6 DE 0,5PO (QTÉ4)
TORNILLO #20,32 CM X 1,27 CM (CANT. 4)
BALL BEARING GLIDE
(QTY. 2)
GLASSIER DE TIROIR (QTÉ2)
RIEL DE LA GAVETA (CANT. 2)
j
x1
X1
X2
x1
SEPARATE THE DRAWER GLIDE FROM THE CASE GLIDE
Séparez la glissière de tiroir de la glissière de coffret
Separe el deslizador de la gaveta del deslizador para caja
ATTACH CASE GLIDES TO PANELS A2 & B2
Fixez les glissières de coffret aux panneaux A2 et B2
Fije los deslizadores de caja a los paneles A2 y B2
3
4

A2
D2
A2
D2
G
MIN
LOCKED
MAX
MIN
LOCKED
MAX
INSTALL PANEL D2 TO A2
Installez le panneau D2 et A2
Instale el panel D2 a A2
ATTACH BOTTOM TOEKICK G
Attachez le toekick inférieur G
Asocie el zocalo inferior G
5
6

MIN
LOCKED
MAX
A2
F2
MIN
LOCKED
MAX
B2
ATTACH TOP RAIL F2
Attachez le rail supérieur F2
Asocie el carril superior F2
ATTACH SIDE PANEL B2
Attacher le panneau latéral B2
Asocie el panel lateral B2
7
8

MIN
LOCKED
MAX
C2
NAIL GUIDE
(QTY. 1)
SERRURE DE CAME
BLOQUEO DE LA LEVA
NAIL
(QTY. 20)
CLOU
CLAVO
t w
Notes/Remarques/Notas:
• Ensure cabinet is square and
secure top two corners rst.
Secure perimeter of back panel
spacing nails approximately
8"-10" apart.
• Assurez-vous que l'armoire est d'équerre
et xez d'abord les deux coins du haut
solidement. Fixez solidement le pourtour
du panneau arrière en espaçant les clous
d'environ 20,32cm à 25,40cm (8 à 10po).
• Asegúrate de que el gabinete esté
perpendicular para asegurar primero
las dos esquinas superiores. Asegura el
perímetro del panel posterior dejando
aproximadamente de 8" a 10" (20,32 a 25,4
cm) entre cada clavo de separación.
ATTACH TOP PANEL C2
Attachez le panneau supérieur C2
Asocie el panel superior C2
SECURE BACK PANEL H
Fixez le panneau arrière H
Asegura el panel posterior H
9
10
8"-10"
20,32cm à 25,40cm
20,32 a 25,4 cm
The back panel should set between the lip
on both side panels.
Le panneau arrière devrait placer entre la lèvre
sur les deux panneaux latéraux.
El panel trasero debe jar entre el labio
en los ambos paneles laterales.
1
3
4
2
H

WARNING! Failure to properly secure the cabinet to the wall can result
in serious injury or death.
AVERTISSEMENT! Un manque à fixer correctement l'armoire au mur peut entraîner
de graves blessures, voire la mort.
¡ADVERTENCIA! No asegurar adecuadamente el gabinete puede resultar en lesiones
graves o la muerte.
Locate and mark wall studs where cabinet is to be installed. Place the cabinet into position. Use
a level to ensure the cabinet is level and straight. Shim if necessary. Secure to the wall through
the Top Rail with #10x3" screws at stud locations. If no studs are available, or if the wall is made
without studs, it is your responsibility to choose the appropriate hardware. The cabinet MUST
be securely attached to the wall for safety and to be eligible for warranty.
Trouvez et marquez les montants muraux là où l'armoire doit être installée. Mettez l'armoire en place. Utilisez un
niveau pour vous assurer que l'armoire est de niveau et droite. Utilisez une cale au besoin. Fixez solidement au mur
à travers la traverse supérieure à l'aide de vis n° 10x3 po aux emplacements des montants. Si aucun montant n'est
disponible ou si le mur est construit sans montants, c'est à vous de choisir la quincaillerie appropriée. L'armoire DOIT
être xée solidement au mur pour la sécurité et pour pouvoir se prévaloir de la garantie.
Localiza y marca las vigas de pared donde vayas a instalar el gabinete. Coloca el gabinete en posición. Usa el nivel
para garantizar que el gabinete quede nivelado y derecho. Usa cuñas si es necesario. Asegúralo a la pared utilizando
el Riel Superior con tornillos núm. 10x3" en las ubicaciones marcadas en las vigas. Si no hay vigas disponibles, o si
pared fue hecha sin vigas, es tu responsabilidad elegir el herraje adecuado. El gabinete DEBE estar asegurado a la
pared por seguridad y para ser elegible para garantía.
TOP RAIL
TRAVERSE SUPÉRIEURE
RIEL SUPERIOR
STUD
MONTANTS MURAUX
VIGAS
#10 x 3" SCREW
(NOT INCLUDED)
#10 x 3" VIS
(NON FOURNI)
#10 x 3" TORNILLO
(NO SE INCLUYE)
SECURE CABINET TO THE WALL
Fixer l’armoire au mur
Asegura el gabinete a la pared
11

For multiple cabinet installations, secure cabinet to wall rst and then to adjacent cabinet.
Pour l’installation de plusieurs armoires, xez d’abord l’armoire au mur, puis xez-la à l’armoire adjacente.
Para instalar varios gabinetes, je el gabinete a la pared primero y luego a un gabinete adyacente.
2. Secure adjacent cabinets together
using #10 x 1" screw (i) provided.
Fixez les armoires adjacentes ensemble à
l’aide de la vis no 10 de 1 po fournie.
Asegure los gabinetes adyacentes
entre sí con el tornillo #10 x 1"
proporcionado.
1. Clamp cabinets together then drill pilot hole.
Serrez les armoires ensemble et percez un avant-trou.
Fije los gabinetes con abrazaderas y perfore un oricio guía.
SCRAP BLOCK
Débris de boise ne
Trozo de madera
1/8" DIA.
(3.2 mm)
CLAMP
Serre-joint
Abrazadera
Recommended screw locations.
Emplacements des vis recommandés.
Ubicaciones de tornillos recomendadas.
10" x 1" screw provided
Vis no 10 de 1 po fournie
Tornillo #10 x 1" proporcionado
10 X 1" SCREW
(QTY. 2)
VIS
TORNILLO
i
SECURE ADJACENT CABINETS
Fixer les armoires adjacentes
Asegure los gabinetes adyacentes
12

#6 x ½” SCREW
(QTY. 8)
VIS
TORNILLO
HINGE
(QTY. 4)
CHARNIÈRE
BISAGRA
d
K
K
3/16" DIA.
(4.8 mm)
SCRAP BLOCK
Débris de boise ne
Trozo de madera
f
INSTALL HINGES
Installer les charnières
Como instalar las bisagras
13

IMPORTANT! Cabinet MUST be secured to the wall before installing doors.
IMPORTANT! L'armoire DOIT être solidement fixée au mur avant l'installation des portes.
¡IMPORTANTE! El gabinete DEBE estar asegurado antes de instalarle las puertas.
Slide hinge onto
hinge plate and
secure all screws.
Faites glisser la
charnière sur la plaque
de charnière et xez
solidement toutes les vis.
Desliza la bisagra en
la placa de la bisagra
y asegura todos los
tornillos.
INSTALL DOORS
Installer les portes
Como instalar las puertas
14

#8-32 x 3/4" SCREW
(QTY. 4)
VIS
TORNILLO
BUMPER
(QTY. 2)
BUTÉE
PROTECTOR
HANDLE
(QTY. 2)
POIGNÉE
ASA
SHELF CLIP
(QTY. 4)
TAQUET POUR ÉTAGÈRE
GANCHO PARA ESTANTE
DOWEL
(QTY. 4)
GOUJON
CLAVIJA
c
h k m n
J2
Q
Q
Notes/Remarques/Notas:
• Tap dowels in to full depth.
• Enfoncez complètement les goujons.
• Inserte las espigas hasta el tope de profundidad.
INSTALL HANDLES & SHELVES
Installer les poignées, étagères
Instale las manijas, estantes
15
INSTALL DOWELS TO DRAWER END PANELS
Installez les goujons sur les panneaux d’extrémité de tiroir
Instale las espigas a los paneles de extremo de la gaveta
16

#6 x ½" SCREW
(QTY. 4)
VIS
TORNILLO
BALL BEARING GLIDE
(QTY. 2)
GLASSIER DE TIROIR (QTÉ2)
RIEL DE LA GAVETA (CANT. 2)
x2
#6 X 1-5/8" SCREW
(QTY. 2)
VIS N°6 DE 1,625PO (QTÉ2)
TORNILLO #20,32 CM X 4,13 CM
(CANT. 2)
g
d
P
P
X2
X2
P
Q
Q
Notes/Remarques/Notas:
• Match grooves on all pieces.
• Alignez les rainures de toutes les pièces.
• Procure que coincidan las ranuras en todas las piezas.
INSTALL DRAWER GLIDES TO DRAWER SIDE PANELS
Installez les glissières de tiroir sur les panneaux latéraux de tiroir
Instale los deslizadores para gaveta en los paneles laterales de la gaveta
INSTALL DRAWER SIDE PANEL
Installez l’autre panneau latéral de tiroir
Instale el panel lateral de la gaveta
17
18

#6 x 1-5/8" SCREW
(QTY. 2)
VIS N°6 DE 1,625PO (QTÉ2)
TORNILLO #20,32 CM X 4,13 CM (CANT. 2)
INSTALL DRAWER BOTTOM PANEL, FINISHED SIDE UP. SECURE DRAWER SIDE PANEL
Installez le panneau inférieur de tiroir, Fixez l’un des panneaux latéraux de tiroir.
Instale el panel inferior de la gaveta. Asegure el panel lateral de la gaveta.
g
P
Q
Q
R
P
Q
Q
P
R
Notes/Remarques/Notas:
• Finished side up.
• Le côté ni vers le haut.
• El lado terminado hacia arriba.
INSTALL HANDLE, THEN SECURE DRAWER FRONT
Installez la poignée, puis xez le devant de tiroir
Instale la manija y luego asegure la parte frontal de la gaveta
K3
Z
M
Y
Y
HANDLE
(QTY. 1)
POIGNÉE
ASA
#8 x 1" SCREW
(QTY. 2)
VIS N°8 DE 1PO (QTÉ2)
TORNILLO #20,32 CM X 2,54 CM (CANT. 2)
#8-32 x 1-3/8" SCREW
(QTY. 2)
VIS N°8 DE 1,375PO (QTÉ2)
TORNILLO #20,32 CM X 3,49 CM (CANT. 2)
m y
z
20
19

INSTALL BUMPERS AND DRAWER
Installez les butoirs et le tiroir
Instale los amortiguadores y la gaveta
21
BUMPER
(QTY. 2)
BUTÉE
PROTECTOR
k
k
HINGE ADJUSTMENT / RÉGLAGE DE LA CHARNIÈRE / AJUSTE DE LA BISAGRA
k

LOADING LIMITATIONS*
Limites de charge*
Limitaciones de carga*
CAUTION! Do not exceed the
maximum weight limitations. Doing
so can result in damage, serious
injury, or death.
ATTENTION! Ne dépassez pas les limitations
de poids maximum. Faire ainsi peut avoir
comme conséquence les dommages, les
dommages sérieux, ou la mort.
¡PRECAUCIÓN! No exceda las limitaciones
del peso máximo. El hacer tan puede dar
lugar a daño, a lesión seria, o a muerte.
* All weights based on an
equally distributed load.
*Tous les poids sont basés sur une
distribution uniforme de la charge.
* Todos los pesos se basan en la
distribución equitativa de la carga.
25 lbs
(11.3 kg)
30 lbs
(13.6 kg)
45 lbs
(20.4 kg)
45 lbs
(20.4 kg)

RSI HOME PRODUCTS, INC. LIMITED WARRANTY
GARANTIE LIMITÉE DE RSI HOME PRODUCTS, INC./ GARANTÍA LIMITADA DE RSI HOME PRODUCTS, INC.
RSI Home Products a subsidiary of American Woodmark corporation.
What this warranty covers: RSI Home Products, inc. ("RSI") warrants its parts and products to be free of substantial defects in materials and workmanship from the original date of
purchase under normal home use. This warranty is offered only to the original consumer purchaser and may not be transferred.
How long the warranty lasts: coverage for nished kitchen cabinets, vanity cabinets, and vanity tops lasts for the life of the product. Coverage for vanity cabinet combos, medicine
cabinets, mirrors, light bars and bath storage cabinets lasts for 5 years from the original date of purchase. Coverage for unnished kitchen cabinets lasts 1 year.
What RSI Home Products will do under the warranty: during the warranty period, RSI, at its option, will repair or replace any part or product that proves to have substantial defects
in materials or workmanship, or RSI will provide an equivalent replacement product. In keeping with our policy of continuous product improvement, RSI reserves the right to change
specications in design and materials without notice and with no obligation to retrot products we previously manufactured.
How state law applies: this warranty gives you specic legal rights, and you may also have other rights that vary from state to state.
IMPLIED WARRANTIES: RSI DISCLAIMS ANY IMPLIED WARRANTY OF MERCHANTABILITY, AND THERE ARE NO WARRANTIES THAT EXTEND BEYOND THE DESCRIPTIONS ON
THE FACE HEREOF. TO THE EXTENT THAT SUCH DISCLAIMER IS NOT VALID UNDER APPLICABLE LAW, ANY IMPLIED WARRANTY SHALL BE COEXTENSIVE IN DURATION WITH THIS
WARRANTY.
Wood, cultured marble and solid surface technology characterisics, aging and printing limitations: because of the varying natural characteristics of wood and the effects of
aging, product shown in displays and/or printed materials may not be an exact match to new cabinetry you will receive. Depending on wood characterisics, the age of a sample and the
environment of the showroom, samples will show some degree of variation from new product. In addition, you should not expect all doors, drawer fronts, trim or molding to match exactly in
either nish or grain. Variation in wood, cultured marble and solid surface technology material is normal and unavoidable. In addition, it is not possible to exactly match our colors in printed
materials. Therefore, you should view the actual samples when making your color selection.
What this warranty does not cover: this warranty does not cover any problems or damage which result from improper transportation, improper installation, mishandling, misuse,
abuse, neglect, abnormal use, commercial use, improper maintenance, non-RSI repairs, accidents, or acts of god, such as hurricanes, re, earthquakes or oods. This warranty and any
applicable implied warranties do not cover incidental or consequential damages arising from any defects in the product, such as labor charges for installation or removal of the product or
any associated products. This warranty does not cover defects or damage caused by normal wear & tear, alterations, environmental conditions, humidity absorption, or mold. In addition,
variations in wood grain, nish color, aging or other natural wood and stain characteristics are not considered defects and are not covered by this warranty. Some states do not allow the
exclusion or limitation of incidental or consequential damages, so the above limitation or exclusion may not apply to you.
How to obtain warranty service: if you need replacement parts or would like to make a warranty claim, please contact our customer service representative by mail, email, fax or
telephone at the address or phone numbers listed on this page. All warranty claims must include the model number of the product, copy of the original receipt and the nature of the problem.
In addition, RSI may at its discretion require inspection of the installation site or authorize the prepaid return of the claimed defective part. Merchandise not pre-approved for return will not
be accepted and the associated claim not accepted.
Products should be examined for defects prior to installation. This warranty also does not cover labor charges for installation or removal of the
product or any associated products. If upon inspection you nd our product has a damaged or missing part, it may not be necessary to return
the unit to the store of purchase. Please contact RSI customer service to possibly obtain a replacement part.
Qué cubre la garantía: RSI Home Products, inc. ("RSI") garantiza que sus piezas y productos no tendrán defectos signicativos de materiales o fabricación a partir de la fecha original de compra, bajo
condiciones de uso doméstico normal. Esta garantía se ofrece sólo al consumidor original y no puede transferirse.
Cuánto dura la garantía: la cobertura para gabinetes de cocina acabados, gabinetes de tocador y mostradores de tocador, comprende la vida útil del producto. La cobertura para los kits combinados de
gabinete para tocador, botiquines de medicinas, espejos, barras de luces, y gabinetes de baño dura 5 años desde la fecha original de compra. La cobertura para gabinetes de cocina sin acabado es de 1
año.
Que hará RSI home productos bajo la garantía: durante el período de garantía RSI, a su discreción, reparará o reemplazará cualquier parte o producto que muestre cualquier defecto signicativo de
materiales o fabricación, o RSI lo reemplazará con un producto equivalente. De acuerdo con lo establecido en nuestra política de mejora continua del producto, RSI se reserva el derecho de cambiar
las especicaciones de diseño y materiales sin previo aviso y sin ninguna obligación de renovar los productos fabricados previamente. Cómo repercuten las leyes estatales: esta garantía le otorga
derechos legales especícos y es posible que también goce de otros derechos que varían de un estado a otro. GARANTÍAS IMPLÍCITAS: RSI SE EXIME DE CUALQUIER GARANTÍA IMPLÍCITA DE
COMERCIABILIDAD; NO EXISTEN OTRAS GARANTÍAS MÁS ALLÁ DE LAS AQUÍ DESCRITAS. EN CASO DE QUE ESTA EXENCIÓN DE RESPONSABILIDAD NO TENGA VALIDEZ EN VIRTUD DE LAS
LEYES APLICABLES, CUALQUIER GARANTÍA IMPLÍCITA TENDRÁ LA MISMA DURACIÓN QUE LA PRESENTE GARANTÍA. Características y envejecimiento de la madera, el mármol cultivado y
materiales de tecnología de supercie sólida, y limitaciones de los materiales impresos: debido a las características variables naturales de la madera y a los efectos del envejecimiento, el producto
mostrado en la exhibición y/o en los materiales impresos puede no coincidir exactamente con los gabinetes nuevos que usted recibirá. Dependiendo de las características de la madera, la edad de la
muestra y las condiciones ambientales de la sala de exhibición, las muestras variarán en cierto grado, del producto nuevo. Adicionalmente, usted no deberá esperar que todas las puertas, caras de los
cajones, acabados o molduras tengan acabados o vetas idénticos. Las variaciones en la madera, el mármol cultivado y el material de tecnología de supercie sólida son normales e inevitables. Además,
es imposible reproducir nuestros colores en el material impreso. Por consiguiente, usted debe ver las muestras reales al elegir su color. Lo que esta garantía no cubre: esta garantía no cubre ningún
problema o daño como resultado de la transportación inadecuada, instalación inapropiada, manipulación incorrecta, uso incorrecto, abuso, negligencia, uso indebido, uso comercial, mantenimiento
inadecuado, reparaciones no autorizadas por RSI, huracanes, incendio, terremotos o inundaciones. Esta garantía y cualquier otra garantía implícita correspondiente, no cubre daños incidentales o
secundarios resultado de cualquier defecto en el producto, tales como cargos por mano de obra por la instalación o retiro del producto o de cualquier producto relacionado. Esta garantía no cubre
defectos ni daños causados por uso y desgaste normales, alteraciones, condiciones ambientales, absorción de la humedad, o moho. Adicionalmente, las variaciones en la veta de la madera, el color del
acabado, el envejecimiento u otras características de la madera o el tinte no se considerarán defectos y no están cubiertos por esta garantía. Algunos estados no permiten la exclusión o limitación de
daños incidentales o secundarios, por lo que las limitaciones o exclusiones anteriores podrían no aplicarse en su caso. Cómo recibir servicio de garantía: si necesita piezas de reemplazo o le gustaría
hacer una reclamación de garantía, por favor contacte a nuestro representante de atención al cliente por email, fax o teléfono, por medio de la dirección o el número de teléfono provistos en esta página.
Todas las reclamaciones de garantía deben incluir el número de modelo del producto, copia del recibo original y la naturaleza del problema. Además RSI podrá, a su discreción, requerir una inspección
del sitio de la instalación o autorizar la devolución prepagada de la pieza defectuosa por la cual se hace la reclamación. No se aceptará ninguna mercancía cuya devolución no haya sido previamente
aprobada ni ninguna reclamación relacionada con tal mercancía.
Antes de la instalación, los productos deben examinarse en busca de defectos. Esta garantía tampoco cubre los cargos por mano de obra relacionados con la
instalación o retiro del producto o productos relacionados. Si al inspeccionar el producto usted encuentra que falta una pieza o que alguna de ellas está dañada,
puede que no sea necesario devolver la unidad a la tienda donde la compró. Por favor contacte a atención al cliente de RSI para determinar la posibilidad de
obtener una pieza de reemplazo.
Important health notice:
Some of the building materials used in this home (or these building materials) emit formaldehyde. Eye, nose, and throat irritation, headache, nausea and a variety of asthma-like symptoms,
including shortness of breath, have been reported as a result of formaldehyde exposure. Elderly persons and young children, as well as anyone with a history of asthma, allergies, or lung
problems, may be at greater risk. Research is continuing on the possible long-term effects of exposure to formaldehyde.
Reduced ventilation may allow formaldehyde and other contaminants to accumulate in the indoor air. High indoor temperatures and humidity raise formaldehyde levels. When a home is to
be located in areas subject to extreme summer temperatures, an air-conditioning system can be used to control indoor temperature levels. Other means of controlled mechanical ventilation
can be used to reduce levels of formaldehyde and other indoor air contaminants.
If you have any questions regarding the health effects of formaldehyde, consult your doctor or local health department.
Aviso de salud importante:
Algunos de los materiales de construcción usados en esta vivienda (o estos materiales de construcción) emiten formaldehído. La irritación en ojos, nariz y garganta; los dolores de cabeza, náusea y
otros síntomas parecidos al asma, como la falta de aire, han sido identicados como consecuencias de la exposición al formaldehído. Las personas de la tercera edad y los niños pequeños, así como
quienquiera que haya padecido de asma, alergias o problemas pulmonares, pueden enfrentar mayor riesgo. Es continua la investigación de las posibles consecuencias a largo plazo por exposición al
formaldehído.
La poca ventilación puede causar que el formaldehído u otros contaminantes se acumulen en la atmósfera interior. Las altas temperatura y humedad en interiores incrementan los niveles de formaldehído.
Para viviendas ubicadas en zonas de temperaturas extremas durante el verano puede usarse un sistema de aire acondicionado a n de controlar los niveles de temperatura en interiores. Otros medios de
ventilación mécanica controlada pueden usarse para reducir los niveles de formaldehído y otros contaminantes del aire en interiores.
Si tienes alguna pregunta o duda con respecto a los efectos del formaldehído sobre la salud, consulta a tu médico o llama al departamento de salud local.
WARNING: This product can expose you to chemicals including Wood Dust which are known to the state of California to cause cancer.
For more information go to www. P65Warnings.ca.gov/products.
Advertencia: Este product puede exponerte a sustancia químicas, incluso aserrín, que el Estado de California reconoce como causante de cáncer. Para más información, visita www.P65Warnings.ca.gov/products.
RSI Home Products, Inc.
400 E. Orangethorpe Avenue
Anaheim, CA 92801
Customer Service & Parts Department
EMAIL: HomeProducts_CC@woodmark.com
TELEPHONE: U.S. call (888) 578-4009
WEBSITE: www.americanwoodmark.com
1/20